QuickTime Screen Recording: Complete Guide + Audio Fix
QuickTime screen recording is the fastest way to capture your Mac screen using a tool that's already installed on your computer. QuickTime Player — the default media player on every Mac — includes a built-in screen recording feature that works right out of the box, no downloads required. (When you outgrow QuickTime, a focused app like ScreenSnap Pro adds annotation and export options it lacks.)
Whether you're creating a tutorial, documenting a bug, or recording a video call, this guide covers everything you need to know: from basic recording to solving the frustrating "no audio" problem.
Quick answer: Open QuickTime Player → File → New Screen Recording → Click Record. For system audio, you'll need BlackHole (free) or a third-party app.
How to Start a Screen Recording in QuickTime
Starting a QuickTime screen recording takes just a few clicks:
- Open QuickTime Player from your Applications folder (or use Spotlight:
⌘ + Space, type "QuickTime") - Click File in the menu bar
- Select New Screen Recording (or press
Control + ⌘ + N) - Choose your recording options (microphone, mouse clicks)
- Click the Record button
- Click anywhere to record the full screen, or drag to select a specific area
- Click Start Recording if you selected a portion
That's it. QuickTime captures everything on screen until you stop the recording.
Important: On macOS Mojave (10.14) and later, choosing "New Screen Recording" in QuickTime actually opens the built-in Screenshot app. According to Apple's official documentation, this is expected behavior — both methods work, but the interface looks slightly different depending on your macOS version.
Recording a Specific Area vs Full Screen
When you click Record, QuickTime gives you a choice:
- Click anywhere to record your entire screen — everything visible on your display gets captured
- Click and drag to select a specific area — only that portion gets recorded
Selecting a specific area is useful when you want to:
- Exclude your messy desktop or dock
- Focus on a single app window
- Reduce file size for quick screen captures
- Hide sensitive information in other parts of the screen
The selected area stays fixed during recording. If you resize or move windows, they may go outside the recording zone.
QuickTime Screen Recording Keyboard Shortcuts
Memorizing these shortcuts makes screen recording much faster. Here's the complete table of QuickTime screen recording keyboard shortcuts:

| Action | Shortcut |
|---|---|
| New Screen Recording (QuickTime) | Control + ⌘ + N |
| Open Screenshot Toolbar | ⌘ + Shift + 5 |
| Capture Entire Screen | ⌘ + Shift + 3 |
| Capture Selected Area | ⌘ + Shift + 4 |
| Capture Window | ⌘ + Shift + 4, then Space |
| Capture Touch Bar | ⌘ + Shift + 6 |
| Stop Recording | ⌘ + Control + Esc |
| Cancel Recording | Esc |
The most important shortcut to remember is ⌘ + Control + Esc to stop recording. Many users struggle to find the stop button (it appears in the menu bar), but this keyboard shortcut works every time.
For a complete guide to all Mac screenshot shortcuts, including hidden tricks, check out our dedicated article.
Recording Options Explained
Before you click Record, QuickTime offers several options to customize your recording. Access these by clicking Options in the recording toolbar:
Save Location
Choose where your recording saves. By default, recordings go to your Desktop. You can select:
- Desktop
- Documents
- Clipboard (copies instead of saving)
- A custom folder
- Mail, Messages, or Preview for quick sharing
Want to permanently change where screenshots save on Mac? You can set a default location that persists across recordings.
Timer Options
Set a delay before recording starts:
- None — Recording starts immediately
- 5 seconds — Gives you time to set up
- 10 seconds — More prep time for complex setups
Microphone Selection
Choose your audio input:
- None — Silent recording (no audio at all)
- Built-in Microphone — Records your voice
- External microphone — If you have one connected
Show Mouse Clicks
When enabled, a dark circle appears around your cursor whenever you click. Essential for tutorials where viewers need to follow your actions.
Capture Format (macOS Tahoe 26+)
On the latest macOS, you can choose:
- SDR (Most Compatible) — H.264 format, works everywhere
- HDR — HEVC format, better quality but less compatible
How to Record Screen with Audio in QuickTime
This is where QuickTime gets tricky. By default, QuickTime can only record microphone audio — your voice through the built-in mic or an external microphone. It cannot capture system audio (sound from apps, websites, video calls) without help.

Recording Microphone Audio
Recording your voice is straightforward:
- Start a new screen recording (
Control + ⌘ + N) - Click Options or the dropdown arrow
- Select your microphone under the audio section
- Adjust volume if you see a slider
- Click Record
Your narration will be captured alongside the screen recording. Use headphones to avoid feedback from your speakers.
Recording System Audio (The Fix)
QuickTime alone cannot capture system audio. This is a macOS limitation, not a QuickTime bug — Apple restricts apps from recording internal audio for privacy reasons.
The solution? A virtual audio driver that routes system sound to a place QuickTime can record from. Two popular free options:
Option 1: BlackHole (Recommended)
BlackHole is a modern, actively maintained virtual audio driver:
- Download BlackHole from GitHub (free)
- Install BlackHole 2ch (2-channel version)
- Open Audio MIDI Setup (in Applications → Utilities)
- Click the + button → Create Multi-Output Device
- Check both BlackHole 2ch and your normal speakers
- Right-click the Multi-Output Device → Use This Device For Sound Output
- In QuickTime, select BlackHole 2ch as your microphone source
- Start recording — system audio is now captured
Option 2: Soundflower (Legacy)
Soundflower was the original solution but is no longer actively maintained. It still works on many Macs, but BlackHole is more reliable for modern macOS versions.
For a complete walkthrough with troubleshooting tips, see our guide on how to screen record with audio on Mac.
How to Stop QuickTime Screen Recording
Stopping a recording confuses many users because the Stop button isn't obvious. Here are all the ways to stop:
Method 1: Menu Bar Button
Look for the Stop button (a square icon) in your Mac's menu bar at the top of the screen. It appears once recording starts.
Method 2: Keyboard Shortcut
Press ⌘ + Control + Esc to stop recording immediately. This is the most reliable method.
Method 3: Touch Bar (MacBook Pro with Touch Bar)
If you have a Touch Bar, a Stop button appears there during recording.
Method 4: Screenshot Toolbar
Press ⌘ + Shift + 5 to open the Screenshot toolbar, then click the Stop button.
Stuck? If none of these work, try pressing Esc first (to cancel any dialogs), then ⌘ + Control + Esc. In rare cases, you may need to force-quit QuickTime from the Apple menu.
Where QuickTime Recordings Are Saved
By default, QuickTime saves recordings to your Desktop with the filename format:
Screen Recording [date] at [time].movFor example: Screen Recording 2026-02-01 at 10.30.15 AM.mov
Changing the Save Location
To save recordings elsewhere:
- Open the Screenshot toolbar (
⌘ + Shift + 5) - Click Options
- Under "Save to," choose your preferred location
- This setting persists for future recordings
Recording Format
QuickTime saves recordings as .mov files using:
- H.264 codec on most Macs (SDR mode)
- HEVC codec on supported Macs with HDR enabled
These files work with most video editors, including iMovie, Final Cut Pro, and Adobe Premiere. Need to edit your recording? Check out our guide on how to edit screen recordings on Mac.
Tired of plain screenshots? Try ScreenSnap Pro.
Beautiful backgrounds, pro annotations, GIF recording, and instant cloud sharing — all in one app. Pay $29 once, own it forever.
See what it doesTrimming Recordings in QuickTime
After you stop recording, QuickTime offers basic trimming without needing another app:
- Open your recording in QuickTime Player
- Go to Edit → Trim (or press
⌘ + T) - Drag the yellow handles to set start and end points
- Click Trim to apply changes
- Save your trimmed recording
QuickTime's trim feature is nondestructive until you save — you can always revert if you trim too much. For more advanced editing like cutting sections from the middle or adding annotations, you'll need iMovie or a dedicated screen recording editor.
Exporting in Different Formats
QuickTime can export your recording in different resolutions:
- Open the recording in QuickTime
- Go to File → Export As
- Choose from 4K, 1080p, 720p, 480p, or Audio Only
- Select destination and save
Lower resolutions create smaller files — helpful for sharing via email or chat. The audio-only option extracts just the sound, useful if you recorded a meeting or lecture.
QuickTime vs Screenshot App (`⌘ + Shift + 5`)

On modern macOS (Mojave and later), you have two ways to record your screen:
| Feature | QuickTime Player | Screenshot App (⌘ + Shift + 5) |
|---|---|---|
| Access Method | Open app → File menu | Keyboard shortcut |
| Full Screen Recording | ✓ | ✓ |
| Selected Portion | ✓ | ✓ |
| Selected Window | ✗ | ✓ (macOS Tahoe 26+) |
| Microphone Audio | ✓ | ✓ |
| System Audio | ✗ (needs BlackHole) | ✗ (needs BlackHole) |
| Show Mouse Clicks | ✓ | ✓ |
| Timer | ✓ (5s, 10s) | ✓ (5s, 10s) |
| Floating Thumbnail | ✗ | ✓ |
| Quick Trim After Recording | ✗ | ✓ |
The truth: On macOS Mojave and later, QuickTime's "New Screen Recording" option actually launches the Screenshot app. They're essentially the same feature with slightly different entry points.
When to use QuickTime directly:
- You're already in QuickTime editing a video
- You prefer the menu-based interface
- You're on an older macOS version
When to use ⌘ + Shift + 5:
- Faster access via keyboard shortcut
- You want the floating thumbnail for quick trims
- You need window-specific recording (macOS Tahoe)
Common Issues and Fixes
"QuickTime screen recording no sound"
The most common complaint. If your recording has no audio:
- Check microphone selection — Make sure a microphone is selected in Options, not "None"
- Grant microphone permission — System Settings → Privacy & Security → Microphone → Enable for QuickTime
- For system audio — You need BlackHole or similar (see audio section above)
- Volume check — Ensure the audio source is actually playing
"Can't stop recording"
Try these in order:
- Press
⌘ + Control + Esc - Click the Stop button in the menu bar
- Press
⌘ + Shift + 5and click Stop - Open Activity Monitor and quit "screencaptureui"
"Recording is choppy or laggy"
- Close unnecessary applications
- Reduce recording resolution (record a smaller area)
- Check available disk space (recordings need room)
- Restart your Mac
"QuickTime can't record this content"
Some apps block screen recording (like Apple TV app) due to DRM. QuickTime will show a black screen or an error. This is intentional and cannot be bypassed.
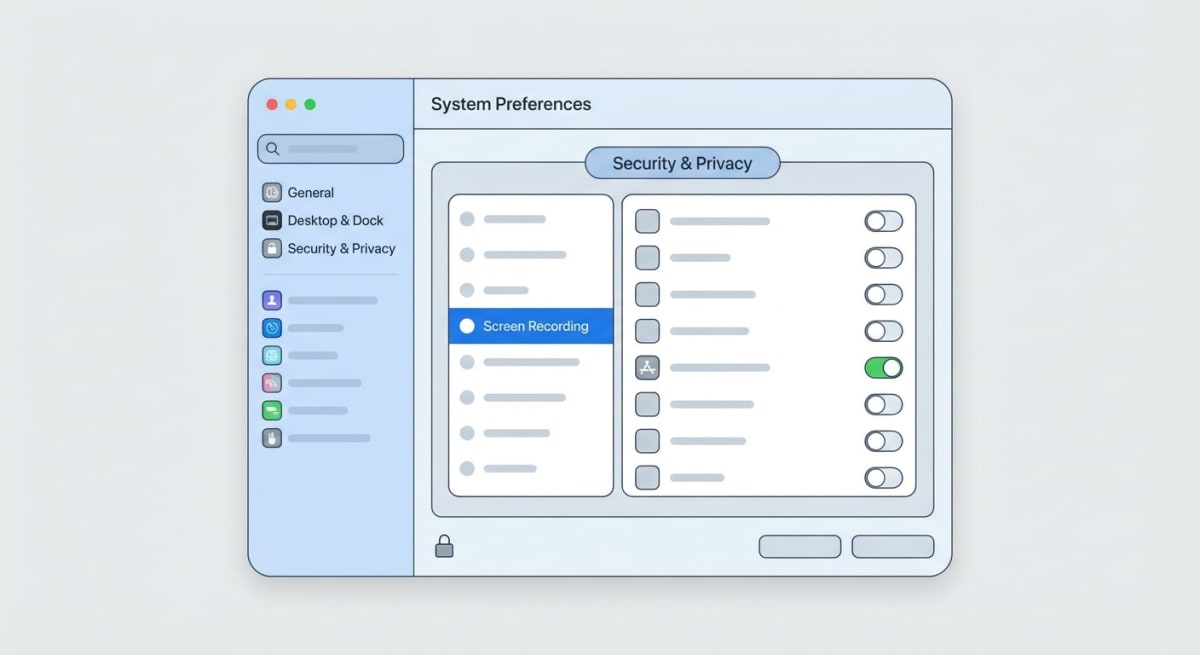
"Screen recording permission denied"
- Open System Settings → Privacy & Security → Screen Recording
- Enable the toggle for QuickTime Player
- Restart QuickTime
- If QuickTime isn't listed, try recording once — macOS will prompt you to add it
Recording Specific Applications
While QuickTime records your entire screen or a selected area, sometimes you only want to capture a single app window. Here's how to handle this:
The Window Capture Workaround
- Position the app window where you want it
- Start screen recording and select just that window's area
- Don't move or resize the window during recording
This works but has drawbacks — if notifications pop up over the window, they get recorded too.
Window Recording in macOS Tahoe
Apple introduced window-specific recording in macOS Tahoe 26. When you use the Screenshot toolbar (⌘ + Shift + 5), you'll see a "Record Selected Window" option. Click it, then click the window you want to record.
This method:
- Only captures the selected window, not overlapping content
- Follows the window if you move it
- Excludes notifications and other windows automatically
For older macOS versions, you're limited to area selection or full screen capture.
When to Use a QuickTime Alternative
QuickTime works great for basic screen recording, but it has real limitations:
Stick with QuickTime if you:
- Need simple, occasional recordings
- Only record microphone audio (no system sound)
- Don't need annotations or editing
- Want zero software installation
Consider an alternative if you:
- Need to record system audio without BlackHole setup
- Want built-in annotation tools (arrows, text, blur)
- Record GIFs instead of video files
- Need instant cloud sharing
- Want to add backgrounds or polish to recordings
While screen recording requires dedicated tools like OBS or third-party recorders with built-in audio capture, if you also need to capture and annotate screenshots or GIFs, ScreenSnap Pro handles that side of your workflow with instant sharing and professional markup tools.
Frequently Asked Questions
Conclusion
QuickTime screen recording handles basic captures well — it's free, built into every Mac, and works without any setup for simple recordings with microphone audio.
The system audio limitation is the main frustration. If you regularly need to record app sounds, video calls, or browser audio, the BlackHole workaround works but adds complexity. For frequent recording with audio, a dedicated app that handles this natively saves significant time.
For most quick recordings — documenting a bug, showing someone how to do something, or capturing a single window — QuickTime does the job. When you need more polish, annotations, or simpler audio capture, that's when third-party tools become worthwhile.
Quick tip: If you're creating tutorials or documentation, pairing QuickTime with a dedicated screenshot and GIF tool like ScreenSnap Pro covers all your capture needs — video recordings from QuickTime plus instant annotated screenshots and GIFs for quick visual communication.
Morgan
Indie DeveloperIndie developer, founder of ScreenSnap Pro. A decade of shipping consumer Mac apps and developer tools. Read full bio
@m_0_r_g_a_n_