Mac Screenshot Not Working? 10 Fixes (2026 Guide)
When your Mac screenshot is not working, the issue is usually one of five things: disabled keyboard shortcuts, incorrect save location, low storage space, a frozen Screenshot utility, or conflicting third-party apps. Most fixes take under two minutes. Here's how to get screenshots working again — and if the built-in tool keeps letting you down, a dedicated app like ScreenSnap Pro is a reliable backup.
Why Is Mac Screenshot Not Working?
When your Mac screenshot is not working, it's typically caused by one of these five issues:
- Disabled keyboard shortcuts — Another app claimed the key combo, or a macOS update reset them
- Wrong save location — Screenshots are saving to clipboard or an unexpected folder
- Low storage space — Your Mac can't save new files when the disk is full
- Frozen Screenshot utility — The background process has become unresponsive
- Third-party app conflict — Screen recording apps or utilities blocking the built-in tool
Understanding why screenshots fail helps you jump straight to the right fix. If you recently installed new software, check Fix 7. If you haven't restarted in weeks, start with Fix 4. Just ran out of disk space? Fix 3 is your answer.
Quick fix checklist
Before diving into detailed solutions, try these rapid fixes in order:
- Restart your Mac — Click Apple menu → Restart
- Try all shortcuts —
⌘ + Shift + 3,⌘ + Shift + 4,⌘ + Shift + 5 - Check your Desktop — Screenshots save there by default
- Check storage — Apple menu → About This Mac → Storage
If none of these quick checks solve the problem, work through the fixes below.
Understanding Mac screenshot shortcuts
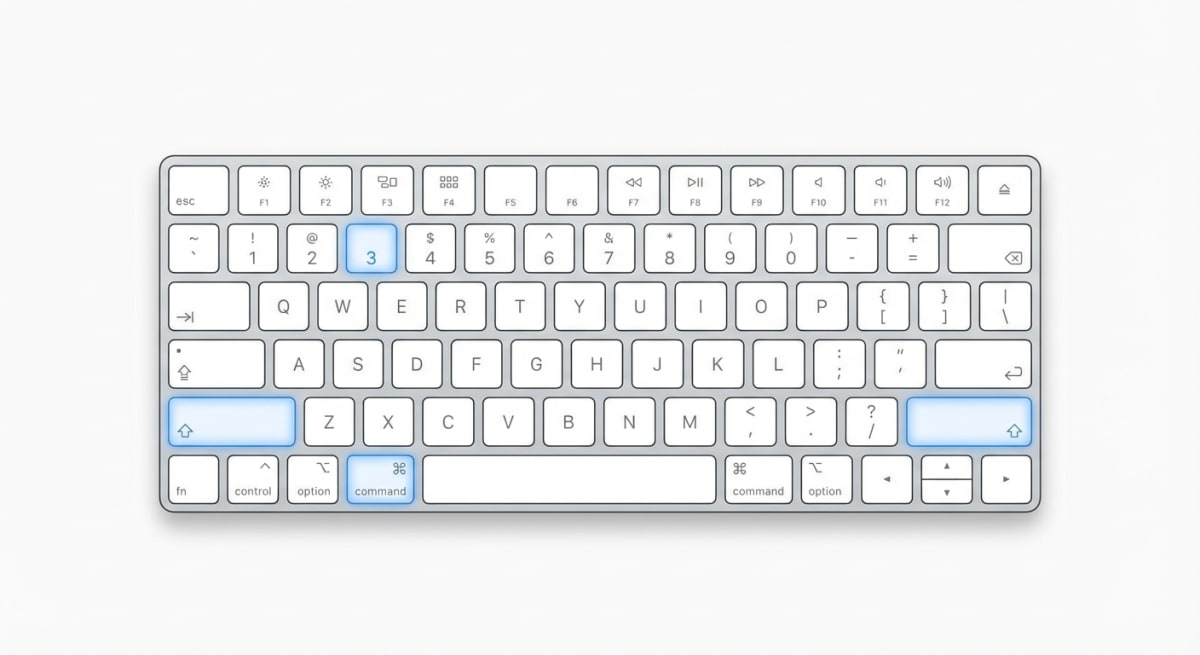
Your Mac has three built-in screenshot shortcuts:
| Shortcut | What it captures |
|---|---|
⌘ + Shift + 3 | Entire screen |
⌘ + Shift + 4 | Selected area (drag to select) |
⌘ + Shift + 5 | Screenshot toolbar with options |
For window captures, press ⌘ + Shift + 4, then hit Space to switch to window selection mode.
If pressing these shortcuts does nothing — no camera shutter sound, no file appearing — one of the fixes below will solve it.
Fix 1: Verify your keyboard shortcuts are enabled
The most common reason for Mac screenshots not working is disabled or reassigned keyboard shortcuts. Another app may have claimed the same key combination, or the shortcuts got turned off after a system update.

Here's how to check and fix them:
- Open System Settings (or System Preferences on older macOS)
- Click Keyboard → Keyboard Shortcuts
- Select Screenshots from the left sidebar
- Make sure all checkboxes are enabled
- Verify the shortcuts match the defaults listed above
If a shortcut shows a different key combination, double-click it and press the correct keys to reassign it. Click Restore Defaults if you want to reset everything.
Pro tip: If another app uses the same shortcut, you'll see a warning. You'll need to change one of them.
Common apps that hijack screenshot shortcuts
Several popular apps are known to claim screenshot keyboard shortcuts:
- Skitch — Uses
⌘ + Shift + 5by default - Lightshot — Takes over
⌘ + Shift + 3and⌘ + Shift + 4 - Snagit — May override system shortcuts during installation
- CleanShot X — Configurable, but can conflict if not set up properly
- Dropbox — Older versions would capture screenshots automatically
Check these apps' preferences and either disable their screenshot shortcuts or change them to non-conflicting combinations. You can also temporarily quit these apps to test if they're causing the issue.
Fix 2: Check your screenshot save location
Sometimes screenshots work perfectly — they're just saving somewhere unexpected. The Screenshot tool remembers your last save location, and it might be set to a folder you forgot about (or even the clipboard).
To check and change the save location:
- Press
⌘ + Shift + 5to open the Screenshot toolbar - Click Options
- Look at the Save to section — there's a checkmark next to the current location
- Select Desktop (or your preferred location)
Common surprise locations include:
- Clipboard — Screenshots copy to clipboard instead of saving as files
- Documents — Buried in a folder you rarely check
- iCloud Drive — Syncing can cause delays before files appear
If Clipboard was selected, that explains why you couldn't find your screenshots. They were copied to memory instead of saved as files.
Fix 3: Free up storage space
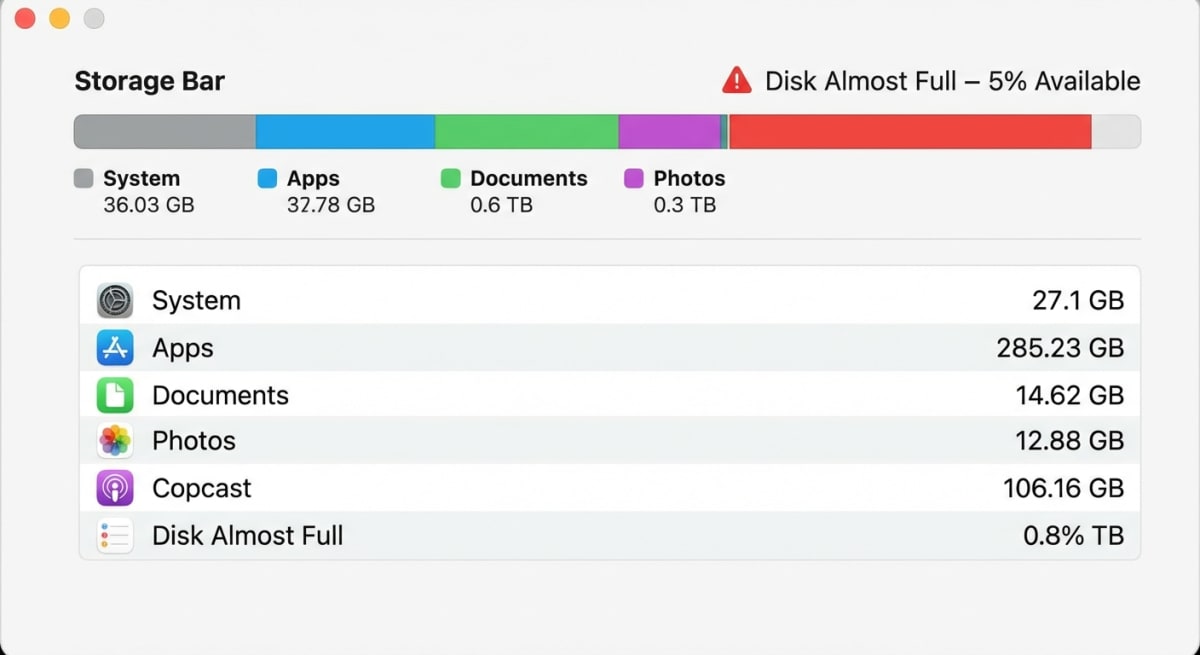
Your Mac needs disk space to save screenshots. When storage runs critically low, macOS silently fails to save new files — including screenshots. You won't see an error message. The screenshot just disappears.
Check your available storage:
- Click the Apple menu → About This Mac
- Click More Info → Storage Settings (on macOS Ventura and later)
- Look at how much space remains
Red or nearly full? You need to clear space. Here are quick wins:
- Empty the Trash (
⌘ + Shift + Delete) - Delete old screenshots from Desktop
- Move large files to external storage
- Clear browser downloads folder
- Remove unused applications
Aim for at least 5-10 GB of free space for smooth macOS operation. Once you've freed up room, try taking a screenshot again.
How to check storage quickly via Terminal
If you prefer the command line, run this in Terminal:
df -h /Look at the "Avail" column — that's your free space. If it shows less than 5GB, you need to clear files before screenshots will work reliably.
You can also find large files eating up space:
find ~ -type f -size +100M 2>/dev/null | head -20This lists files over 100MB in your home folder. Review and delete what you don't need.
Fix 4: Restart the Screenshot utility
The Screenshot app runs as a background process. Like any software, it can freeze or become unresponsive. Restarting it often fixes screenshot issues instantly.
Here's how to restart it using Activity Monitor:
- Open Finder → Applications → Utilities → Activity Monitor
- Click the Search field and type "Screenshot"
- Select the Screenshot process if it appears
- Click the X button in the toolbar
- Click Quit (or Force Quit if needed)
macOS automatically restarts the Screenshot utility when you next press a screenshot shortcut. Try ⌘ + Shift + 3 — it should work now.
Alternative method: Open Terminal and run:
killall ScreenshotThis does the same thing in one command.
Tired of plain screenshots? Try ScreenSnap Pro.
Beautiful backgrounds, pro annotations, GIF recording, and instant cloud sharing — all in one app. Pay $29 once, own it forever.
See what it doesFix 5: Reset NVRAM (Intel Macs) or restart (Apple Silicon)
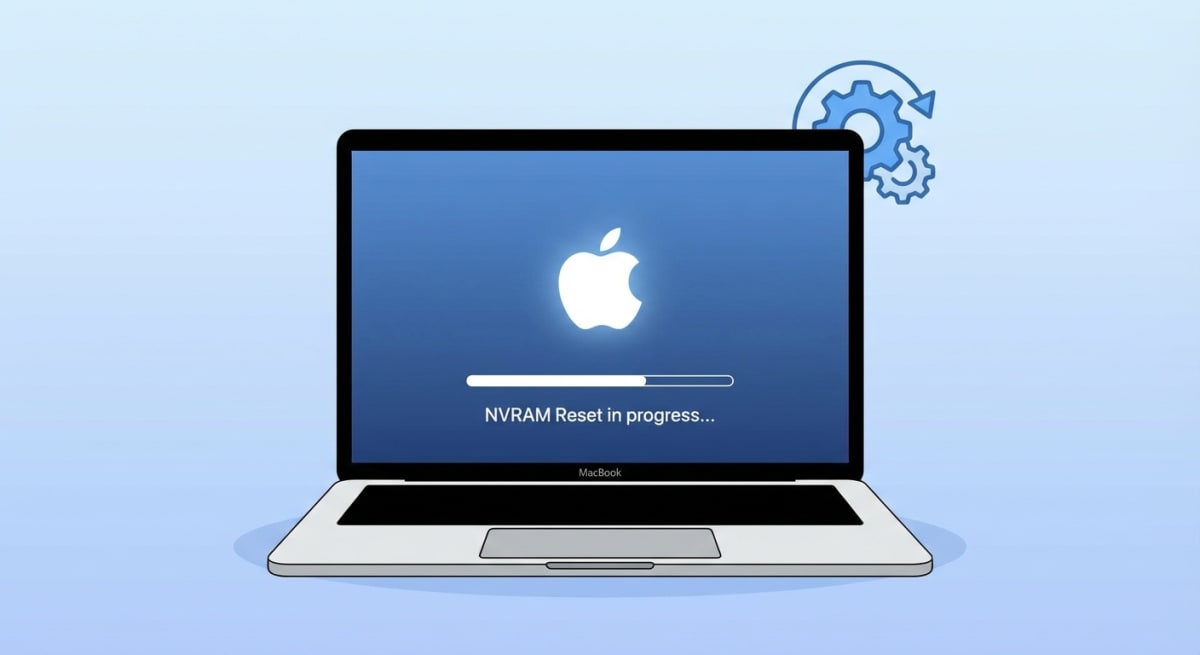
NVRAM (Non-Volatile Random-Access Memory) stores low-level settings that persist across restarts. Corrupted NVRAM data can cause various issues, including screenshot malfunctions.
For Intel-based Macs:
- Shut down your Mac completely
- Turn it back on
- Immediately press and hold
⌘ + Option + P + R - Keep holding for about 20 seconds
- Release the keys and let your Mac boot normally
You might hear the startup chime twice or see the Apple logo appear and disappear. Both are normal.
For Apple Silicon Macs (M1, M2, M3, M4):
Good news — Apple Silicon Macs handle NVRAM automatically. There's no manual reset procedure. Instead:
- Shut down your Mac
- Wait 30 seconds
- Turn it back on
This brief power cycle allows the system to clear any temporary issues that might affect screenshots.
Fix 6: Boot into Safe Mode
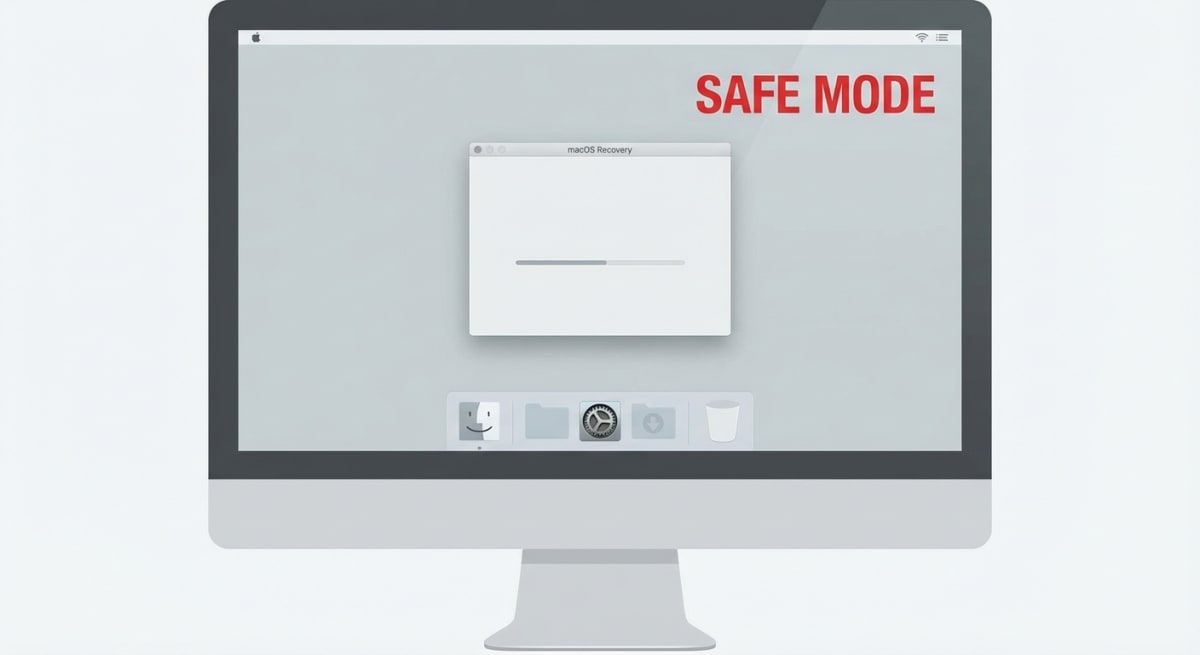
Safe Mode starts your Mac with only essential system software. This helps identify whether third-party apps or extensions are causing screenshot problems.
For Apple Silicon Macs:
- Shut down your Mac
- Press and hold the power button until "Loading startup options" appears
- Select your startup disk
- Press and hold Shift, then click Continue in Safe Mode
For Intel Macs:
- Shut down your Mac
- Turn it on and immediately press and hold Shift
- Release Shift when you see the login window
- Log in (you might need to log in twice)
Once in Safe Mode, try taking a screenshot. If it works, a third-party app is causing the conflict. Restart normally and systematically disable recently installed apps until you find the culprit.
How to identify the conflicting app
If screenshots work in Safe Mode but not in normal mode, here's a systematic approach to find the problem:
- Check Login Items — Go to System Settings → General → Login Items. Disable all non-essential items, restart, and test
- Recent installations — Think about what you installed right before screenshots stopped working
- Process of elimination — Enable one login item at a time, restart, and test until screenshots break again
- Check launch agents — Some apps install background processes. Look in
~/Library/LaunchAgentsfor unfamiliar items
Once you identify the culprit, you can either uninstall it, update it to a newer version, or check its settings for screenshot-related options.
Fix 7: Check third-party app permissions
Some apps request Screen Recording permissions to capture your display. Ironically, certain screen capture apps with incorrect permissions can block the built-in Screenshot tool.
Check which apps have screen recording access:
- Open System Settings → Privacy & Security → Screen Recording
- Review the list of apps with access
- Toggle off any apps you don't recognize
- Toggle off recently installed screenshot or screen recording apps temporarily
Common culprits include:
- Screen recording software
- Video conferencing apps (Zoom, Teams)
- Remote desktop applications
- Gaming capture tools
After adjusting permissions, restart your Mac and test screenshots again. If they work, re-enable apps one at a time to identify which one was causing the issue.
Fix 8: Scan for malware
This one's rare, but worth checking if nothing else works. Some malware specifically targets screenshot functionality — either to prevent you from capturing evidence or because it's interfering with system processes.
Signs malware might be involved:
- Screenshots stopped working suddenly without any changes
- Your Mac is running unusually slow
- You see unexpected pop-ups or browser redirects
- Unfamiliar apps appear in your Applications folder
To scan for malware:
- Open System Settings → Privacy & Security → Full Disk Access
- Run Apple's built-in malware protection by restarting your Mac
- Consider running a reputable third-party security scan
macOS includes XProtect, which automatically scans for known malware. Keeping your system updated ensures you have the latest definitions.
Recommended security tools
If you want to run a more thorough scan, these reputable tools are safe to use:
- Malwarebytes for Mac (free version available) — Excellent at detecting adware and potentially unwanted programs
- Objective-See tools — Free, open-source security utilities built specifically for macOS by a former NSA analyst
Avoid downloading random "antivirus" software from search results — some are actually malware themselves disguised as security tools.
Fix 9: Try alternative screenshot methods
If the keyboard shortcuts refuse to cooperate, you have backup options built right into macOS.
Use the Screenshot app directly
- Open Finder → Applications → Utilities → Screenshot
- The Screenshot toolbar appears
- Click the button for the type of capture you want
- No keyboard required
Use Preview
- Open Preview
- Click File → Take Screenshot
- Choose from Selection, Window, or Entire Screen
- Preview opens the screenshot for immediate editing
Use Terminal
For the technically inclined, the screencapture command offers powerful options:
screencapture ~/Desktop/screenshot.pngThis captures the entire screen. Add -i for interactive selection mode:
screencapture -i ~/Desktop/screenshot.pngMore useful screencapture options:
| Flag | What it does |
|---|---|
-w | Capture a specific window |
-c | Copy to clipboard instead of saving |
-T 5 | Wait 5 seconds before capturing (great for menus) |
-x | No sound (silent capture) |
-R x,y,w,h | Capture specific screen region |
Example: Capture a dropdown menu
screencapture -T 3 ~/Desktop/menu-screenshot.pngRun this, then quickly open the menu you want to capture. The screenshot triggers after 3 seconds.
Use a dedicated screenshot tool
If you take screenshots frequently for work, a dedicated app like ScreenSnap Pro offers more reliability and features than the built-in tool. You get instant annotations, cloud sharing, and GIF recording — plus it works independently of macOS keyboard shortcuts.
Once you've captured your screenshot, you might want to annotate it professionally or blur sensitive information before sharing.
Fix 10: When to contact Apple Support
You've tried everything. Shortcuts are enabled, storage is fine, NVRAM is reset, Safe Mode works but normal mode doesn't. At this point, the issue might be hardware-related or a deeper system problem.
You can reach Apple Support directly or schedule a Genius Bar appointment.
Contact Apple Support if:
- Screenshots work in Safe Mode but not normally, and you've removed all third-party apps
- You notice other system features failing alongside screenshots
- Your Mac is under warranty or AppleCare coverage
- The keyboard shortcuts work in some apps but not others (possible hardware issue)
Before contacting support:
- Note your macOS version (Apple menu → About This Mac)
- List the troubleshooting steps you've already tried
- Mention when the issue started and any recent changes
- Back up your Mac with Time Machine if you haven't recently
Apple can run diagnostics and determine if you need a repair or system reinstall.
Troubleshooting flowchart
Not sure where to start? Follow this decision tree:
Screenshot shortcut does nothing → Check keyboard shortcuts (Fix 1)
Screenshot sound plays but no file appears → Check save location (Fix 2) or storage space (Fix 3)
Worked yesterday, broken today → Restart Screenshot utility (Fix 4) or restart Mac
Works in Safe Mode only → Third-party app conflict (Fix 6 & 7)
Still broken after all fixes → Contact Apple Support (Fix 10)
FAQ
Wrapping up
Most Mac screenshot problems come down to a handful of causes: disabled shortcuts, wrong save location, low storage, or a conflicting app. Work through the fixes in order — you'll likely solve the issue within the first three or four steps.
For official guidance, check Apple's screenshot support documentation which covers the basics, though this guide goes deeper into troubleshooting.
If you're constantly troubleshooting screenshot issues or need more powerful capture features, it might be time to try a dedicated screenshot tool. ScreenSnap Pro handles all the headaches automatically while adding features like instant annotation and cloud sharing that the built-in tool lacks.
Now go capture that screen.
Morgan
Indie DeveloperIndie developer, founder of ScreenSnap Pro. A decade of shipping consumer Mac apps and developer tools. Read full bio
@m_0_r_g_a_n_