How to Disable Screenshot Sound on Mac (2026)
Want to disable the screenshot sound on Mac? Here are your options (or skip the system shutter entirely with a silent screenshot app like ScreenSnap Pro):
- Press the mute key before capturing
- Connect headphones to redirect the audio
- Turn off UI sounds in System Settings
- Use a screenshot app with sound controls
That camera shutter plays every time you take a screenshot. It confirms your capture worked. But it's annoying in quiet rooms or during video calls.
The good news? You've got options to turn off screenshot sound on Mac. Some are quick fixes. Others are permanent. Let's walk through each method.
Why You Might Want to Mute Screenshot Sounds
Before we dive in, here's why people want a silent screenshot experience:
- Video calls and meetings — That sound can go through your mic. Everyone hears it.
- Late night work — Working while others sleep? The sound is loud in quiet rooms.
- Recording tutorials — If you're screen recording, the click gets captured.
- Professional presentations — A random camera click breaks the flow.
- Personal preference — Some people just find it distracting.
Whatever your reason, macOS gives you options. Here are four methods, from quickest to most permanent.
Method 1: Quick Mute Before Capturing (Temporary)
Best for: One-off silent screenshots when you need quiet fast.
The fastest way to take a screenshot without sound on Mac? Mute your system first.
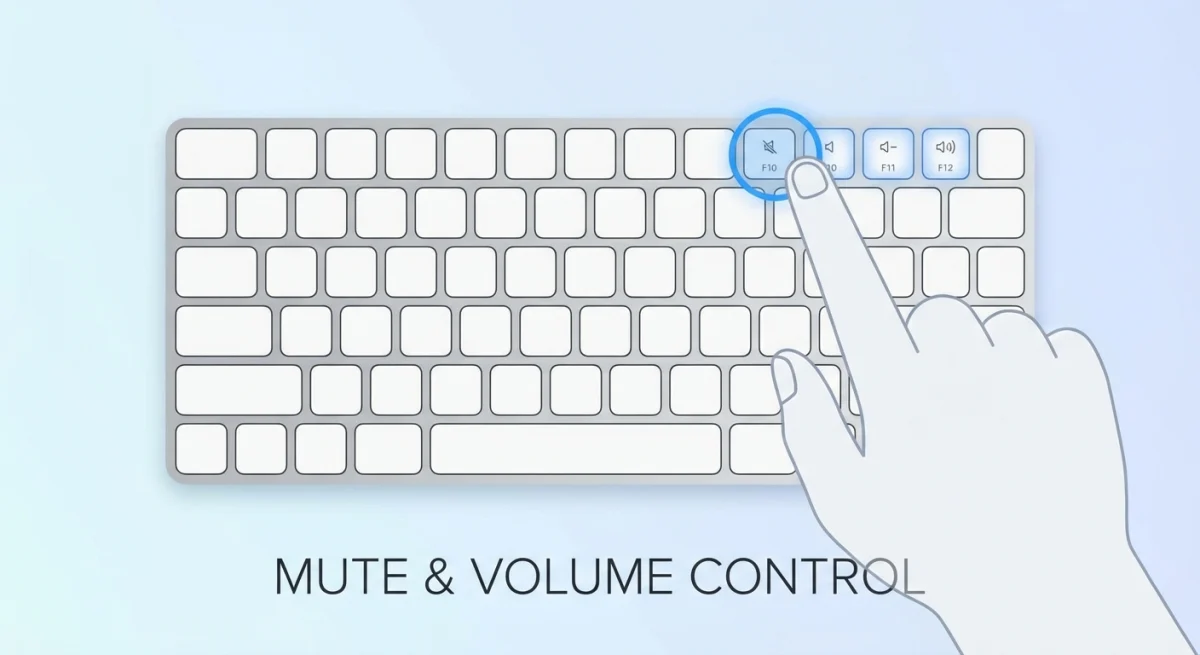
How to do it:
- Press the Mute key (
F10or speaker icon with X) - Take your screenshot with
⌘ + Shift + 3or⌘ + Shift + 4 - Unmute when you're done
You can also use the volume keys:
- Press Volume Down (
F11) until muted - Capture your screenshot
- Press Volume Up to restore audio
Pros:
- Instant
- No settings changes needed
Cons:
- You might forget to unmute
- You'll miss other sounds while muted
Tip: Still hearing the sound while muted? Your Mac might route audio differently. Try the System Settings method below.
Method 2: Use Headphones or AirPods (Temporary)
Best for: Screenshots during video calls without broadcasting the sound.
When you connect headphones, the screenshot sound effect routes through them. Your speakers stay silent.
How to do it:
- Connect headphones or pair your AirPods
- Take screenshots as usual
The shutter plays in your ears only. People around you won't hear it. Neither will video call participants.
Pros:
- No settings to change
- Sound still confirms capture
Cons:
- You need headphones
- You'll still hear it yourself
This works great during Zoom or Teams calls. Capture your screen without alerting anyone.
Method 3: Disable UI Sound Effects in System Settings (Permanent)
Best for: A permanent fix when you never want the screenshot sound.
This is the most reliable way to mute screenshot sounds permanently on Mac. You'll turn off all UI sound effects. That includes the screenshot shutter.
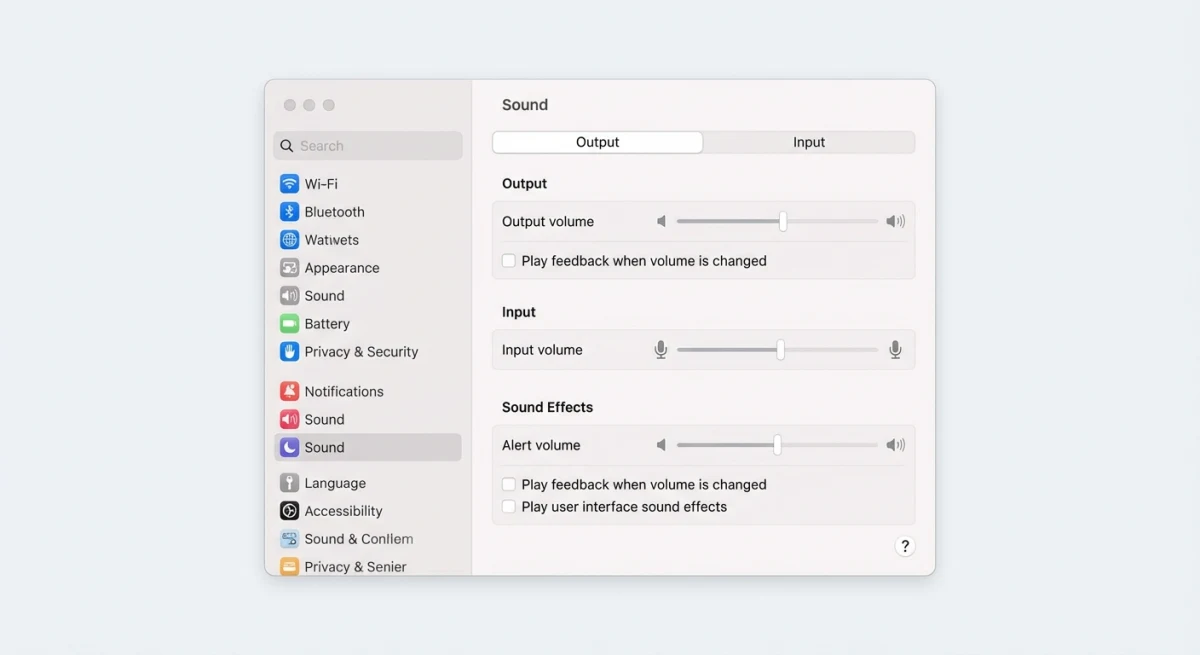
For macOS Ventura, Sonoma, and Sequoia (20150+)
Apple redesigned System Settings starting with Ventura. Here's the updated path:
- Click the Apple menu () in the top-left corner
- Select System Settings
- Click Sound in the left sidebar
- Scroll down to the Sound Effects section
- Toggle off "Play sound effects for user interface actions"
The toggle takes effect immediately. No restart needed.
For macOS Monterey, Big Sur, and Catalina (2019–2021)
Older macOS versions use the classic System Preferences layout:
- Click the Apple menu () in the top-left corner
- Select System Preferences
- Click the Sound icon (speaker symbol)
- Select the Sound Effects tab at the top
- Uncheck "Play user interface sound effects"
The checkbox is near the bottom of the panel, below the alert sound selector.
For macOS Mojave and High Sierra (2017–2018)
The oldest supported versions follow the same path as above:
- Open System Preferences from the Apple menu
- Click Sound
- Go to the Sound Effects tab
- Uncheck "Play user interface sound effects"
On these older versions, you might also see a "Play feedback when volume is changed" option. That's separate—it controls the volume key beeps.
Quick reference table
| macOS Version | App Name | Navigation Path |
|---|---|---|
| Sequoia, Sonoma, Ventura | System Settings | Sound → Sound Effects section |
| Monterey, Big Sur, Catalina | System Preferences | Sound → Sound Effects tab |
| Mojave, High Sierra | System Preferences | Sound → Sound Effects tab |
Pros:
- Permanent fix
- Works for all capture methods
- No third-party software needed
Cons:
- Also disables other system sounds (see below)
Tired of plain screenshots? Try ScreenSnap Pro.
Beautiful backgrounds, pro annotations, GIF recording, and instant cloud sharing — all in one app. Pay $39 once, own it forever.
See what it doesWhat Else Gets Muted When You Disable UI Sounds?
Here's the tradeoff. Turning off UI sound effects affects more than screenshots. You'll also lose:
- Trash emptying sound — The crumpling paper when you empty the bin
- Finder navigation sounds — Subtle clicks when switching folders or opening items
- File drag sounds — Audio feedback when dragging files to new locations
- Screenshot thumbnail pop — The soft sound when the preview floats to the corner
- Volume feedback beeps — The pop when pressing volume keys
- Login window sounds — The chime when switching users
- AirDrop sounds — Notifications when receiving files
Examples in practice
Before disabling: You empty the Trash and hear the satisfying crumple. You drag a file to a folder and hear a soft thud. Every volume key press makes a pop sound.
After disabling: These actions complete silently. You'll only notice visual feedback—the Trash icon empties, files animate to their destination, the volume indicator appears on screen.
What stays the same
Some sounds remain unaffected by this setting:
- Notification sounds — Calendar alerts, Messages pings, Mail notifications
- Music and media — Apple Music, Spotify, video playback
- App sounds — Slack pings, browser audio, game sounds
- System alerts — Error dialogs, battery warnings
These are controlled separately in System Settings → Notifications or within each app.
Most people don't mind losing UI sounds. They find system sounds distracting anyway. But if you want to keep other sounds while silencing only screenshots, you need a different approach.
Bonus Method: Use Terminal Commands (Advanced)
Best for: Power users who prefer command-line solutions.
macOS includes a built-in command-line tool called screencapture. It's what runs behind the scenes when you use keyboard shortcuts. And it has a flag for silent captures.
How to take silent screenshots with Terminal
- Open Terminal (find it in Applications → Utilities)
- Run this command:
screencapture -x ~/Desktop/screenshot.pngThe -x flag tells macOS to skip the sound. Your screenshot saves to the Desktop as screenshot.png.
Useful screencapture flags
| Flag | What it does |
|---|---|
-x | Silent mode (no sound) |
-i | Interactive selection (like ⌘ + Shift + 4) |
-c | Copy to clipboard instead of file |
-W | Window selection mode |
-T [seconds] | Delay before capture |
Examples for different capture types
Silent full screen capture:
screencapture -x ~/Desktop/fullscreen.pngSilent selection capture:
screencapture -x -i ~/Desktop/selection.pngSilent capture to clipboard:
screencapture -x -cSilent capture with 3-second delay:
screencapture -x -T 3 ~/Desktop/delayed.pngMake it easy with an alias
Add this to your ~/.zshrc file for quick access:
alias silentshot='screencapture -x -i ~/Desktop/screenshot-$(date +%Y%m%d-%H%M%S).png'Now type silentshot in Terminal for a silent screenshot Mac capture with automatic timestamped filenames.
Pros:
- No settings changes required
- Doesn't affect other sounds
- Powerful customization options
Cons:
- Requires Terminal knowledge
- Less convenient than keyboard shortcuts
Method 4: Use a Third-Party Screenshot Tool (Best of Both Worlds)
Best for: Full control over screenshot sounds without affecting other audio.
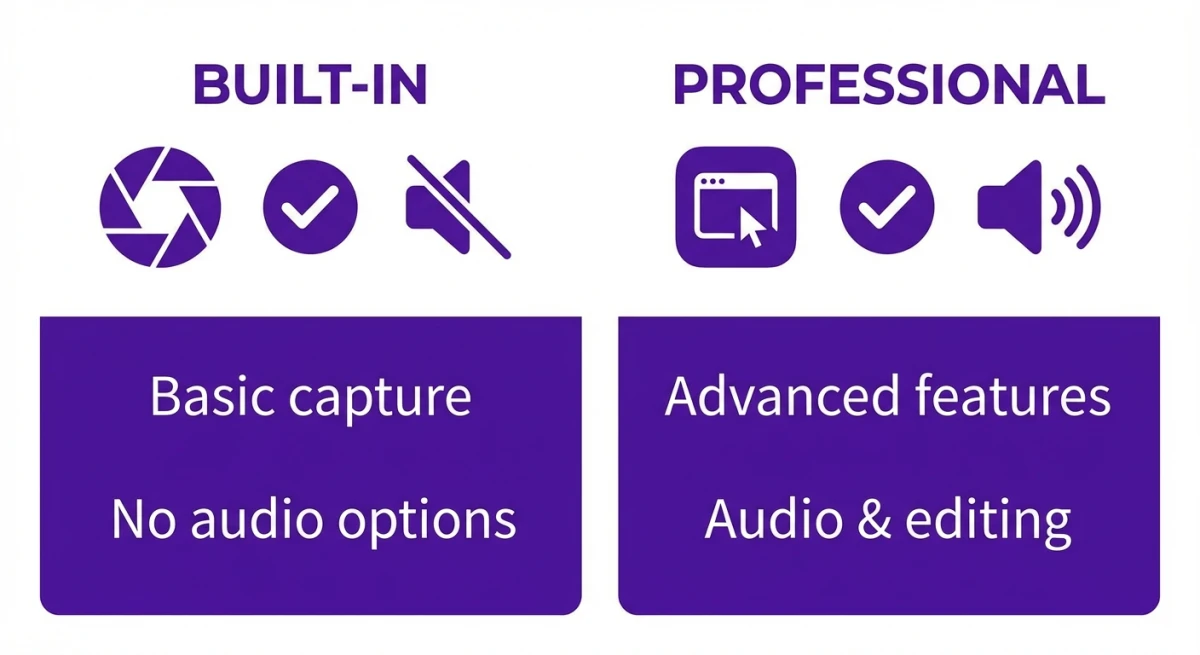
The built-in macOS Screenshot doesn't let you disable just the capture sound. It's all or nothing.
But dedicated screenshot apps for Mac give you more control.
Screenshot tools with sound control:
ScreenSnap Pro — Has a dedicated sound toggle. Turn off capture sounds while keeping other macOS sounds. Also offers annotation tools, cloud sharing, and more.
CleanShot X — Sound toggle in settings. Subscription pricing.
Shottr — Free tool with basic sound options.
Why use a third-party tool?
Beyond sound control, these apps offer features the built-in tool lacks:
- Annotation without Preview — Add arrows, text, blur right after capture
- Cloud upload — Get a shareable link instantly
- Scrolling capture — Screenshot entire web pages
- Custom shortcuts — Set up captures your way
- OCR text extraction — Copy text from any image
If your Mac screenshots aren't working with the built-in tool, these apps can help too.
Quick Comparison: Which Method Should You Choose?
| Method | Permanence | Affects Other Sounds | Effort |
|---|---|---|---|
| Mute key | Temporary | Yes (all audio) | Low |
| Headphones | Temporary | No (redirects only) | Low |
| System Settings | Permanent | Yes (UI sounds) | Low |
| Terminal command | Permanent | No | High |
| Third-party app | Permanent | No | Medium |
Our recommendations:
- Occasional silent screenshots? The mute key is fastest.
- During video calls? Headphones redirect sound to your ears only.
- Never want UI sounds? System Settings is the permanent fix.
- Tech-savvy and want full control? Terminal commands work great.
- Want the best of both worlds? A screenshot app like ScreenSnap Pro gives sound control without touching system settings.
Frequently Asked Questions
Not with built-in macOS settings. The toggle controls all UI sounds together—screenshots, Trash, Finder, and more. To disable only the screenshot sound while keeping other system audio, you'll need a third-party app with its own sound toggle, or use the Terminal screencapture -x command.
Yes. The System Settings method works on macOS Mojave (10.14) and later. The location differs slightly—newer versions use System Settings while older versions use System Preferences—but the toggle exists in all versions. Even the Terminal method works across all macOS releases.
Some Macs route screenshot sounds through a different audio path than your main output. If the mute key doesn't silence screenshots, use the System Settings method instead. It controls UI sounds at the system level, which is more reliable than muting your speakers.
No. Notification sounds are managed separately under System Settings → Notifications. The UI sounds toggle only affects interface feedback like screenshots, Trash emptying, Finder navigation, and volume adjustment beeps. Your Messages, Calendar, and Mail alerts will still play.
macOS doesn't include a built-in keyboard shortcut for this. You could create an Automator workflow or Shortcuts automation to toggle the setting, but it's complex. Most people find it easier to use a dedicated screenshot app that has its own sound control—one toggle and you're done.
Wrapping Up
Your Mac screenshot mute options range from quick fixes to permanent solutions.
For most people, two options work best:
- System Settings if you don't mind losing all UI sounds
- Screenshot app if you want control over just the screenshot sound
Exploring screenshot tools? Check out our guide to snipping tools on Mac. Or learn how to crop screenshots faster.
Ready for full sound control? Try ScreenSnap Pro free and customize your captures—including the sound.
Morgan
Indie DeveloperIndie developer, founder of ScreenSnap Pro. A decade of shipping consumer Mac apps and developer tools. Read full bio
@m_0_r_g_a_n_