Print Screen on Mac: Windows Switcher Guide (2026)
Coming from Windows? You've probably noticed something missing: there's no Print Screen key on Mac keyboards. If the built-in shortcuts feel limiting, a dedicated app like ScreenSnap Pro gives you a Windows-style capture experience on macOS.
Don't worry. Taking a screenshot on Mac is just as easy. You just need to learn the print screen on Mac shortcuts. This guide is for Windows switchers who want fast, efficient screen captures.
TL;DR: Press⌘ + Shift + 3for full screen,⌘ + Shift + 4for selection. AddControlto copy to clipboard instead of saving a file.
Mac uses different shortcuts than Windows. But they're actually more powerful. You get control over what you capture. Full screen, specific windows, or custom areas—no extra software needed.
Why Macs Don't Have a Print Screen Key
Mac keyboards follow a different design philosophy. Apple wanted a cleaner layout. So they used keyboard combos for screenshots instead of a dedicated key.
The good news? Mac's approach is actually more flexible:
- Multiple capture modes — full screen, window, or custom selection
- Built-in editing — annotate screenshots immediately after capture
- Cloud integration — save directly to clipboard, files, or cloud services
- No extra software needed — everything works out of the box
Used to pressing Print Screen and pasting into Paint? Mac's workflow is more streamlined. You'll adapt quickly.
Print Screen on Mac: The Keyboard Shortcuts You Need
Here's what you need to know. These shortcuts work on every Mac. MacBook, iMac, Mac Mini, Mac Studio—all of them.
Capture Entire Screen (Like Windows Print Screen)
Press: ⌘ + Shift + 3
This is the closest equivalent to Windows Print Screen. It captures your entire screen. The file saves as PNG on your desktop.
Pro tip: Want to copy to clipboard instead? Add Control: ⌘ + Control + Shift + 3. Now paste into any app with ⌘ + V.
Capture a Selected Area (Like Windows Snipping Tool)
Press: ⌘ + Shift + 4
Your cursor turns into a crosshair. Click and drag to select your area. Release to take the screenshot.
This works like the Windows Snipping Tool. You get precise control over what you capture.
Useful modifiers while selecting:
- Hold Space — move the entire selection area
- Hold Shift — lock the width or height while resizing
- Press Escape — cancel the screenshot
Capture a Specific Window
Press: ⌘ + Shift + 4, then press Space
The crosshair turns into a camera icon. Hover over any window—it highlights blue. Click to capture just that window. It includes a nice drop shadow.
Perfect for app screenshots or documentation. No desktop clutter. See our guide on capturing specific windows for more tips.
Pro tip: Hold Option while clicking to capture the window without the shadow.
Windows vs Mac Screenshot Comparison
Here's a quick reference table comparing Windows and Mac screenshot methods:
| Action | Windows | Mac |
|---|---|---|
| Capture full screen to file | Print Screen → Paste in app | ⌘ + Shift + 3 |
| Capture full screen to clipboard | Print Screen | ⌘ + Control + Shift + 3 |
| Capture selected area | Win + Shift + S | ⌘ + Shift + 4 |
| Capture specific window | Alt + Print Screen | ⌘ + Shift + 4, then Space |
| Open screenshot tool | Snipping Tool | ⌘ + Shift + 5 |
| Delayed screenshot | Snipping Tool delay | Screenshot app > Options > Timer |
The Mac screenshot shortcuts cover every Windows scenario. They just use different keys.
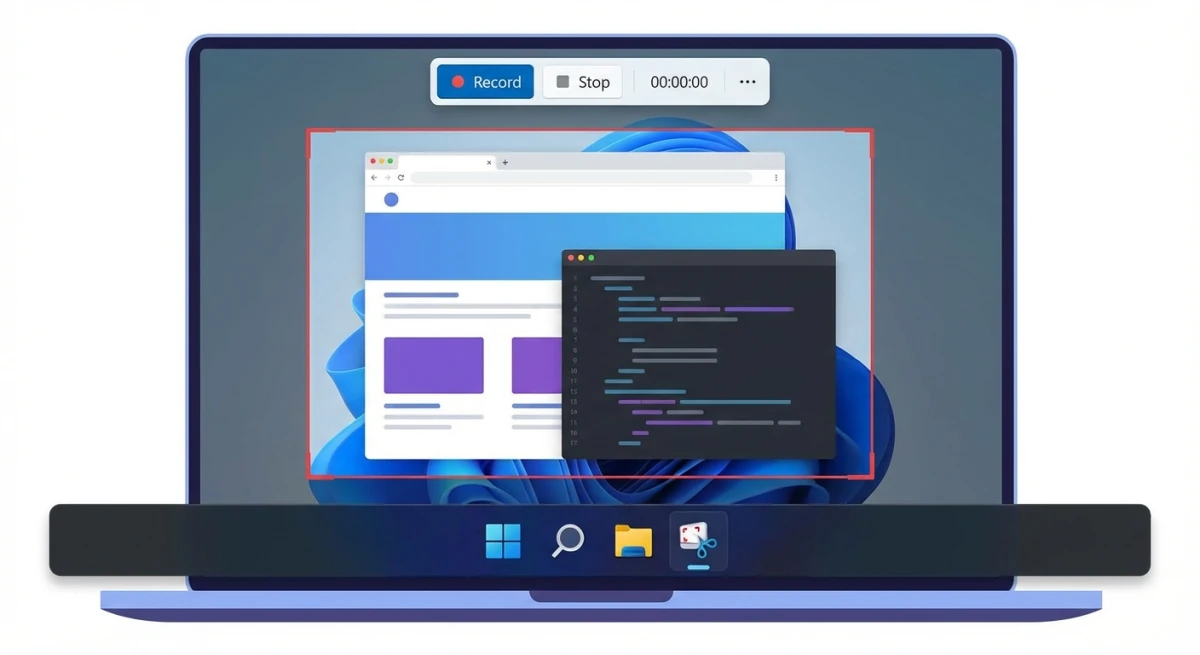
The Screenshot App: Mac's Built-In Power Tool
Press: ⌘ + Shift + 5
This opens macOS's Screenshot app, which gives you a toolbar with all capture options in one place:
- Capture Entire Screen — same as
⌘ + Shift + 3 - Capture Selected Window — same as
⌘ + Shift + 4+ Space - Capture Selected Portion — same as
⌘ + Shift + 4 - Record Entire Screen — screen recording (video)
- Record Selected Portion — record a specific area
Screenshot App Options
Click Options in the toolbar to access additional settings:
- Save to: Desktop, Documents, Clipboard, Mail, Messages, or Preview
- Timer: None, 5 seconds, or 10 seconds delay
- Show Floating Thumbnail: Enable/disable the preview that appears after capture
- Remember Last Selection: Useful for repeated captures of the same area
- Show Mouse Pointer: Include or hide the cursor in screenshots
This is much more powerful than Windows' basic Print Screen. You control exactly how and where your screenshots save.
How to Remap Keyboard Shortcuts (Create Your Own Print Screen Key)
Using a Windows keyboard with your Mac? Want a single-key screenshot shortcut? You can customize the shortcuts.
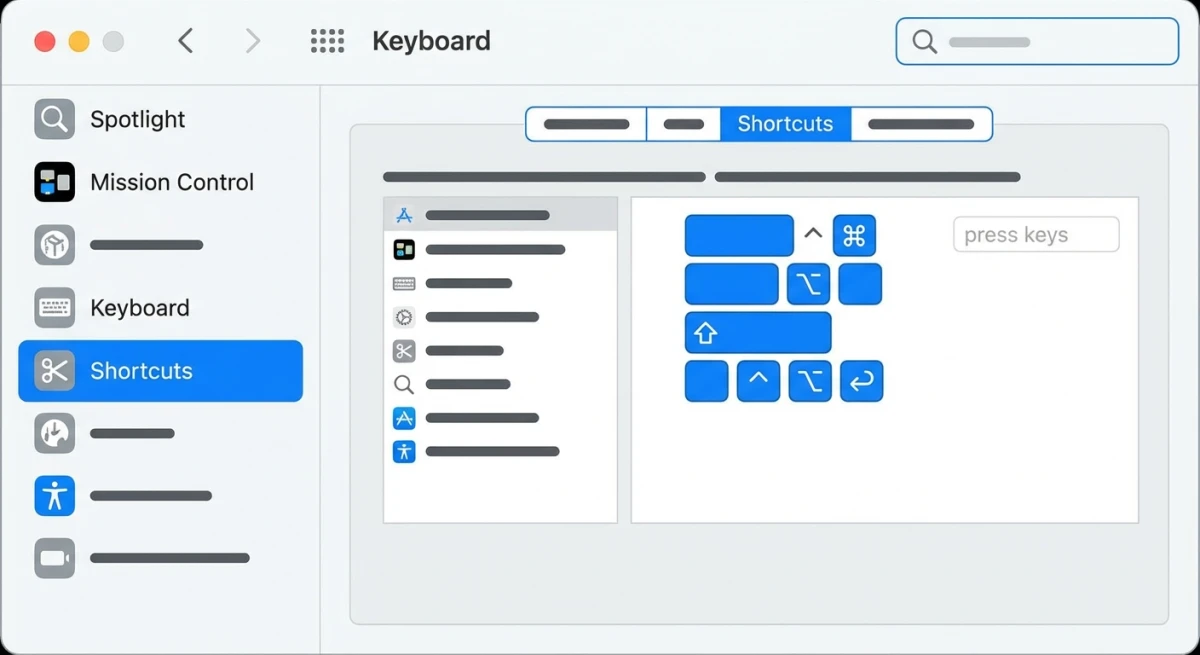
Customize Screenshot Shortcuts in System Settings
- Open System Settings (or System Preferences on older macOS)
- Go to Keyboard → Keyboard Shortcuts
- Select Screenshots from the sidebar
- Click on any shortcut to reassign it
- Press your preferred key combination (like a Function key)
You can assign any screenshot action to a single key. Map F13 to capture the entire screen. This mimics Windows Print Screen behavior.
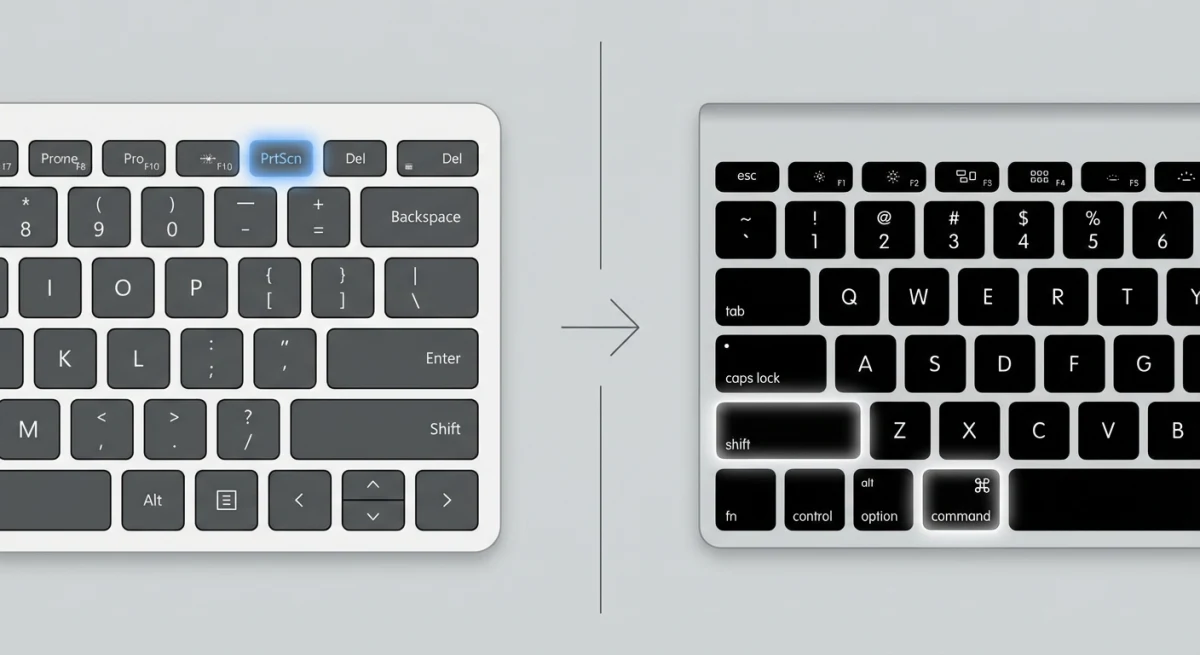
Using Windows Keyboards with Mac
Many Windows switchers keep their favorite keyboards. Windows keyboards work perfectly with Mac. You just need to understand the key mapping.
Here's how the modifier keys translate:
| Windows Key | Mac Equivalent | Physical Position |
|---|---|---|
| Windows key | Command (⌘) | Same position |
| Alt | Option (⌥) | Same position |
| Ctrl | Control (⌃) | Same position |
So on a Windows keyboard, the full-screen screenshot shortcut (⌘ + Shift + 3) becomes:
Windows key + Shift + 3
Here's the complete translation for all screenshot shortcuts on a Windows keyboard:
| Mac Shortcut | Windows Keyboard Equivalent |
|---|---|
⌘ + Shift + 3 | Win + Shift + 3 |
⌘ + Shift + 4 | Win + Shift + 4 |
⌘ + Shift + 5 | Win + Shift + 5 |
⌘ + Control + Shift + 3 | Win + Ctrl + Shift + 3 |
⌘ + Control + Shift + 4 | Win + Ctrl + Shift + 4 |
Swapping Alt and Windows Key Positions
Find the key positions uncomfortable? Windows uses Ctrl more than Command. You can swap them:
- Open System Settings → Keyboard
- Click Keyboard Shortcuts → Modifier Keys
- Select your external keyboard from the dropdown
- Swap Option (⌥) and Command (⌘) to match muscle memory
This makes the Alt key act as Command. Many Windows users find this more natural. It's in a similar position to Ctrl.
Third-Party Keyboard Remapping
For advanced remapping, try Karabiner-Elements. It lets you create complex keyboard modifications. You can map the Print Screen key to trigger ⌘ + Shift + 3.
Boot Camp and Windows on Mac
If you're running Windows through Boot Camp on your Mac, the screenshot shortcuts depend on which operating system you're booted into:
- In macOS: Use the Mac shortcuts covered in this guide
- In Windows: Your regular Print Screen key works normally
Important Boot Camp considerations:
Boot Camp runs native Windows. Everything works like a regular Windows PC. Print Screen captures the screen. Win + Shift + S opens Snipping Tool. Screenshots save to your Pictures folder.
One catch: Mac keyboards lack a Print Screen key. On Apple keyboards, use Snipping Tool (Win + Shift + S). Or try these workarounds:
- Fn + Shift + F11 — May work as Print Screen on some Mac keyboard configurations
- Use On-Screen Keyboard — Windows Accessibility feature with Print Screen button
- Install third-party tool — ShareX or Greenshot add screenshot shortcuts
Boot Camp Screenshot Troubleshooting
Running into issues with screenshots in Boot Camp? Here are common problems and solutions:
Problem: Fn + Shift + F11 doesn't work
Apple keyboards map function keys differently in Windows. The Boot Camp drivers handle most translations, but Print Screen often gets lost. Try these fixes:
- Install Boot Camp drivers — Open Boot Camp Control Panel from your system tray. Click "Download Latest Windows Support Software" to ensure drivers are current.
- Check function key settings — In Boot Camp Control Panel → Keyboard, toggle "Use all F1, F2, etc. keys as standard function keys."
- Use Windows key + Print Screen — If you have an external Windows keyboard, this saves directly to Pictures → Screenshots.
Problem: Screenshots save but I can't find them
Boot Camp Windows saves screenshots to different locations:
| Shortcut | Save Location |
|---|---|
| Print Screen | Clipboard only — paste into an app |
| Win + Print Screen | Pictures > Screenshots folder |
| Win + Shift + S | Clipboard, or save manually from Snipping Tool |
| Alt + Print Screen | Clipboard (active window only) |
Problem: Screenshot shortcut conflicts with Mac actions
Boot Camp doesn't run macOS simultaneously. No conflict should occur. But if you're switching frequently between macOS and Boot Camp Windows, muscle memory gets confusing. Keep this mental model:
- Booted into macOS → Use
⌘ + Shift + 3/4/5 - Booted into Boot Camp Windows → Use Windows shortcuts
There's no way to use Mac shortcuts while in Windows, or vice versa. They're completely separate operating systems.
Recommended Tools for Boot Camp
Since Mac keyboards lack Print Screen, install one of these free Windows screenshot tools:
- ShareX — Power user tool with region capture, GIF recording, and OCR. Highly configurable keyboard shortcuts.
- Greenshot — Lightweight, simple. Perfect Print Screen replacement.
- Lightshot — Quick captures with instant sharing.
Configure any of these to use Ctrl + Shift + 3 in Windows. Mimics the Mac shortcut you're learning. Reduces mental switching cost.
Virtual Machines (Parallels, VMware Fusion, UTM)
Running Windows via Parallels or VMware Fusion? Print Screen works inside Windows. Some shortcuts may conflict with macOS. Here's what to expect:
Parallels Desktop:
- Print Screen works inside Windows
⌘ + Shift + 4captures the entire Parallels window from macOS- In Preferences → Shortcuts, you can customize which shortcuts pass through to Windows
VMware Fusion:
- Similar behavior to Parallels
- Check Preferences → Keyboard & Mouse for shortcut customization
- Use "Send Key" menu to manually trigger Print Screen
UTM (Free, Apple Silicon native):
- Works like other VMs
- Keyboard passthrough configurable in VM settings
Pro tip: Want to capture the VM window from macOS? Use ⌘ + Shift + 4 + Space. Click on the virtual machine window. Great for documentation showing the VM alongside Mac apps.
Where Do Mac Screenshots Go?
By default, screenshots save to your desktop with filenames like:
Screen Shot 2026-02-01 at 2.30.45 PM.png
This can clutter your desktop quickly. Here's how to change your screenshot save location:
- Press
⌘ + Shift + 5to open the Screenshot app - Click Options
- Under "Save to," choose your preferred location
- Options include: Desktop, Documents, Clipboard, Mail, Messages, Preview, or any custom folder
Pro tip: Create a dedicated "Screenshots" folder. Select it as your default. Keeps your desktop clean.
Tired of plain screenshots? Try ScreenSnap Pro.
Beautiful backgrounds, pro annotations, GIF recording, and instant cloud sharing — all in one app. Pay $39 once, own it forever.
See what it doesEditing Screenshots After Capture
After taking a screenshot, a thumbnail appears in the corner. This is the "Floating Thumbnail." Click it before it disappears. This opens Markup tools:
- Crop — remove unwanted edges
- Draw — freehand drawing and shapes
- Text — add annotations
- Signature — insert saved signatures
- Shapes — arrows, boxes, circles, speech bubbles
- Share — send directly to apps or people
Windows doesn't offer this natively. It makes Mac screenshots efficient for quick annotations.

Using Touch Bar for Screenshots (Older MacBook Pro)
If you have an older MacBook Pro with the Touch Bar (2016-2020 models), you have another screenshot option:
Press: ⌘ + Shift + 6
This captures what's on your Touch Bar. It saves as a long, thin screenshot. Useful for documenting Touch Bar setups or app-specific controls.
You can also add a Screenshot button to your Touch Bar:
- Go to System Settings → Keyboard
- Click Customize Touch Bar
- Drag the Screenshot icon to your Touch Bar
Now you'll have a dedicated screenshot button always visible.
Beyond Built-In Tools: When You Need More
Mac's built-in tools are solid. Apple's support guide covers the basics. But power users often want more:
- Professional backgrounds and frames
- Advanced annotation tools (blur, pixelation, numbering)
- Instant cloud sharing with link generation
- GIF recording for demos
- OCR (text extraction from images)
Coming from Windows? Used ShareX or Greenshot? You'll appreciate dedicated Mac screenshot apps.
Tools like ScreenSnap Pro offer a Windows-like single-click workflow with additional features:
- 500+ wallpapers for polished screenshots
- 15 annotation tools including blur and counter badges
- One-click cloud sharing with instant links
- GIF recording for quick demos
- One-time purchase — no subscription needed
Take screenshots often? For docs, bug reports, or social media? A dedicated tool saves hours. See our guide on best screenshot apps for Mac.
Common Mistakes Windows Switchers Make
Years of Windows muscle memory? It's easy to trip up on Mac. Here are common mistakes and how to avoid them:
Pressing Control Instead of Command
On Windows, Ctrl is the main modifier key. On Mac, it's Command (⌘). Press Ctrl + Shift + 3? Nothing happens. You need ⌘ + Shift + 3.
The fix: Think of Command as Mac's "do stuff" key. It sits where Alt is on Windows keyboards. Feels strange at first.
Looking for Screenshots in the Pictures Folder
Windows saves screenshots to Pictures > Screenshots. Mac saves to Desktop by default. Can't find your screenshots? Check your Desktop first.
The fix: Use ⌘ + Shift + 5 → Options. Set a custom save location like ~/Pictures/Screenshots. Matches the Windows convention.
Expecting Screenshots to Auto-Copy to Clipboard
Windows Print Screen copies to clipboard by default. Mac saves to a file. Take a screenshot and try to paste? You'll get nothing.
The fix: Add Control to your shortcut. ⌘ + Control + Shift + 3 copies to clipboard. Or right-click the floating thumbnail and choose "Copy."
Not Using the Floating Thumbnail
That little preview in the corner after a screenshot? Many Windows users dismiss it. Or wait for it to disappear. But clicking it opens instant editing tools.
The fix: Click the thumbnail before it vanishes. Crop, annotate, or share immediately. Faster than opening the file afterward.
Using Snipping Tool Habits
On Windows, you open Snipping Tool. Then click New. Then draw your selection. On Mac? Just press ⌘ + Shift + 4. The selection tool activates instantly.
The fix: Embrace Mac's shortcut-first approach. You'll rarely need to open an app to take a screenshot.
Troubleshooting Common Issues
Screenshots Not Working?
If your screenshot shortcuts suddenly stop working, try these fixes:
- Check keyboard shortcuts — Go to System Settings → Keyboard → Keyboard Shortcuts → Screenshots and ensure they're enabled
- Restart your Mac — Sometimes a simple reboot fixes shortcut issues
- Check for conflicting apps — Some apps override system shortcuts
- Reset shortcuts to defaults — In the Keyboard Shortcuts pane, click "Restore Defaults"
For more detailed troubleshooting, see our guide on Mac screenshot not working.
Screenshot Files Are Too Large?
Mac saves screenshots as PNG by default. This preserves quality but creates larger files. File size a concern? Try these:
- Use Preview to export as JPEG (File → Export → JPEG)
- Use a tool like ScreenSnap Pro that offers multiple export formats
- Convert using the command line:
sips -s format jpeg screenshot.png --out screenshot.jpg
Can't Find Your Screenshots?
If screenshots seem to disappear:
- Check your Desktop first (the default location)
- Use Spotlight: Press
⌘ + Spaceand type "Screen Shot" - Check if they're saving to clipboard instead (Options → Save to)
- Look in the location you may have set previously in Screenshot app Options
Frequently Asked Questions
Quick Reference Cheat Sheet
Print this out until the shortcuts become muscle memory:
| Shortcut | Action |
|---|---|
⌘ + Shift + 3 | Capture entire screen to file |
⌘ + Shift + 4 | Capture selected area |
⌘ + Shift + 4 + Space | Capture specific window |
⌘ + Shift + 5 | Open Screenshot app |
⌘ + Control + Shift + 3 | Full screen to clipboard |
⌘ + Control + Shift + 4 | Selected area to clipboard |
Escape | Cancel screenshot |
Wrapping Up
Switching from Windows Print Screen to Mac shortcuts? Takes a day or two of practice. Once it clicks, you'll find Mac's system more powerful.
Key takeaways:
⌘ + Shift + 3= full screen (your new Print Screen)⌘ + Shift + 4= selected area (your new Snipping Tool)⌘ + Shift + 5= all options in one toolbar- Add
Controlto copy to clipboard instead of saving to file
Want more features? Instant cloud sharing, beautiful backgrounds, advanced annotations? Check out ScreenSnap Pro. It combines the best of Windows and Mac workflows. One-time purchase.
Happy screenshotting on your new Mac!
Morgan
Indie DeveloperIndie developer, founder of ScreenSnap Pro. A decade of shipping consumer Mac apps and developer tools. Read full bio
@m_0_r_g_a_n_