How to Take Timed Screenshots on Mac (5 Methods) | 2026
A timed screenshot on Mac is a delayed screen capture. It gives you a few seconds to set up your screen before the image is taken. The built-in Screenshot app handles short delays, while apps like ScreenSnap Pro let you set custom timers. This is great for capturing:
- Dropdown menus
- Tooltips
- Hover states
- Other UI elements that disappear when you press a key
Ever tried to screenshot a dropdown menu? It closes the instant you hit ⌘ + Shift + 4. Frustrating, right?
The good news: macOS has built-in timer options. You can also use Terminal commands or third-party apps for more control.
Here are five ways to take delayed screenshots on Mac.
Method 1: Use the Built-in Screenshot Timer (Easiest)
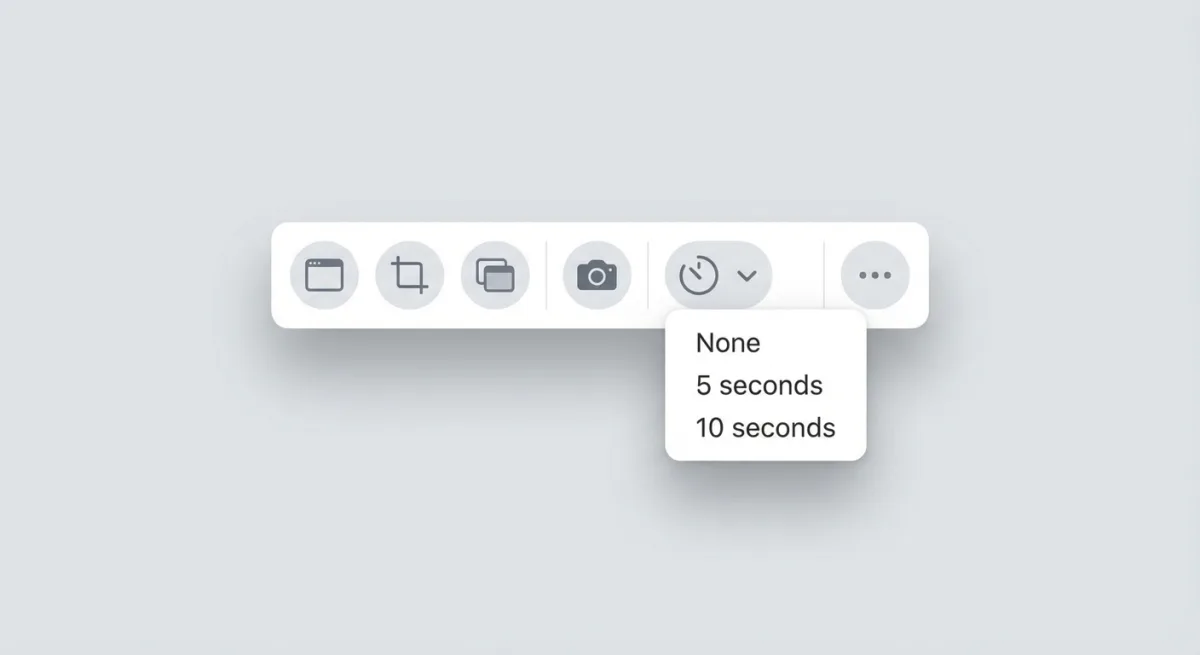
The fastest way to take a mac screenshot with a timer is the Screenshot app. It's built into every Mac running macOS Mojave or later. You get two delay options: 5 seconds and 10 seconds.
How to set a screenshot timer:
- Press
⌘ + Shift + 5to open the Screenshot toolbar - Click Options in the toolbar
- Under Timer, select 5 Seconds or 10 Seconds
- Choose your capture type (entire screen, portion, or window)
- Click Capture or press Return
The countdown shows in the toolbar. This gives you time to:
- Open menus
- Hover over elements
- Arrange your screen
When the timer hits zero, your screenshot is captured.
Pro tip: Check "Remember Last Selection" in Options. This keeps your timer setting for future screenshots. Otherwise, it resets to "None" each time.
What you can capture with the timer:
- Entire screen — Best for full workspace shots
- Selected portion — Draw a rectangle before the countdown
- Selected window — Click a window after choosing this mode
The built-in timer works great for most situations. For more details, see Apple's official guide to taking screenshots.
Need a custom delay like 3 seconds or 30 seconds? Keep reading.
Method 2: Use Terminal for Custom Delays
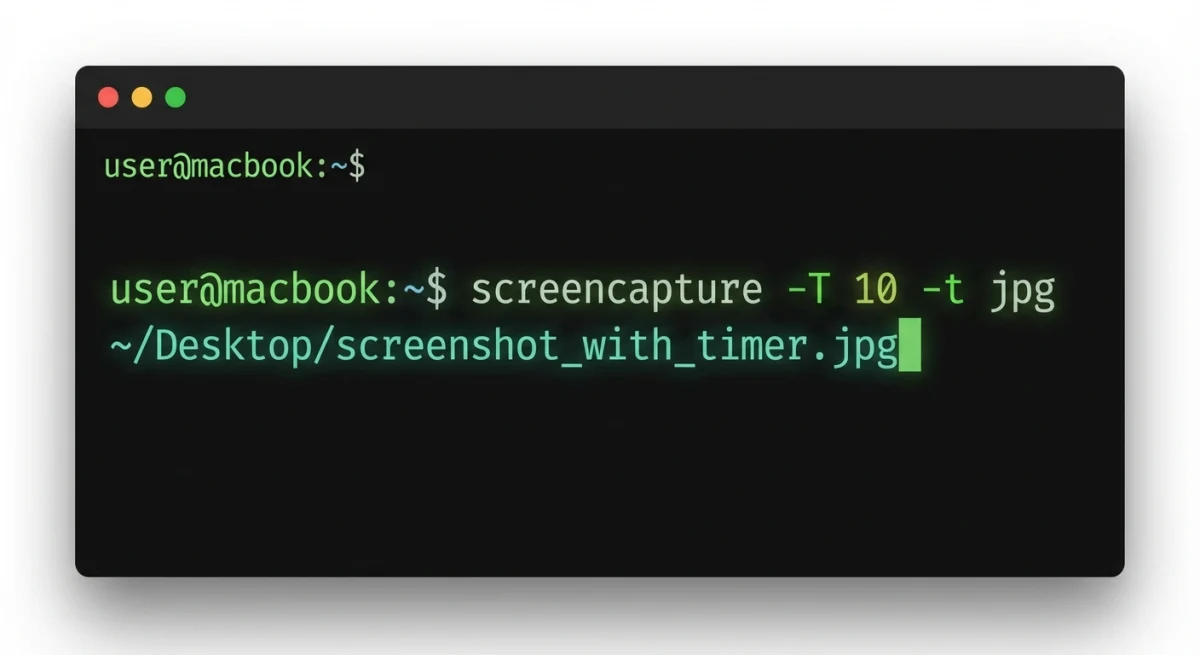
Want a 3-second delay? 15 seconds? 60 seconds? Terminal's screencapture command lets you pick any delay.
Basic timed screenshot command:
screencapture -T 5 ~/Desktop/screenshot.pngThis takes a screenshot after 5 seconds. It saves to your Desktop.
Understanding the command:
screencapture— The built-in macOS screenshot tool-T 5— Timer in seconds (change 5 to any number)~/Desktop/screenshot.png— Where to save the file
Useful variations:
Select an area with delay:
screencapture -T 5 -i ~/Desktop/screenshot.pngThe -i flag lets you pick an area or window after the timer starts.
Capture a specific window:
screencapture -T 5 -w ~/Desktop/screenshot.pngThe -w flag captures the window you click.
Show the cursor:
screencapture -T 5 -C ~/Desktop/screenshot.pngThe -C flag includes the mouse cursor in your capture.
Copy to clipboard:
screencapture -T 5 -cThe -c flag copies the screenshot to your clipboard. Great for quick pasting.
No shadow around windows:
screencapture -T 5 -o -w ~/Desktop/screenshot.pngThe -o flag removes the default macOS window shadow. Useful for cleaner documentation.
Capture in JPEG format (smaller files):
screencapture -T 5 -t jpg ~/Desktop/screenshot.jpgThe -t flag lets you specify format: png, jpg, gif, pdf, or tiff.
First-time setup: Grant Terminal permissions
macOS may ask for Screen Recording permission the first time. Here's how to enable it:
- Go to System Settings → Privacy & Security → Screen Recording
- Toggle on Terminal
- Restart Terminal if needed
This is a one-time setup. Once enabled, Terminal can take screenshots without prompts.
For more mac screenshot shortcuts, check our complete guide.
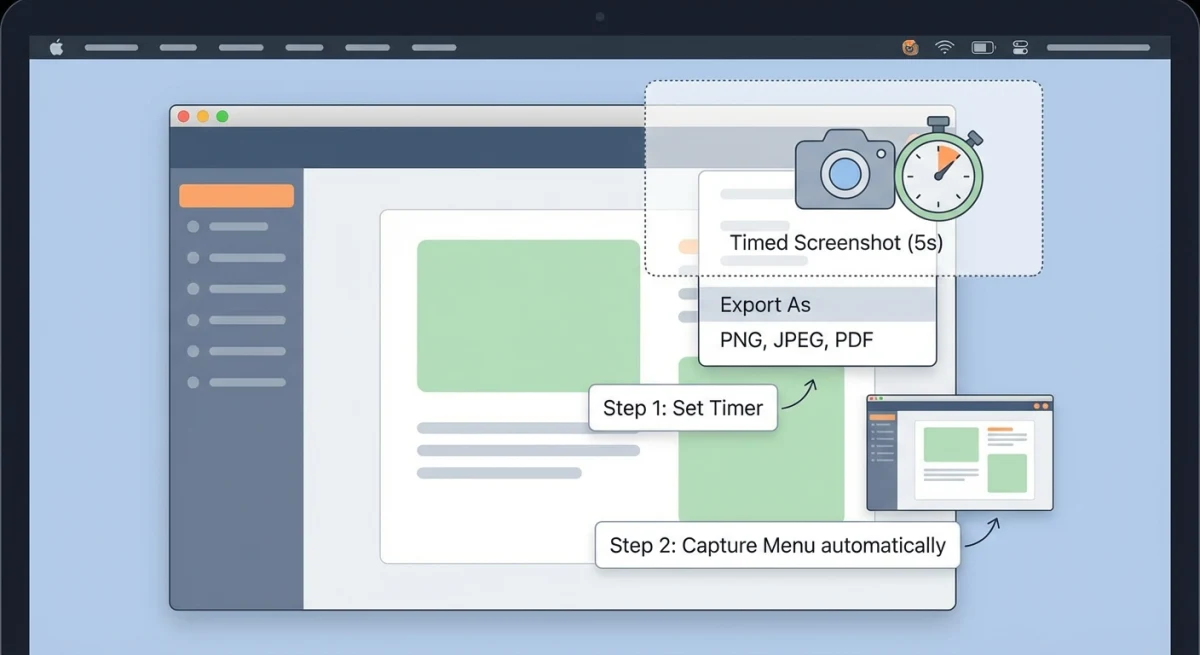
Method 3: Create an Automator Quick Action (No Typing)
Don't want to type Terminal commands every time? You can create an Automator workflow. Then trigger it with a keyboard shortcut.
How to create a timed screenshot shortcut:
- Open Automator (search in Spotlight)
- Create a new Quick Action
- Set "Workflow receives" to no input
- Drag Run Shell Script from the left sidebar
- Paste this command:
sleep 5 && screencapture -i ~/Desktop/timed-screenshot.png- Save as "Timed Screenshot"
Assign a keyboard shortcut:
- Go to System Settings → Keyboard → Keyboard Shortcuts
- Select Services in the sidebar
- Find your "Timed Screenshot" action under General
- Click "Add Shortcut" and press your preferred keys (e.g.,
⌘ + Shift + 6)
Now you can trigger a 5-second delayed screenshot from anywhere. Just one keystroke!
Method 4: Use Third-Party Screenshot Apps
If you take screenshots often, a dedicated tool offers more than just timers. You get annotation, cloud sharing, and pro features that the built-in screenshot tool on Mac can't match.
CleanShot X
CleanShot X has a self-timer mode that works with all capture types. You can set custom delays and capture scrolling content too.
- Price: $29 one-time (cloud features extra)
- Timer options: Custom delays (1-60+ seconds)
- Best for: Power users who need advanced options
Shottr
Shottr is free and lightweight. It has a quick-access timer in the menu bar. It also includes OCR, scrolling capture, and annotation.
- Price: Free
- Timer options: Quick access from menu bar
- Best for: Users who want pro features without paying
ScreenSnap Pro
Need to annotate screenshots on Mac professionally after capturing? ScreenSnap Pro combines timed capture with instant cloud sharing. It also has 150+ background options.
The workflow is simple: capture → annotate → share in seconds.
- Price: One-time purchase (no subscription)
- Timer options: Built-in delay capture
- Best for: Developers, designers, and content creators
For a full comparison, see our guide to the best screenshot apps for Mac.
Tired of plain screenshots? Try ScreenSnap Pro.
Beautiful backgrounds, pro annotations, GIF recording, and instant cloud sharing — all in one app. Pay $29 once, own it forever.
See what it doesMethod 5: Use Grab App (Legacy Method for Older Macs)
Running macOS High Sierra (10.13) or earlier? You'll have the Grab app instead of Screenshot. Apple replaced Grab in macOS Mojave.
To use Grab's timer:
- Open Grab from Applications → Utilities
- Go to Capture → Timed Screen (or press
⌘ + Shift + Z) - Click Start Timer
- You get a 10-second countdown
Grab only offers a 10-second delay. There's no customization. If you need more flexibility on an older Mac, use Terminal instead.
When to Use Timed Screenshots
Timed screenshots solve one problem: capturing things that disappear. Here are the most common use cases.
Dropdown menus and context menus
Right-click menus close when you press keyboard shortcuts. A 5-second timer lets you:
- Start the countdown
- Open the menu
- Position your cursor
- Wait for the capture
Tooltips and hover states
Some UI elements only appear on hover. This includes tooltips, button effects, and preview popups. A timer gives you time to trigger them first.
Multi-step UI interactions
Some screens need several clicks to reach the right state. A 10-second (or longer) timer gives you time to get there.
Tutorial and documentation screenshots
Creating step-by-step guides? You often need to show specific UI states. Timed screenshots let you set up each step perfectly.
Combined with counter and annotation tools or our free image annotation tool, you can create pro documentation fast.
Screenshots of temporary states
Even for GIFs or videos, a still screenshot of a fleeting UI state is often easier with a timer. Then you can add backgrounds to your screenshots for a polished look.
Troubleshooting Timed Screenshots
Timer not appearing in Screenshot toolbar
Make sure you're on macOS Mojave (10.14) or later. The Screenshot app replaced the old Grab app. Check your macOS version in Apple menu → About This Mac.
Terminal screencapture not working
You need to grant Screen Recording permission to Terminal:
- System Settings → Privacy & Security → Screen Recording
- Toggle on Terminal
- Quit and reopen Terminal
If Terminal isn't listed, run a screencapture command first. macOS will prompt you to add it.
Screenshots saving to wrong location
By default, screenshots save to your Desktop. Want to change this?
Open the Screenshot toolbar (⌘ + Shift + 5), click Options, and pick a new folder under "Save to." For more details, see how to change screenshot location on Mac.
Screenshot captures wrong display
On multi-monitor setups, make sure your cursor is on the right display when the timer ends. For Terminal's -i flag, you'll select the area after the timer starts.
Countdown timer too fast
If 5 seconds isn't enough, you have options:
- Use Terminal with a longer delay (
-T 15for 15 seconds) - Create an Automator action with a custom
sleepduration - Use CleanShot X or another app with longer custom timers
Screenshot quality looks poor
By default, macOS captures at full resolution. If your screenshots look blurry:
- Check your display scaling in System Settings → Displays
- Avoid resizing the image after capture
- For Retina displays, files are larger but sharper — don't compress them before sharing
For smaller files, use JPEG format via Terminal:
screencapture -T 5 -t jpg ~/Desktop/screenshot.jpgTimer resets after each screenshot
The Screenshot toolbar resets the timer to "None" after each capture (unless you enable it). To keep your timer setting:
- Open Screenshot toolbar with
⌘ + Shift + 5 - Click Options
- Check Remember Last Selection
Now your 5 or 10-second timer persists between captures.
Automator shortcut not triggering
If your custom Automator Quick Action isn't working:
- Check that Terminal has Screen Recording permission
- Verify the shortcut doesn't conflict with other system shortcuts
- Try a different key combination — some are reserved by macOS
- Restart your Mac if the shortcut was just created
Quick Reference: Timed Screenshot Methods
| Method | Delay Options | Best For |
|---|---|---|
Screenshot app (⌘ + Shift + 5) | 5s, 10s | Quick captures, most users |
Terminal (screencapture -T) | Any duration | Custom delays, automation |
| Automator Quick Action | Any duration | Keyboard shortcut access |
| Third-party apps | Varies | Power users, extra features |
| Grab app (legacy) | 10s only | macOS High Sierra and older |
Frequently Asked Questions
screencapture -T 30 ~/Desktop/screenshot.png- Open Screenshot toolbar with
⌘ + Shift + 5 - Enable the timer in Options
Capture More with the Right Tools
Taking a timed screenshot on Mac is easy once you know where to look.
The built-in Screenshot toolbar handles 90% of use cases. It has 5 and 10-second timers. For custom delays, Terminal gives you full control. And if you capture screens often, a dedicated app like ScreenSnap Pro can speed up your whole workflow.
Having trouble with screenshots? Check our guide on fixing Mac screenshot not working issues.
Morgan
Indie DeveloperIndie developer, founder of ScreenSnap Pro. A decade of shipping consumer Mac apps and developer tools. Read full bio
@m_0_r_g_a_n_