Screenshot Zoom Meeting Mac: 5 Methods That Work (2026)
Need to screenshot a Zoom meeting on your Mac? Good news: Zoom won't notify anyone when you do — and a dedicated capture app like ScreenSnap Pro makes the grab even faster.
Whether you're saving slides, taking notes, or keeping a record—it's easy. And private.
This guide covers five ways to capture Zoom meetings on Mac. You'll also learn when it's OK to screenshot—and when to ask first.
5 Ways to Screenshot a Zoom Meeting on Mac
Here's a quick look at every method in this guide:
- Mac keyboard shortcuts — fastest option, zero setup
- Zoom's built-in tool — auto-sorts files by meeting name
- Third-party apps — best for annotation and sharing
- GIF capture — ideal for demos and walkthroughs
- Same tricks for other apps — works with Meet, Teams, and FaceTime
Each method fits different needs. Read on for step-by-step instructions.
Does Zoom Notify When You Screenshot?
No, Zoom does not notify anyone when you screenshot. There's no alert. No warning. No one finds out.
This is a common worry. Many remote workers fear their boss or clients will know they took a screenshot.
Rest easy. Zoom has no way to detect it.
You can freely capture:
- Slides and shared screens
- Participant grids
- Chat messages
- Whiteboard content
What about recording? That's different.
Zoom does notify everyone when someone starts a cloud recording. A banner pops up saying the call is being recorded. But screenshots? No alert at all.
Third-party screen recorders don't trigger alerts either. Only Zoom's own cloud recording shows a warning.
The quick summary:
- Screenshots = no notification
- Local screen recording = no notification
- Zoom cloud recording = everyone gets notified
Zoom's support docs confirm this. The recording alert exists for transparency. It doesn't apply to screenshots you take with your Mac.
Method 1: Mac Keyboard Shortcuts (Fastest)
The quickest way to capture a Zoom meeting is with built-in Mac shortcuts. No extra apps needed. Works during any call.
Capture the Entire Screen
Press ⌘ + Shift + 3 to grab your full display. The image saves to your Desktop right away.
This is the fastest option. One keypress and done. Great when you need to capture fast and sort later.
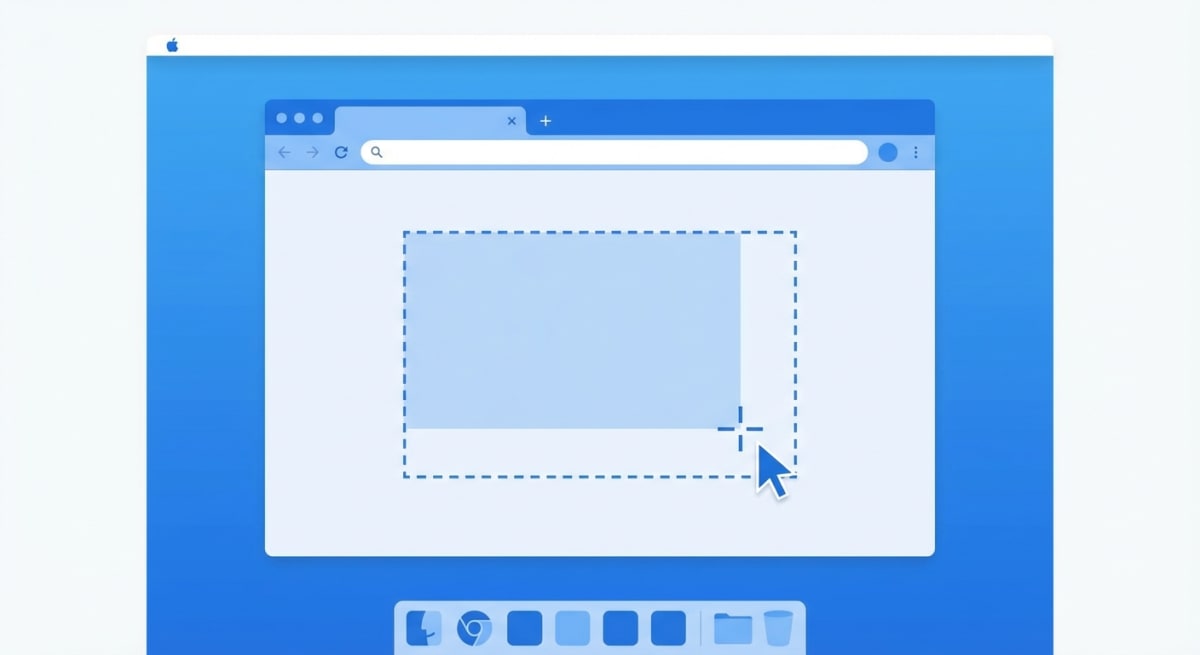
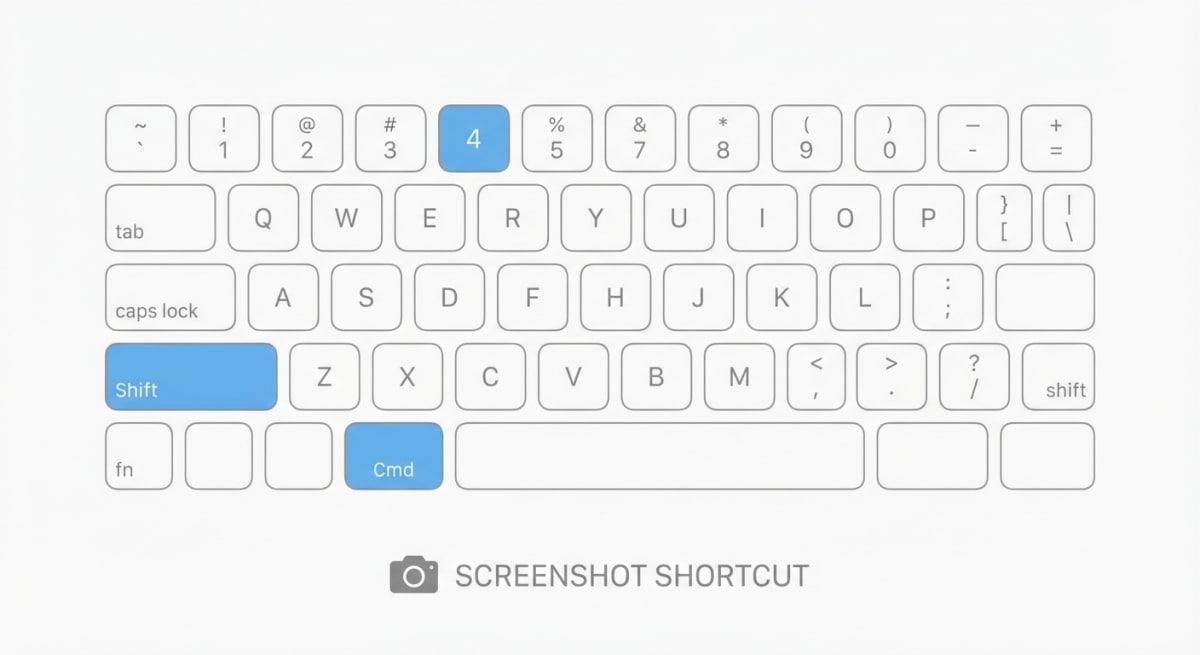
Capture a Specific Area
Press ⌘ + Shift + 4 to get crosshairs. Click and drag to select the part you want.
This is the most popular choice. You grab only what matters. No cropping needed later.
Pro tip: After pressing ⌘ + Shift + 4, hit the spacebar. This switches to window mode. Click the Zoom window to capture it with a nice shadow effect.
Use the Screenshot Toolbar
Press ⌘ + Shift + 5 to open the toolbar. This gives you the most options:
- Capture entire screen
- Capture one window
- Capture a selected area
- Record screen (video)
- Set a timer (5 or 10 seconds)
The timer is handy for Zoom. Set it, switch to your meeting, and the capture happens on its own. Great for getting that perfect slide.
You can also change where screenshots save. Click "Options" to pick Desktop, Documents, or Clipboard.
See Apple's screenshot guide for more details.
Want more options? Check our guide on Mac's built-in snipping tool.
Method 2: Zoom's Built-In Screenshot Feature
Zoom has its own screenshot tool on Mac. It's not on by default. But it's easy to turn on.
How to Enable It
- Open Zoom and click the Settings gear
- Click Keyboard Shortcuts
- Find "Screenshot" and check the box
- Note the shortcut:
⌘ + T
How to Use It
During a meeting, press ⌘ + T to capture. Zoom saves the file to:
~/Documents/Zoom/[Meeting Name]/
This is nice because screenshots get sorted by meeting. Easy to find them later.
One downside: it only captures the Zoom window. You can't grab other content on screen at the same time.
For most people, Mac's built-in shortcuts work better. But if you want auto-sorted files, this is a good choice.
Method 3: Third-Party Screenshot Apps
Take lots of meeting screenshots? A dedicated app can speed things up. Built-in tools work fine for quick grabs. But daily users get more from extra features.
ScreenSnap Pro
Need to edit your screenshots before sharing? ScreenSnap Pro lets you:
- Add arrows and highlights to key points
- Blur names for privacy
- Pin screenshots on-screen as a reference
- Share via link in one click
The pin feature is great for Zoom calls. Capture a slide, pin it to your screen, and keep talking. Your reference stays visible while the meeting moves on.
Remote workers love quick sharing too. Grab a screenshot, add a note, and send a link. No email attachments. No file size limits.
Other Options
Check our list of the best screenshot apps for Mac. We compare free and paid tools for different needs.
Method 4: Capture Screen to GIF
Sometimes a still image isn't enough. For demos or walkthroughs shown in Zoom, a GIF works better.
GIFs are perfect for:
- Software demos
- Step-by-step guides
- Funny reactions
- Short tutorial clips
Why GIFs? They're small files. They play on their own. They work in Slack, email, and most apps. No video player needed.
Unlike video, GIFs loop. This makes them great for showing a quick process over and over.
Learn how to record GIFs on Mac with our full guide.
Tired of plain screenshots? Try ScreenSnap Pro.
Beautiful backgrounds, pro annotations, GIF recording, and instant cloud sharing — all in one app. Pay $29 once, own it forever.
See what it doesMethod 5: Screenshot Other Video Call Apps
These methods work for all video apps. Not just Zoom. Here's a quick reference:
| App | Sends Alert? | Best Method |
|---|---|---|
| Zoom | No | ⌘ + Shift + 4 |
| Google Meet | No | ⌘ + Shift + 4 |
| Microsoft Teams | No | ⌘ + Shift + 4 |
| FaceTime | No | ⌘ + Shift + 4 |
| Slack Huddles | No | ⌘ + Shift + 4 |
None of these apps alert others when you screenshot. They all work the same way.
For FaceTime, we have a full guide on how to screenshot FaceTime calls.
Best Practices: When to Screenshot Meetings

Just because you can screenshot doesn't mean you always should. Here's when it's OK—and when to ask first.
When It's Usually Fine
- Public talks: Webinars, conferences, training sessions
- Shared slides: Content the presenter wants you to see
- Your own notes: Personal reference from meetings you attended
- With consent: When everyone knows and agrees
When to Ask First
- Private chats: One-on-ones, sensitive topics
- Faces and names: Especially with people outside your team
- Secret data: Finance, HR, legal matters
- Client calls: When NDAs or contracts apply
Quick Tips
- Blur names and faces before sharing outside your team
- Crop to the key part instead of grabbing everything
- Add context so others know what they're looking at
- Sort by project to find screenshots later
Want to grab text from a screenshot? Learn how to copy text from images with OCR.
After the Screenshot: Quick Editing
Most screenshots need a quick edit before sharing. Here's how to clean them up.
Crop to Focus
Remove extra stuff around the edges. Keep just the important part.
Our guide on how to crop screenshots shows five easy ways.
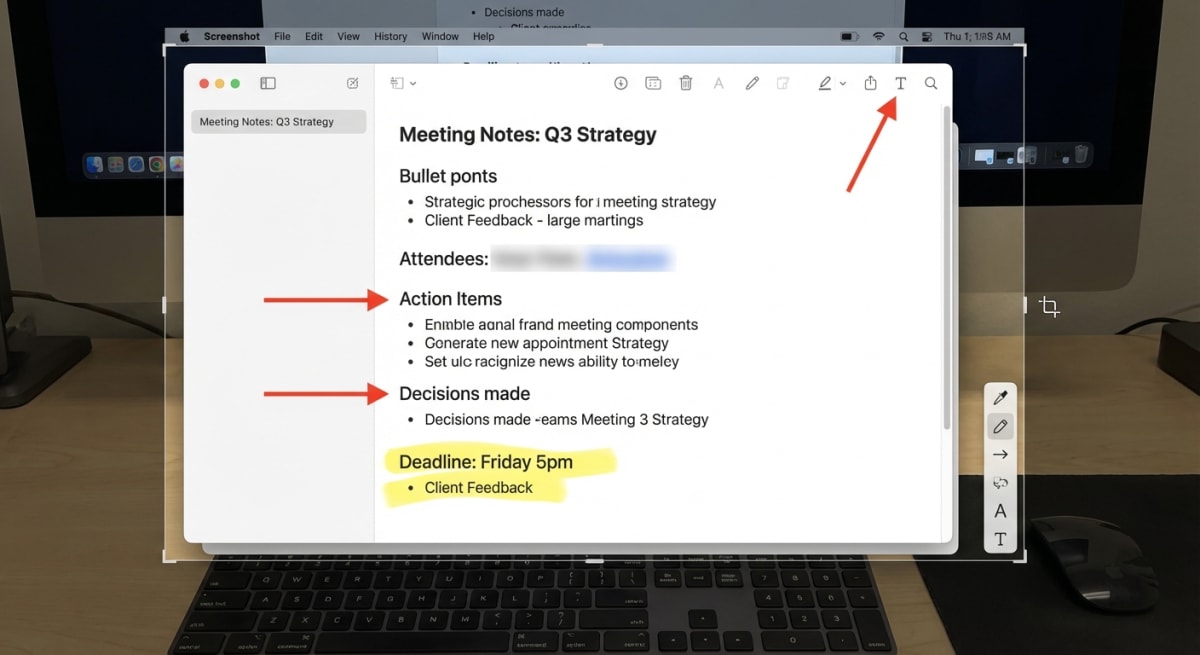
Add Markup
Draw arrows, circles, or text to highlight key areas. This helps when sharing with people who missed the meeting.
Use arrows to point out key details on a slide. Add circles around important numbers or data points. Text boxes work well when you need labels like "Q3 target" or "Action item for dev team."
A labeled screenshot communicates faster than a written summary. A quick 30-second annotation can replace an entire paragraph of explanation.
Share with Your Team
After editing, get your screenshot to the right people fast:
- Paste directly — press
⌘ + Vin Slack, Teams, or email - Drag and drop — pull the file from your Desktop into any chat window
- Share a link — tools like ScreenSnap Pro generate instant share links
If you share Zoom screenshots regularly, create a dedicated folder for each project or client. This saves time when you need to find something weeks later.
Need to convert your screenshot to a different format? Our free image format converter handles PNG, JPG, and WebP.
Blur Private Info
Before sharing outside your team, hide:
- Names and faces
- Email addresses
- Private data
- Meeting IDs and passwords
Where Do Mac Screenshots Save?
By default, screenshots save to your Desktop. The filename looks like:
Screenshot [date] at [time].png
To change where they save:
- Press
⌘ + Shift + 5 - Click Options
- Pick a new folder
Want a permanent change? See how to change your screenshot save location.
Fixing Common Problems
Screenshot Shows Black Screen
If your Zoom screenshots come out black:
- Open Zoom Settings > Video
- Turn off "Hardware Acceleration"
- Try
⌘ + Shift + 4and drag to select - Update Zoom to the latest version
This usually fixes it. The black screen happens when your GPU handles the video in a way that blocks screen capture.
Shortcuts Not Working
Mac shortcuts can stop working sometimes. Reasons include permission issues, conflicts with other apps, or macOS bugs.
Our guide on fixing screenshot issues has 10 solutions.
Screenshots Look Blurry or Low Resolution
Zoom compresses video to save bandwidth. Your screenshot captures what's on screen—not the original quality of the presentation.
To get sharper results:
- Ask the presenter to share their screen directly (not a virtual background with slides embedded)
- Switch Zoom to Speaker View for presentations or Gallery View for participant shots
- Maximize the Zoom window before capturing
- Use
⌘ + Shift + 4and drag tightly around the content you want
If you're on a Retina Mac, screenshots save at 2x resolution by default. The file looks better than what you see on screen.
For screenshots that need to look polished, use our free screenshot background generator to add a clean backdrop.
Screenshot Captures the Wrong Monitor
If you use multiple displays and ⌘ + Shift + 3 grabs the wrong screen:
- Use
⌘ + Shift + 4instead and select the area manually - Or press
⌘ + Shift + 5, then click the specific screen you want - Move the Zoom window to your primary display before capturing
The ⌘ + Shift + 5 toolbar is the most reliable option for multi-monitor setups. It shows thumbnails of each connected screen so you can pick the right one.
Frequently Asked Questions
Wrapping Up
Taking Zoom screenshots on Mac is simple. And no one gets notified.
For fast captures, use ⌘ + Shift + 4. For daily use with markup needs, try ScreenSnap Pro. It lets you annotate, blur private info, and share in seconds.
Just be thoughtful about what you capture. When in doubt, ask first. This is key for private or sensitive meetings.
Morgan
Indie DeveloperIndie developer, founder of ScreenSnap Pro. A decade of shipping consumer Mac apps and developer tools. Read full bio
@m_0_r_g_a_n_