How to Reduce GIF File Size: 7 Methods (2026)
GIF compression is the process of reducing a GIF's file size while maintaining acceptable visual quality. By optimizing frames, colors, and dimensions, you can shrink GIFs by 30-80% without noticeable quality loss—making them load faster and easier to share, especially when you've recorded them with a tool like ScreenSnap Pro.
Ever hit Discord's 256KB limit? Or watched a webpage crawl because of a huge GIF? You know the frustration.
GIFs are great for demos and reactions. But their file sizes can get out of control fast.
The good news? You can reduce GIF file size without destroying the animation. This guide covers seven proven methods. From quick one-click fixes to advanced optimization.
Why Are GIF Files So Large?
Let's understand the problem first. The GIF format was created in 1987. That's before modern video compression existed. It works everywhere, but its compression is primitive.
Here's what makes GIF files balloon in size:
- Frame count: Each frame is a separate image. A 5-second GIF at 15 FPS has 75 frames. More frames = bigger file.
- Color depth: GIFs support up to 256 colors. More colors = larger files.
- Resolution: More pixels = more data. A 1080p GIF stores 2 million pixels per frame.
- No motion compression: Unlike MP4 or WebM, GIFs treat each frame separately. They can't compress motion between frames.
- Lossless by default: GIFs preserve every pixel. Great for quality. Bad for file size.
Here's a real example. A 10-second screen recording can hit 15MB as a GIF. The same content as MP4? Just 500KB.
That's a 30x difference. Let's fix it.
Method 1: Reduce GIF File Size with Lossy Compression

Lossy compression is the fastest way to compress animated GIFs. It makes small, invisible changes that shrink file size a lot.
How it works:
The tool analyzes your GIF and makes smart tradeoffs:
- Merges similar colors
- Simplifies fine details you won't notice
- Smooths out noise patterns
- Makes LZW compression more efficient
Step-by-step:
- Upload your GIF to a compression tool
- Select a compression level (light, medium, or heavy)
- Preview the result to ensure quality is acceptable
- Download the optimized version
Expected results: 30-50% size reduction with minimal visible quality loss. Heavy compression can achieve 60-70% reduction but may show artifacts.
This method is ideal when you need quick results and don't want to manually tweak individual settings. Tools like our free GIF Compressor handle this automatically—just drag, drop, and download.
Best for: Converted videos, photo slideshows, GIFs with gradients, many colors, or photographic content.
Avoid heavy compression for: Text-heavy content, pixel art, or animations where sharp edges matter.
Method 2: Reduce Frame Count and Frame Rate

Every frame adds to file size. This is often the biggest factor in how to make GIFs smaller.
Cut your frame rate from 30 FPS to 15 FPS and you'll cut file size nearly in half.
Why does this work? Your eyes see smooth motion at 12-15 FPS. Most GIFs don't need movie-quality frame rates.
Two approaches:
- Remove every Nth frame: Drop every 2nd or 3rd frame. A 30 FPS GIF becomes 15 FPS when you remove every other frame. Tools adjust timing automatically.
- Remove duplicate frames: Screen recordings often have identical frames where nothing moves. Removing these is free compression—no quality loss.
Frame rate recommendations by content type:
| Content Type | Recommended FPS | Why |
|---|---|---|
| UI demos | 10-12 FPS | Clicks and movements are clear enough |
| Reactions/memes | 12-15 FPS | Maintains expressiveness |
| Game footage | 15-20 FPS | Higher motion needs more frames |
| Tutorials | 8-12 FPS | Viewers need time to follow steps |
Pro tip: When recording GIFs on Mac, tools like ScreenSnap Pro let you set a lower frame rate from the start—creating smaller files without post-processing.
Expected results: 20-50% size reduction, depending on original frame rate. A 30 FPS GIF reduced to 10 FPS can shrink by 60%+.
Method 3: Resize Dimensions (Smaller Resolution)
This is simple math. Smaller dimensions = smaller file size.
A 1920×1080 GIF has 2 million pixels per frame. A 960×540 version? Just 500,000 pixels. That's 4x less data.
Halve your dimensions. Quarter your file size.
When to resize:
- GIFs display at smaller sizes anyway (chat apps, social media)
- The content doesn't need fine detail
- You're hitting platform size limits and other methods aren't enough
Recommended dimensions by use case:
| Use Case | Suggested Width |
|---|---|
| Discord/Slack | 400-600px |
| Email signatures | 300-400px |
| Blog posts | 600-800px |
| Social media | 480-720px |
Most viewers won't notice the difference. But your file size will drop a lot.
How to resize a GIF:
- Upload to a GIF-compatible resizer
- Enter your target width (height scales automatically)
- Preview to ensure text is still readable
- Download the smaller version
Our Image Resizer handles GIFs while preserving animation. No frames lost.
Expected results: 50-75% size reduction when halving dimensions.
Method 4: Reduce the Color Palette

GIFs can use up to 256 colors per frame. But many animations look fine with fewer.
Drop to 128 colors. Or 64. Or even 32. The file shrinks with each reduction.
How color reduction works:
- Original: 256 colors (8-bit)
- Reduced: 128 colors (~15% smaller)
- Aggressive: 64 colors (~30% smaller)
- Extreme: 32 colors (~40% smaller)
Fewer colors = less data to store. The LZW compression inside GIFs also works better with limited color palettes.
When to reduce colors:
- Simple animations (icons, text, UI elements)
- Screen recordings with a limited color scheme
- Logos and branded content
- Diagrams and charts
When to keep more colors:
- Photos or realistic images
- Gradients that need smooth transitions
- Video footage converted to GIF
- Content where banding would be ugly
How to reduce colors:
Most GIF tools offer a color slider. Start at 128 and preview the result. If it looks fine, try 64. Keep going until you see artifacts, then step back.
Dithering helps. It adds noise patterns that make color transitions look smoother. Enable it when reducing to fewer colors.
Expected results: 15-40% size reduction, depending on how many colors you remove and how complex the original was.
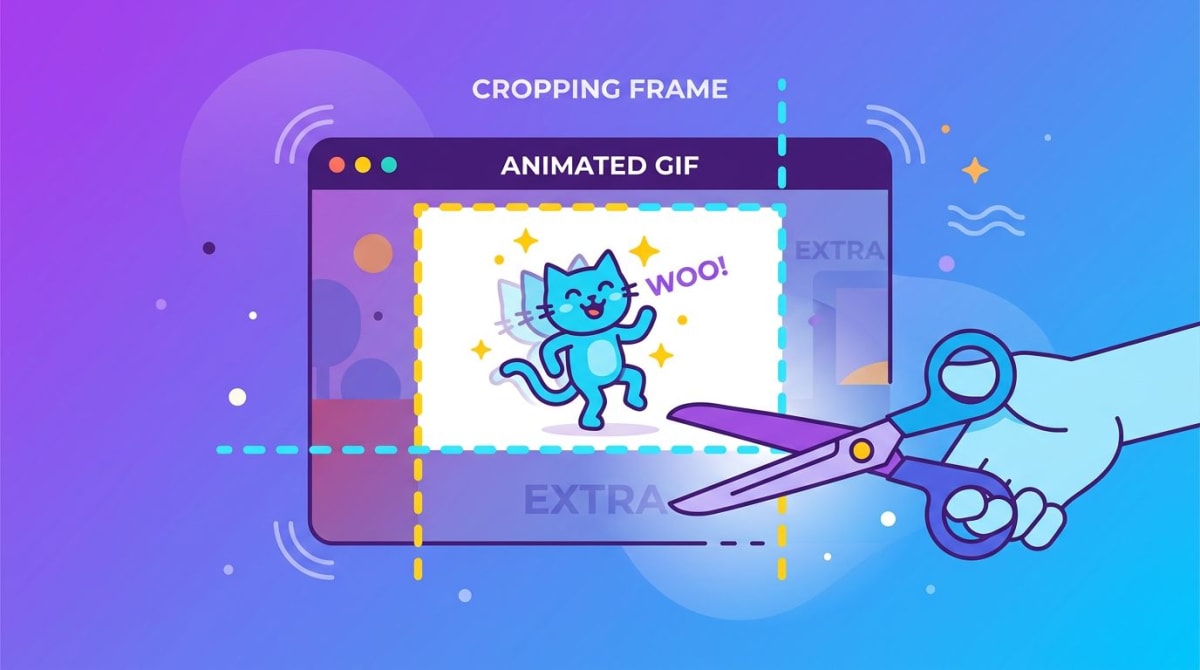
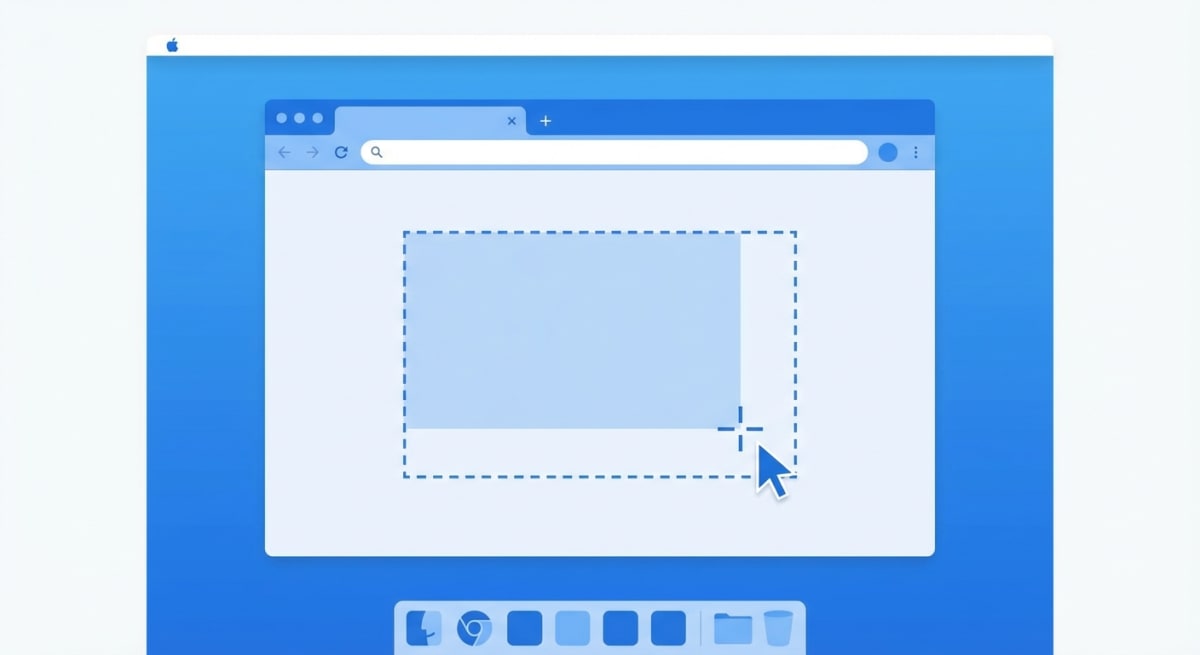
Method 5: Crop Unnecessary Areas to Reduce GIF File Size
Dead space wastes bytes. Crop out areas that don't add value.
Think about it this way: if 30% of your frame is empty desktop, you're storing that empty area 75+ times (once per frame). That's a lot of wasted data for nothing useful.
Common opportunities to crop:
- Screen recordings with the Mac dock or Windows taskbar visible
- Webcam recordings with empty wall space around your face
- Phone screen captures with status bars and navigation buttons
- App demos that only need to show part of the interface
- Tutorial GIFs where the action happens in one corner
How to identify what to crop:
- Watch for movement. Where does the action actually happen? That's what matters.
- Check the edges. Toolbars, menus, and docks often stay static. They add context but also add weight.
- Ask yourself: Does a viewer need to see the entire screen? Usually, no.
Real-world example:
Say you recorded a full 1920×1080 screen to demo a button click in Slack. The Slack window is 800×600 in the center. The rest is desktop background, menu bar, and dock.
- Original: 1920×1080 = 2,073,600 pixels per frame
- After crop: 800×600 = 480,000 pixels per frame
- That's a 77% reduction in data per frame.
The file size drops accordingly. What was 12MB might become 3MB—just by cropping.
Step-by-step cropping process:
- Open your GIF in a tool that supports GIF cropping
- Play through the animation to see where the action happens
- Draw a crop box around the essential area
- Leave a small margin so it doesn't feel cramped
- Preview the result to ensure nothing important got cut
- Export the cropped version
When NOT to crop:
- If the full context matters (showing where a setting lives in a menu)
- If viewers need to see the whole interface to follow along
- If important reactions happen in multiple areas of the screen
Caution: Don't remove helpful context. A button click makes more sense when viewers see which menu it's in.
Our Image Cropper supports GIF cropping in your browser. No software install needed.
Pro tip: Crop before applying other compression methods. You'll get better results because the compressor has less data to work with.
Expected results: 10-50% size reduction, depending on how much you remove. Full-screen to window crop can cut 60%+ off the file size.
Tired of plain screenshots? Try ScreenSnap Pro.
Beautiful backgrounds, pro annotations, GIF recording, and instant cloud sharing — all in one app. Pay $29 once, own it forever.
See what it doesMethod 6: Optimize Transparency (Delta Compression)
This is a clever trick. It only stores pixels that change between frames. Everything else becomes transparent.
Some tools call this "delta compression" or "frame differencing."
How it works in simple terms:
- The first frame stores the full image
- The tool compares frame 2 to frame 1
- Pixels that didn't change become transparent
- Only the changed pixels get stored
- Repeat for every frame
Why this shrinks file size:
GIF players stack frames on top of each other. Transparent pixels let the previous frame show through. So instead of storing a 500×500 image 75 times, you might store one full frame plus 74 small patches of changes.
A practical example:
Imagine a cursor moving across a static webpage. The cursor is maybe 20×20 pixels. The rest of the 800×600 screen stays identical.
- Without optimization: Each frame stores all 480,000 pixels
- With optimization: Each frame stores ~400 pixels (just the cursor)
That's a massive difference. The file size drops just as much.
Best for:
- Screen recordings where most of the screen stays still
- Cursor demos and mouse click tutorials
- UI walkthroughs where one element changes at a time
- Loading spinners on solid backgrounds
- Presentations where text appears over a fixed slide
- Software tutorials with mostly static interface
When this won't help much:
- Video converted to GIF (the camera moves, so everything changes)
- Photo slideshows where the whole frame swaps
- Full-screen animations or games
- GIFs with camera shake, motion blur, or panning shots
- Content where the background moves
How to apply transparency optimization:
Most GIF tools offer this as an option:
- Look for "Optimize transparency" or "Delta frames" in settings
- Enable the option before exporting
- Some tools apply this automatically—check their documentation
Gifsicle (command line) does this with the -O3 flag. Online tools like Ezgif include it in their "Optimize" feature.
Combine with other methods:
This trick works great alongside other compression. Apply it after you've cropped and resized.
The fewer total pixels per frame, the better this works.
Troubleshooting issues:
Sometimes this trick causes visual glitches:
- Ghosting: Previous frames showing through incorrectly. Try a different disposal method.
- Flickering: Frames not blending properly. Some GIFs need full frames to look right.
- Artifacts at edges: Compression got too aggressive. Reduce the optimization level.
If you see issues, try less aggressive settings. Or skip this method for that GIF.
Expected results: 20-60% size reduction for suitable content.
Screen recordings with static backgrounds? Expect 50-60% savings. Video-style GIFs? Only 5-10%.
Method 7: Convert to Modern Formats (WebP, AVIF)
Here's a secret: you might not need a GIF at all.
Modern formats like WebP and AVIF support animation. They compress much better than GIFs.
Why? They use video codec techniques. The 1987-era GIF format can't compete.
| Format | Compression | Browser Support | Best For |
|---|---|---|---|
| GIF | Poor | Universal (100%) | Maximum compatibility |
| WebP | Good (30-50% smaller) | 97%+ browsers | Web use, most platforms |
| AVIF | Excellent (50-70% smaller) | 92%+ browsers | Cutting-edge optimization |
| MP4 (looped) | Best (80-90% smaller) | Universal | Web video elements |
Why modern formats win:
GIF uses 1987 compression. WebP and AVIF use modern techniques:
- Compress motion between frames
- Support millions of colors (not just 256)
- Use smarter compression algorithms
- Allow lossy compression without ugly dithering
If you're displaying animations on the web, WebP animated images offer the same visual result at a fraction of the file size.
How to convert:
- Use an online converter or image editing software
- Export your GIF as WebP (animated)
- Test playback in your target browsers
- Implement with fallback if needed
When to stick with GIF:
- Some chat apps don't support WebP
- Email clients often can't display WebP or AVIF
- You need 100% compatibility
- The platform converts it anyway (Twitter auto-converts to video)
Pro tip: Twitter, Imgur, and others secretly convert GIFs to MP4. Upload video directly for better quality.
Check out how to convert MOV to GIF on Mac for tips on creating optimized animations from video files—or consider keeping them as video in the first place.
Best Free GIF Compression Tools Compared
Here's how the most popular GIF optimization tools stack up:
| Tool | Lossy Compression | Frame Removal | Color Reduction | Resize | Free |
|---|---|---|---|---|---|
| ScreenSnap Pro GIF Compressor | ✓ | ✓ | ✓ | ✓ | ✓ |
| Ezgif | ✓ | ✓ | ✓ | ✓ | ✓ |
| FreeConvert | ✓ | ✓ | ✓ | ✓ | ✓ (limits) |
| ShortPixel | ✓ | ✗ | ✗ | ✗ | ✓ (limits) |
| XConvert | ✓ | ✓ | ✓ | ✓ | ✓ |
For most users, our free GIF Compressor handles everything in one tool—upload, compress, download.
Troubleshooting Common GIF Compression Problems
Even with the right tools, things can go wrong. Here's how to fix the most common issues.
"My GIF looks terrible after compression"
Problem: Visible artifacts, banding, or blurry animation.
Fixes:
- Use lighter compression settings. Most tools have a quality slider—try 70-80% instead of maximum compression.
- Keep more colors. Dropping to 64 colors is aggressive. Try 128 or 192 first.
- Reduce dimensions instead. Smaller pixels are less noticeable than compression artifacts.
"I can't get under the Discord 256KB limit"
Problem: Discord's free tier is brutal. Even compressed GIFs often exceed 256KB.
Fixes:
- Resize to 400px width or less
- Drop to 10-12 FPS
- Shorten the animation (2-3 seconds max)
- Use 64 colors
- Consider WebP instead (if your target can view it)
- Link to the GIF on Imgur or Tenor instead of uploading directly
"Colors look banded or posterized"
Problem: Smooth gradients show visible color steps.
Fixes:
- GIF only supports 256 colors. Gradients suffer in this format.
- Keep more colors (192-256)
- Add dithering to smooth color transitions
- For gradients, WebP or MP4 will always look better
"Animation stutters or plays too fast"
Problem: Frame timing got broken during compression.
Fixes:
- Check frame delay settings. Most tools let you set uniform timing.
- Standard delay is 0.1s (10 FPS) or 0.067s (15 FPS)
- Some tools mess up timing when removing frames. Re-export with correct delays.
"The file is the same size after compression"
Problem: Compression didn't work or the GIF was already optimized.
Fixes:
- Try a different tool. Some compressors work better on certain types of content.
- The GIF might already be optimized. Check if it came from Giphy or a similar service.
- Resize or reduce frames instead. Compression alone has limits.
"Transparency looks wrong or shows glitches"
Problem: Previous frames show through incorrectly.
Fixes:
- Change the disposal method in your GIF editor
- Disable transparency optimization for this file
- Some content needs full frames. Video-style GIFs often don't work well with delta compression.
GIF Size Limits by Platform

Knowing your target platform's limits helps you optimize GIF files appropriately:
| Platform | Max GIF Size | Notes |
|---|---|---|
| Discord | 256 KB (free) / 50 MB (Nitro) | Most restrictive for free users |
| Slack | 25 MB | Generous but affects load times |
| Twitter/X | 15 MB | Auto-converts to video internally |
| 1-2 MB | Recommended for inbox delivery | |
| iMessage | 100 MB | Large but affects send time |
| 20 MB | Larger GIFs may buffer | |
| Imgur | 200 MB | Very generous |
Discord users: The 256KB limit is brutal. Use aggressive compression (lossy + color reduction + resize) or consider linking to hosted GIFs instead.
Create Smaller GIFs From the Start
The best compression happens before you create the GIF. When recording GIFs on Mac, ScreenSnap Pro lets you:
- Set lower frame rates (10-15 FPS vs. 30 FPS)
- Capture only the region you need (no cropping later)
- Choose output quality before recording
This prevents the need for heavy post-processing and maintains better quality than compressing a bloated GIF after the fact.
Frequently Asked Questions
- Light lossy compression
- Remove duplicate frames
- Resize to needed dimensions
- High frame rate (30 FPS vs 15 FPS)
- Large dimensions
- Too many colors
- 400px width or less
- 15 FPS or lower
- Lossy compression
- 64-128 colors
- Halve the dimensions (= quarter the file size)
- Lower frame rate
- Reduce colors
- Apply lossy compression
Morgan
Indie DeveloperIndie developer, founder of ScreenSnap Pro. A decade of shipping consumer Mac apps and developer tools. Read full bio
@m_0_r_g_a_n_