How to Crop a GIF: 6 Free Methods (2026)
Cropping a GIF means cutting away the outer edges of an animated image to focus on a specific area. Unlike resizing (which scales the whole image) or trimming (which shortens the duration), cropping removes unwanted pixels from the frame while keeping every animation frame intact. (Better still, a recorder like ScreenSnap Pro lets you select the exact region before recording so cropping later is rarely needed.)
Maybe you recorded a screen demo but captured too much desktop. Or you downloaded a reaction GIF with ugly borders. Or that Slack emoji you made has too much whitespace around the edges.
Either way, you need to crop your GIF without breaking the animation. And most image editors either flatten GIFs to a single frame or don't support the format at all.
The good news? You don't need expensive software. Here are six free methods that work on any platform — from browser-based tools to Photoshop to mobile workarounds.
Crop vs. resize vs. trim — what's the difference?
Before you start, make sure "crop" is what you need. These three terms get mixed up all the time:
| Action | What it does | Example |
|---|---|---|
| Crop | Cuts edges to focus on a region | Remove extra desktop around a button click |
| Resize | Scales the entire image up or down | Shrink a 1920x1080 GIF to 480x270 |
| Trim | Shortens the animation duration | Cut the first 2 seconds from a 5-second GIF |
Crop changes the frame dimensions by removing pixels from the sides. The animation plays the same — you only lose the parts outside the crop area. Use this when you have extra space around the edges that you want to remove.
Resize keeps everything visible but changes the resolution. A 50% resize makes the GIF smaller in both dimensions and file size. Use this when the GIF is too large for a platform's size limit but the framing is already correct.
Trim cuts frames from the start, end, or middle. The dimensions stay the same, but the GIF gets shorter in duration. Use this when the animation is too long or has unnecessary parts at the beginning or end.
You can combine all three. Crop first to remove unwanted edges, resize to hit a target width, then trim to cut dead time. Most GIF editors let you do all three in one session.
Need to shrink your file size instead? Check out our guide on how to reduce GIF file size for seven proven methods.
How to crop a GIF online (3 free tools)
Online tools are the fastest option. No downloads, no installs. Upload your GIF, drag the crop handles, and download the result. These work on any device with a browser — Windows, Mac, Linux, or even a Chromebook.
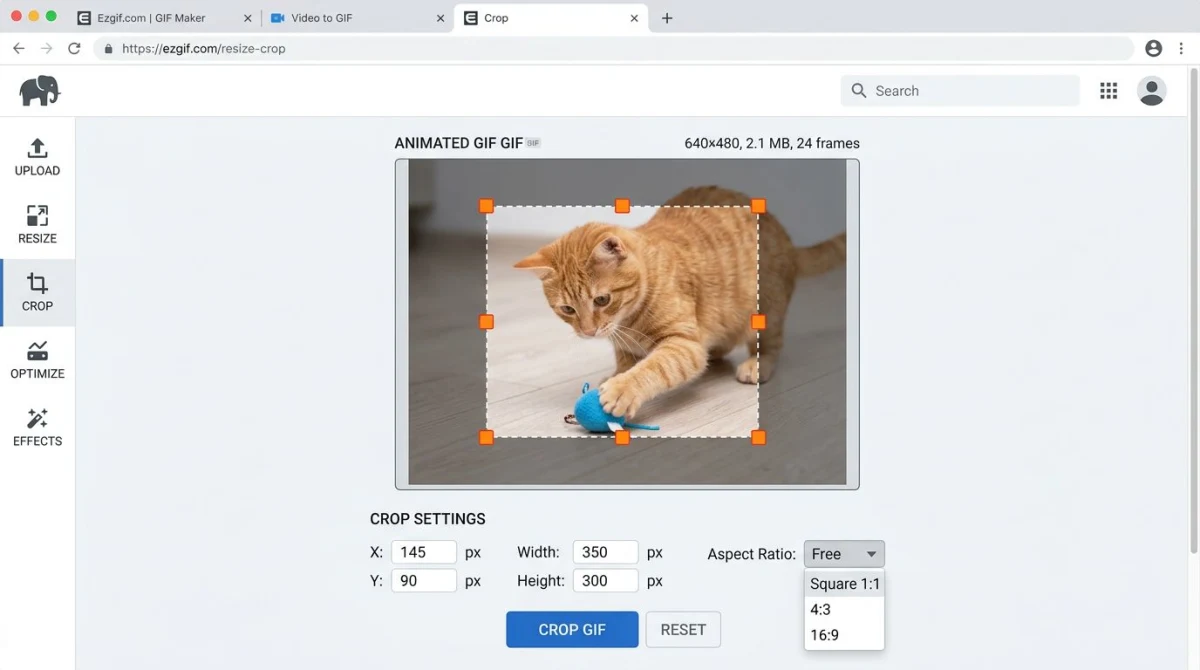
Method 1: ezgif (best free GIF cropper)
ezgif.com is the most popular GIF cropper online. It's free, handles files up to 200MB, and supports GIF, WebP, and APNG formats.
- Go to ezgif.com/crop
- Click Choose File and upload your GIF (or paste a URL)
- Wait for the preview to load
- Drag the crop handles to select the area you want to keep
- Pick a preset aspect ratio (square, 4:3, 16:9) or crop freely
- Click Crop image
- Right-click the result and save it
Pro tip: If the output looks glitchy, change the "Crop with" dropdown to a different option. The default method is fast but can break GIFs that use frame differencing. The "coalesce" method fixes most artifacts but may increase file size slightly.
ezgif also has an Autocrop feature that strips transparent borders automatically. Handy for GIFs with padding around the edges. You'll find it right below the crop tool — it detects and removes empty space in one click.
When to use ezgif: It's the best choice for quick, one-off crops. The interface is basic but functional. If you need batch processing or a polished editor, try VEED instead.
Method 2: VEED
VEED.io offers a cleaner interface with drag-and-drop upload.
- Open VEED's GIF cropper
- Drag your GIF onto the upload area
- Drag the corner handles to resize the crop area
- Use preset aspect ratios from the Settings panel if needed
- Click Export and select GIF format
- Download the cropped file
VEED works well for quick crops and has a more modern interface than ezgif. It also lets you combine multiple GIFs and convert between formats in the same editor.
Keep in mind that the free tier adds a small watermark to your output. If you need a clean, watermark-free result, ezgif is the better free option. VEED's paid plans remove the watermark and unlock HD export.
Method 3: Free browser-based Image Cropper
Our free Image Cropper tool runs in your browser. Upload a GIF, drag the crop area, and download. No signup needed and no watermarks.
- Open the Image Cropper tool
- Upload your GIF file
- Drag the crop handles to select your area
- Click Crop and download the result
Everything runs in your browser — your files never leave your device. For animated GIFs that need more control, pair the crop with our GIF Compressor to optimize the file size after cropping.
Which online tool should you use?
Here's a quick comparison:
| Tool | Max File Size | Watermark | Best For |
|---|---|---|---|
| ezgif | 200MB | No | Advanced crops with aspect ratio presets |
| VEED | 250MB (free) | Yes (free tier) | Clean interface, format conversion |
| Image Cropper | No limit | No | Quick, privacy-focused browser crops |
For most people, ezgif covers the basics well. It's free, fast, and gives you a good amount of control. Use VEED if you also need to convert formats. Use our Image Cropper if you want a simple, private option.
How to crop a GIF on Mac
Mac has built-in options, but they come with limits when it comes to animated images. Here are your best choices for cropping a GIF on Mac.
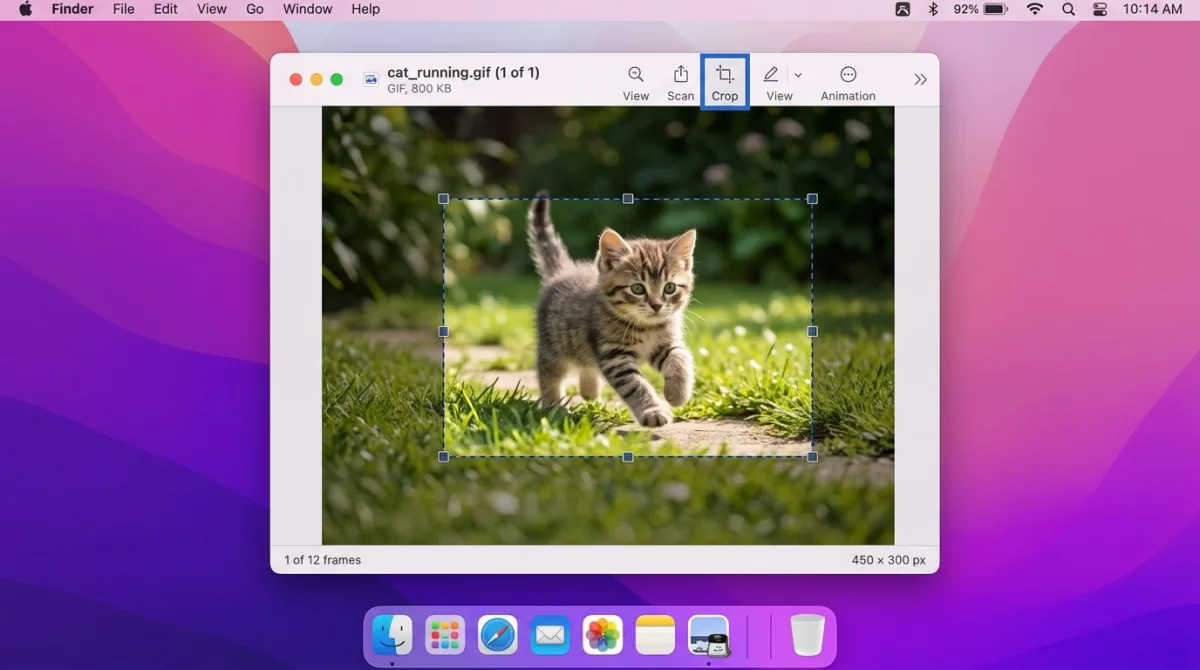
Method 4: Preview app (built-in)
Preview can open GIFs, but it only works with individual frames — not the full animation. This method works when you need to crop a single frame as a still image.
- Right-click your GIF and select Open With > Preview
- Click View > Thumbnails to see all frames in the sidebar
- Select the frame you want to crop
- Click the Markup toolbar button (pencil icon)
- Select the Rectangular Selection tool
- Drag to select the crop area
- Press
⌘ + Kto crop - Save with
⌘ + S
Limitation: Preview flattens the GIF into a single frame when you save. You lose the animation entirely. This is a known macOS limitation — Preview was designed for static images, not animated formats.
When this is useful: If you only need a single frame from a GIF (like a thumbnail or reference image), Preview does the job. For a full animated crop, use an online tool or the next method.
If you work with Mac screenshots often, our guide on how to record GIFs on Mac covers better ways to capture the exact area you need from the start. You can also check out our guide on GIF screen capture on Mac for more recording options.
Method 5: Record only the area you need
Here's a different approach. Instead of cropping after the fact, capture only the region you want.
ScreenSnap Pro lets you record your screen directly as a GIF. You select the exact area before recording starts. No cropping needed afterward.
- Open ScreenSnap Pro and select GIF Recording
- Drag to select the precise region you want to capture
- Click Record and perform your action
- Stop recording — your GIF is ready with perfect dimensions
This skips the whole crop-edit-export cycle. You get a clean GIF with no wasted pixels from the start. It runs on both Mac and Windows, costs $39 one-time (no subscription), and comes with 15 annotation tools to mark up your GIFs before sharing.
Want more options? See our roundup of the best GIF screen capture tools for a full comparison of recording apps.
How to crop a GIF in Photoshop
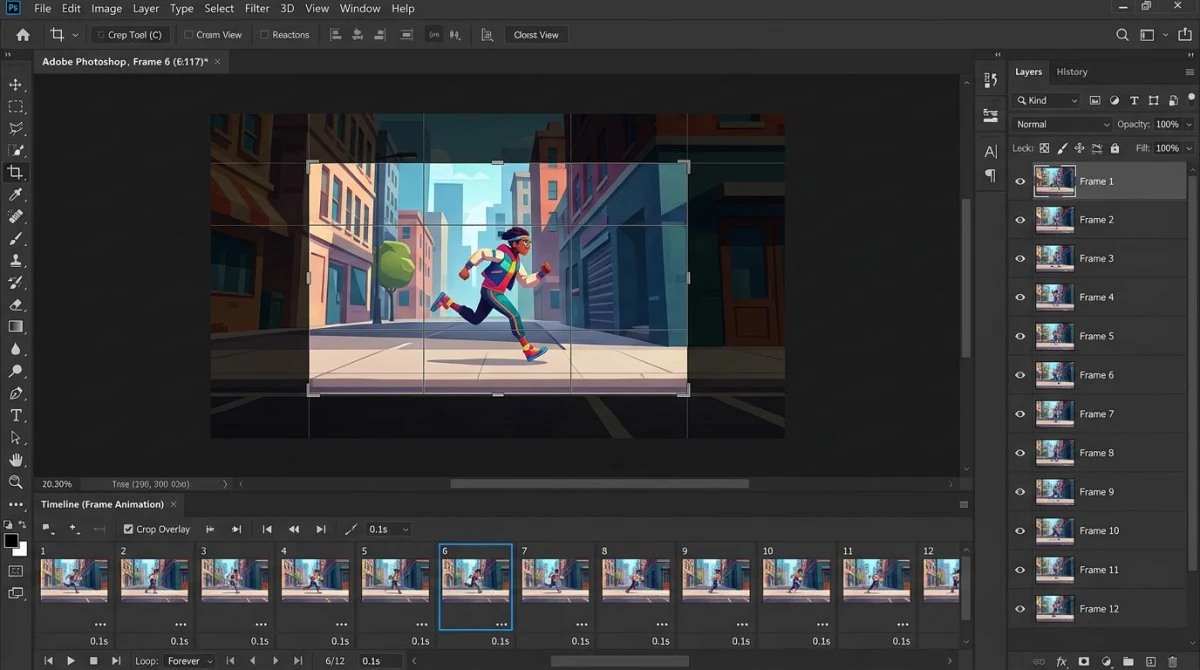
Photoshop handles animated GIFs through its Timeline panel. This gives you pixel-perfect control over the crop area and is the best choice when you need exact dimensions or want to edit individual frames while cropping.
Method 6: Photoshop frame-by-frame crop
- Open your GIF in Photoshop: File > Open
- Open the Timeline panel: Window > Timeline
- You should see all frames listed at the bottom of the screen
- Select the Crop tool from the toolbar (shortcut:
C) - Drag the crop handles to define the area you want to keep
- Press Enter to apply the crop
Photoshop crops every frame at once. The animation stays intact.
To export your cropped GIF:
- Go to File > Export > Save for Web (Legacy)
- Select GIF as the format
- Set Looping Options to Forever
- Adjust colors (128 is a good balance of quality and size)
- Click Save
Pro tip: Before cropping, check that all frames are visible in the Timeline. If frames are hidden, Photoshop won't include them in the export. Click the menu icon in the Timeline panel and select Select All Frames to be safe.
Another tip: In the Save for Web dialog, check the Metadata dropdown and set it to None. This strips unnecessary data and saves a few kilobytes.
Photoshop gives you the most control of any method listed here. But it's overkill for quick crops. If you don't already have Photoshop, use ezgif instead — it's free and gets the same result for basic crops.
If your cropped GIF is too large, you can convert it to MP4 for a much smaller file. Video formats use motion compression, which makes them 10-50x smaller than the same content as a GIF. Or check our guide on converting MOV to GIF on Mac if you're starting from video footage and want to create an optimized GIF from scratch.
Tired of plain screenshots? Try ScreenSnap Pro.
Beautiful backgrounds, pro annotations, GIF recording, and instant cloud sharing — all in one app. Pay $39 once, own it forever.
See what it doesHow to crop a GIF on iPhone
No dedicated GIF editor ships with iOS for cropping animated images. The built-in Photos app can crop still images and videos, but it doesn't handle animated GIFs. Here are two workarounds:
Option A: Use Safari with an online tool
- Open Safari and go to ezgif.com/crop
- Tap Choose File and select your GIF from Photos
- Crop using the on-screen handles
- Download the result
This works the same as the desktop version. The interface is a bit cramped on smaller screens but fully functional.
Option B: Use the Shortcuts app
Apple's Shortcuts app can crop GIFs with a custom workflow:
- Open the Shortcuts app
- Create a new shortcut with these actions:
- Get Images from Input
- Crop Image (set to custom dimensions)
- Save to Photo Album
- Run the shortcut and select your GIF
The Shortcuts method is faster once set up. But building the workflow takes a few minutes the first time. You can also find pre-built GIF shortcuts on the Apple Shortcuts gallery or community sites like RoutineHub.
Third-party apps: If you crop GIFs on iPhone often, apps like GIPHY and ImgPlay offer built-in crop tools with visual previews. Both have free tiers that handle basic cropping without watermarks.
Best GIF dimensions for every platform
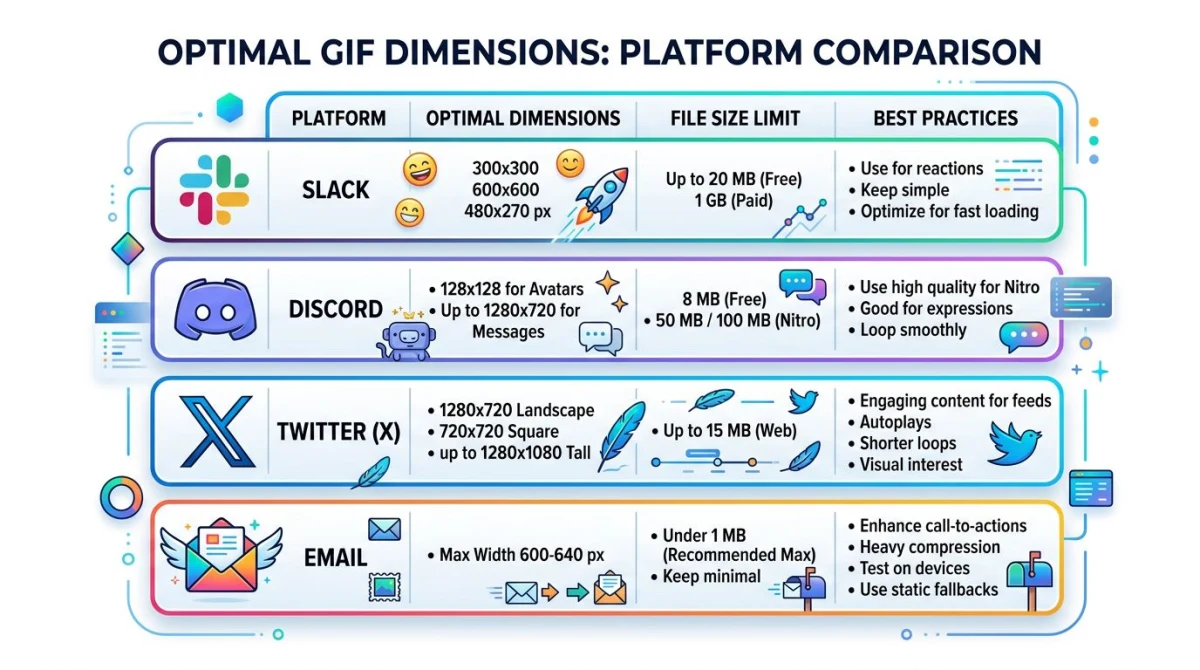
Crop your GIF to match the platform where you plan to share it. Here are the recommended sizes:
| Platform | Max Width | Max File Size | Notes |
|---|---|---|---|
| Slack | 400px | 256KB (inline) | Larger GIFs show as links |
| Discord | 400px | 256KB (free), 50MB (Nitro) | Auto-compresses above limit |
| Twitter/X | 1280px | 15MB | Keep under 5MB for fast loading |
| GitHub | 1024px | 10MB | Use in issues, PRs, and READMEs |
| 600px | Under 1MB | Many clients block large GIFs | |
| iMessage | 600px | 4MB | Compress for faster sending |
General rule: 480-600px wide is the sweet spot for most uses. It's sharp enough to read text but small enough to load fast.
Aspect ratio matters too. Most platforms display GIFs best at 16:9 or 4:3 ratios. Square GIFs (1:1) work well for social media profiles and chat avatars. Avoid odd ratios like 3:1 — they look stretched on most platforms and take up too much vertical space.
If you're creating GIFs for documentation or blog posts, stick to 600-800px wide. This ensures the GIF renders well on both desktop and mobile screens without horizontal scrolling.
After cropping to the right dimensions, you can reduce the GIF file size even further with compression and frame optimization.
Tips to keep GIF quality after cropping
Cropping itself doesn't reduce quality — you're removing pixels, not compressing them. But the export settings can make or break your result.
Keep frame rate consistent. Most GIF editors preserve timing automatically. But double-check that the delay between frames didn't change after export. Choppy playback usually means frames got dropped.
Watch the color palette. GIFs max out at 256 colors per frame. If your crop tool re-encodes the palette, you might see banding or dithering. Use the highest color count your file size allows.
Coalesce before cropping. Some GIFs use "frame differencing" — each frame only stores the pixels that changed. Cropping without coalescing first can create visual artifacts. Most online tools handle this automatically. In Photoshop, flatten each frame before cropping.
Optimize after cropping. A cropped GIF has fewer pixels per frame. That's already smaller. But you can squeeze more savings by:
- Reducing colors from 256 to 128 (often invisible for screen recordings)
- Removing every other frame (cuts size in half with minimal visual impact)
- Using lossy compression at a low setting (10-30% in ezgif works well)
- Increasing the frame delay to slow down playback slightly
Test on the target platform. Cropped GIFs can look different across apps. Slack auto-compresses GIFs above 256KB, which can add artifacts. Discord does the same for free users. Preview your GIF on the platform where it'll be shared to catch issues early.
Use the right tool for the job. For a quick crop-and-compress workflow, ezgif lets you crop and then optimize in back-to-back steps without re-uploading. In Photoshop, you can adjust everything in one session before exporting.
If your final GIF is still too large, consider converting video to GIF on Mac with better compression settings from the start. You can also convert your GIF to MP4 for platforms that support video, which will be much smaller.
Skip the crop — record the right area from the start
Cropping is a fix for capturing too much. The better approach? Capture only what you need.
Tools like ScreenSnap Pro let you draw a precise region on screen and record it straight to GIF. You get the exact dimensions every time, with no post-editing needed. It comes with 500+ gradient wallpapers and 15 annotation tools to polish your GIFs before sharing.
If you create GIFs for docs, tutorials, or bug reports, recording the right area saves time on every single capture. No more opening ezgif after every recording to trim the edges.
For more ways to create GIFs from video content, check out our guide on converting video to GIF on Mac.
Frequently Asked Questions
Morgan
Indie DeveloperIndie developer, founder of ScreenSnap Pro. A decade of shipping consumer Mac apps and developer tools. Read full bio
@m_0_r_g_a_n_