How to Convert HEIC to JPG on Mac (5 Easy Methods) 2026
HEIC is the default photo format on iPhones since iOS 11. It saves space but doesn't work everywhere. (If you also work with screen captures, a tool like ScreenSnap Pro saves straight to JPG or PNG to skip this conversion entirely.)
Ever tried uploading an iPhone photo and got rejected? That's HEIC. Here are five ways to convert HEIC to JPG on Mac.
TL;DR: Right-click your HEIC file in Finder → Quick Actions → Convert Image → JPEG. Done. Works on macOS Monterey and later. For older Macs, open in Preview → File → Export → choose JPEG.
Why your Mac uses HEIC (and why you might need JPG)
Apple chose HEIC to cut photo file size in half. Same quality, half the storage.
The catch? Compatibility is spotty:
- Web uploads — Many forms and CMS platforms reject HEIC files
- Email attachments — Some recipients can't open them on Windows or Android
- Older apps — Photo editors released before 2018 often can't read HEIC
- Print services — Most online print shops require JPG or PNG
Good news: macOS has built-in tools for this. No installs needed.
What is HEIC format?
HEIC stands for High Efficiency Image Container. It uses the HEVC (H.265) codec that Apple adopted with iOS 11.
A typical 12MP iPhone photo takes 2-3 MB as HEIC. The same shot as JPG? 5-7 MB. Big difference across thousands of photos.
HEIC also supports features JPG can't:
- 16-bit color depth for richer tones
- Transparency (alpha channel) support
- Multiple images in one file (like Live Photos)
None of that helps if your app can't read HEIC. That's where conversion comes in.
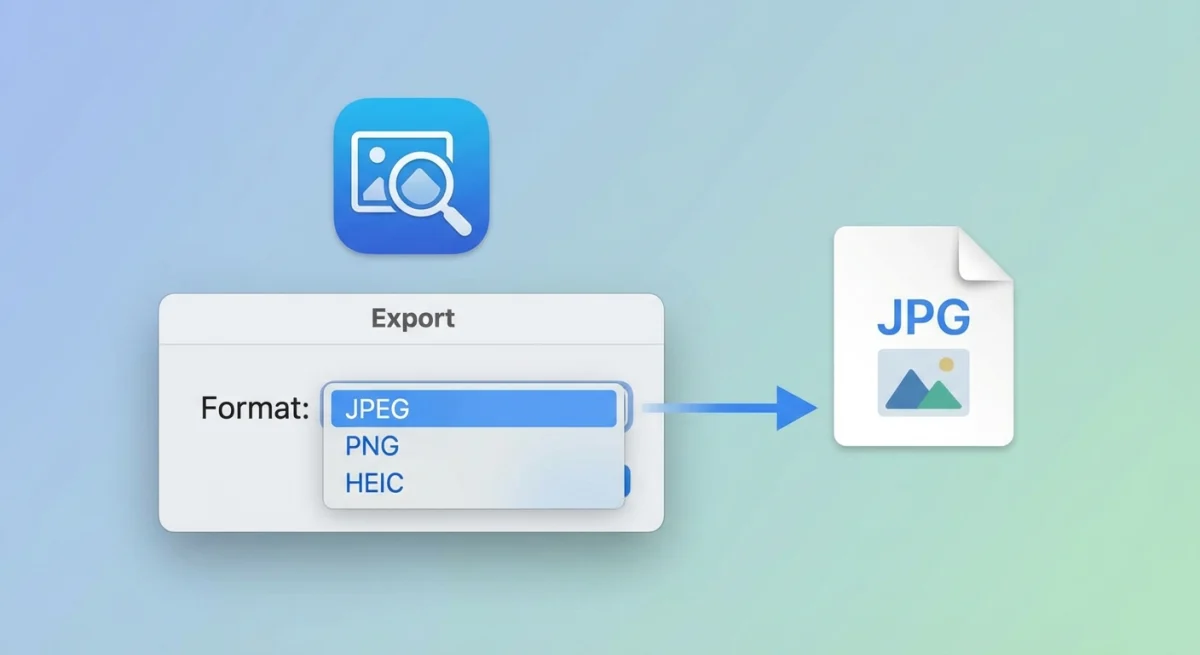
Method 1: Convert HEIC to JPG on Mac with Preview
Preview is the fastest way to convert one or two HEIC files. It's already on your Mac.
- Double-click the HEIC file to open it in Preview
- Click File → Export in the menu bar
- Click the Format dropdown and select JPEG
- Adjust the Quality slider (80-85% balances size and clarity)
- Choose your save location and click Save
Pro tip: Hold Option while clicking the Format dropdown to see additional formats like TIFF and PNG. You can also convert screenshots to PDF using this same Export workflow.
Preview keeps EXIF metadata (camera info, GPS, date) intact. Need to strip it for privacy? Uncheck More Options before saving.
Method 2: Finder Quick Actions (fastest)
If you're on macOS Monterey or later, this is the quickest method — no app needed.
- Right-click the HEIC file (or files) in Finder
- Select Quick Actions → Convert Image
- Choose JPEG from the format dropdown
- Pick your preferred image size (Small, Medium, Large, or Actual Size)
- Click Convert to JPEG
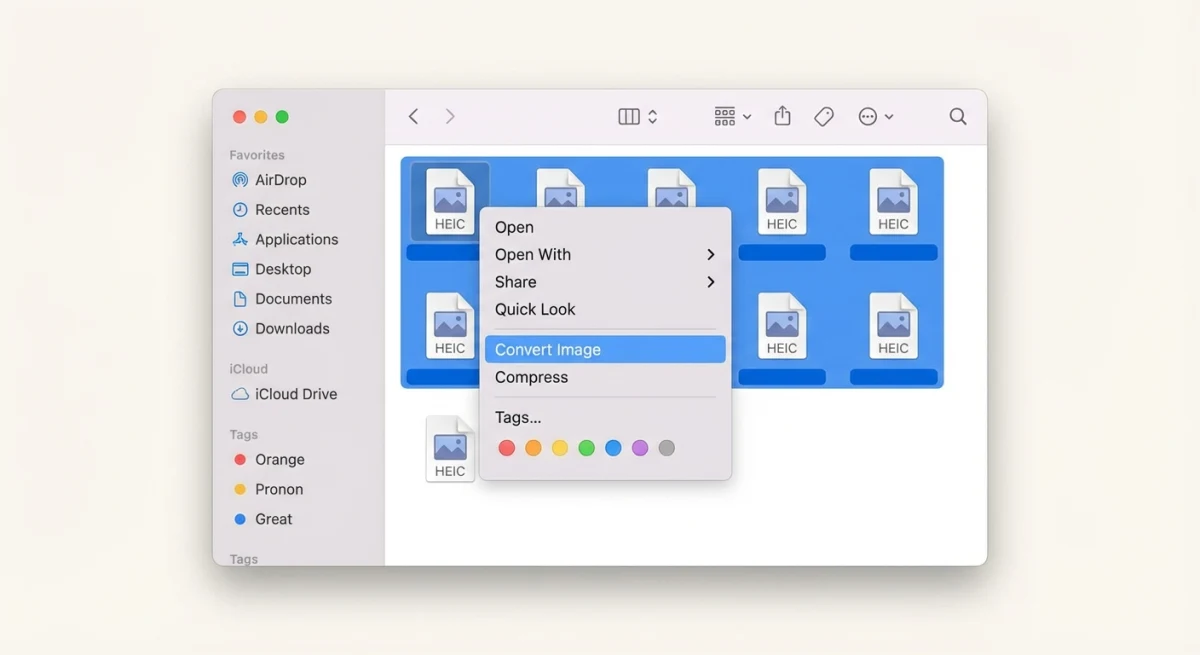
This works with multiple files. Select a batch, right-click, and convert them all at once. JPGs appear next to the originals.
Don't see Convert Image? Open System Settings → Privacy & Security → Extensions → Finder and make sure it's enabled.
Method 3: Terminal with sips (power users)
The sips (Scriptable Image Processing System) command is built into macOS and handles HEIC to JPG conversion in one line.
Convert a single file:
sips -s format jpeg photo.HEIC --out photo.jpgConvert and set quality (0-100):
sips -s format jpeg -s formatOptions 85 photo.HEIC --out photo.jpg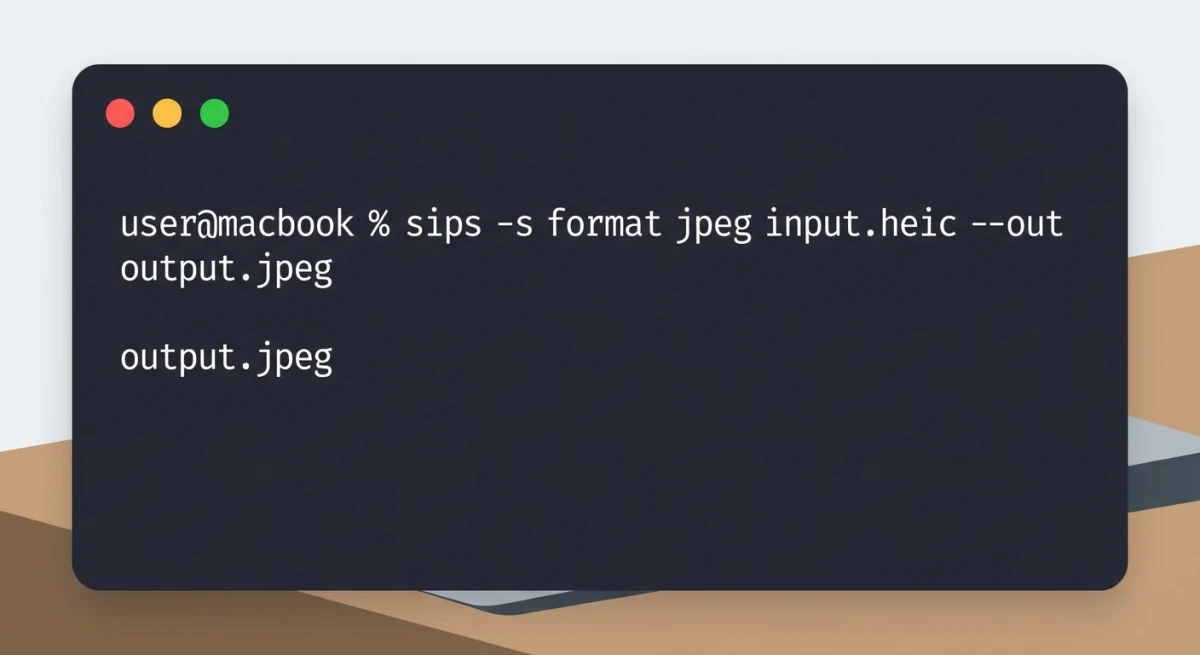
Convert all HEIC files in a folder:
for file in *.HEIC; do
  sips -s format jpeg "$file" --out "${file%.HEIC}.jpg"
done
This converts every .HEIC file in the folder to .jpg. Fastest method for large batches.
The sips command also handles conversion to PNG if you need lossless output:
sips -s format png photo.HEIC --out photo.pngFor more Terminal-based image workflows, check out our free HEIC to JPG converter that handles everything in your browser.
Method 4: Batch convert multiple HEIC files
Got dozens or hundreds of photos to convert? These approaches handle volume without slowing down.
Using Preview (batch)
- Select all HEIC files in Finder (
⌘ + Aor click-drag) - Right-click → Open With → Preview
- In Preview's sidebar, press
⌘ + Ato select all thumbnails - Click File → Export Selected Images
- Click Options, set Format to JPEG, adjust quality
- Choose the output folder and click Choose
Preview converts all selected images at once. Works well for up to ~200 files. Beyond that, use Terminal instead.
Using Automator (reusable workflow)
Want a permanent one-click solution? Create an Automator Quick Action:
- Open Automator from Spotlight or Applications
- Choose Quick Action as the document type
- Set "Workflow receives current" to image files in Finder
- Search for Change Type of Images in the action library
- Drag it into the workflow area and set format to JPEG
- Optionally add Scale Images after it to resize during conversion
- Save the workflow with a clear name (e.g., "Convert to JPG")
Now right-click any HEIC file(s) in Finder → Quick Actions → Convert to JPG. Unlike Method 2, you can chain steps — convert, resize, and copy in one click.
Tip: Automator workflows live in ~/Library/Services/. Edit or delete them anytime.
Using Shortcuts (macOS Ventura and later)
Apple's Shortcuts app replaced Automator for new workflows on macOS Ventura 13 and later. Here's how to build a HEIC-to-JPG shortcut:
- Open Shortcuts from Spotlight
- Click the + button to create a new shortcut
- Add the Convert Image action and set it to JPEG
- Add Save File and pick your output folder
- Name it "HEIC to JPG" and save
Run it from Finder's Quick Actions, the menu bar, or a keyboard shortcut. It syncs across Apple devices too.
Why Shortcuts over Automator? Shortcuts is faster and actively developed. Automator still works but hasn't been updated in years. On Ventura or later, go with Shortcuts.
Tired of plain screenshots? Try ScreenSnap Pro.
Beautiful backgrounds, pro annotations, GIF recording, and instant cloud sharing — all in one app. Pay $39 once, own it forever.
See what it doesMethod 5: Online converters (when offline isn't an option)
On a managed Mac without Terminal access? Browser tools work great:
- ScreenSnap Pro HEIC to JPG — Free, runs entirely in your browser (no upload to servers)
- heictojpg.com — Simple drag-and-drop, converts up to 50 files at once
- iLoveIMG — Batch conversion with additional editing options
Client-side tools like ScreenSnap Pro's converter keep your photos on your computer. Server-based converters upload your files — a privacy concern for personal photos.
Video walkthrough
Watch a quick demo of the conversion methods covered above:
HEIC vs JPG: which format to use when?
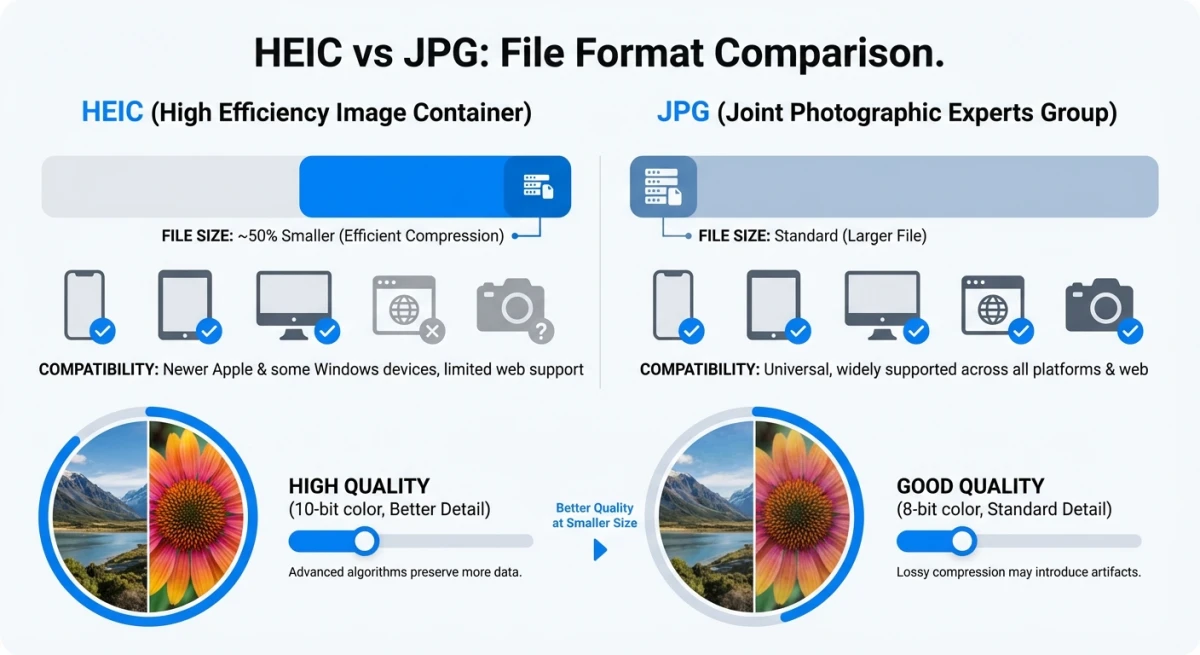
| Feature | HEIC | JPG |
|---|---|---|
| File size | ~50% smaller | Larger |
| Quality | Excellent (supports 16-bit) | Good (8-bit) |
| Transparency | ✅ Supported | ❌ Not supported |
| Compatibility | Apple ecosystem + modern apps | Universal |
| Editing support | Limited in older tools | Everywhere |
| Web uploads | Often rejected | Always accepted |
Keep HEIC when: Storing photos on your iPhone or Mac. Apple handles it natively, so no reason to convert local files.
Convert to JPG when: Sharing via email, uploading to websites, printing, or sending to Windows/Android users.
If you work with multiple image formats regularly, our image format converter handles HEIC, PNG, WebP, AVIF, and more — all in your browser.
Prevent HEIC on iPhone (change camera settings)
If you'd rather not deal with conversion at all, you can set your iPhone to shoot JPG natively:
- Open Settings → Camera → Formats
- Select Most Compatible (instead of High Efficiency)
This switches your camera to JPG/H.264. The tradeoff: photos take roughly twice the storage.
Note: Third-party camera apps (Halide, ProCamera) have their own format settings. Check each app if you're still getting HEIC files.
A middle ground: keep High Efficiency but turn on Automatic transfer in Settings → Photos → Transfer to Mac or PC. iOS will convert HEIC to JPG automatically when transferring to non-Apple devices.
Troubleshooting common HEIC conversion issues
"The file couldn't be exported" in Preview: Usually a corrupted HEIC file. Open it in Photos app first, then export from there. Photos handles damaged files better.
Converted JPGs look washed out: Newer iPhones use Display P3 color. JPG uses sRGB. Colors sometimes shift during conversion. Fix: convert to PNG first (lossless), then PNG to JPG for more control over color profiles.
"Convert Image" missing from Quick Actions: Requires macOS Monterey 12.0+. On older versions, use Preview or Terminal. Check System Settings → Extensions → Finder too.
"Command not found" for sips: Try the full path: /usr/bin/sips. Still nothing? Run xcode-select --install to restore command-line tools.
Batch conversion freezes midway: Preview runs out of memory with large batches. For 500+ photos, use the Terminal loop from Method 3. It processes one file at a time.
Tips for managing HEIC photos on Mac
- Spotlight search works with HEIC files — type the filename or use
kind:imageto find them - Photos app handles HEIC natively and exports as JPG when you drag images to Finder
- Quick Look (press Space in Finder) previews HEIC files instantly
- Preview's Export workflow works the same for any format — HEIC, PNG, TIFF, or WebP
- ScreenSnap Pro handles HEIC natively — capture, annotate, and export as JPG in one workflow
- Keep originals after converting. Storage is cheap; re-converting from JPG back to HEIC isn't possible
Frequently Asked Questions
Morgan
Indie DeveloperIndie developer, founder of ScreenSnap Pro. A decade of shipping consumer Mac apps and developer tools. Read full bio
@m_0_r_g_a_n_