How to Convert an Image to a Link (5 Methods) | 2026
Converting an image to a link means uploading the image to a web server and getting a shareable URL that anyone can open in their browser. Whether you need to embed images in forums, share screenshots in Slack, or include visuals in emails without bulky attachments, an image URL is the fastest way to do it — and apps like ScreenSnap Pro hand you that link the moment you capture.
Mac users deal with this constantly. You take a screenshot, grab a design mockup, or export a chart — and now you need to share it as a link instead of a file. The good news is there are several ways to create an image URL, from one-click tools to free online converters.
Here are five methods ranked by speed and convenience, so you can pick the one that fits your workflow.
Method 1: Use a screenshot tool with built-in cloud sharing
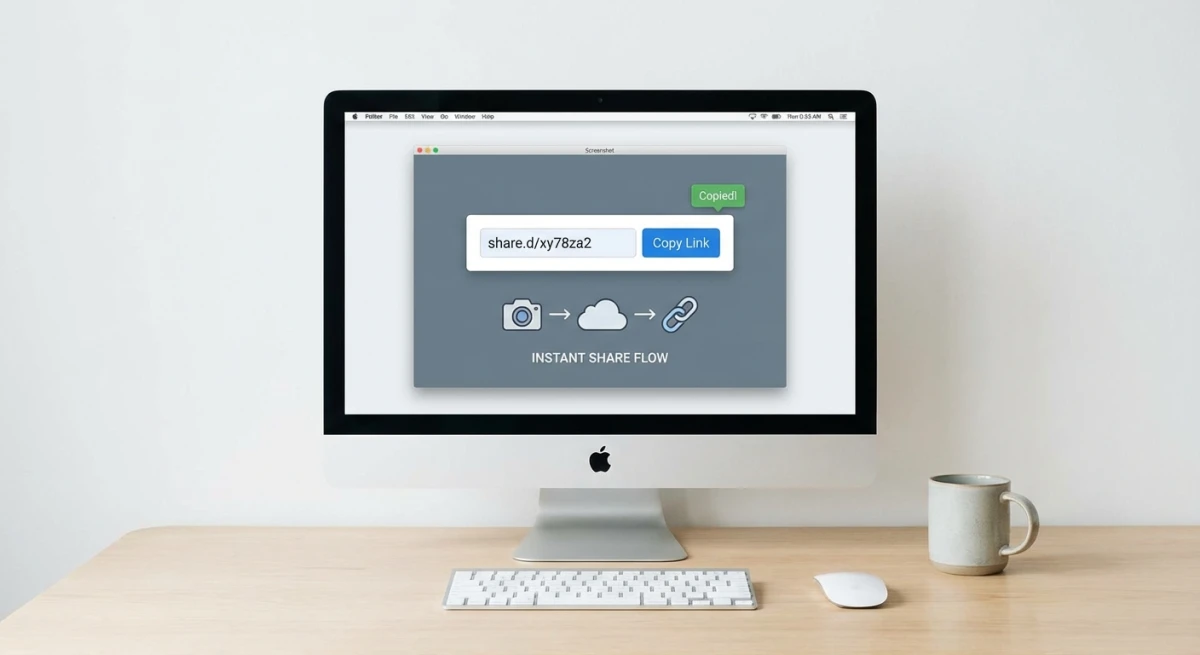
The fastest way to turn an image into a link is to skip the upload step entirely. Screenshot tools with built-in cloud sharing generate a shareable URL the moment you capture or drop an image.
ScreenSnap Pro, for example, uploads your screenshot to the cloud automatically and copies the link to your clipboard. The entire process — capture, upload, get link — takes about two seconds.
How it works:
- Take a screenshot with your keyboard shortcut (or drag an existing image into the app)
- The image uploads to a CDN automatically
- A shareable link copies to your clipboard
- Paste the link anywhere
This approach eliminates the manual upload-and-copy dance that other methods require. If you share screenshots regularly — for bug reports, design feedback, or documentation — a dedicated tool pays for itself in saved time.
Best for: People who share images multiple times a day and want the fastest possible workflow.
Method 2: Free online image-to-URL converters
If you only need an image link occasionally, free online converters work well. These tools let you upload an image and get a permanent URL without installing anything.
Popular options:
- ImageKit — Upload any image, get an optimized CDN link instantly. No registration required for basic use.
- Image2URL — Drag-and-drop interface with permanent links. Supports JPG, PNG, and GIF up to 2MB.
- Imgur — The classic image host. Great for sharing on Reddit, forums, and social media.
- Postimages — No sign-up needed, offers direct links and thumbnails.
How to use ImageKit (example):
- Go to imagekit.io/tools/image-to-url
- Drop your image or click to browse
- Wait for the upload to complete
- Copy the generated URL
These tools are free and reliable for occasional use. The tradeoff is the extra steps — you need to open a browser, navigate to the site, upload the file, and copy the link. That adds up if you're doing it repeatedly.
Best for: Occasional image sharing when you don't want to install anything.
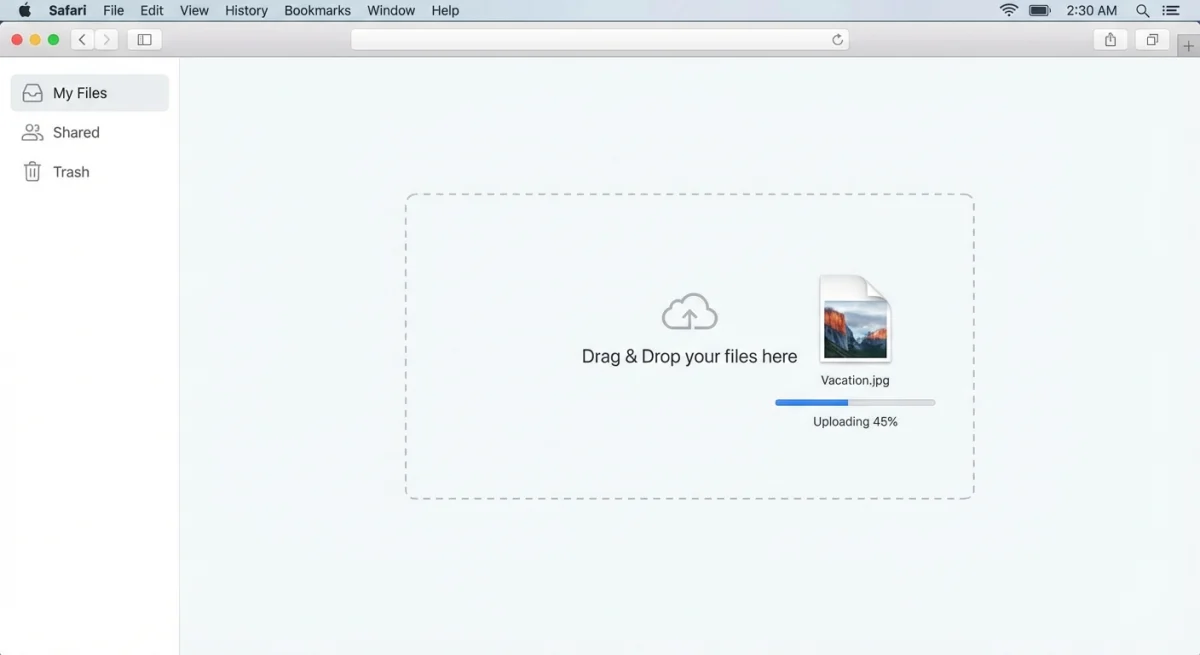
Method 3: Cloud storage sharing links (iCloud, Dropbox, Google Drive)
You probably already have cloud storage. Most services let you generate a public link for any file, including images.
iCloud Drive:
- Open Finder and navigate to your iCloud Drive
- Right-click the image → Share → Share File (Apple's sharing guide)
- Set permissions to "Anyone with the link"
- Copy the link
Dropbox:
- Upload your image to Dropbox (or save it there)
- Right-click → Copy Dropbox link
- The link copies to your clipboard automatically
Google Drive:
- Upload the image to Google Drive
- Right-click → Share → Get link
- Change access to "Anyone with the link"
- Copy the link
There's a catch with cloud storage links. They're not direct image URLs — they open a preview page instead of showing the raw image. That means they won't embed in forums, Markdown, or HTML. For those use cases, grab a direct image URL using methods 1, 2, or 4.
One workaround for Google Drive: change the sharing link from https://drive.google.com/file/d/FILE_ID/view to https://drive.google.com/uc?id=FILE_ID. This creates a more direct download link. It still isn't a true image URL for embedding, but it works better than the default.
For Dropbox, swap www.dropbox.com with dl.dropboxusercontent.com and remove ?dl=0. This turns it into a direct download link that works in some embedding contexts.
Best for: Sharing with specific people via chat or email where a preview page is acceptable.
Method 4: GitHub and CDN hosting for developers
If you're a developer, you already have tools for image hosting built into your workflow. GitHub repositories, CDNs, and static hosting services all generate direct image URLs.
GitHub (quick method):
- Open any GitHub issue or pull request
- Drag your image into the comment box
- GitHub uploads it and inserts a Markdown image link
- Copy the URL from the generated Markdown
This gives you a permanent, direct image URL hosted on GitHub's CDN. It works even if you don't submit the comment — the upload happens on drag.
GitHub repository method:
- Add the image to your repo (e.g., in a
/docs/images/folder) - Push to GitHub
- Navigate to the file on GitHub
- Click Raw to get the direct URL
Other developer-friendly options:
- Cloudinary — Free tier with 25GB storage, automatic optimization, and transformation URLs
- Netlify/Vercel — Deploy a folder of images as a static site
- AWS S3 — Upload via CLI with
aws s3 cp image.png s3://bucket/ --acl public-read
If you work with code and already have a screenshot workflow on Mac, hosting images on a CDN gives you the most control over URLs, formats, and caching.
For teams that need to share technical documentation screenshots, a CDN-hosted approach ensures consistent loading speeds across regions. The images serve from edge servers closest to your viewers, which makes a noticeable difference for international teams.
Best for: Developers who want direct URLs with full control over hosting.
Tired of plain screenshots? Try ScreenSnap Pro.
Beautiful backgrounds, pro annotations, GIF recording, and instant cloud sharing — all in one app. Pay $39 once, own it forever.
See what it doesMethod 5: Browser extensions for quick uploads
Browser extensions add image-to-link functionality directly to your right-click menu. No switching apps, no opening new tabs.
Popular extensions:
- ShareX (Windows) — Not available on Mac, but worth mentioning for cross-platform teams
- Gyazo — Screenshot and upload in one click, available for Mac
- Lightshot — Capture a region and upload instantly
How browser extensions typically work:
- Install the extension from the Chrome Web Store or Firefox Add-ons
- Right-click any image on the web → Upload to [service]
- Or use the extension's screenshot feature to capture and upload
- The link copies to your clipboard
The downside? Most extensions focus on web images or screenshots. They don't handle desktop files as smoothly. For local images, you'll still need to drag them into the extension's upload area.
If you're already using a dedicated screenshot app, check whether it includes cloud sharing — that'll be faster than any browser extension for desktop captures.
Best for: Sharing images you find online or quick browser screenshots.
Comparison: Which method should you use?
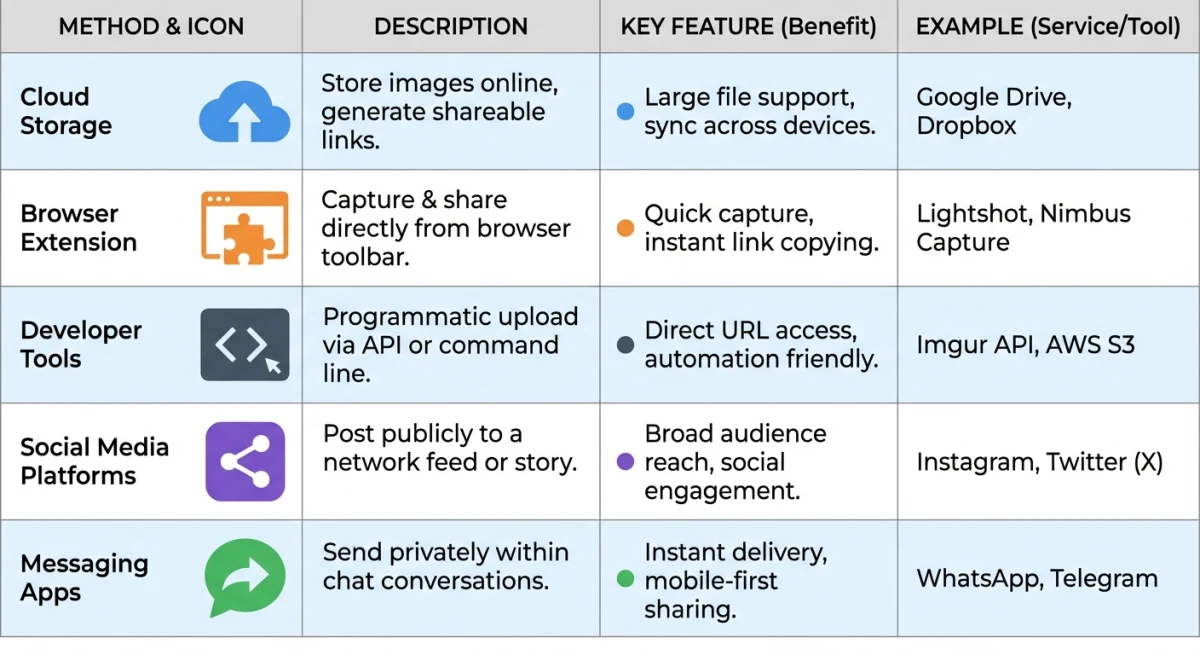
| Method | Speed | Direct URL | Free | Best for |
|---|---|---|---|---|
| Screenshot tool (ScreenSnap Pro) | ⚡ Instant | ✅ Yes | Trial available | Daily sharing |
| Online converters | 🔄 30 seconds | ✅ Yes | ✅ Yes | Occasional use |
| Cloud storage | 🔄 30 seconds | ❌ Preview page | ✅ Yes | Private sharing |
| GitHub/CDN | ⚙️ Varies | ✅ Yes | ✅ Yes | Developers |
| Browser extensions | ⚡ Fast | ✅ Yes | ✅ Yes | Web images |
The quick answer: If you share images often, use a screenshot tool with built-in cloud sharing. If it's a one-off, an online converter works fine. Developers should use GitHub or a CDN for the most control.
Best Practices for Image to Link Sharing
Before you share that URL, keep these tips in mind:
Optimize file size first. Large images load slowly and eat bandwidth. Resize or compress your images before uploading, especially for web use.
Choose the right format. PNG for screenshots with text, JPG for photos, WebP for web optimization. If you need to convert between formats, do it before uploading.
Check privacy settings. Public image links are accessible to anyone with the URL. Don't upload sensitive information — or blur sensitive details before sharing.
Use descriptive filenames. quarterly-report-chart.png is more useful than IMG_4392.png, both for SEO and for anyone who downloads your image.
Test the link. Open it in an incognito window to make sure it works without your login. Cloud storage links sometimes require authentication even when set to "public."
Common use cases for image URLs
Embedding in forums and Markdown: Most forums and Markdown editors use the standard Markdown image syntax with an exclamation mark, square brackets for alt text, and parentheses for the URL. You need a direct image URL for this. Cloud storage preview links won't work.
Email signatures: Instead of attaching a logo, host it as a URL and reference it in your HTML signature. The image loads from the server rather than bloating every email.
Bug reports and documentation: Sharing annotated screenshots via link keeps your bug tracker clean. No attachments, no file size limits.
Social media and blogs: Hosted image URLs load faster than uploaded images on some platforms. They're also easier to update — change the source image and every reference updates automatically.
Slack and Discord: Paste an image URL directly into chat. Both platforms preview the image inline without requiring a file upload. This is especially useful for remote teams where file uploads can be slow on spotty connections.
Client presentations: Instead of attaching large image files to proposals, host them as URLs. This keeps your documents lightweight and ensures clients always see the latest version. Combined with screenshot backgrounds and proper cropping, your visuals will look polished and professional.
Frequently Asked Questions
Morgan
Indie DeveloperIndie developer, founder of ScreenSnap Pro. A decade of shipping consumer Mac apps and developer tools. Read full bio
@m_0_r_g_a_n_