How to Convert SVG to PNG Free (6 Methods) | 2026
Converting SVG to PNG turns a scalable vector image into a fixed-size raster file that works everywhere — social media uploads, email signatures, documents, and apps that don't support SVG. The conversion takes seconds with the right method. You can preserve transparency, control the output size, and even batch convert hundreds of files at once. If you're producing graphics alongside screenshots from a tool like ScreenSnap Pro, keeping everything in PNG keeps your docs visually consistent.
Most search results point you to a single online converter and call it a day. This guide covers six different methods so you can pick the one that fits your workflow — whether you prefer a browser tool, a desktop app, or a one-line terminal command.
Why convert SVG to PNG?
SVG files are fantastic for logos, icons, and illustrations because they scale to any size without losing quality. But not every platform plays nicely with them.
Here are the most common reasons you'd need to convert SVG to PNG:
- Social media uploads. Instagram, LinkedIn, and most platforms reject SVG files entirely. PNG is universally accepted.
- Email and messaging. SVG files often render as code or attachments in email clients. PNG displays inline every time.
- Legacy software. Older apps, CMS platforms, and presentation tools may not render SVGs correctly.
- Print and documents. When you need a fixed-size image for a report, PDF, or slide deck, PNG gives predictable results.
- Transparency support. PNG preserves transparent backgrounds, making it ideal for logos and overlays — something JPEG can't do.
If your SVG looks perfect in a browser but breaks when you try to use it elsewhere, converting to PNG is the quickest fix.
Method 1: Use an online SVG to PNG converter
The fastest way to convert SVG to PNG is with a free online tool. No installation, no sign-up — you upload a file and download the result.
Best free online converters
CloudConvert handles SVG to PNG with options for custom size, DPI, and transparency. It processes files server-side and deletes them within 24 hours.
Ezgif SVG to PNG is lightweight and fast. Upload your SVG, set the output dimensions (up to 10,000 x 10,000 pixels), and download. No watermarks, no limits on the free tier.
SVGtoPNG.com focuses exclusively on this conversion. The interface is minimal — drag, drop, convert. It supports batch uploads if you have multiple files.
How to convert using an online tool
- Open your preferred converter in a browser.
- Drag your SVG file onto the upload area (or click to browse).
- Set the output size if the tool offers it — 2x or 3x the original size works well for high-DPI screens.
- Click Convert or Download.
- Save the PNG to your computer.
Pro tip: If you need a high-quality SVG to PNG conversion, our free SVG to PNG tool lets you set exact dimensions and preserves transparency automatically. If the artwork sits on a solid background and you'd rather have a smaller file, convert the SVG to JPG instead. JPG drops transparency but compresses photographic detail far better.
When to use this method
Online converters work best for quick, one-off conversions. If you're converting files regularly or need to automate the process, the command-line methods below are faster.
Method 2: Convert SVG to PNG with Mac Preview
Mac users have a built-in option that most people overlook. Preview can open SVG files and export them as PNG — no third-party tools needed.
Step-by-step instructions
- Right-click your SVG file in Finder.
- Select Open With > Preview.
- Go to File > Export in the menu bar.
- Change the Format dropdown to PNG.
- Adjust the size if needed — a higher DPI gives you a sharper image.
- Click Save.
This method preserves transparency by default. The output size depends on the SVG's viewBox dimensions, so if you need a larger PNG, consider using Inkscape or a dedicated converter.
Limitations
Preview's SVG rendering can sometimes differ from how browsers display the file. Complex SVGs with embedded fonts, CSS animations, or advanced filters may not convert perfectly. For those cases, the browser method (Method 6) gives more accurate results.
Method 3: Screenshot your SVG for pixel-perfect output
Here's a trick that designers use all the time: instead of converting the file, take a screenshot of the SVG rendered at the exact size you need. This gives you pixel-perfect control because your browser renders the SVG exactly as it should look.
How it works
- Open the SVG file in any browser (Chrome, Safari, Firefox).
- Zoom to the exact size you want for the final PNG.
- Take a screenshot of the rendered SVG.
On Mac, press ⌘ + Shift + 4 to select a region, or use a screenshot tool like ScreenSnap Pro to capture the exact area and instantly add a background or annotate the result.
This approach works especially well when you need to capture an SVG at a specific viewport size or when the SVG uses browser-specific CSS that other converters might miss.
When this method shines
- You need the SVG rendered with specific browser styling
- You want to capture only part of a complex SVG illustration
- You need to add annotations or overlays before saving
- The SVG uses CSS gradients, filters, or animations that converters strip out
Method 4: Convert SVG to PNG with command-line tools
If you work with SVGs regularly — or need to batch convert SVG to PNG files — command-line tools are the most powerful option. Two tools dominate here: Inkscape and ImageMagick.
Using Inkscape CLI
Inkscape is a free, open-source vector editor, and its command-line mode converts SVGs without opening the GUI.
# Basic conversion
inkscape input.svg --export-type=png --export-filename=output.png

# Set specific dimensions (width 1200px, height auto)
inkscape input.svg --export-type=png --export-width=1200 --export-filename=output.png

# Set DPI for high-resolution output
inkscape input.svg --export-type=png --export-dpi=300 --export-filename=output.png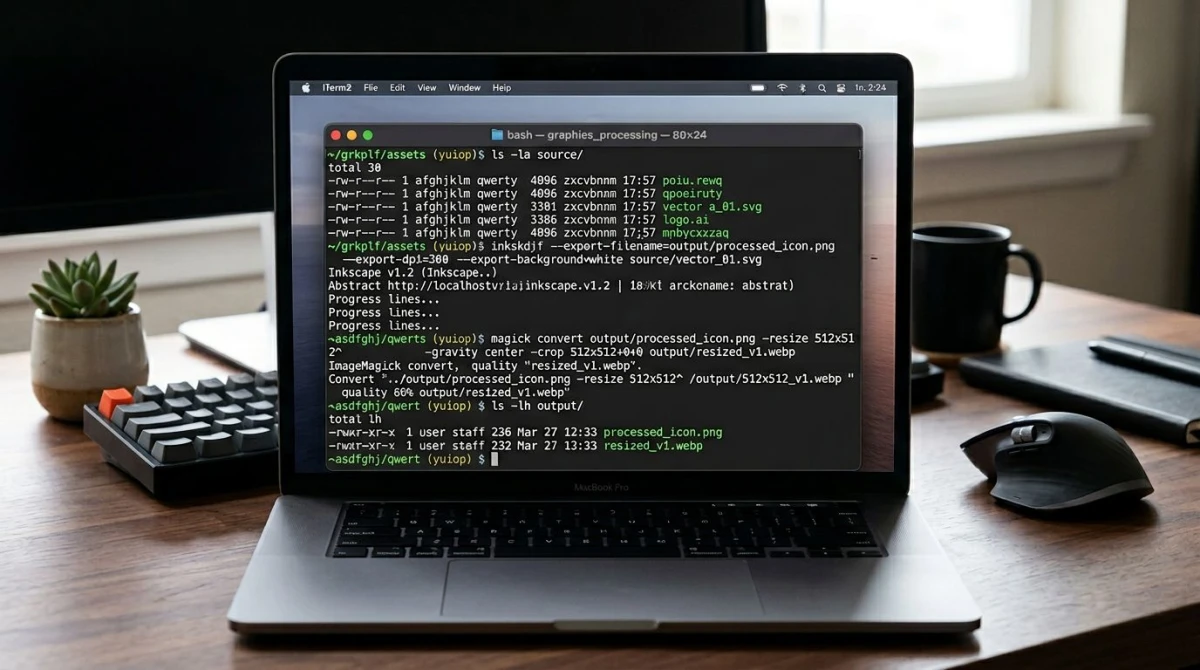
Using ImageMagick
ImageMagick is another popular option. Install it via Homebrew on Mac (brew install imagemagick) or your package manager on Linux.
# Basic conversion
magick convert input.svg output.png

# Set output dimensions
magick convert -resize 1200x input.svg output.png

# Set density (DPI) for sharper rendering
magick convert -density 300 input.svg output.png
Which CLI tool to pick?
- Inkscape — Best SVG rendering accuracy, handles complex files well
- ImageMagick — Already installed on many systems, versatile for other image tasks
- rsvg-convert — Install via
brew install librsvgfor the fastest, most lightweight option
Tired of plain screenshots? Try ScreenSnap Pro.
Beautiful backgrounds, pro annotations, GIF recording, and instant cloud sharing — all in one app. Pay $39 once, own it forever.
See what it doesMethod 5: Export SVG to PNG from Figma or a design tool
If your SVG lives inside a design tool like Figma, Sketch, or Adobe Illustrator, you can export directly to PNG without converting separately.
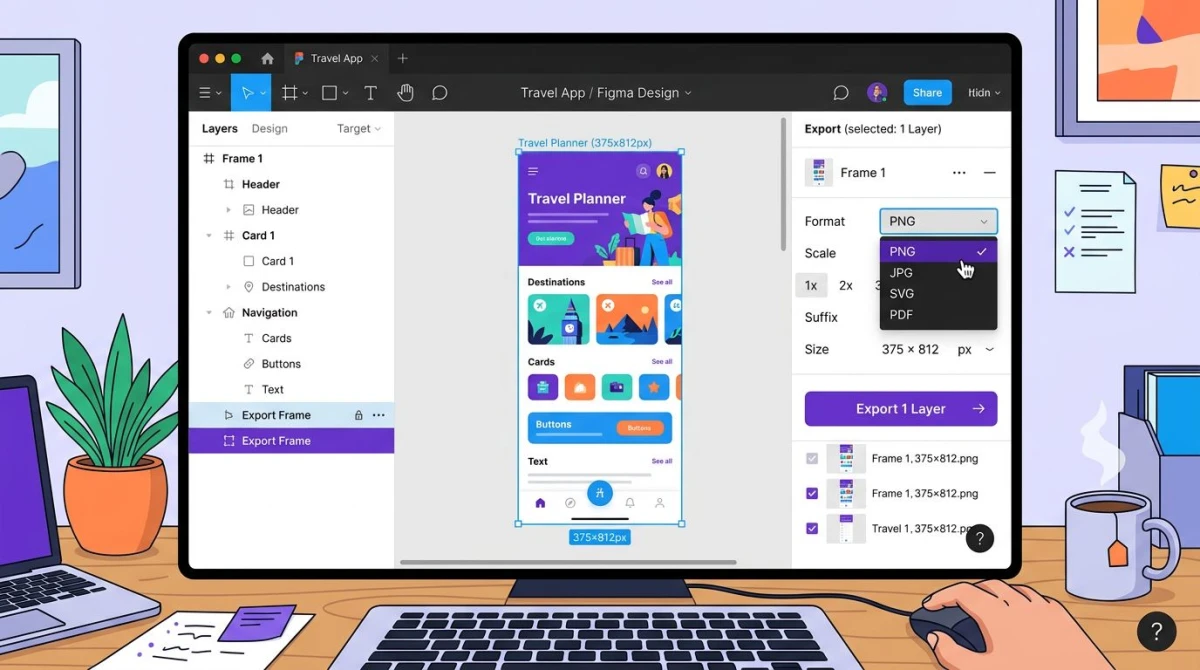
Figma
- Select the frame or element containing your SVG.
- In the right panel, scroll to Export.
- Click + to add an export setting.
- Choose PNG from the format dropdown.
- Set the scale — 2x for Retina displays, 3x for extra-sharp output.
- Click Export.
Adobe Illustrator
- Open your SVG file.
- Go to File > Export > Export As.
- Choose PNG from the format menu.
- Set the resolution (72 DPI for web, 300 DPI for print).
- Enable Transparent Background if needed.
- Click Export.
Design tools give you the most control over the final output because you can adjust colors, layers, and sizing before exporting. Sketch follows a similar workflow — select a layer, make it exportable, and choose PNG at your preferred scale.
Method 6: Use the browser developer tools trick
This method is a hidden gem for developers. Every modern browser can render SVGs natively. You can use the canvas API to turn them into PNGs with code.
Quick browser console method
- Open your SVG file in Chrome or Firefox.
- Open Developer Tools (
⌘ + Option + Ion Mac,F12on Windows). - Go to the Console tab.
- Paste this script:
const svgElement = document.querySelector('svg');
const svgData = new XMLSerializer().serializeToString(svgElement);
const canvas = document.createElement('canvas');
const ctx = canvas.getContext('2d');
const img = new Image();

img.onload = function() {
  canvas.width = img.width * 2; // 2x for high quality
  canvas.height = img.height * 2;
  ctx.drawImage(img, 0, 0, canvas.width, canvas.height);
  const pngUrl = canvas.toDataURL('image/png');
  const link = document.createElement('a');
  link.download = 'converted.png';
  link.href = pngUrl;
  link.click();
};

img.src = 'data:image/svg+xml;base64,' + btoa(unescape(encodeURIComponent(svgData)));- Press Enter — the PNG downloads automatically.
This method renders the SVG exactly as the browser displays it, including CSS styles and web fonts. The 2 multiplier gives you a 2x size PNG — change it to 3 or * 4 for even higher quality.
When to use this
- You need the SVG rendered with its exact CSS context
- The SVG references external stylesheets or fonts
- You want full control over the output size with code
- You're a developer who's already comfortable with browser tools
How to batch convert SVG to PNG
If you have dozens or hundreds of SVGs to convert, doing them one-by-one isn't practical. Here are the fastest batch conversion methods.
Batch convert with Inkscape CLI
# Convert all SVGs in a folder
for file in *.svg; do
  inkscape "$file" --export-type=png --export-width=1200 --export-filename="${file%.svg}.png"
done
Batch convert with ImageMagick
# Convert all SVGs in current directory
mogrify -format png -resize 1200x *.svg
Online batch conversion
CloudConvert supports batch uploads on its free tier (25 conversions per day). Upload multiple files, set your preferences, and download as a ZIP.
For larger batches, the CLI methods are faster and have no daily limits. Once converted, you can edit the resulting PNGs or crop them with Preview or ScreenSnap Pro.
SVG vs PNG: when to use each format
Understanding when to keep your SVG and when to convert helps you avoid unnecessary conversions.
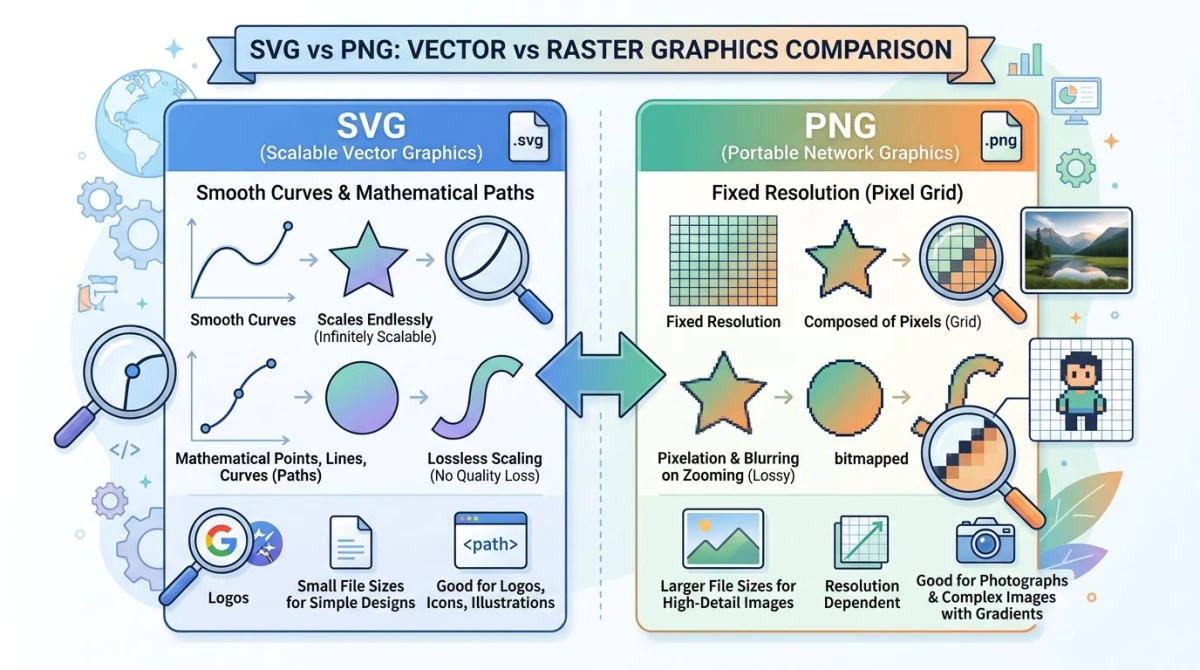
| Feature | SVG | PNG |
|---|---|---|
| File type | Vector (code-based) | Raster (pixel-based) |
| Scaling | Infinite, no quality loss | Fixed size, gets blurry |
| Transparency | Supported | Supported |
| File size | Small for simple graphics | Grows with dimensions |
| Animation | CSS/JS animations possible | Static only |
| Browser support | All modern browsers | Universal |
| Social media | Not supported | Universally accepted |
| Editing | Edit shapes, paths, colors | Pixel-level editing only |
| Best for | Logos, icons, illustrations | Photos, screenshots, social |
Keep SVG when:
- The image will be displayed at different sizes (responsive design)
- You need to animate or interact with the graphic
- File size matters and the graphic is simple
- You want to edit individual shapes later
Convert to PNG when:
- You need to upload to social media or email
- The destination app doesn't support SVG
- You want a fixed-size image for print or docs
- You need to combine the image with other raster graphics
Tips for high-quality SVG to PNG conversion
Getting a crisp PNG from an SVG requires a few extra considerations:
- Set the right output size. Export at 2x or 3x the display size for Retina and high-DPI screens. A 600px icon should be exported as 1200px or 1800px.
- Preserve transparency. Always choose PNG over JPEG if your SVG has a transparent background. JPEG doesn't support transparency and will add a white background.
- Check embedded fonts. If your SVG uses custom fonts, convert text to paths before exporting. Otherwise, the converter may substitute a different font.
- Flatten complex effects. SVG filters, blend modes, and CSS animations may not convert perfectly. Simplify the SVG or use the browser method for the most accurate rendering.
- Verify the output. Always open the converted PNG and compare it to the original SVG. Look for missing elements, color shifts, or blurry edges.
Frequently Asked Questions
Morgan
Indie DeveloperIndie developer, founder of ScreenSnap Pro. A decade of shipping consumer Mac apps and developer tools. Read full bio
@m_0_r_g_a_n_