Selenium Screenshot Guide: Code Examples (2026)
# Selenium Screenshot Guide: Capture Pages, Elements & Failures
To take a Selenium screenshot, cast the driver to TakesScreenshot and call getScreenshotAs(OutputType.FILE) in Java, driver.save_screenshot("shot.png") in Python, or driver.takeScreenshot() in JavaScript. Selenium 4 supports element-level captures and (in some browsers) full-page captures via the Chrome DevTools Protocol.
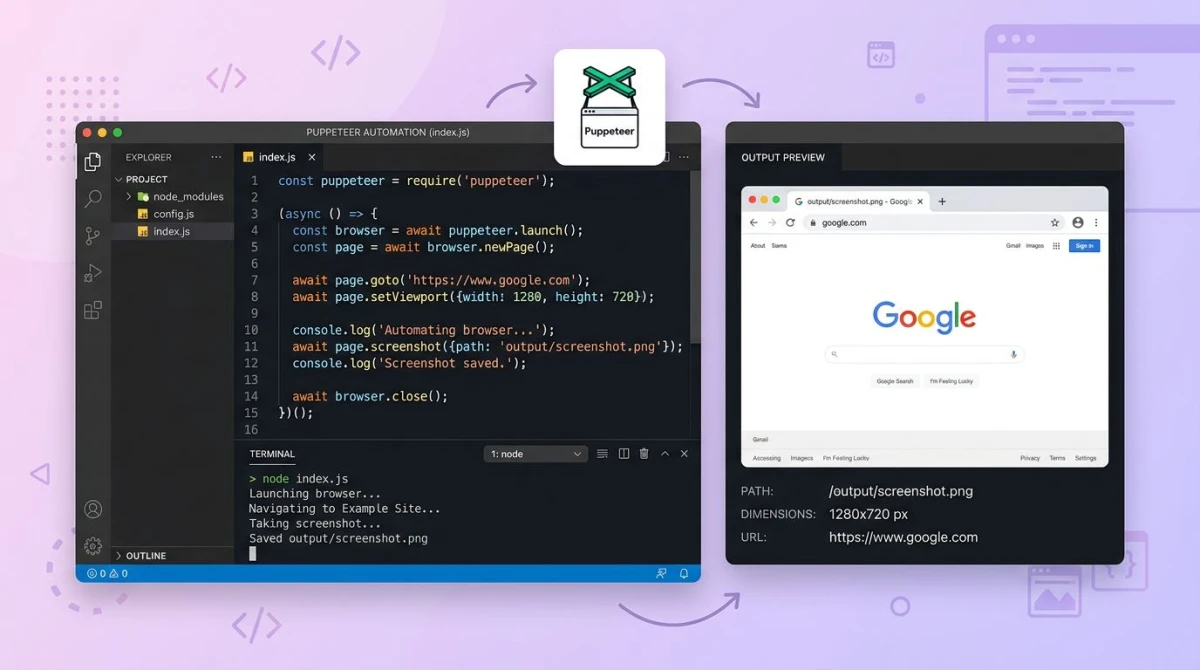
Selenium WebDriver is the right pick for legacy test suites. It also fits cross-browser runs on BrowserStack or Sauce Labs, and polyglot teams mixing Java, Python, .NET, and Ruby. Newer tools like Playwright and Puppeteer are faster. But Selenium still owns the cross-language story and ships Safari support out of the box. This guide walks through every screenshot operation you'll need. Code in three languages, plus the gotchas QA engineers hit in production.
Setup matrix: install Selenium for your stack
| Language | Install | Driver |
|---|---|---|
| Python | pip install selenium | Built-in via Selenium Manager (4.10+) |
| Node.js | npm install selenium-webdriver | Built-in or npm i chromedriver |
| Java | Maven: org.seleniumhq.selenium:selenium-java:4.x | Built-in |
| .NET | dotnet add package Selenium.WebDriver | Built-in |
| Ruby | gem install selenium-webdriver | Built-in |
Selenium 4.10 and later ship with Selenium Manager. It grabs the right Chrome, Firefox, Edge, or Safari driver for your browser. You no longer need webdriver-manager packages. You also don't have to pin ChromeDriver versions by hand. See the official Selenium docs for the full setup matrix.
Page screenshot: viewport capture in three languages
The default Selenium screenshot is a viewport capture. It grabs only what the user sees, not the full scrollable page.
Python:
from selenium import webdriver

driver = webdriver.Chrome()
driver.get("https://example.com")
driver.save_screenshot("page.png")
driver.quit()
Java:
import org.openqa.selenium.*;
import org.openqa.selenium.chrome.ChromeDriver;
import java.io.File;
import java.nio.file.Files;

WebDriver driver = new ChromeDriver();
driver.get("https://example.com");
File src = ((TakesScreenshot) driver).getScreenshotAs(OutputType.FILE);
Files.copy(src.toPath(), new File("page.png").toPath());
driver.quit();
JavaScript (Node):
const { Builder } = require('selenium-webdriver');
const fs = require('fs');

const driver = await new Builder().forBrowser('chrome').build();
await driver.get('https://example.com');
const png = await driver.takeScreenshot();
fs.writeFileSync('page.png', png, 'base64');
await driver.quit();
That's the bread-and-butter call. Each binding wraps the same WebDriver protocol endpoint under the hood.
Element screenshot: capture a single component
Selenium 4 added native element screenshots, so you can crop straight to a specific button, card, or chart without post-processing.
# Python
header = driver.find_element("css selector", "h1.hero-title")
header.screenshot("hero.png")
// Java
WebElement header = driver.findElement(By.cssSelector("h1.hero-title"));
File src = header.getScreenshotAs(OutputType.FILE);
Files.copy(src.toPath(), new File("hero.png").toPath());// JavaScript
const header = await driver.findElement(By.css('h1.hero-title'));
const png = await header.takeScreenshot();
fs.writeFileSync('hero.png', png, 'base64');Element screenshots are pixel-precise. They respect the element's own padding and border. They're the cleanest way to feed component-level images into a visual diff tool.
Save as base64, byte array, or file
Often you don't want a file on disk. You might attach the image to a test report. Or embed it in an HTML email. Or push it to S3 directly.
# Python — base64 string
b64 = driver.get_screenshot_as_base64()

# Python — raw bytes
png_bytes = driver.get_screenshot_as_png()
// Java — file, bytes, or base64
File file = ((TakesScreenshot) driver).getScreenshotAs(OutputType.FILE);
byte[] bytes = ((TakesScreenshot) driver).getScreenshotAs(OutputType.BYTES);
String b64 = ((TakesScreenshot) driver).getScreenshotAs(OutputType.BASE64);// JavaScript — base64 by default
const b64 = await driver.takeScreenshot();
const buf = Buffer.from(b64, 'base64');Selenium only emits PNG. There's no native option for JPEG or WebP. Need a smaller format? Encode the PNG bytes through Pillow (Python) or sharp (Node) after capture.
The full-page caveat: Selenium's biggest gap
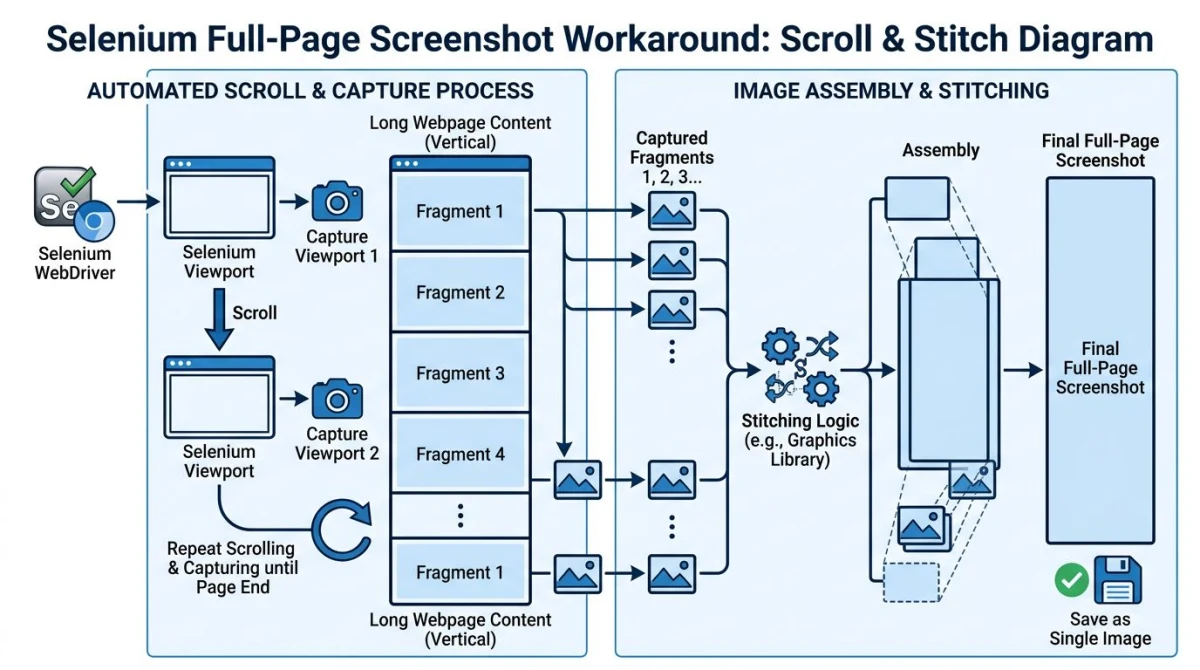
Here's where Selenium falls behind Playwright and Puppeteer. Selenium WebDriver has no one-line full-page API that works everywhere. The viewport is all you get by default.
You have three workarounds:
1. Firefox-only native API. Selenium 4 added getFullPageScreenshotAs() for the Firefox driver:
// Firefox only
File src = ((FirefoxDriver) driver).getFullPageScreenshotAs(OutputType.FILE);
If you're already standardized on Firefox for screenshot tests, this is the cleanest path.
2. Headless Chrome + window resize. Resize the window to match body.scrollHeight. Then take a regular screenshot. Chrome captures the full document because everything fits in the viewport.
total_height = driver.execute_script("return document.body.scrollHeight")
driver.set_window_size(1280, total_height)
driver.save_screenshot("fullpage.png")
This works in headless mode. But it breaks for fixed headers and lazy-loaded images. Scroll the page first if your site loads images on scroll.
3. Chrome DevTools Protocol (CDP). In Selenium 4, you can call CDP commands directly:
result = driver.execute_cdp_cmd(
    "Page.captureScreenshot",
    {"captureBeyondViewport": True, "fromSurface": True}
)
import base64
with open("fullpage.png", "wb") as f:
    f.write(base64.b64decode(result["data"]))
CDP is the most reliable approach. But it locks you to Chromium-based browsers. Pick whichever workaround matches your browser matrix.
Tired of plain screenshots? Try ScreenSnap Pro.
Beautiful backgrounds, pro annotations, GIF recording, and instant cloud sharing — all in one app. Pay $29 once, own it forever.
See what it doesVisual regression testing with Selenium
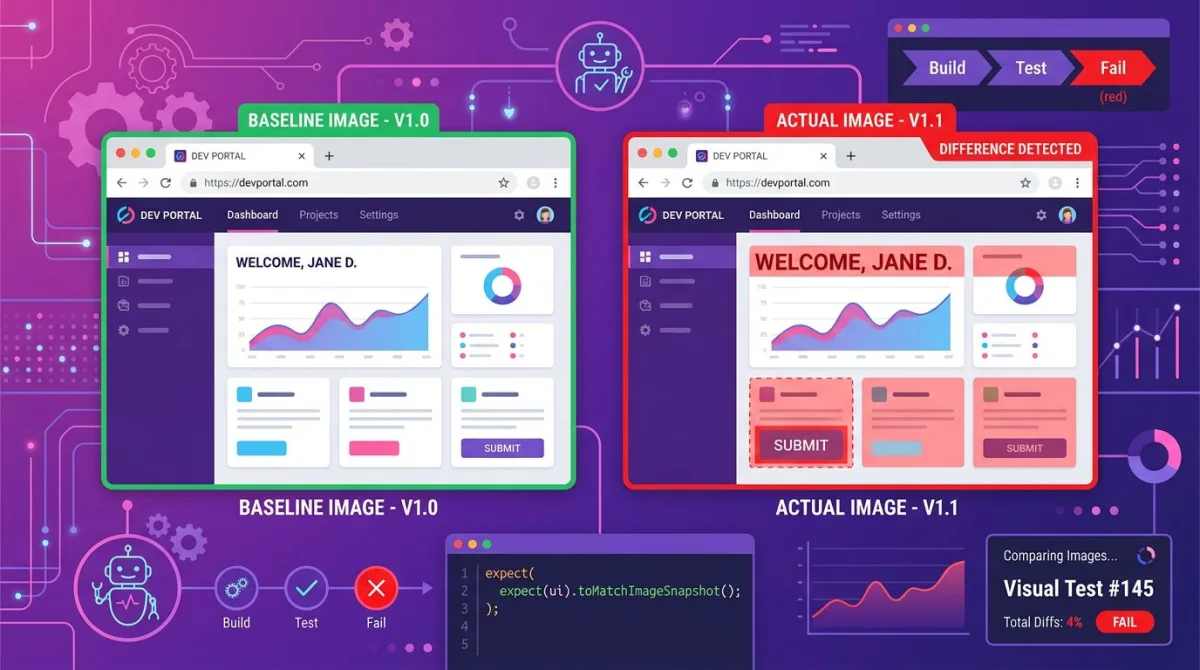
Selenium has no built-in image diffing. You'll pair it with one of three tools: Applitools, Percy, or an open-source library like pixelmatch.
Applitools wraps the screenshot call so you don't manage baselines by hand:
Eyes eyes = new Eyes();
eyes.setApiKey(System.getenv("APPLITOOLS_API_KEY"));
eyes.open(driver, "MyApp", "Login Page Test");
eyes.checkWindow("Login form");
eyes.close();
Percy uses a similar pattern in JavaScript:
const percySnapshot = require('@percy/selenium-webdriver');
await percySnapshot(driver, 'Login page');
For a deeper look at frameworks and diff strategies, see our guide on visual regression testing. Pick a managed service when speed of setup matters more than cost. Pick pixelmatch when you want zero fees and don't mind wiring the diff loop yourself.
Common gotchas every QA hits
A few production traps catch teams over and over.
Wait before you capture. A screenshot taken before the page renders is just a blank canvas. Wrap captures with WebDriverWait:
from selenium.webdriver.support.ui import WebDriverWait
from selenium.webdriver.support import expected_conditions as EC
from selenium.webdriver.common.by import By

WebDriverWait(driver, 10).until(
    EC.presence_of_element_located((By.CSS_SELECTOR, ".product-card"))
)
driver.save_screenshot("loaded.png")
Use the new headless mode. In Chrome 109 and later, the old --headless flag is out of date. Use --headless=new:
options = webdriver.ChromeOptions()
options.add_argument("--headless=new")
options.add_argument("--window-size=1920,1080")
The new headless mode uses the same rendering pipeline as headed Chrome. Your screenshots match what users see.
Use absolute paths in CI. Relative paths break in Docker and GitHub Actions runners. The working directory shifts. Resolve paths up front:
import os
out = os.path.join(os.getcwd(), "artifacts", "page.png")
driver.save_screenshot(out)
Watch zoom and DPI. Browser zoom and high-DPI displays change screenshot dimensions. Force a fixed window size and pin the device scale factor. That gives you byte-equal screenshots in CI:
options.add_argument("--force-device-scale-factor=1")
options.add_argument("--window-size=1280,720")
Capture on test failure. This is the highest-value pattern. Hook the failure path of your test framework. Every red build then leaves a screenshot artifact. In pytest:
import pytest

@pytest.fixture(autouse=True)
def screenshot_on_failure(request, driver):
    yield
    if request.node.rep_call.failed:
        driver.save_screenshot(f"failures/{request.node.name}.png")
In TestNG (Java), implement ITestListener.onTestFailure and call getScreenshotAs from there.
Selenium vs Playwright vs Puppeteer for screenshots

Each tool has a different sweet spot:
| Feature | Selenium | Playwright | Puppeteer |
|---|---|---|---|
| Languages | Java, Python, JS, .NET, Ruby | JS, Python, Java, .NET | JS only |
| Full-page screenshot | Workarounds | Native, one line | Native, one line |
| Element screenshot | Yes (Selenium 4) | Yes | Yes |
| JPEG / quality control | No (PNG only) | Yes | Yes |
| Safari support | Yes (SafariDriver) | Yes (WebKit) | No |
| Speed | Slower | Faster | Faster |
Selenium is older and slower. But it has the broadest language support and the only out-of-the-box Safari driver. If your team writes Java tests today, Selenium is still the path of least resistance. For a side-by-side breakdown of the two newer tools, see Puppeteer vs Playwright. Our best screenshot APIs roundup covers hosted services that can replace WebDriver for simpler jobs.
For ad-hoc desktop screenshots while you're debugging, ScreenSnap Pro offers region capture, annotation, and instant cloud links on Mac and Windows. Test code stays in Selenium. Quick "send this to a teammate" captures stay in a desktop app.
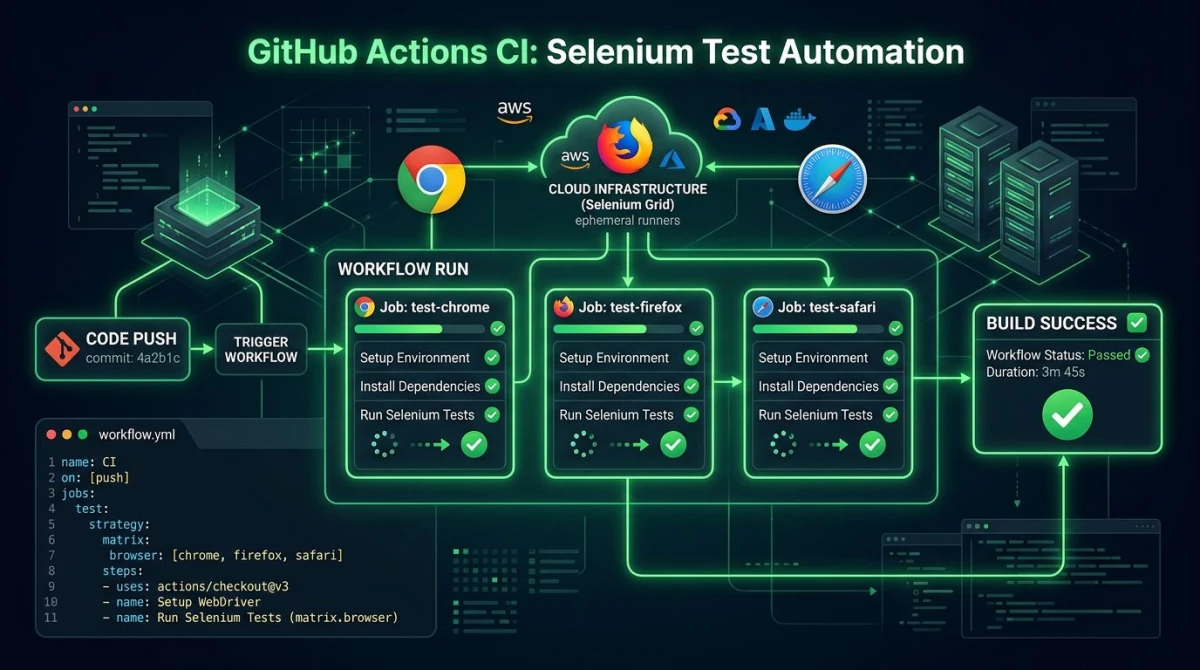
CI/CD example: Selenium on GitHub Actions
Here's a working GitHub Actions workflow that runs Selenium with ChromeDriver and uploads any screenshot artifacts on failure:
name: Selenium Tests
on: [push, pull_request]

jobs:
  test:
    runs-on: ubuntu-latest
    steps:
      - uses: actions/checkout@v4
      - uses: actions/setup-python@v5
        with:
          python-version: '3.12'
      - name: Install dependencies
        run: pip install selenium pytest
      - name: Run tests
        run: pytest tests/ --tb=short
      - name: Upload screenshots
        if: always()
        uses: actions/upload-artifact@v4
        with:
          name: screenshots
          path: failures/
Ubuntu runners ship with Chrome preinstalled. Selenium Manager picks the matching ChromeDriver. The if: always() clause uploads screenshots even when tests fail. That's exactly when you want them. The Selenium GitHub repository has more sample workflows in its docs.
Frequently Asked Questions
Wrapping up
Selenium isn't the fastest tool for screenshots. But it's the most flexible across languages and browsers. Three patterns to remember. Cast to TakesScreenshot for raw captures. Call element.screenshot() for component-level images. Lean on CDP or Firefox's native API when you need full-page output. Pair it with a diff tool for visual regression. Now you have a full pipeline from capture to artifact.
For the desktop side of your workflow, ScreenSnap Pro handles ad-hoc captures with annotation and one-click cloud sharing. No test framework needed. It's a $29 one-time purchase for Mac and Windows.
Morgan
Indie DeveloperIndie developer, founder of ScreenSnap Pro. A decade of shipping consumer Mac apps and developer tools. Read full bio
@m_0_r_g_a_n_