Puppeteer Screenshot Guide: Full Page, PDF, Headless
# Puppeteer Screenshot Guide: Full Page, PDFs & Headless Chrome (2026)
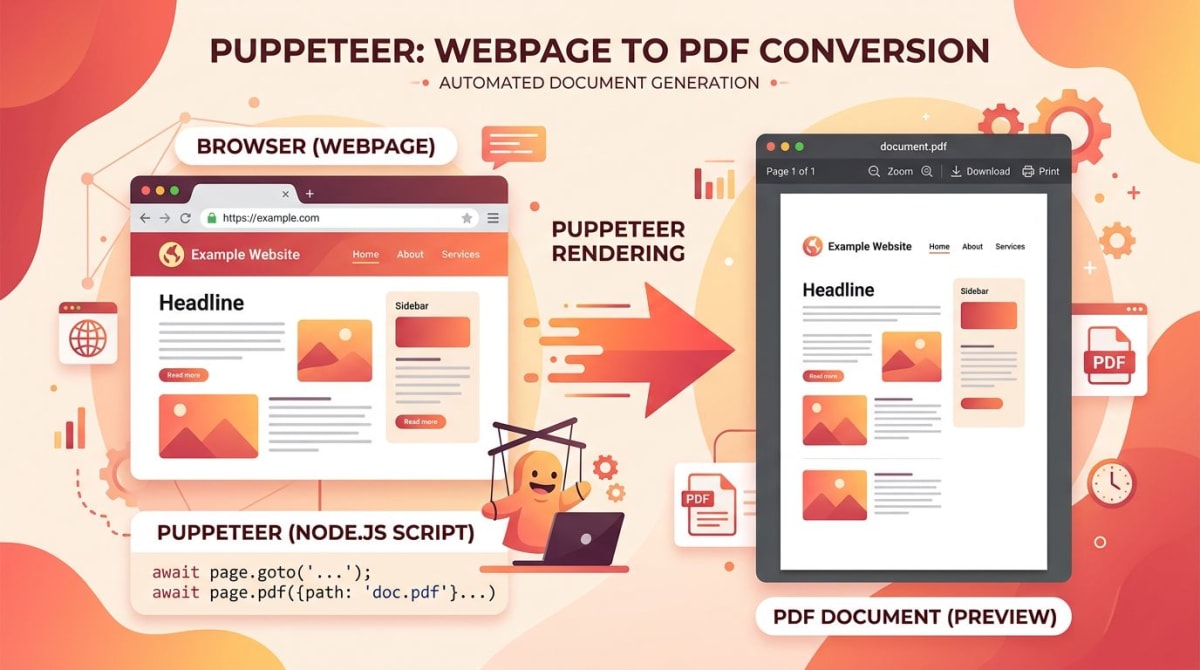
Puppeteer is a Node.js library that drives Chrome through the DevTools Protocol. You call page.screenshot() to capture a viewport, full page, element, or clipped region. You call page.pdf() to render the same page as a PDF. It is the right pick when you want first-party Chrome behavior, a small API, and a tight bond to the browser.
When Puppeteer is the right tool
Puppeteer ships from the Chrome team. It tracks Chrome closely and exposes Chrome-only features like PDF rendering. Use it when you want:
- Server-side screenshots of dynamic pages (dashboards, charts, social previews).
- Web scraping that needs JavaScript execution and Chrome quirks.
- HTML-to-PDF rendering with headers, footers, and CSS print styles.
- End-to-end tests where you only need Chrome and want one less dependency.
If you need cross-browser coverage (Firefox, WebKit) or a richer test runner, see our Puppeteer vs Playwright comparison. For the equivalent recipes in Playwright, jump to the Playwright screenshot guide.
Setup: install and smoke test
You have two install options:
# Option 1: bundles a known-good Chromium build
npm install puppeteer

# Option 2: bring your own Chrome binary (smaller install)
npm install puppeteer-core
Use puppeteer for local dev and most servers. Use puppeteer-core when you already manage a Chrome install (Docker images, Lambda layers, CI runners with Chromium pre-installed).
Smoke test with a one-liner:
import puppeteer from 'puppeteer';

const browser = await puppeteer.launch();
const page = await browser.newPage();
await page.goto('https://example.com');
await page.screenshot({ path: 'smoke.png' });
await browser.close();
If smoke.png lands in your working directory, you are good to go. Read the full API on the Puppeteer docs site and the GitHub repo.
Core screenshot operations
These eight recipes cover 90% of real-world Puppeteer screenshot work.
Default page screenshot
By default, page.screenshot() captures only the visible viewport (1280x720 unless you set a viewport).
await page.screenshot({ path: 'page.png' });The path option writes the file to disk. Drop it to get a buffer instead.
Full-page screenshot
Pass fullPage: true to capture the entire scrollable height, not just the viewport.
await page.screenshot({ path: 'full.png', fullPage: true });Puppeteer grows the viewport behind the scenes, paints the full document, then restores the old size. This is the top cause of blank space in lazy-loaded pages — see the gotchas section below.
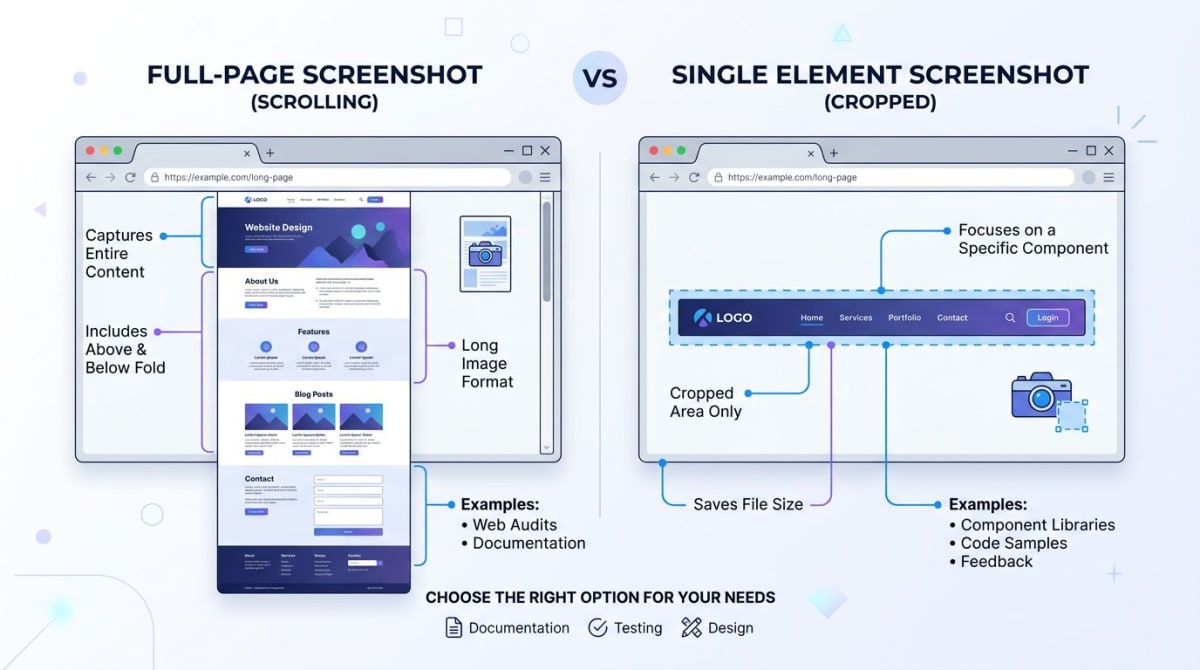
Element screenshot
Grab a handle with page.$() (or page.waitForSelector()), then call screenshot() on it.
const el = await page.$('h1');
await el.screenshot({ path: 'h1.png' });
Element screenshots scroll the element into view and crop to its bounding box. Perfect for OG cards, chart exports, and component snapshots.
Clip a region
Skip the element handle and pass raw coordinates with clip.
await page.screenshot({
  path: 'region.png',
  clip: { x: 0, y: 0, width: 600, height: 400 },
});
Use clipping when you know exact pixel offsets. For example, you can grab a fixed map widget at the top of a page.
Get a buffer instead of a file
Skip path and the call returns a Buffer. Useful for streaming to S3, posting to Slack, or piping into Sharp.
const buffer = await page.screenshot({ encoding: 'binary' });
// buffer is a Node.js Buffer you can upload, transform, or stream
Custom viewport and retina output
Set the viewport before navigating to control the canvas size. Bump deviceScaleFactor for crisp 2x retina output.
await page.setViewport({
  width: 1920,
  height: 1080,
  deviceScaleFactor: 2, // 2x = retina, file size doubles
});
A deviceScaleFactor of 2 with a 1920x1080 viewport gives you a 3840x2160 PNG. Stick with 1 for thumbnails and CI artifacts where size matters more than sharpness.
PDF generation
This is Puppeteer's signature feature versus Playwright. PDF rendering only works in headless mode and only in Chrome.
await page.pdf({
  path: 'page.pdf',
  format: 'A4',
  printBackground: true,
  margin: { top: '20mm', right: '15mm', bottom: '20mm', left: '15mm' },
  landscape: false,
  displayHeaderFooter: true,
  headerTemplate: '<div style="font-size:10px; width:100%; text-align:center;">Quarterly Report</div>',
  footerTemplate: '<div style="font-size:10px; width:100%; text-align:center;"><span class="pageNumber"></span> / <span class="totalPages"></span></div>',
});
Set printBackground: true to keep CSS background colors and images. Use a @media print stylesheet to hide nav, banners, and chat widgets. The rendered PDF respects your print CSS.
JPEG, PNG, and WebP
PNG is the default. Switch to JPEG when you want smaller files and do not need transparency.
await page.screenshot({ path: 'page.jpg', type: 'jpeg', quality: 80 });
await page.screenshot({ path: 'page.webp', type: 'webp', quality: 80 });
Quality runs from 0 to 100. For dashboards and charts, JPEG at 75-85 saves 60-70% over PNG with no visible loss.
Hidden DOM elements
Hidden elements get scrolled into view, but only for element screenshots. For full-page or clip captures, run a manual scroll first to wake up lazy loaders.
await page.evaluate(async () => {
  await new Promise((resolve) => {
    let total = 0;
    const distance = 200;
    const timer = setInterval(() => {
      window.scrollBy(0, distance);
      total += distance;
      if (total >= document.body.scrollHeight) {
        clearInterval(timer);
        resolve();
      }
    }, 100);
  });
});
This loop paints every lazy section before you capture. Now fullPage: true will include everything below the fold.
Common patterns
A few recurring patterns show up in almost every Puppeteer script.
Wait for content before capturing
Network idle and selector waits are the two reliable hooks.
await page.goto('https://example.com', { waitUntil: 'networkidle2' });
await page.waitForSelector('main article');
await page.waitForNetworkIdle({ idleTime: 500 });
await page.screenshot({ path: 'ready.png' });
waitForNetworkIdle() resolves once 0 requests are in flight for idleTime ms. It is the modern fix for random setTimeout() waits.
Authentication via cookies
Skip slow login flows by setting cookies before navigating.
await page.setCookie({
  name: 'session',
  value: process.env.SESSION_TOKEN,
  domain: '.example.com',
});
await page.goto('https://example.com/dashboard');
await page.screenshot({ path: 'dashboard.png', fullPage: true });
For OAuth, run a one-time login script that saves page.cookies() to a JSON file. Then load that file in your screenshot job.
Mobile emulation
Puppeteer ships device profiles that match real iPhone, Pixel, and iPad specs.
import puppeteer, { KnownDevices } from 'puppeteer';

const iPhone = KnownDevices['iPhone 14 Pro'];
await page.emulate(iPhone);
await page.goto('https://example.com');
await page.screenshot({ path: 'iphone.png' });
emulate() sets viewport, user agent, and deviceScaleFactor in one call. Great for catching mobile layout bugs.
Tired of plain screenshots? Try ScreenSnap Pro.
Beautiful backgrounds, pro annotations, GIF recording, and instant cloud sharing — all in one app. Pay $29 once, own it forever.
See what it doesHeadless versus headful
Headless is the default. Chrome 112 added "new headless" mode. It runs the same code path as the regular browser, not a separate binary. Puppeteer 22 and later default to it.
// Headless (default — fast, no visible window)
const browser = await puppeteer.launch();

// Headful (visible window — useful for debugging)
const browser = await puppeteer.launch({ headless: false });

// Force old headless if a site detects new headless
const browser = await puppeteer.launch({ headless: 'shell' });
Use headful to debug timing issues and CSS bugs. Use headless everywhere else — it is faster and uses less memory. The new headless mode renders the same as a real browser. Anti-bot sites that flagged the old headless binary are less likely to flag your traffic.
Common gotchas
These four issues account for most "it works locally, breaks in CI" tickets.
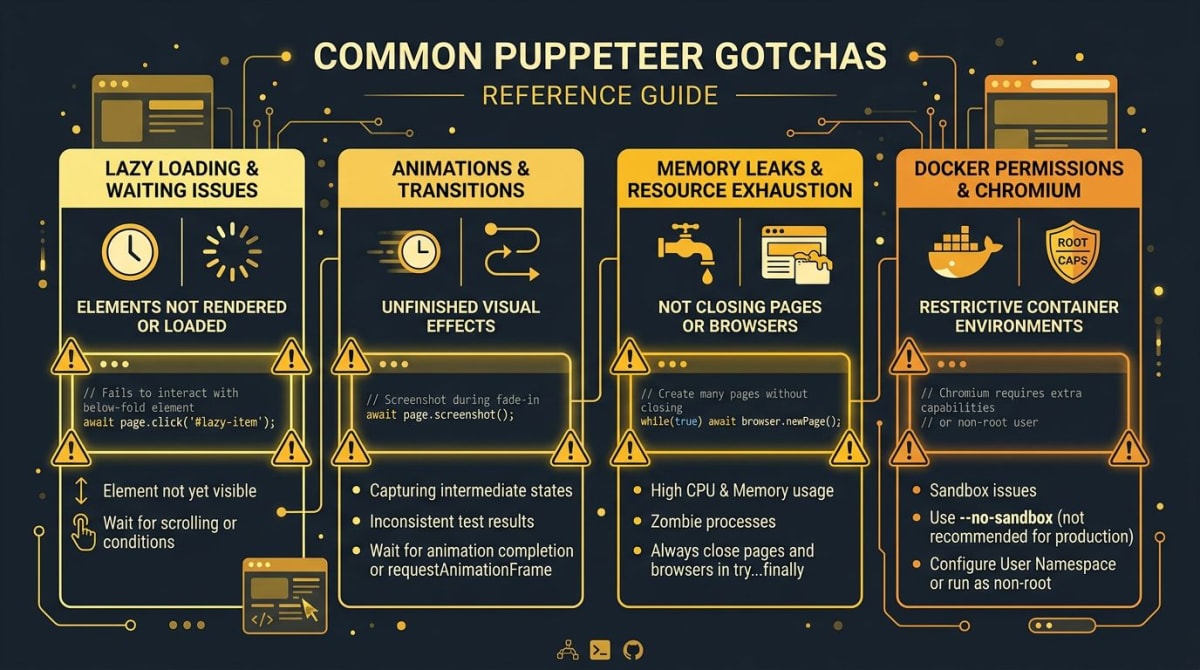
Lazy-loaded images miss the screenshot
Pages with loading="lazy" or IntersectionObserver only paint images when they enter the viewport. A blind fullPage: true capture shows empty boxes.
Fix: scroll the full document with the helper from the hidden-elements section, then call waitForNetworkIdle() before the screenshot.
Animations create flaky pixels
CSS transitions, marquee tickers, and "loading..." spinners draw different frames each run. Visual regression diffs go red on the noise.
Fix: inject a stylesheet that disables motion right after goto().
await page.addStyleTag({
  content: `
    *, *::before, *::after {
      animation-duration: 0s !important;
      animation-delay: 0s !important;
      transition-duration: 0s !important;
      transition-delay: 0s !important;
      caret-color: transparent !important;
    }
  `,
});
Memory leaks in long-running scripts
Open pages hold render trees, JS heaps, and network buffers. A loop that opens 10,000 URLs without cleanup will run your container out of memory.
Fix: close pages explicitly. Reuse the browser, recycle pages.
for (const url of urls) {
  const page = await browser.newPage();
  try {
    await page.goto(url);
    await page.screenshot({ path: `${slug(url)}.png` });
  } finally {
    await page.close();
  }
}
File-system writes need permissions in Docker
Default Docker images run as root, but many CI setups drop those rights. If path: 'out.png' writes to a read-only filesystem, the call fails with EACCES.
Fix: write to /tmp or a mounted volume. Or capture to a buffer and stream the bytes upstream.
Puppeteer versus Playwright for screenshots
The two libraries have nearly identical screenshot APIs — page.screenshot(), fullPage, clip, element captures. The differences:
- Browser support: Playwright drives Chrome, Firefox, and WebKit. Puppeteer is Chrome-only.
- PDF rendering: Puppeteer has it natively. Playwright only supports it in Chromium contexts.
- Auto-waiting: Playwright's locators auto-wait by default. Puppeteer needs explicit
waitForSelector(). - Test runner: Playwright bundles one. Puppeteer is just the browser driver.
If your only target is Chrome and you already have a test runner, Puppeteer is the leaner pick. For the full breakdown, see the Puppeteer vs Playwright deep dive.
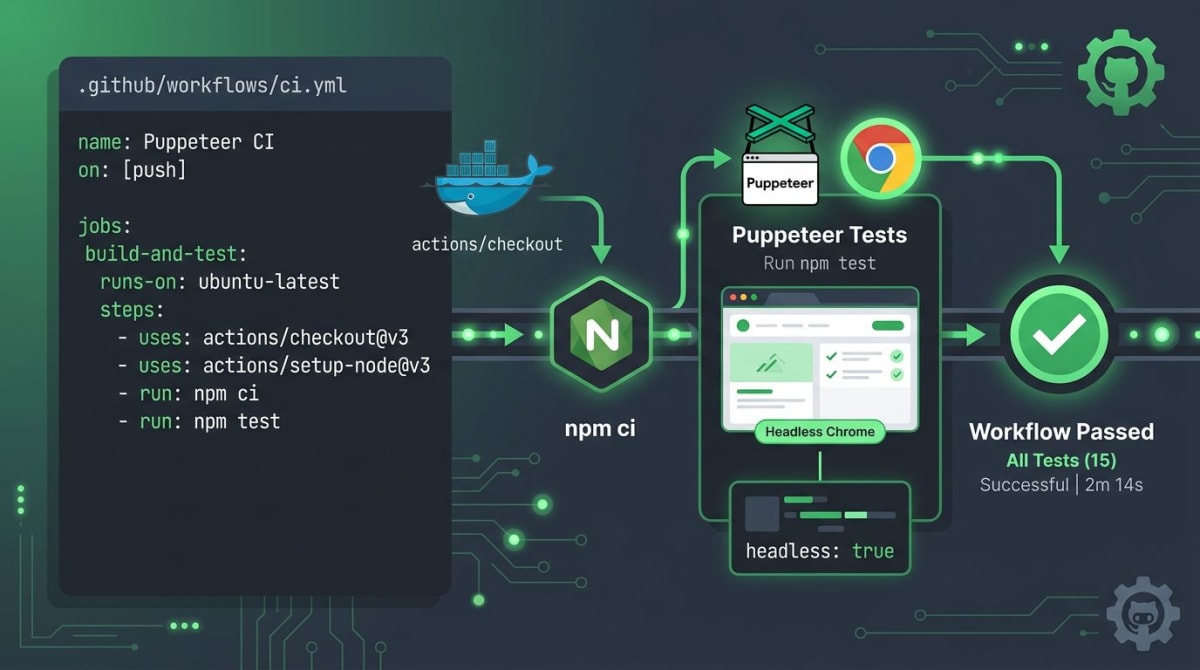
CI/CD example: GitHub Actions
This workflow installs Node, runs the screenshot script, and uploads the output as an artifact. The --no-sandbox flag is needed when Chrome runs as root in a Linux container.
name: Capture screenshots

on:
  push:
    branches: [main]
  workflow_dispatch:

jobs:
  capture:
    runs-on: ubuntu-latest
    steps:
      - uses: actions/checkout@v4

      - name: Setup Node
        uses: actions/setup-node@v4
        with:
          node-version: '20'
          cache: 'npm'

      - name: Install
        run: npm ci

      - name: Run Puppeteer
        run: node scripts/screenshot.js
        env:
          PUPPETEER_ARGS: '--no-sandbox --disable-setuid-sandbox'

      - name: Upload artifacts
        uses: actions/upload-artifact@v4
        with:
          name: screenshots
          path: out/*.png
In your script, read the env var and pass it to launch:
const browser = await puppeteer.launch({
  args: (process.env.PUPPETEER_ARGS || '').split(' ').filter(Boolean),
});
For Docker, use the official puppeteer/puppeteer image. It ships with the system libraries Chrome needs, like Roboto, libxss, and fonts.
If you are wiring screenshots into a regression suite, our visual regression testing guide covers diff thresholds, baseline management, and flake budgets in detail. For hosted alternatives, see the roundup of the best screenshot APIs.
Where ScreenSnap Pro fits
If you also need quick desktop screenshots — bug reports, design feedback, terminal grabs — without writing code, ScreenSnap Pro is a $29 one-time desktop app for Mac and Windows. It has annotation, blur, and instant cloud sharing. It does not replace Puppeteer for automation, but it covers the manual side of a developer screenshot workflow.
Frequently Asked Questions
Morgan
Indie DeveloperIndie developer, founder of ScreenSnap Pro. A decade of shipping consumer Mac apps and developer tools. Read full bio
@m_0_r_g_a_n_