Full Page Screenshot on Windows — 4 Methods (2026)
A full page screenshot on Windows captures an entire webpage from top to bottom in a single image — including everything below the fold that you would normally need to scroll to see. This is useful for saving long articles, receipts, dashboards, and web designs without stitching together multiple captures, and pairs well with screenshot apps like ScreenSnap Pro for markup and sharing.
Here's the catch: Windows has no built-in way to do this. The Snipping Tool and Win + Shift + S only capture what's visible on screen. For a full webpage screenshot, you need your browser's built-in tools or a dedicated extension.
The good news? Every major browser on Windows already has this feature — it's just hidden. Whether you use Chrome, Edge, or Firefox, you can capture an entire webpage without installing anything extra. And if you want the cleanest result on any URL, ScreenSnap Pro ships a dedicated Full-Page Website Capture feature that skips the browser entirely.
Below are five methods, starting with the cleanest end-to-end option and then the free in-browser tricks.
The cleanest pick: ScreenSnap Pro Full-Page Website Capture
If you want full-page website screenshots without browser quirks, ScreenSnap Pro Full-Page Website Capture is the most reliable answer. Paste any URL, pick first-screen or full-page, and the app returns one clean image.
It renders the page fully before capture, so lazy-loaded images appear, infinite-scroll content stops at the natural fold, and fixed headers don't repeat down the image. No browser extension, no DevTools, no Ctrl-Shift dance.
Use this for: any website — articles, dashboards, marketing pages, design references.
Use the in-browser methods below if: you only need it once and don't want a new app, or you're on a locked-down work computer.
Use Snagit or PicPick if: you need full-page capture of a native Windows app like Photoshop, Excel, or a desktop PDF reader. Browser-based capture cannot reach those.
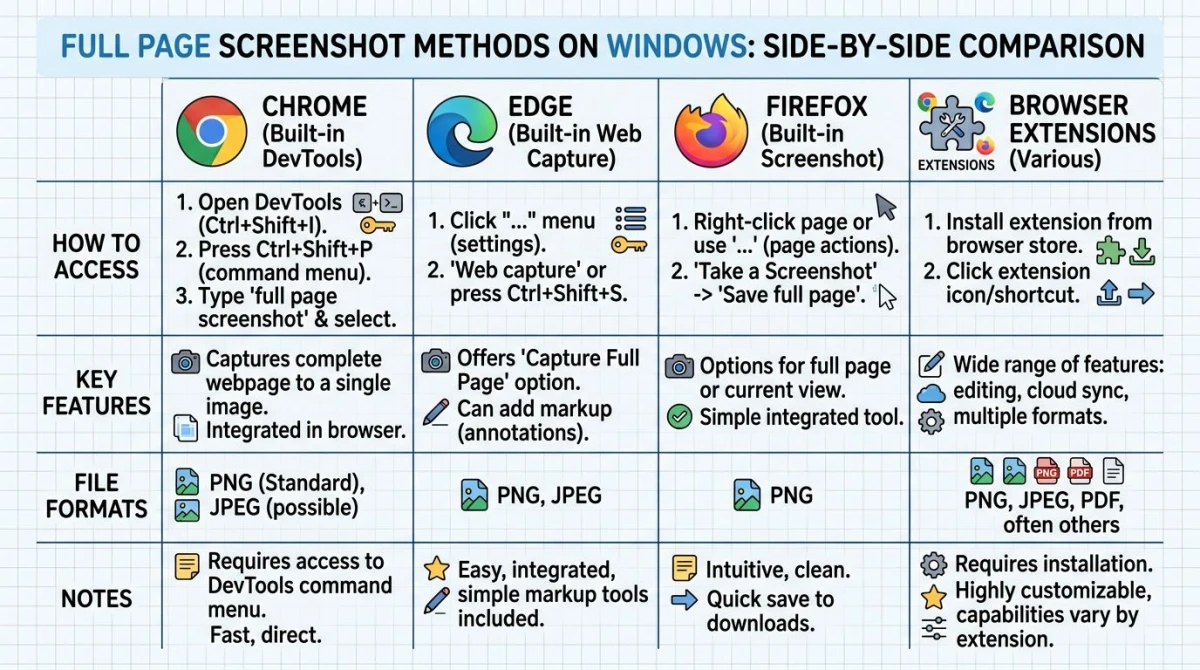
Quick comparison: full page screenshot methods
| Method | Browser | Cost | Difficulty | Best For |
|---|---|---|---|---|
| ScreenSnap Pro Full-Page Website Capture | None (desktop app) | $39 one-time | Easy | Any URL, lazy-load, infinite scroll |
| Chrome DevTools | Chrome / Brave | Free | Medium | Developers, precise control |
| Edge Web Capture | Edge | Free | Easy | Everyday users |
| Firefox Screenshot | Firefox | Free | Easy | Quick one-click saves |
| Browser extension | Any | Free | Easy | Non-technical users |
If you want the cleanest result and don't mind a paid desktop app, start with ScreenSnap Pro. Otherwise, Chrome, Edge, and Firefox users can each use the built-in method for their own browser.
Method 1: full page screen capture in Chrome DevTools
Chrome has a built-in full page screen capture command hidden inside its developer tools. No extension needed, and it works on any webpage.
How to capture a full webpage screenshot in Chrome
- Open the page you want to capture in Chrome
- Press
Ctrl + Shift + Ito open DevTools (or right-click the page and select Inspect) - Press
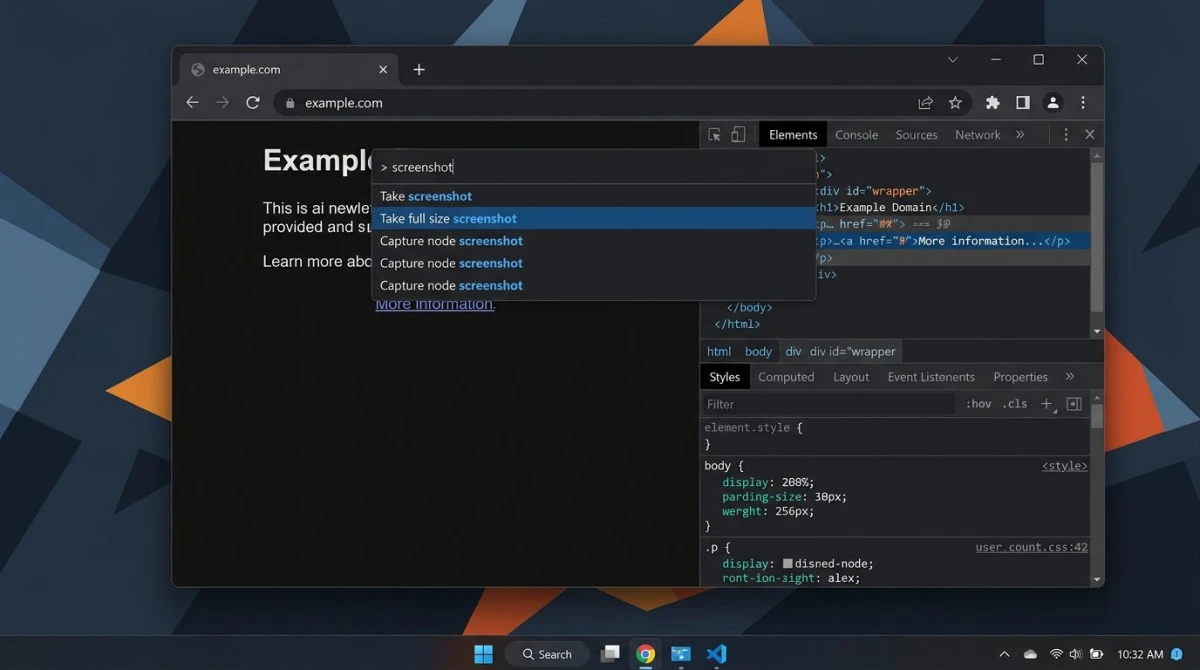
Ctrl + Shift + Pto open the Command Menu - Type screenshot in the search box
- Click Capture full size screenshot
- Chrome saves a PNG of the entire page to your Downloads folder
That's it. The image includes everything from the top of the page to the very bottom, even if the page is hundreds of scrolls long.
Pro tip: Want a full webpage screenshot in Chrome at a specific width? Press Ctrl + Shift + M to toggle the device toolbar before taking the screenshot. You can set any custom resolution — handy for grabbing mobile or tablet views on your Windows PC.
Things to know
- Fixed headers and sticky navbars may repeat throughout the image. There's no way around this in Chrome.
- Very long pages produce large files. A 10,000-pixel-tall capture can be 5-10 MB as a PNG. You can compress the image afterward to reduce the file size.
- This method only works for web pages. Desktop apps, PDFs, and Word documents need a different approach (see our scrolling screenshot guide for Windows).
- Chrome must be at 100% zoom for accurate results. Press
Ctrl + 0to reset zoom before capturing.
Bonus: capture a specific element
In the same Command Menu, you'll also see Capture node screenshot. First select an element in the Elements panel, then run this command. Chrome saves only that element as an image — perfect for grabbing a single section, chart, or widget.
Where Chrome saves full page screenshots
Chrome downloads the image as a PNG file to your default Downloads folder. The file name follows the pattern page-title] (date).png. If you need the screenshot in a different format, you can [convert the image to JPEG or WebP afterward.
To find your saved screenshots quickly, press Ctrl + J in Chrome to open the Downloads panel. Your most recent capture will be at the top.
Method 2: Edge Web Capture (easiest built-in option)
Microsoft Edge has the simplest full page screenshot tool of any Windows browser. It's built right into the menu — no DevTools needed.
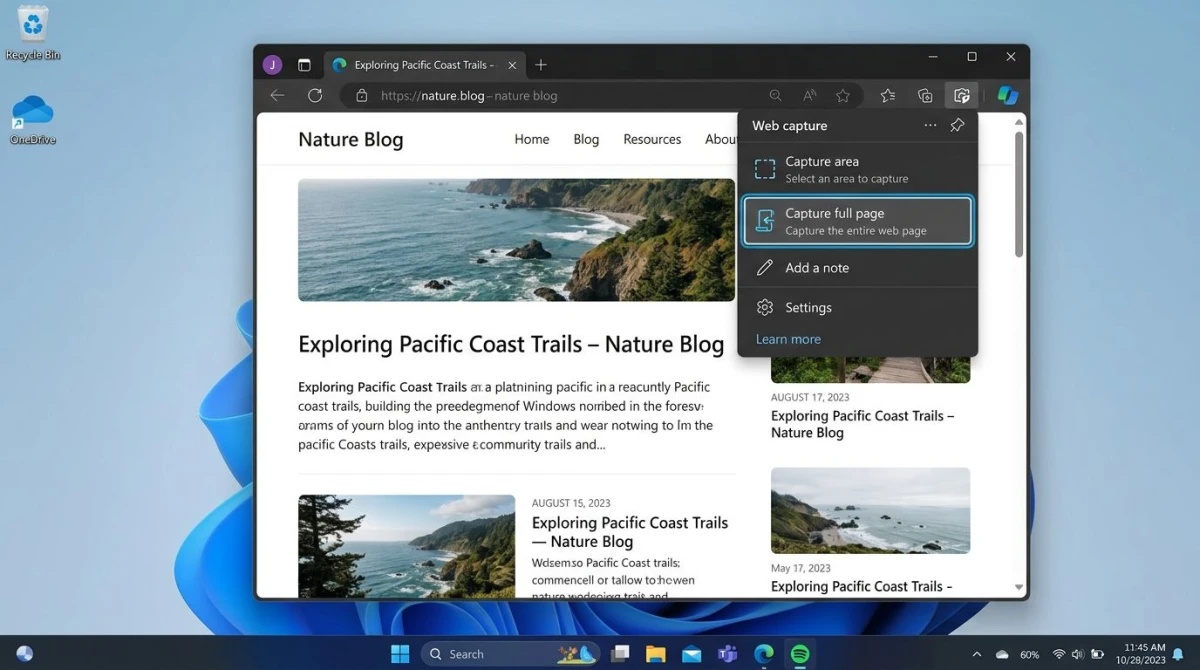
How to take a full page screenshot in Edge
- Open the webpage in Microsoft Edge
- Press
Ctrl + Shift + Sto open Web Capture (or click the three-dot menu and select Screenshot) - Click Capture full page at the top of the overlay
- Edge captures the entire page and opens it in a built-in editor
- Use the markup tools to highlight or annotate, then click Save
Edge downloads the image as a JPEG file. You can also click Copy to paste the screenshot directly into another app.
The Edge method is faster than Chrome's DevTools approach because it skips the developer tools entirely. Microsoft designed this for everyday users who need a quick webpage capture without any technical steps.
Edge vs Chrome for full page captures
Edge has one advantage: it includes a markup editor right in the capture flow. You can draw, highlight, and add text before saving. Chrome's DevTools method saves the raw image with no editing step.
On the other hand, Chrome gives you more control over resolution and device emulation. If you need pixel-perfect captures at specific dimensions, Chrome's DevTools is the better pick.
Edge keyboard shortcut summary
| Action | Shortcut |
|---|---|
| Open Web Capture | Ctrl + Shift + S |
| Capture full page | Click Capture full page in overlay |
| Capture selected area | Click Capture area, then drag |
| Copy to clipboard | Click Copy in editor |
| Save to disk | Click Save in editor |
Edge saves captures to your Downloads folder by default. If you want to change where Edge saves files, go to Settings > Downloads and pick a new folder.
Method 3: Firefox built-in screenshot tool
Firefox makes full page screenshots the simplest of all three browsers. Two clicks and you're done.
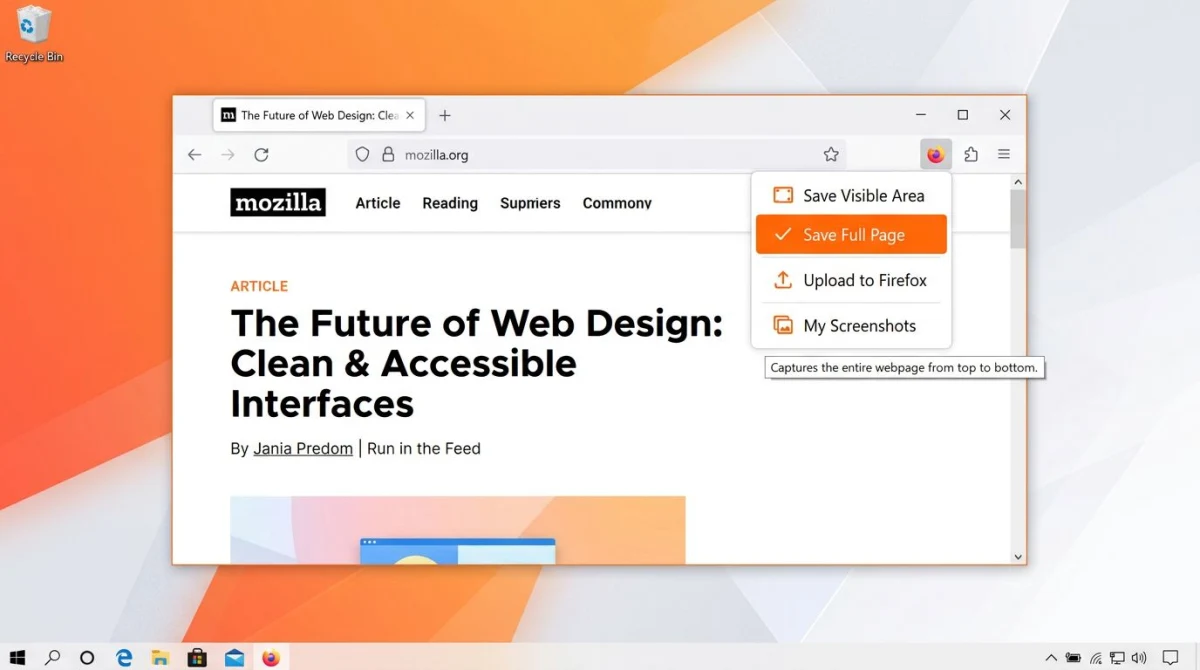
How to capture a full page in Firefox
- Open the page in Firefox
- Right-click anywhere on the page
- Select Take Screenshot from the context menu
- Click Save full page in the top-right corner
- Click Download to save the image
Firefox also gives you a Save visible option if you only want what's on screen. And you can drag to select a custom region of the page.
Alternative shortcut: Press Ctrl + Shift + S in Firefox to open the screenshot tool directly. This skips the right-click menu step.
Why Firefox stands out
Firefox's screenshot tool is the most user-friendly option. It shows a live preview before you download, lets you copy to clipboard with one click, and doesn't require any developer tools or menu diving.
The downside? Firefox's screenshot tool sometimes struggles with pages that use complex JavaScript rendering or infinite scroll. For those cases, Chrome DevTools tends to handle the capture better.
Firefox screenshot file format
Firefox saves full page captures as PNG files. The file name includes the page title and a timestamp, making it easy to identify later. Unlike Edge, Firefox does not compress to JPEG, so your screenshots stay sharp with no quality loss — but file sizes will be larger.
Tired of plain screenshots? Try ScreenSnap Pro.
Beautiful backgrounds, pro annotations, GIF recording, and instant cloud sharing — all in one app. Pay $39 once, own it forever.
See what it doesMethod 4: browser extensions for full page screenshots
If you want a one-click solution that works in any Chromium browser (Chrome, Edge, Brave, Opera), a browser extension is the way to go.

GoFullPage (most popular)
GoFullPage is the most-used full page screenshot extension on the Chrome Web Store. Here's how it works:
- Install GoFullPage from the Chrome Web Store
- Navigate to the page you want to capture
- Click the GoFullPage icon in your toolbar (or press
Alt + Shift + P) - Watch as it scrolls through and captures each section
- A new tab opens with your screenshot — download as PNG, JPEG, or PDF
GoFullPage is free for basic use. The paid version ($1/month) adds batch capture, custom file naming, and auto-download. The free version handles most needs — you only hit limits if you capture dozens of pages per day.
One thing to watch for: GoFullPage scrolls through the page during capture, so fixed headers and footers may appear multiple times. If that happens, try closing sticky elements before capturing (you can hide them in DevTools or using an ad blocker).
FireShot
FireShot is another solid option that adds PDF export and the ability to capture only the visible area, the entire page, or a selected region. It works in Chrome, Firefox, and Edge.
Awesome Screenshot
Awesome Screenshot goes beyond basic capture. It combines full page screenshots with a built-in annotation editor — you can add arrows, boxes, text, and blur sensitive information before saving. The free version covers most use cases, while the paid plan adds cloud storage and video recording.
For a deeper look at screenshot extensions, see our guide to the best screenshot Chrome extensions.
When to use an extension vs built-in tools
Extensions make sense when:
- You take full page screenshots often and want a single-click workflow
- You need PDF export (not available in built-in tools)
- You want to customize the output format and quality
Built-in tools are better when:
- You don't want to install anything
- You need a quick one-time capture
- You're on a work computer with restricted extension policies
What about Windows Snipping Tool?
The Snipping Tool (Win + Shift + S) is great for regular screenshots, but it cannot capture a full webpage. It only grabs what's visible on your screen — there's no scroll-and-stitch feature built into Windows 10 or Windows 11 as of 2026.
Microsoft has added screen recording and OCR to the Snipping Tool, but full page capture hasn't made the cut yet. For now, the browser methods above are your best bet.
The Snipping Tool does support four capture modes — rectangle, freeform, window, and full screen. These are perfect for grabbing visible content. If you need OCR to grab text from a screenshot, check out our list of the best OCR software for Windows.
If you need more than what the Snipping Tool offers but don't want to rely on browser tools, a third-party app like Snagit can help. See our Snagit vs Snipping Tool comparison for a detailed breakdown.
Tips for better full page screenshots
Clean up the page first
Before capturing, remove anything you don't want in the image:
- Close cookie banners and popups — dismiss them manually or use a content blocker
- Collapse chat widgets — live chat bubbles appear on every scroll segment
- Switch to reader mode — press
F9in Edge or install a reader extension in Chrome to strip ads and sidebars - Set zoom to 100% — press
Ctrl + 0to reset and avoid blurry or misaligned captures
Handle the output file
Full page screenshots can be large — both in pixel dimensions and file size. Here's how to manage them:
- Convert PNG to JPEG if you don't need transparency. Use our free image format converter to switch formats in seconds.
- Crop out unnecessary sections — most pages have large footers you don't need. You can crop them out using Paint, Paint 3D, or a dedicated editing tool for Windows screenshots.
- Resize before sharing — a 15,000-pixel-tall image won't display well in Slack or email. Resize it to a reasonable height first.
- Annotate key areas — after capturing, add arrows or highlights to draw attention to the parts that matter. Our guide to editing screenshots on Windows covers free markup tools.
Save and organize your captures
If you take full page screenshots often, set up a consistent file system:
- Create a dedicated folder like
C:\Users\YourName\Screenshots\Full Pages - Rename captures right away — the default file names from browsers are hard to search later
- If you're building documentation or bug reports, consider converting screenshots to PDF to bundle multiple captures into one file
Wondering where Windows saves your other screenshots by default? Our guide to where screenshots go on Windows covers every save location for Snipping Tool, Print Screen, and Game Bar.
Know the limits
All four methods have the same blind spots:
- Lazy-loaded images may appear blank. Scroll through the entire page manually before capturing so the browser loads all images.
- Infinite scroll pages (like Twitter or Facebook feeds) can't be captured in full — there's no "bottom" to reach.
- Password-protected content behind login walls won't render for DevTools captures in some setups.
- iframes and embedded content may not appear in the final image, depending on the page structure.
- Very wide pages may get cut off. If a page has horizontal scrolling, the capture only includes the default viewport width. In Chrome, use device emulation to set a wider viewport before capturing.
- Dynamic content like carousels and slideshows freeze on the current slide. You'll only capture what's showing at that moment.
Full page screenshot vs scrolling screenshot
These terms often overlap, but there's a subtle difference:
- Full page screenshot typically means capturing an entire webpage inside a browser, using the browser's own rendering engine. The browser already knows the full page layout and stitches it into one image automatically.
- Scrolling screenshot usually refers to capturing any scrollable window — including desktop apps, PDFs, and chat apps — by physically scrolling and stitching frames together.
All four methods in this guide are full page screenshot tools. They work only inside browsers. If you need to capture long content in desktop apps like Word, Excel, or your file manager, you'll need a scrolling screenshot tool for Windows like ShareX or PicPick.
Which method should you pick?
Here's the quick decision tree:
- Use ScreenSnap Pro Full-Page Website Capture if you want the cleanest result for any URL — no extension, no scroll-stitching artifacts, handles lazy-load and infinite scroll.
- Use Edge Web Capture if you want a free no-install option. One shortcut (
Ctrl + Shift + S), built-in markup, done. - Use Chrome DevTools if you need full control — custom resolutions, device emulation, element-level captures.
- Use Firefox if you're already a Firefox user. Its screenshot tool is the most streamlined.
- Use an extension if you take full page screenshots regularly inside the browser and want a one-click workflow.
For most people, Edge Web Capture hits the sweet spot among free options. It's already installed on every Windows PC, the shortcut is simple, and the built-in editor handles basic markup. Power users who need precise control over viewport size and resolution will prefer Chrome DevTools.
If you take lots of screenshots beyond just full page captures — regions, windows, annotations, GIF recordings — ScreenSnap Pro bundles the Full-Page Website Capture feature with 15 annotation tools and 500+ backgrounds, for $39 one-time and no subscription.
Frequently Asked Questions
Morgan
Indie DeveloperIndie developer, founder of ScreenSnap Pro. A decade of shipping consumer Mac apps and developer tools. Read full bio
@m_0_r_g_a_n_