GIF Screen Capture on Windows — 5 Free Tools (2026)
GIF screen capture on Windows lets you record any part of your screen as a looping animation. Unlike video files that need a media player, GIFs play on their own in Slack, GitHub issues, email, and docs. They're the fastest way to share quick demos, bug reports, and tutorials that people will actually watch, and apps like ScreenSnap Pro record straight to GIF in a click.
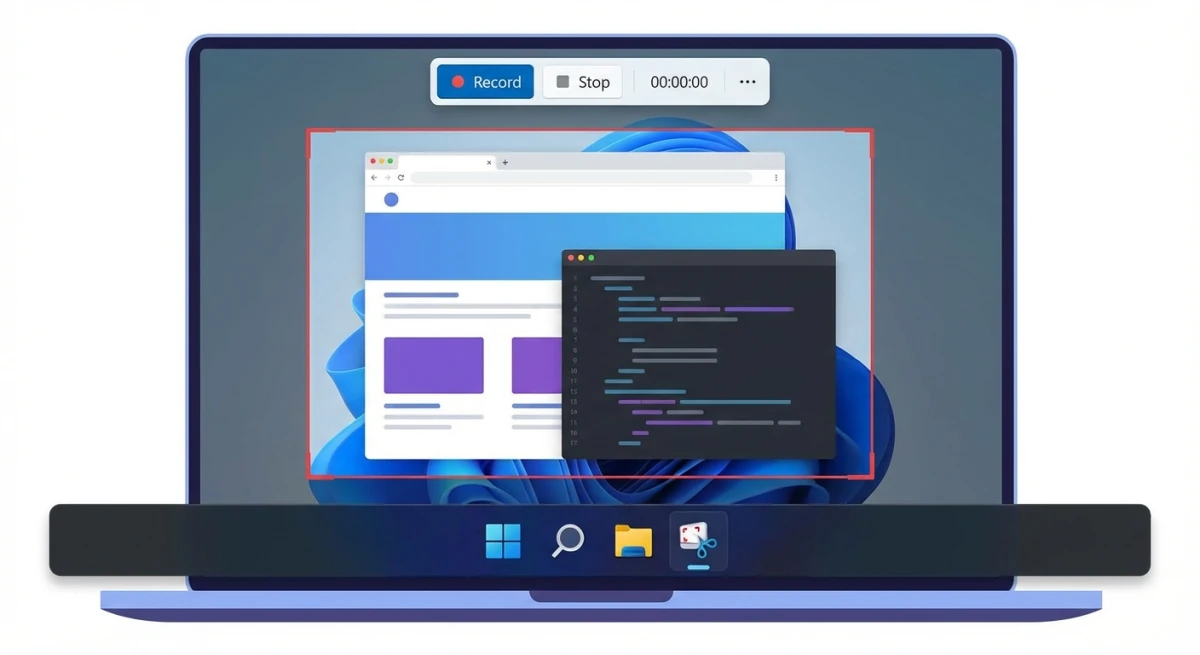
Windows doesn't include a built-in GIF recorder. The Snipping Tool and Xbox Game Bar only save video files. But several free tools fill that gap and let you record GIFs in seconds.
This guide covers the best ways to create GIF screen captures on Windows, plus tips for keeping your files small and sharp. For a cross-platform roundup, see our best GIF screen capture tools comparison.
Quick Comparison: Best GIF Screen Capture Tools for Windows
| Tool | Price | Direct GIF Recording | Frame Editor | Best For |
|---|---|---|---|---|
| ScreenToGif | Free | Yes | Yes (full editor) | Power users who want total control |
| ShareX | Free | Yes | No | Users who already use ShareX |
| ScreenSnap Pro | $39 once | Yes | No | Fast capture + cloud sharing |
| LICEcap | Free | Yes | No | Quick, lightweight recording |
| Gyazo GIF | Free (limited) | Yes | No | Cloud-first teams |
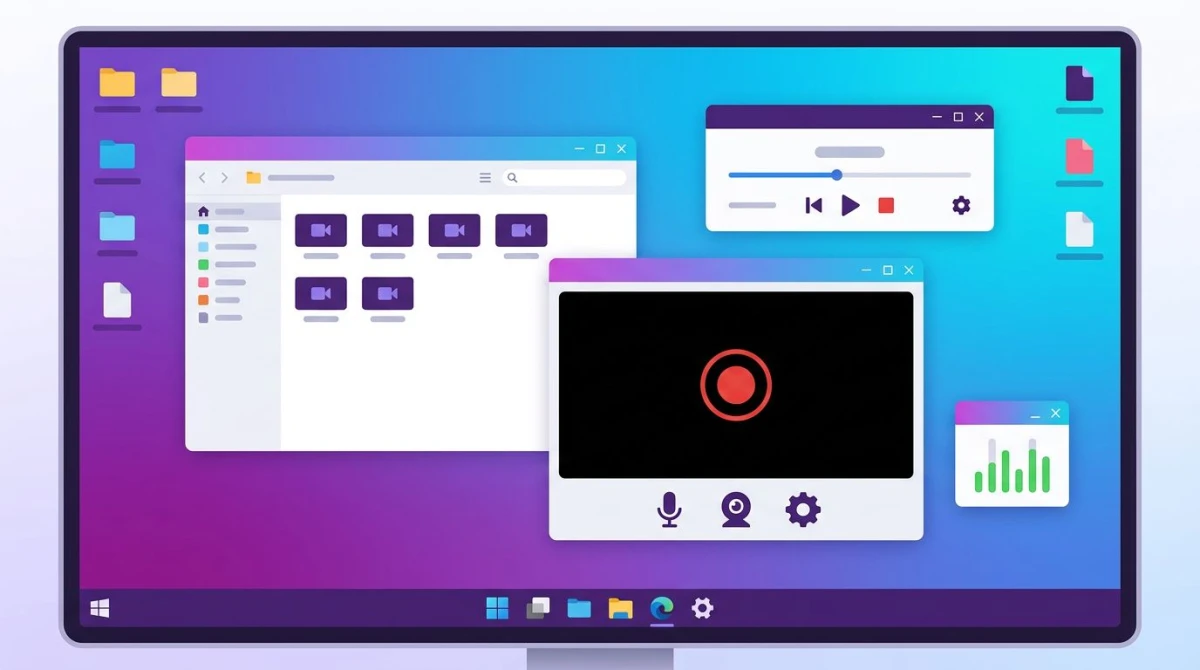
All five tools skip the video-to-GIF conversion step. You press record, capture your screen, and get a GIF file right away.
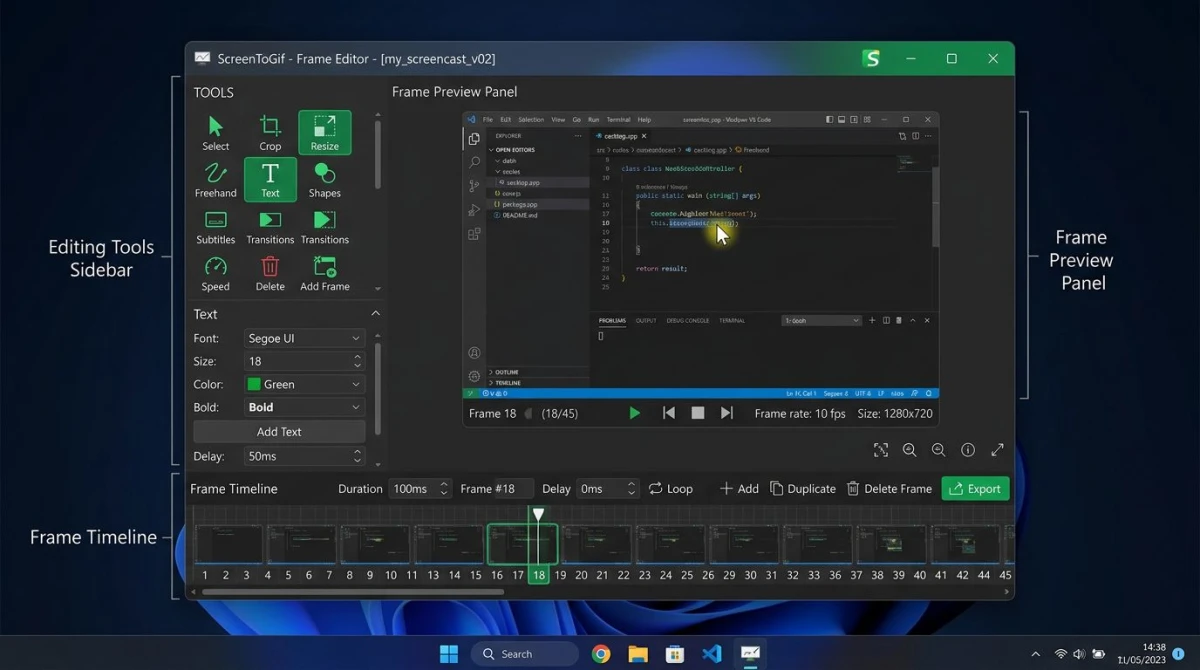
ScreenToGif: Free GIF Recording with a Frame Editor
ScreenToGif is a popular free GIF recorder for Windows. It's open-source, lightweight, and includes features that paid tools often lack.
One thing that sets it apart is the built-in frame editor. After recording, you can delete frames, add text, draw on frames, crop, resize, and fine-tune your GIF before saving — a level of control most free tools don't offer.
How to record a GIF with ScreenToGif
- Screen to GIF download — grab the portable or installer version from the official site
- Open ScreenToGif and click Recorder on the launch screen
- Drag the recording frame over the area you want to capture
- Set frame rate — 15 FPS works well for most demos (lower means smaller files)
- Click Record (or press
F7) to start capturing - Click Stop (or press
F8) when you're done - Edit in the frame editor — trim, crop, add captions, or delete unwanted frames
- Click Save As and choose GIF format
ScreenToGif pros and cons
Pros:
- Free with no watermarks or limits
- Full frame-by-frame editor built in
- Portable version runs without installing
- Export as GIF, APNG, video, or project file
- Active development and community
Cons:
- Windows only (Mac users often reach for GIPHY Capture, but see our full GIF capture guide for Mac for more options)
- Frame editor has a learning curve
- No cloud sharing built in
Pro tip: Use the "Remove duplicates" feature in the editor to cut file size fast. ScreenToGif finds frames that look the same and removes extras.
ShareX: GIF recording built into a screenshot powerhouse
ShareX is a free screenshot and screen recording tool that many Windows users already have installed. What most people don't realize is that it can also record GIFs.
Since ShareX handles screenshots, video capture, and GIF recording in one app, it's a strong all-in-one option. You won't need separate tools for each task.
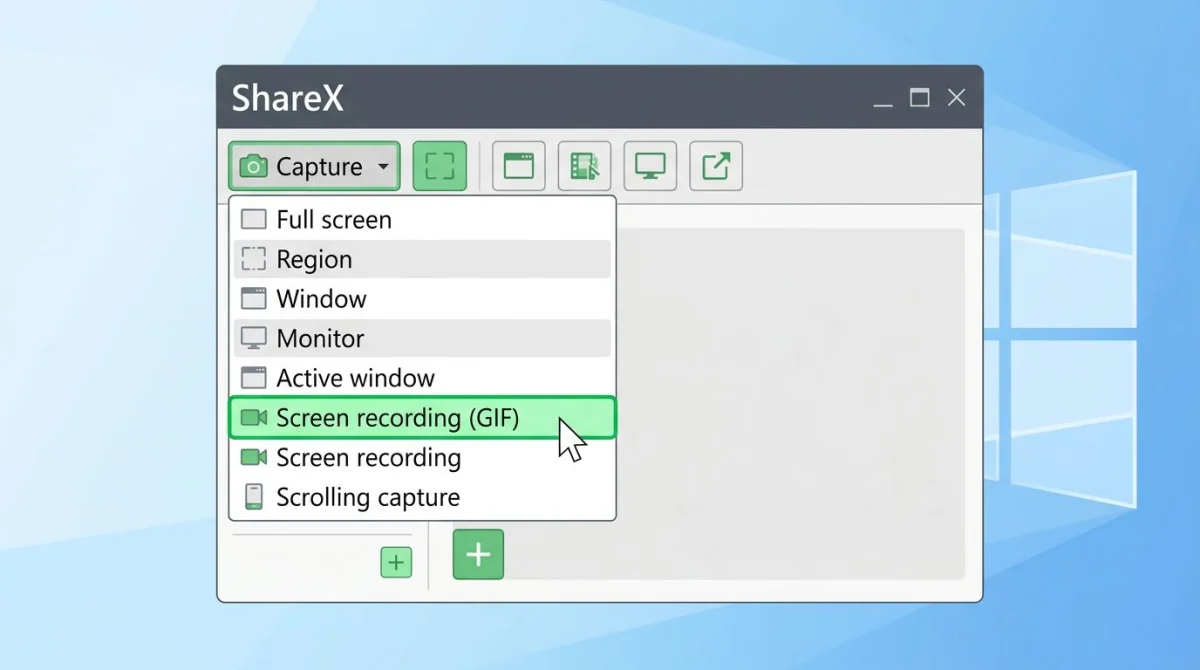
How to record a GIF with ShareX
- Open ShareX and go to Capture in the sidebar
- Click Screen Recording (GIF)
- Select the capture area using the crosshair — drag to pick any region
- Recording starts right away after your selection
- Click Stop in the toolbar (or press
Shift + Print Screen) to finish - Find your GIF in the ShareX history panel or in
Documents\ShareX\Screenshots
ShareX pros and cons
Pros:
- Free and open-source
- All-in-one tool (screenshots + video + GIF)
- Tons of upload destinations (Imgur, Google Drive, FTP, and more)
- Automation with workflows and hotkeys
Cons:
- Interface feels cluttered at first
- No frame editor for GIFs
- Learning curve to find GIF recording option
- Windows only
Pro tip: Set up a hotkey for GIF recording in ShareX settings. Go to Hotkey settings > Add > set the task to Screen Recording (GIF), and assign a key combo like Ctrl + Shift + G. Now you can start a GIF capture with one key press.
ScreenSnap Pro: Fastest capture-to-share workflow
ScreenSnap Pro records your screen straight to GIF with no extra steps. Hit your shortcut, select the area, and you have a GIF ready to share. It also uploads to the cloud and gives you a link right away — great for teams that share captures over Slack or email.
How to record a GIF with ScreenSnap Pro
- Click the ScreenSnap Pro icon in your system tray
- Select Record GIF (or use your custom hotkey)
- Drag to select the region you want to capture
- Click Start to begin recording
- Click Stop when done
- Share right away — copy the cloud link, drag the GIF into a chat, or save it locally
ScreenSnap Pro adds features that free tools skip: 500+ gradient backgrounds for polished captures, 15 annotation tools for arrows and callouts, and cloud sharing with one click. All for a $39 one-time purchase — no monthly fee.
When ScreenSnap Pro makes sense
Pick ScreenSnap Pro if you:
- Share GIFs with your team daily and want instant cloud links
- Need to mark up captures with arrows, text, or highlights
- Want one tool for screenshots, GIFs, and screen recordings
- Prefer a clean interface over power-user complexity
LICEcap: Lightweight and dead simple
LICEcap does one thing and does it well: record your screen as a GIF. The app is tiny (under 500 KB), uses almost no resources, and gets out of your way.
How to record a GIF with LICEcap
- Download LICEcap from cockos.com/licecap
- Open LICEcap — a transparent frame window appears
- Position and resize the frame over what you want to record
- Set frame rate (default 8 FPS — raise to 15 for smoother results)
- Click Record, choose where to save your GIF
- Click Stop when you're finished
LICEcap pros and cons
Pros:
- Very lightweight (under 500 KB)
- Dead simple to use
- Low CPU and memory footprint
- Cross-platform (also works on macOS)
Cons:
- No editing features at all
- Outdated interface
- No annotation or cloud sharing
- Saves directly to file (can't preview first)
LICEcap is the best pick when you need a tiny, portable GIF recorder that won't slow down your machine. Great for recording on older hardware or virtual machines.
Gyazo GIF: Cloud-based capture for teams
Gyazo GIF records your screen and uploads the result to the cloud on its own. You get a shareable link the moment you stop recording — no file management needed.
How to record a GIF with Gyazo GIF
- Install Gyazo from gyazo.com
- Right-click the Gyazo icon in the system tray
- Select Capture GIF
- Drag to select the recording area
- Recording starts — capture up to 7 seconds on the free plan
- Your browser opens with the GIF hosted on Gyazo's servers
Gyazo GIF pros and cons
Pros:
- Fastest path from capture to shareable link
- Clean, simple interface
- Browser-based history and organization
Cons:
- Free plan limits GIF length to 7 seconds
- Pro plan costs $4.99/month
- Requires an account and internet connection
- Less control over output quality
Gyazo is best for teams that already use it for screenshots. If you want longer recordings or offline capture, the other tools on this list fit better.
Tired of plain screenshots? Try ScreenSnap Pro.
Beautiful backgrounds, pro annotations, GIF recording, and instant cloud sharing — all in one app. Pay $39 once, own it forever.
See what it doesBest practices for recording GIFs on Windows
Getting a good GIF takes more than pressing record. These best practices help you capture clean, pro-looking animations every time.
Set the right frame rate before you start. Higher FPS means smoother motion but larger files. Here's a quick guide:
- 8-10 FPS — Static UI walkthroughs where not much moves
- 12-15 FPS — General purpose, good balance of smooth motion and file size
- 20-30 FPS — Fast-moving content like games or animations
Most tutorials look great at 12 FPS. Start there and adjust if needed.
Use a standard capture size. Pick a width like 800px or 600px and stick with it across all your GIFs. This keeps your docs and README files looking uniform. In ScreenToGif, you can lock the recorder window to exact dimensions.
Close unneeded windows. A messy desktop makes for messy GIFs. Before recording, minimize anything that's not part of the demo. Less visual noise means smaller files and cleaner results.
Add a cursor highlight. Some tools let you add a yellow circle or glow around your mouse cursor. This helps viewers follow the action in complex UIs. ScreenToGif has cursor options under Options > Cursor.
Record one action per GIF. If you need to show a three-step process, make three separate GIFs. Each one should cover a single clear action. Stack them with short text explanations in between.
Choose a clean background. A solid-color desktop wallpaper makes your GIF look more polished. Avoid busy wallpapers that compete with the content you're recording.
Common use cases for GIF screen capture on Windows
Here's where screen-recorded GIFs work best:
Bug reports and QA. Recording a bug as a GIF is faster than writing out steps. Drop it into a Jira ticket or GitHub issue and the developer sees the problem right away. ScreenToGif and ShareX both work well for this — you can crop to the affected area and trim the recording to show only the relevant behavior.
Software tutorials and docs. GIFs are perfect for showing "click here, then drag there" instructions. They loop endlessly, so the reader can watch until they get it. Keep each GIF focused on one action. For longer tutorials, chain multiple GIFs with text between them.
Slack and Teams messages. Need to show a coworker how to find a setting? Record a 5-second GIF and paste it in. It auto-plays right in the chat window. This is where Gyazo GIF and ScreenSnap Pro shine — the cloud link is ready before you finish typing your message.
README files and wikis. Animated GIFs in README files make open-source projects stand out. They show what the software does without making readers install it first. Host the GIF on your repo or use a CDN to keep load times fast.
Email campaigns. GIFs play in most email clients (Gmail, Outlook, Apple Mail). Embed a short demo of your product or feature. Keep it under 3 seconds and under 2MB for email — larger GIFs may get stripped or slow down loading.
How to optimize GIF file size
GIFs can get large fast. A 10-second screen recording at full resolution might hit 10-20 MB. That's too big for email, Slack, and most websites. Here are proven ways to shrink your GIFs without wrecking quality.
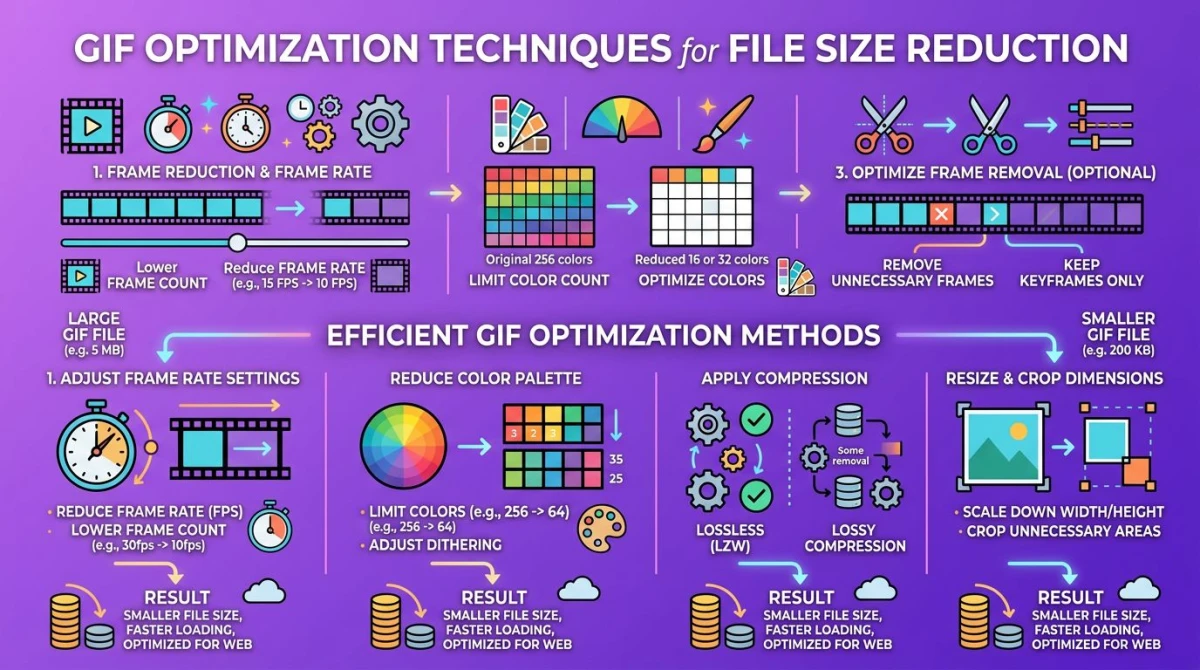
Reduce frame rate
Most GIF screen captures look fine at 10-15 FPS. Dropping from 30 FPS to 15 FPS cuts your file size roughly in half. Set this before recording in ScreenToGif or LICEcap.
Shrink the capture area
Record only what matters. A full 1920x1080 capture creates huge files. Crop to the window or UI element you need. A 600x400 region produces GIFs that are 5-10x smaller than full-screen recordings.
Trim extra frames
Cut dead time at the start and end. ScreenToGif's editor lets you remove frames one by one. Even cutting 10-20 frames from the beginning and end can save hundreds of KB.
Use fewer colors
GIFs support up to 256 colors. Most screen recordings don't need all of them. In ScreenToGif, try the "Reduce colors" option. Dropping to 128 or 64 colors often looks fine for UI recordings and noticeably cuts the file size.
Compress after recording
If your GIF is still too big, run it through a compression tool. You can compress your GIFs for free right in your browser. For a deeper look at file size tricks, check out our guide on how to reduce GIF file size.
GIF vs video: When to use which
Not every screen capture should be a GIF. Here's how to decide between GIF and video formats.
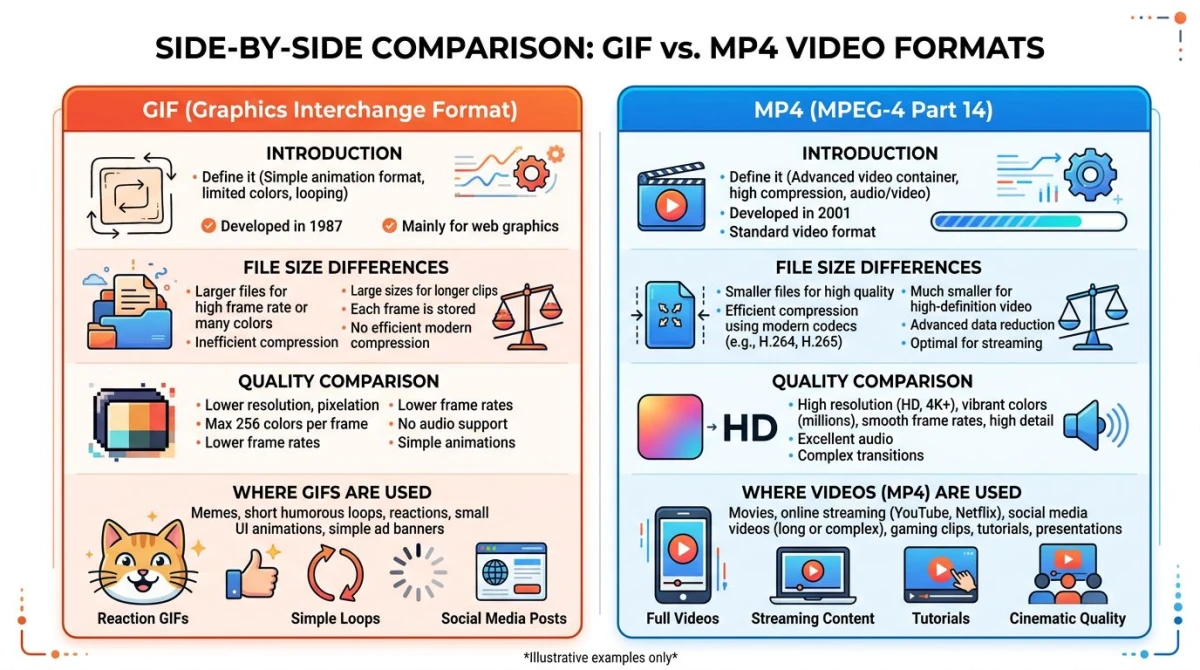
Choose GIF when
- The clip is under 15 seconds — GIFs work best for short loops
- You need autoplay — GIFs start playing with no click needed
- The destination supports GIFs — Slack, GitHub issues, Jira tickets, email, docs
- You're showing a simple action — a button click, a UI animation, a quick workflow
- File size is manageable — small capture area, short duration
Choose video when
- The recording is over 30 seconds — MP4 is much more efficient for longer content
- You need audio — GIFs have no sound
- Quality matters most — video supports millions of colors; GIFs max out at 256
- The file would be huge as a GIF — full-screen, long recordings belong in video
File size comparison
| Format | 10-Second Clip (720p) | Autoplay | Sound | Colors |
|---|---|---|---|---|
| GIF | 5-15 MB | Yes | No | 256 |
| MP4 | 0.5-2 MB | Varies | Yes | Millions |
| WebM | 0.3-1 MB | Varies | Yes | Millions |
For most quick demos and bug reports, GIF is the right call. For anything longer or more complex, stick with video — our guide on how to record your screen on Windows covers the best free options. If you also work on Mac, see our guide on converting video to GIF on Mac for additional methods.
Built-in Windows tools (and their limits)
Windows 10 and 11 include screen recording tools, but neither one saves GIFs directly.
Snipping Tool (Windows 11)
The updated Snipping Tool can record screen video, but it only saves as MP4. There's no GIF export option. Microsoft has hinted at GIF support in Insider Preview builds, but as of mid-2026 it's not in the stable release.
If you record with Snipping Tool and want a GIF, you'll need to convert the MP4 afterward. That extra step is why dedicated GIF tools are worth having.
Xbox Game Bar
Press Win + G to open the Xbox Game Bar. It records apps and games as MP4 video with audio. Like the Snipping Tool, there's no GIF option. Game Bar also can't record your desktop or File Explorer — only app windows. Microsoft has documentation on Game Bar recording if you want to explore its video features.
For more info on what Windows captures and where it saves files, check our guide on where screenshots go on Windows.
Tips for better GIF screen captures
These tips work no matter which tool you pick:
Plan your recording. Practice the action once before you hit record. Smooth, purposeful mouse movements look much better than random clicking.
Keep it short. Aim for 3-10 seconds. If your GIF runs over 15 seconds, split it into multiple clips or switch to video.
Hide notifications. Turn on Focus Assist (Win + A > Focus Assist) before recording. A random Teams or Slack alert mid-recording ruins the take.
Use a clean desktop. Close extra tabs and windows. Less visual noise means smaller files and cleaner results.
Slow your mouse. Move at about 70% of your normal speed. Fast cursor movements look jittery in GIFs, especially at lower frame rates.
Add annotations after. If you need to highlight a button or label an area, do it after recording. ScreenToGif's editor and ScreenSnap Pro's annotation tools both let you add arrows, text, and callouts. You can also use OCR tools on Windows to grab text from your captures when needed.
If you want to capture more than what fits on one screen — like a long webpage — check out our guide on scrolling screenshots on Windows.
Frequently Asked Questions
Morgan
Indie DeveloperIndie developer, founder of ScreenSnap Pro. A decade of shipping consumer Mac apps and developer tools. Read full bio
@m_0_r_g_a_n_