How to Record Screen on Windows (2026) | 5 Free Ways
Screen recording on Windows lets you capture everything happening on your display (tutorials, presentations, gameplay, or bug reports) as a video file you can save or share. Whether you're on Windows 10 or 11, you already have free screen recording tools built right in, and dedicated apps like ScreenSnap Pro cover the gaps when you need GIFs, annotations, or one-click sharing.
Here's the quick breakdown: Windows 11 users get the Snipping Tool screen recorder, Windows 10 and 11 users have Xbox Game Bar, and everyone can use OBS Studio, PowerPoint, or browser-based recorders at zero cost. Below, you'll find step-by-step instructions for each method, plus tips on recording system audio (the #1 question people ask).
Quick comparison: 5 free screen recording methods
Before we get into the details, here's how each method stacks up:
| Method | Windows Version | System Audio | Mic Audio | Editing | Best For |
|---|---|---|---|---|---|
| Snipping Tool | 11 only | ✅ | ✅ | Trim only | Quick, no-fuss captures |
| Xbox Game Bar | 10 & 11 | ✅ | ✅ | None | App/game recording |
| PowerPoint | 10 & 11 | ✅ | ✅ | Trim | Embedding in presentations |
| OBS Studio | 10 & 11 | ✅ | ✅ | None (record only) | Pro-level, multi-source |
| Browser recorders | Any | Varies | ✅ | Varies | No-install, one-off recordings |
Method 1: Snipping Tool screen recording (Windows 11)
The Snipping Tool is the fastest built-in way to record your screen on Windows 11. No installs, no setup.
Press Win + Shift + R, drag a rectangle over the area you want, toggle microphone and system audio in the toolbar, then click Start. A 3-second countdown runs. Click Stop when you're done and the clip saves as an MP4.
For the full walkthrough, including the audio toggles, the save folder, the Clipchamp handoff and what to do when the Record button is missing, see our dedicated guide to Snipping Tool screen recording.
Snipping Tool limitations
- Windows 11 only, and it needs a current Snipping Tool build from the Microsoft Store
- No webcam overlay
- No annotation during recording
- MP4 only, so a GIF means converting afterwards with a free MP4 to GIF converter
Method 2: Xbox Game Bar (Windows 10 & 11)
Xbox Game Bar is built into both Windows 10 and Windows 11. Despite the name, it records any app, not only games. It's the most reliable built-in recorder for Windows 10 users.
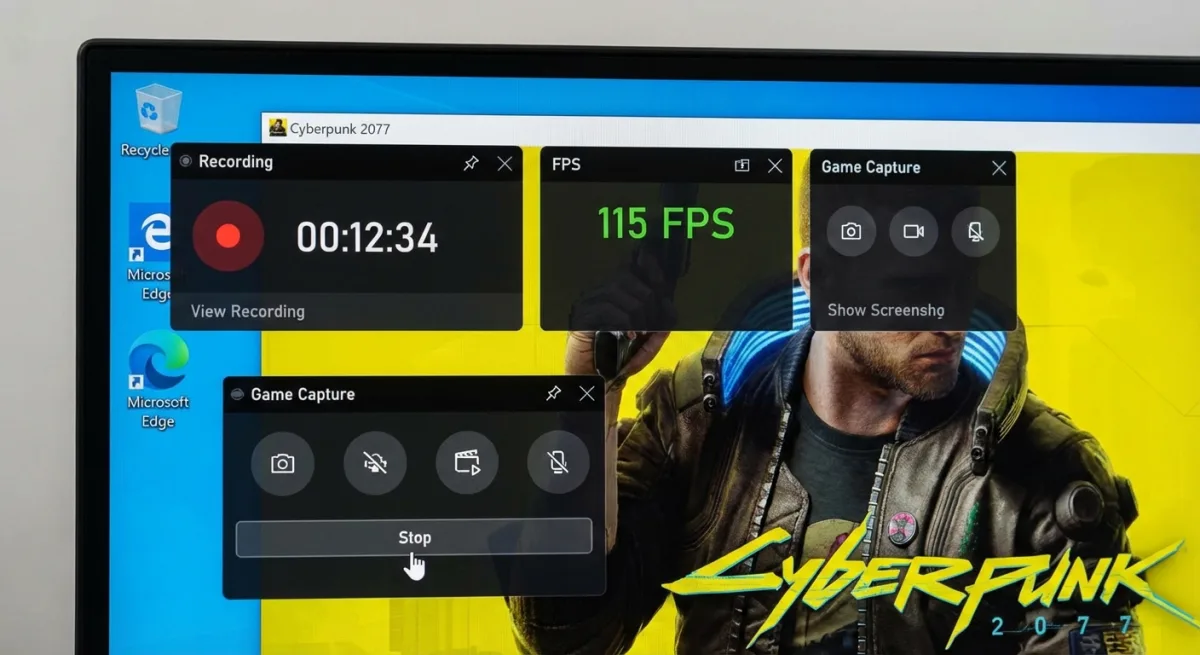
How to record with Xbox Game Bar
- Open the app you want to record (Game Bar records active windows, not the desktop).
- Press
Win + Gto open the Game Bar overlay. - In the Capture widget, click the microphone icon to toggle mic audio.
- Click the Record button (⏺️) or press
Win + Alt + Rto start recording. - A small floating timer appears in the corner. Record as long as you need.
- Press
Win + Alt + Ragain to stop, or click Stop on the timer widget. - Your recording saves to
C:\Users\[YourName]\Videos\Capturesas an MP4 file.
Xbox Game Bar limitations
- Records app windows only, not the desktop or File Explorer
- No custom region selection (records the full active window)
- Default max recording is 2 hours (adjustable in Settings > Gaming > Captures)
- Performance can dip in demanding games
Good to know: You can change recording quality in Settings > Gaming > Captures. Choose 30 or 60 FPS and standard or high quality depending on your storage and performance needs.
Method 3: PowerPoint screen recording (hidden gem)
Most people don't know that Microsoft PowerPoint has a built-in screen recorder. It captures any area of your screen with system audio and mic input. If you already have Office installed, this is a zero-cost option.
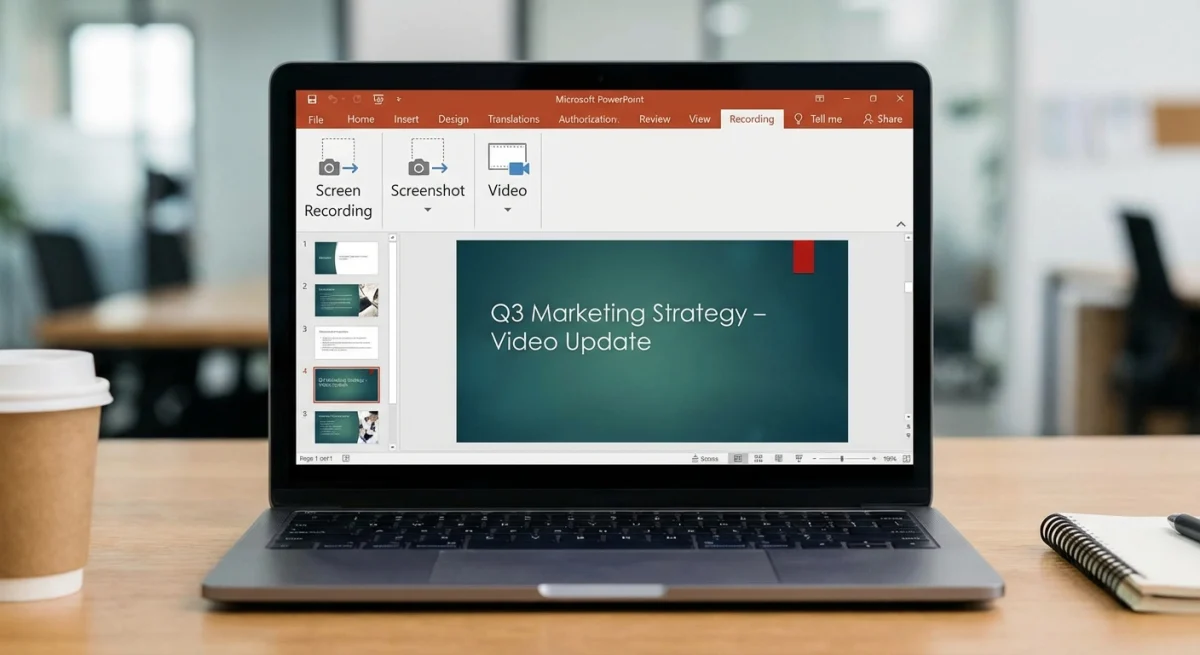
How to record with PowerPoint
- Open PowerPoint and create a new blank presentation.
- Go to the Insert tab and click Screen Recording on the far right.
- A control dock appears at the top of your screen. Click Select Area and drag to choose the recording region.
- Toggle Audio (mic) and Record Pointer (cursor visibility) as needed. System audio records automatically.
- Click Record or press
Win + Shift + R. - When done, press
Win + Shift + Qor hover at the top of the screen to reveal the dock and click Stop. - The recording embeds into your slide. Right-click it and select Save Media as to export as MP4.
PowerPoint recording tips
- No time limit on recordings.
- The exported MP4 includes a basic trim option (right-click > Trim Video) before saving.
- Works in PowerPoint 2016, 2019, 2021, and Microsoft 365.
Method 4: OBS Studio (free, pro-level)
OBS Studio is free, open-source, and widely used for screen recording and live streaming on Windows. It handles multiple sources, scenes, audio tracks, and output formats. If you need professional results, OBS is a capable free option.
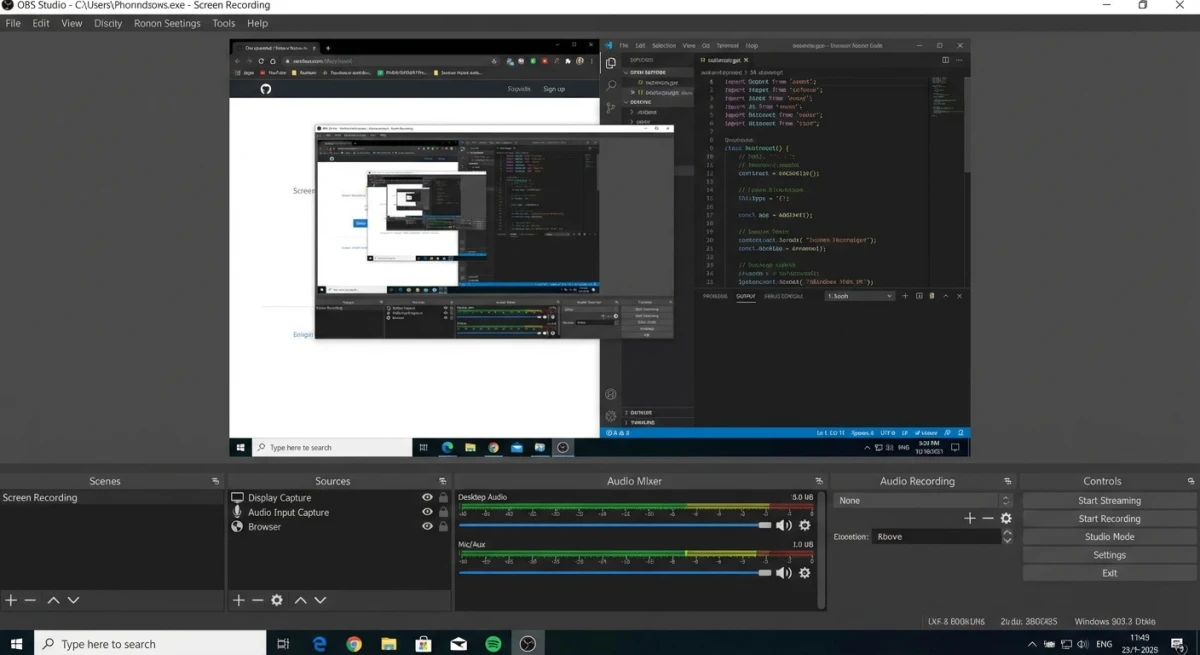
How to record with OBS Studio
- Download OBS Studio and run the auto-configuration wizard.
- In the Sources panel, click + and add Display Capture (full screen) or Window Capture (single app).
- To record audio, add Audio Output Capture (system audio) and/or Audio Input Capture (microphone) in Sources.
- Click Settings > Output to choose your recording format (MP4 or MKV) and encoder (x264 for CPU, NVENC for NVIDIA GPU).
- Click Start Recording in the bottom-right controls panel.
- When finished, click Stop Recording. Files save to the path shown in Settings > Output > Recording Path.
Why choose OBS?
- Record multiple monitors simultaneously
- Separate audio tracks for mic and system sound
- Custom overlays, webcam, and text sources
- Hardware-accelerated encoding (NVENC, AMD AMF, QuickSync)
- No watermarks, no time limits, completely free
OBS tips for beginners
- Use MKV as your recording format (crash-proof). Remux to MP4 afterward via File > Remux Recordings.
- Set your base and output resolution to match your monitor for the sharpest capture.
- For tutorials, 30 FPS is fine. For gameplay, use 60 FPS.
OBS encoder comparison: which one should you pick?
OBS offers several encoders, and picking the right one makes a real difference in both recording quality and system performance. Here's how they compare:
| Encoder | Type | Best For | CPU Impact | Quality |
|---|---|---|---|---|
| x264 | Software (CPU) | Any system, no GPU needed | High | Excellent at slower presets |
| NVENC | Hardware (NVIDIA GPU) | NVIDIA GTX 1660+ or RTX cards | Very low | Great, near x264 quality |
| AMD AMF | Hardware (AMD GPU) | AMD RX 5000+ series | Very low | Good, improving with drivers |
| QuickSync | Hardware (Intel iGPU) | Intel CPUs with integrated graphics | Very low | Decent for casual recording |
How to choose:
- Have an NVIDIA GPU? Use NVENC. It offloads encoding to your graphics card, so your CPU stays free for whatever you're recording. Set the preset to "Quality" for the best balance.
- AMD graphics card? Use AMF. Recent driver updates have closed the gap with NVENC significantly. Set the preset to "Quality" or "Balanced."
- Intel CPU, no dedicated GPU? QuickSync works well for basic screen recordings and tutorials. It won't match NVENC quality in fast-motion content, but it's perfectly fine for presentations and software demos.
- No compatible GPU at all? Fall back to x264. Use the "veryfast" preset to keep CPU usage manageable. Drop down to "faster" or "medium" only if your CPU can handle it. Check Task Manager while recording.
One common mistake: leaving OBS on x264 when you have an NVIDIA GPU. You're making your CPU do extra work for no benefit. Switch to NVENC in Settings > Output > Recording > Encoder and you'll likely see smoother recordings with less dropped frames.
Method 5: Browser-based recorders (no install)
If you need a quick, one-off recording without installing anything, browser-based tools get the job done. These work on any Windows version with a modern browser.
Popular free options:
- Loom (loom.com): Free plan includes 25 recordings up to 5 minutes each. Great for quick async messages.
- Vimeo Record (vimeo.com/features/screen-recorder): Free Chrome extension, unlimited recording length.
- ScreenApp (screenapp.io): Browser-based, records screen and webcam, no account required for basic use.
How to use a browser recorder
- Open the recorder's website in Chrome, Edge, or Firefox.
- Click Start Recording and grant screen-sharing permissions.
- Choose to share your entire screen, a specific window, or a browser tab.
- Record, then stop when finished.
- Download the MP4 or share via a generated link.
Step-by-step: recording with Loom (browser)
Loom is the most popular browser-based recorder. Here's how to use it without installing anything:
- Go to loom.com and create a free account (Google sign-in works).
- Click New Video > Record a Video from your dashboard.
- The first time, your browser asks for camera and microphone permissions, so click Allow.
- Choose your recording mode: Screen only, Screen and camera, or Camera only.
- Select what to share: entire screen, a specific application window, or a single browser tab. If you're sharing a browser tab, check "Share tab audio" to capture sound.
- Click Start Recording. A 3-second countdown begins, then you're live.
- Click the Loom icon in your toolbar or press
Alt + Shift + Lto stop. - Loom opens your recording in a new tab with a shareable link. Click Download to save the MP4 locally.
The free plan limits you to 25 videos at 5 minutes each. For one-off recordings where you don't want to install software, that's usually plenty.
Trade-offs: Browser recorders depend on your internet connection for uploads, may have recording limits on free tiers, and offer less control over quality settings compared to desktop apps.
How to record screen with system audio (the #1 question)
Recording your microphone is straightforward, and every method above supports it. But capturing system audio (the sound coming from your computer, like app audio or video playback) trips people up.
Here's the system audio support breakdown:
| Method | System Audio | How to Enable |
|---|---|---|
| Snipping Tool | ✅ | Click the speaker icon before recording |
| Xbox Game Bar | ✅ | Enabled by default; check Settings > Gaming > Captures |
| PowerPoint | ✅ | Enabled by default when Audio is toggled on |
| OBS Studio | ✅ | Add "Audio Output Capture" source |
| Browser tools | ⚠️ Tab audio only | Enable "Share tab audio" when selecting browser tab |
The key takeaway: All five desktop methods record system audio. Browser tools capture tab audio only when you share a browser tab and check the audio-sharing option.
If you're recording a tutorial and want both your voice and the app sounds, use OBS Studio, which lets you put mic and system audio on separate tracks and makes editing much easier.

Tired of plain screenshots? Try ScreenSnap Pro.
Beautiful backgrounds, pro annotations, GIF recording, and instant cloud sharing, all in one app. Pay $49 once, own it forever.
See pricing and featuresHow to record a specific window or area
Not every method lets you choose exactly what to record:
- Snipping Tool: Drag to select any custom area before recording.
- Xbox Game Bar: Records the active window only (no custom area or desktop).
- PowerPoint: Drag to select any custom area.
- OBS Studio: Use Window Capture for a specific app, or Display Capture + crop filter for a custom area.
- Browser tools: Choose entire screen, window, or tab when prompted.
For the most flexibility, Snipping Tool and OBS give you the most control over what gets captured.
Best format and quality settings
Most screen recordings export as MP4, which is universally compatible and offers good compression. Here's what to consider:
- Resolution: Match your display resolution (1920×1080 or 2560×1440) for sharp output. Downscale to 1080p if file size matters.
- Frame rate: 30 FPS is fine for tutorials and presentations. Use 60 FPS for gameplay or smooth UI animations.
- Encoder: If you have an NVIDIA GPU, use NVENC in OBS for hardware-accelerated encoding that barely impacts performance. Otherwise, x264 (CPU) works well.
- Bitrate: For 1080p30, 4-6 Mbps is a good balance. For 1080p60, aim for 6-10 Mbps.
Need to share your recording as a GIF? You can convert short clips using our free MP4 to GIF converter, or build one frame by frame with Image to GIF.
Editing your screen recording
Once you've recorded, you might need to trim, crop, or annotate:
- Windows built-in: The Photos app (Windows 10) or Clipchamp (Windows 11) offer basic trimming.
- Clipchamp: Free with Windows 11. Handles trimming, transitions, text overlays, and export up to 1080p.
- DaVinci Resolve: Free professional editor. Overkill for simple trims, but powerful for complex edits.
- Canva: Browser-based, good for adding text and simple edits to short recordings.
For quick annotations on screenshots, tools like image annotation can help mark up individual frames.
Screen recording vs GIF recording
Screen recordings (MP4/video) and GIF recordings serve different purposes:
| Screen Recording (MP4) | GIF Recording | |
|---|---|---|
| File size | Smaller for long clips | Smaller for short clips (<15s) |
| Audio | ✅ Supported | ❌ No audio |
| Quality | Full resolution, smooth | Limited colors (256), can be choppy |
| Best for | Tutorials, demos, gameplay | Quick UI demos, documentation, chat |
| Playback | Needs video player | Auto-plays everywhere |
When to use GIFs: Short, looping demos under 15 seconds: bug reports, UI interactions, quick how-tos. ScreenSnap Pro, a screen recorder for Windows and Mac, records directly to GIF (up to 1 minute) without the video-to-GIF conversion step. Already have an MP4 from one of the methods above? Convert it with our MP4 to GIF converter.
When to use video: Anything longer than 15 seconds, anything requiring audio, or when you need full-quality output.
Windows default screen recorder: which one should you use?
With multiple built-in options, choosing the right Windows default screen recorder comes down to your situation:
- Just need a quick clip? Snipping Tool on Windows 11 is the fastest path from "I need to record this" to a saved MP4. No menus, no configuration.
- Recording an app or game? Xbox Game Bar handles it with a keyboard shortcut. Perfect for capturing gameplay highlights or demonstrating a software bug to your team.
- Making a presentation? PowerPoint's screen recorder drops the video directly into your slide. No export-import dance.
- Need full control? OBS Studio gives you scene composition, multiple audio tracks, and encoding options that rival paid software.
- No time to install anything? Browser-based recorders work immediately. Open a tab, click record, and you're done.
Most Windows users don't realize they already have two or three screen recording options installed. Try the built-in tools first, because you might not need anything else.
Tips for better screen recordings
A few small adjustments make a noticeable difference in your final recording:
- Close unnecessary apps to reduce visual clutter and free up system resources.
- Turn off notifications before recording. Go to Settings > System > Notifications and enable Focus Assist (Windows 10) or Do Not Disturb (Windows 11).
- Use a clean desktop wallpaper if you're recording the full screen. Solid colors or subtle gradients look more professional.
- Set your display scaling to 100% for the sharpest text in recordings. Find this in Settings > Display > Scale.
- Record in a quiet environment if capturing mic audio. Even a basic USB microphone improves voice clarity dramatically over laptop speakers.
- Do a 10-second test recording before the real thing. Check audio levels, framing, and resolution before committing to a longer session.
Troubleshooting common screen recording problems
Even with the right tool, screen recordings don't always go smoothly. Here are fixes for the most common issues Windows users run into.
Black screen in recordings
A black screen usually means the recorder can't access your display output. This happens most often with Xbox Game Bar and OBS.
Fixes:
- OBS: Switch from Display Capture to Window Capture (or vice versa). Some GPUs block Display Capture when hardware acceleration is active. You can also try running OBS as administrator: right-click the OBS shortcut and select "Run as administrator."
- Xbox Game Bar: Make sure the app you're recording isn't running in fullscreen exclusive mode. Switch to borderless windowed mode in the app's settings.
- NVIDIA users: Open NVIDIA Control Panel > Manage 3D Settings and set OBS to run on the same GPU as the app you're recording. Mismatched GPU assignments cause black screen captures.
- General: Update your graphics drivers. Outdated drivers are the #1 cause of black screen issues across all recording tools.
No audio in recordings
You hit stop, play back the file, and there's no sound. Frustrating but usually a quick fix.
Fixes:
- Check your audio source in the recording tool. In OBS, make sure "Audio Output Capture" is added and set to your correct playback device (headphones, speakers, etc.).
- Windows audio settings: Right-click the speaker icon in the taskbar > Sound settings > make sure your output device matches what the recording tool expects.
- Xbox Game Bar: Go to Settings > Gaming > Captures and confirm "Record audio when I record a game" is toggled on. Check both the system audio and microphone sliders.
- Browser recorders: When sharing your screen, check the "Share tab audio" or "Share system audio" checkbox in the sharing dialog. This is easy to miss and it's off by default.
Lag, stuttering, or dropped frames
Your recording plays back choppy or your system grinds to a halt while recording.
Fixes:
- Lower your output resolution. Recording at 4K when you only need 1080p wastes resources. In OBS, set Output Resolution to 1920×1080 even if your monitor is higher.
- Reduce frame rate. 30 FPS is enough for tutorials and presentations. Reserve 60 FPS for gameplay only.
- Switch to hardware encoding. If you're using x264 (CPU encoding) and have a dedicated GPU, switch to NVENC or AMF immediately. This alone often eliminates lag.
- Close background apps. Web browsers with many tabs, Spotify, and cloud sync tools (OneDrive, Dropbox) compete for CPU and disk I/O. Close what you don't need.
- Record to a separate drive. If possible, record to a different physical drive than your OS drive. An SSD is ideal. Writing large video files to the same drive your system runs on creates I/O bottlenecks.
Frequently Asked Questions

Morgan
Indie DeveloperIndie developer, founder of ScreenSnap Pro. A decade of shipping consumer Mac apps and developer tools. Read full bio
@m_0_r_g_a_n_