How to Record Computer Audio on Windows (2026)
TL;DR: Enable Stereo Mix in Sound settings if your hardware supports it. If not, install VB-Audio Cable for virtual routing, use OBS Studio for full control, or try ScreenSnap Pro ($29 one-time) for one-click capture. Xbox Game Bar and Audacity with WASAPI loopback are free built-in options. Skip to Method 5 for the easiest path or Method 6 for the best free route.
Want to record computer audio on Windows — a YouTube video, a game, or a Zoom call — without your microphone bleeding in? Windows makes it harder than it should be. Stereo Mix is hidden on most modern laptops, and many recorders mix system sound and mic into one muddy track.
This guide covers six working methods to capture system audio on Windows 10 and 11. If you also need video, see how to screen record with audio on Windows.
What is "system audio" vs microphone audio?
Two very different things on Windows:
- System audio (also called internal audio or loopback) is sound coming out of your speakers — Spotify, a YouTube video, game audio, the other side of a Zoom call.
- Microphone audio is sound going into your PC — your voice, room noise, a guest on a headset.
Most built-in Windows recorders mix both together. That's fine for a tutorial voiceover but a problem if you want clean system audio capture on Windows with no mic hiss.
The methods below are ordered roughly by difficulty. If one doesn't work on your PC, try the next — Windows audio support varies by hardware.
Quick comparison: which method records system audio?
| Method | System audio | Mic optional | Cost | Best for |
|---|---|---|---|---|
| Stereo Mix | Yes (if supported) | Yes | Free | Desktop PCs with older sound cards |
| VB-Audio Cable | Yes | Yes | Free (donationware) | Any PC, most control |
| OBS Studio | Yes | Yes | Free | Streamers and tutorials |
| Xbox Game Bar | Yes (app only) | Yes | Free (built-in) | Quick clips with video |
| ScreenSnap Pro | Yes (one click) | Yes | $29 one-time | Clean UX, no setup |
| Audacity + WASAPI | Yes | No | Free | Audio-only recording |
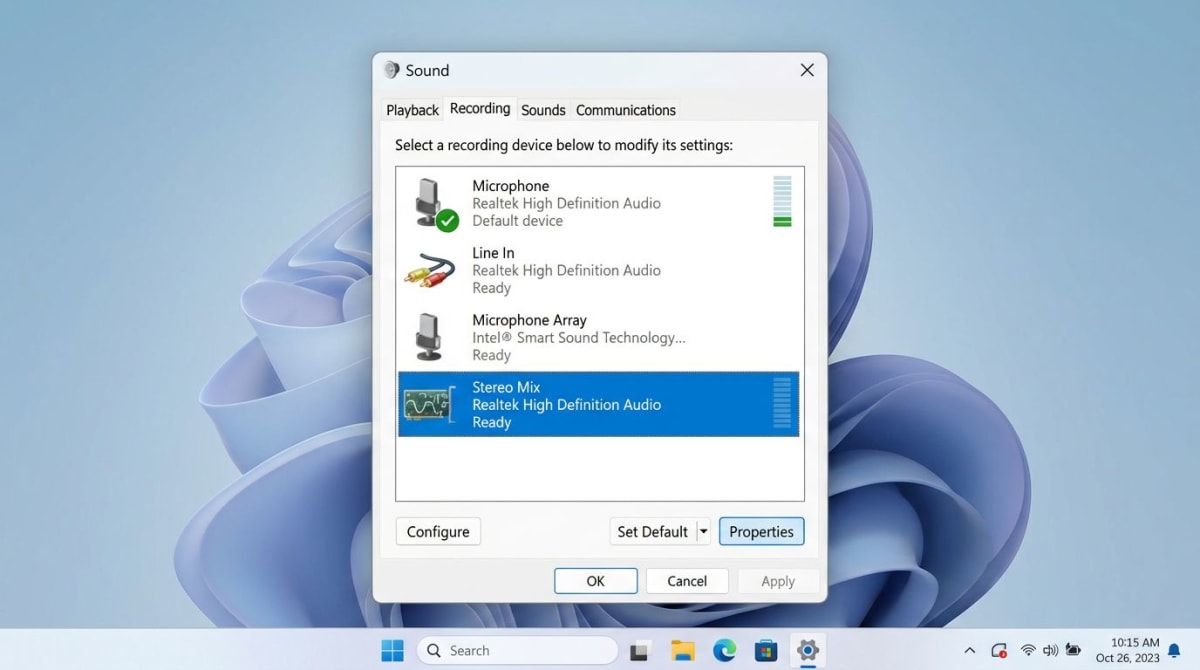
Method 1: Enable Stereo Mix in Sound settings
Stereo Mix is a hidden Windows feature that records whatever your default playback device is playing. The catch: many modern laptops and USB audio devices don't ship with it.
How to enable Stereo Mix
- Right-click the speaker icon in the taskbar and choose Sound settings.
- Click More sound settings (Windows 11) or Sound Control Panel (Windows 10).
- Click the Recording tab.
- Right-click in the empty space and select Show Disabled Devices and Show Disconnected Devices.
- If Stereo Mix appears, right-click it and choose Enable.
- Set it as the Default Device.
- Open any recorder (Voice Recorder, Audacity) and pick Stereo Mix as the input.
If you don't see Stereo Mix, your driver doesn't expose it. Update the Realtek or audio chipset driver from the laptop maker's site (not Windows Update). If nothing works, skip to Method 2.
Pros: Free, built in, no extra software.
Cons: Missing on most laptops. Captures everything including notification dings, which can ruin a take.
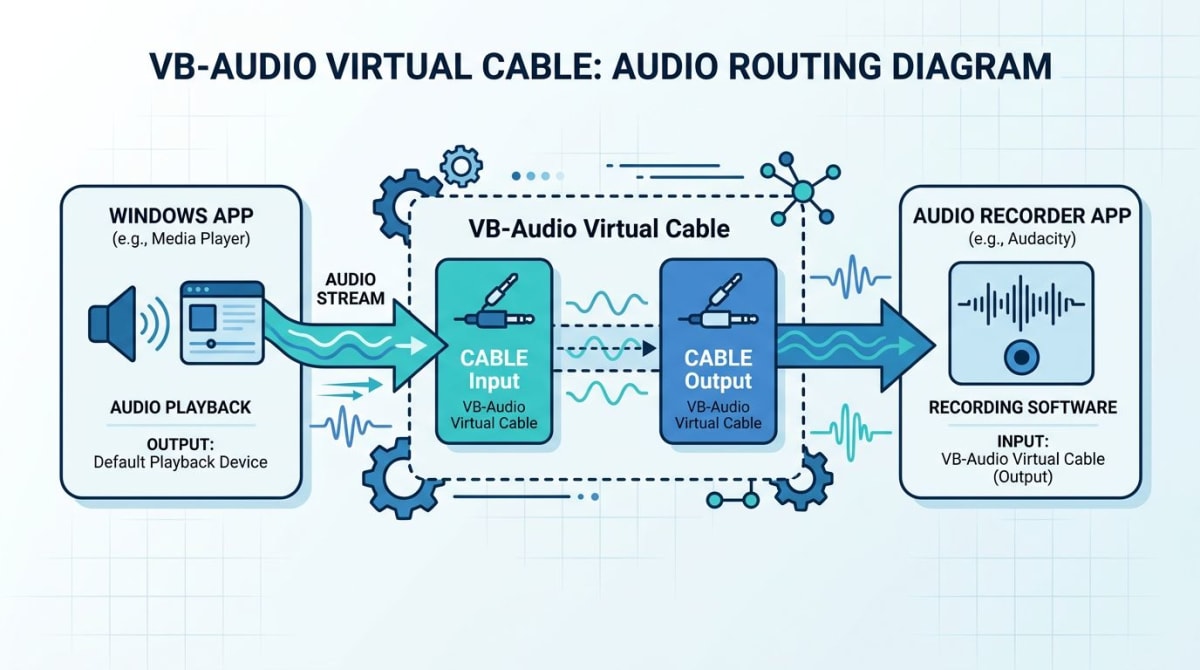
Method 2: VB-Audio Cable (virtual audio routing)
If your PC doesn't have Stereo Mix, VB-Audio Cable is the next best thing. It's a free virtual cable that acts as both a playback device and a recording device. Donationware — free to download, optional tip.
How to set up VB-Audio Cable
- Download VB-Cable from vb-audio.com and install it. Reboot when prompted.
- Open Sound settings and set CABLE Input as your default playback device. Your speakers will go silent — expected.
- To still hear audio while recording, open Sound Control Panel > Recording, right-click CABLE Output > Properties > Listen. Check Listen to this device and pick your real speakers.
- In your recorder (Audacity, OBS, ScreenSnap Pro), pick CABLE Output as the input.
- Play audio normally — your recorder captures it cleanly, with no mic noise.
Pros: Works on any PC, clean signal, zero mic bleed.
Cons: Slightly involved setup. The free version is one cable — if you need separate mic and system channels, VB-Audio also sells VoiceMeeter for more advanced routing.
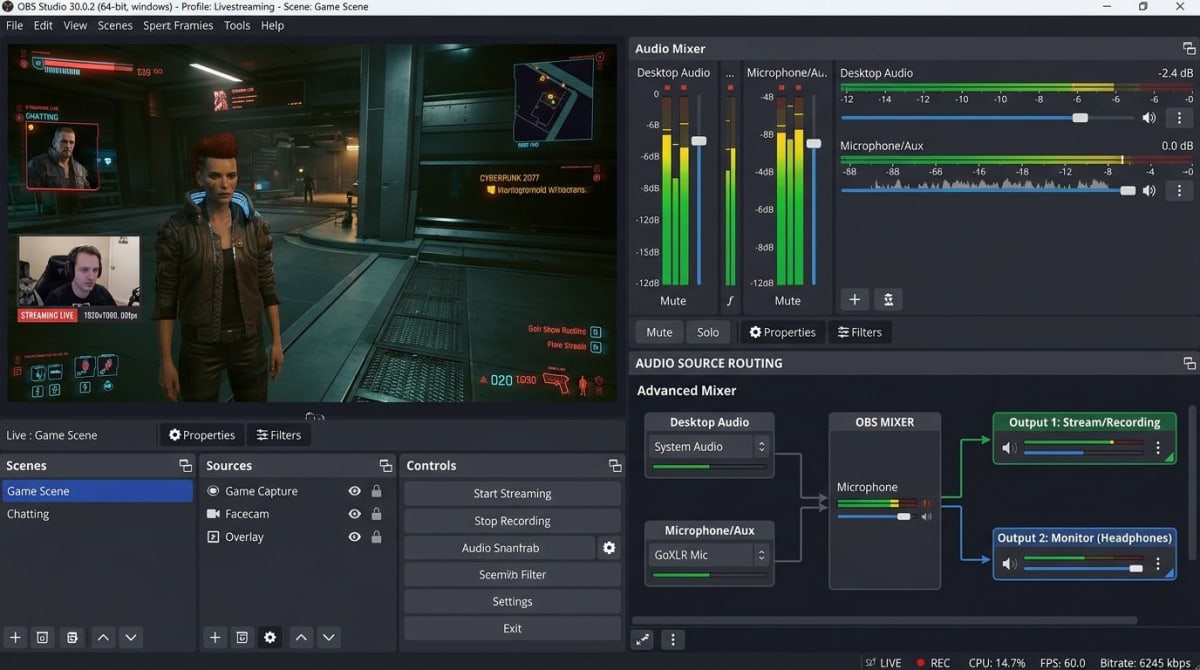
Method 3: Record computer audio in OBS Studio
OBS Studio isn't only for streaming. It has one of the best audio engines on Windows, and it can capture system audio directly without any virtual cable. If you already use OBS for video, it's the obvious choice. Our OBS Studio alternatives for Windows guide compares it with simpler options if OBS feels heavy.
How to record system audio in OBS
- Open OBS Studio. In the bottom-left Sources panel, click the + icon.
- Choose Audio Output Capture. Name it "System audio" and click OK.
- In the Properties window, pick your playback device and click OK.
- Open the Audio Mixer panel. You should see levels bouncing when audio plays.
- To also record mic, click + again and add Audio Input Capture, pointing at your microphone.
- In Settings > Output, switch Output Mode to Advanced. In the Recording tab, set Audio Track to
1for system and2for mic if you want them on separate tracks. - Hit Start Recording. OBS saves an MP4 or MKV with your audio tracks intact.
OBS tracks each source as a separate audio track, so you can mute the mic in post without touching system audio. The OBS Studio Quickstart guide covers the basics, and if audio isn't coming through, see our fix for OBS not recording audio on Windows.
Pros: Free, pro-grade control, separate tracks.
Cons: Learning curve. Overkill if you only want a quick audio clip.
Tired of plain screenshots? Try ScreenSnap Pro.
Beautiful backgrounds, pro annotations, GIF recording, and instant cloud sharing — all in one app. Pay $29 once, own it forever.
See what it doesMethod 4: Xbox Game Bar (system audio only)
Xbox Game Bar is built into Windows 10 and 11 and records screen video with system audio. It's not a pure audio recorder, but if you only need a quick clip of something playing (a funny moment in a game, a YouTube snippet), it's the fastest route.
How to record with Xbox Game Bar
- Press
Win + Gto open Xbox Game Bar. - Click the Capture widget. If it's not visible, click the widget menu icon on top and enable it.
- Click the microphone icon to toggle mic on or off. Turn it off if you only want system audio.
- Press
Win + Alt + Rto start recording. Record for as long as you need. - Press
Win + Alt + Ragain to stop. Your MP4 lands inVideos > Captures. - To keep only the audio, open the file in any editor and export the audio track as MP3 or WAV.
Pros: Built in, one shortcut.
Cons: Records the active window only — not your whole desktop. You get video too, even when you don't want it. If the shortcut fails, see Xbox Game Bar not working. For a broader walkthrough, see our screen record on Windows guide, or the roundup of free screen recorders for Windows.
Method 5: ScreenSnap Pro (the simplest UX)
If you don't want to mess with Stereo Mix, virtual cables, or OBS menus, ScreenSnap Pro captures system audio with a single toggle. Turn on the system audio icon, hit record, and the app grabs both the screen and what's playing — cleanly, on any Windows 10 or 11 PC.
How to record system audio with ScreenSnap Pro
- Open ScreenSnap Pro and click the video icon.
- In the recording toolbar, turn on the system audio toggle (the speaker icon). Leave the mic toggle off if you only want internal audio.
- Pick full screen or a specific region.
- Click Record. Do your thing. Click stop when done.
- The clip opens right away. Click Extract audio to save as MP3, or keep it as a video file.
That's the whole flow. No Sound Control Panel, no driver hunting, no virtual cable install. ScreenSnap Pro also includes webcam recording, GIF recording, 150+ gradient backgrounds, and 15 annotation tools — all for a $29 one-time price (no subscription). Works on Mac too, so one license covers both platforms.
Pros: One click. Pay once. Clean signal.
Cons: Paid (though $29 once is cheaper than most subscription competitors over a year).
Method 6: Audacity with WASAPI loopback
Audacity is the classic free audio editor, and it has a hidden trick: WASAPI loopback. Loopback records whatever your default output device is playing — without needing Stereo Mix or a virtual cable. It's the cleanest free audio-only method.
How to record system audio in Audacity
- Download Audacity from the official audacityteam.org site (avoid mirror downloads).
- Open Audacity. In the top toolbar, change Audio Host from MME to Windows WASAPI.
- Set the Recording Device to your playback device followed by "(loopback)" — for example,
Speakers (Realtek Audio) (loopback). - Set Playback Device to the same speakers, no loopback suffix.
- Click the red Record button. Play the audio you want to capture.
- Hit Stop. Export via File > Export Audio and pick MP3 or WAV.
Audacity's loopback is rock solid on Windows 10 and 11. The Audacity manual includes extra tips if the device list looks wrong.
Pros: Free, great editor built in, clean capture.
Cons: Audio-only (no video). WASAPI loopback can't record when the output device is set to "Stereo Mix" — they conflict.
Troubleshooting: no sound, mic is included anyway, crackling audio
No audio in recording. Double-check the input device — it's easy to leave the mic selected. If you use VB-Cable, confirm your playback device is CABLE Input.
Mic keeps getting mixed in. If your mic is set to "Listen to this device," it plays back into the output. Turn off listening in Sound Control Panel > Recording > Microphone > Listen.
Crackling or choppy audio. Usually a sample rate mismatch. In Sound Control Panel > Properties > Advanced, set the format to 16 bit, 44100 Hz or 24 bit, 48000 Hz, and match it on your recording device.
App silent in recording. Some DRM-protected players block loopback at the OS level. No legal workaround exists.
Recording is too quiet. Open Volume mixer and check the source app isn't turned down. Microsoft's fix sound problems in Windows guide has more fixes.
Legal reminder: copyright of audio you capture
Recording your own computer audio is fine for personal use. It gets murky when you record copyrighted music, paid streaming content, or someone else's voice without permission.
Rough guide:
- Your own game or app for a tutorial: fine.
- A Zoom or Teams call: legal in most places only with consent. Check your state — some are "one-party consent," some are "all-party."
- Spotify, Apple Music, or Netflix audio: violates their terms of service. Don't redistribute.
- A paid live stream or webinar: personal use usually OK, redistribution not.
When in doubt, ask.
FAQ
Bottom line
Windows makes recording computer audio harder than it should be, but you have options. Try Stereo Mix first. If not available, VB-Audio Cable is the most flexible free route, OBS Studio gives pro-level control, and Audacity with WASAPI loopback is the cleanest audio-only path. Xbox Game Bar handles quick screen-plus-sound clips.
If that sounds like too much, ScreenSnap Pro trades $29 for "one toggle, it just works." Match the tool to the job — and double-check the legal side before recording anything that isn't yours.
Morgan
Indie DeveloperIndie developer, founder of ScreenSnap Pro. A decade of shipping consumer Mac apps and developer tools. Read full bio
@m_0_r_g_a_n_