Screen Record With Audio on Windows | 2026 Guide
TL;DR: To screen record with audio on Windows, use Xbox Game Bar (Win + Alt + R) for quick recordings with system sound and microphone. For full control over audio sources, use OBS Studio (free). For a simpler paid option with system audio, mic, and webcam, try ScreenSnap Pro ($29 one-time). Skip to Method 1 for the fastest option or Method 3 for professional setups.Need to screen record with audio on Windows? The good news is that Windows has built-in tools for screen recording. The bad news? Getting audio to actually work — especially system audio from apps, browsers, and games — can be surprisingly tricky depending on which method you use. Dedicated apps like ScreenSnap Pro handle system audio and mic in one click, so you skip the routing headaches.
This guide covers five methods to record your screen with audio on Windows 10 and Windows 11, from the simplest built-in options to powerful free tools. If you just need a basic recording without audio, our guide on how to screen record on Windows covers the essentials.
Quick comparison: which method records audio?
Before walking through each method, here is a comparison of audio support across all five options. This table helps you pick the right tool based on your audio needs.
| Method | System audio | Microphone | Cost | Best for |
|---|---|---|---|---|
| Xbox Game Bar | Yes (in-app) | Yes | Free (built-in) | Quick game/app recordings |
| Snipping Tool | Limited | Limited | Free (built-in) | Short clips without audio |
| OBS Studio | Yes (full) | Yes | Free | Professional recordings |
| PowerPoint | Yes | Yes | Microsoft 365 | Presentations, tutorials |
| ScreenSnap Pro | Yes | Yes | $29 one-time | Easy recording with full audio |
Common scenarios:
- Recording a Teams or Zoom call -- Method 1 (quick) or Method 3 (best quality)
- Making a tutorial with voiceover -- Method 3 (most control) or Method 5 (simplest setup)
- Capturing gameplay with commentary -- Method 1 (built-in, low overhead)
- Quick screen clip, no audio needed -- Method 2 (simplest)
Method 1: Xbox Game Bar (built-in)
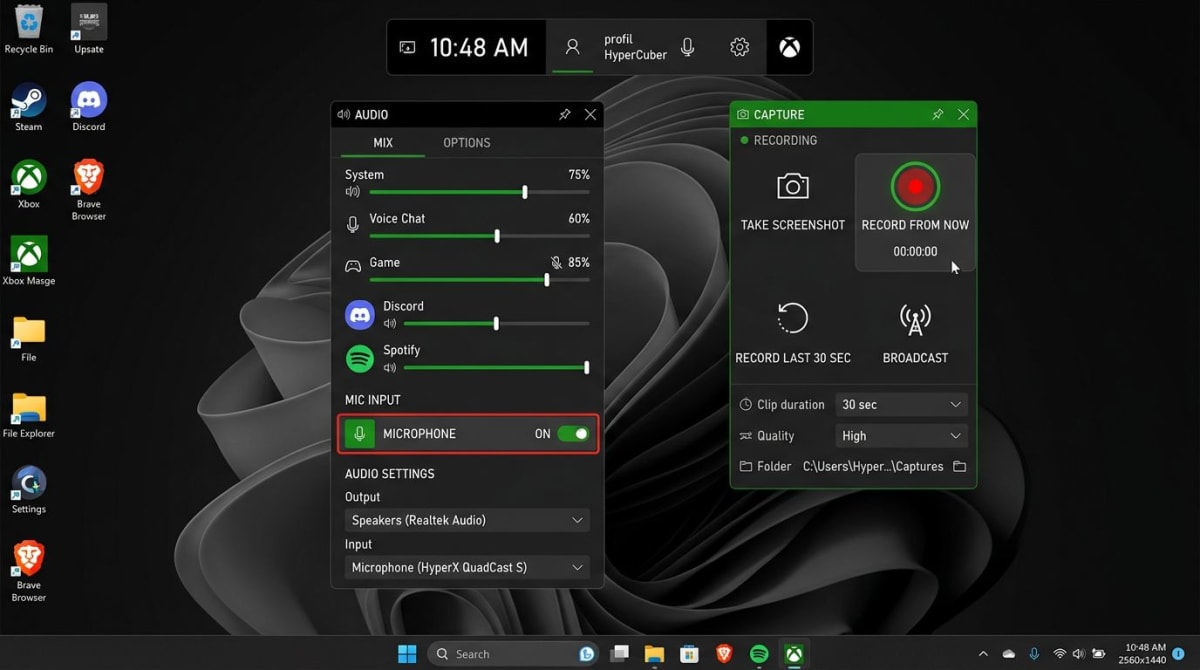
Xbox Game Bar is the fastest way to screen record on Windows with audio. Despite the name, it works for any application -- not only games. It comes pre-installed on Windows 10 and Windows 11.
Audio support: Records system audio from the active app and optionally captures microphone input. The main limitation is that it records only one window at a time -- you cannot capture your full desktop.
How to record with Xbox Game Bar
- Open the app or window you want to record.
- Press
Win + Gto open Xbox Game Bar. - Click the Capture widget (camera icon). If you do not see it, click the widget menu and enable Capture.
- To include microphone audio, click the microphone icon in the Capture widget to toggle it on. You can also press
Win + Alt + Mas a shortcut. - Click the Record button (circle icon) or press
Win + Alt + Rto start recording. - A small recording indicator appears in the corner. Press
Win + Alt + Ragain to stop. - Your recording saves to
Videos > Capturesas an MP4 file with audio included.
Configure audio settings
For better audio quality, open Xbox Game Bar (Win + G) and click the gear icon:
- Audio to record: Choose "Game" (active app only), "All" (system-wide), or "None."
- Audio quality: Set to 192 kbps for clear audio.
- Microphone: Make sure your preferred input device is selected in Windows sound settings.
Pro tip: If you hear no audio in your recording, check that the app you are recording is not muted in the Windows Volume Mixer. Right-click the speaker icon in the taskbar, select Sound settings, and scroll to Volume mixer. If you are having broader audio issues, Microsoft's guide on fixing sound problems in Windows covers additional troubleshooting steps. Xbox Game Bar records app-level audio, so a muted app produces silent recordings.
Method 2: Snipping Tool (Windows 11 only)
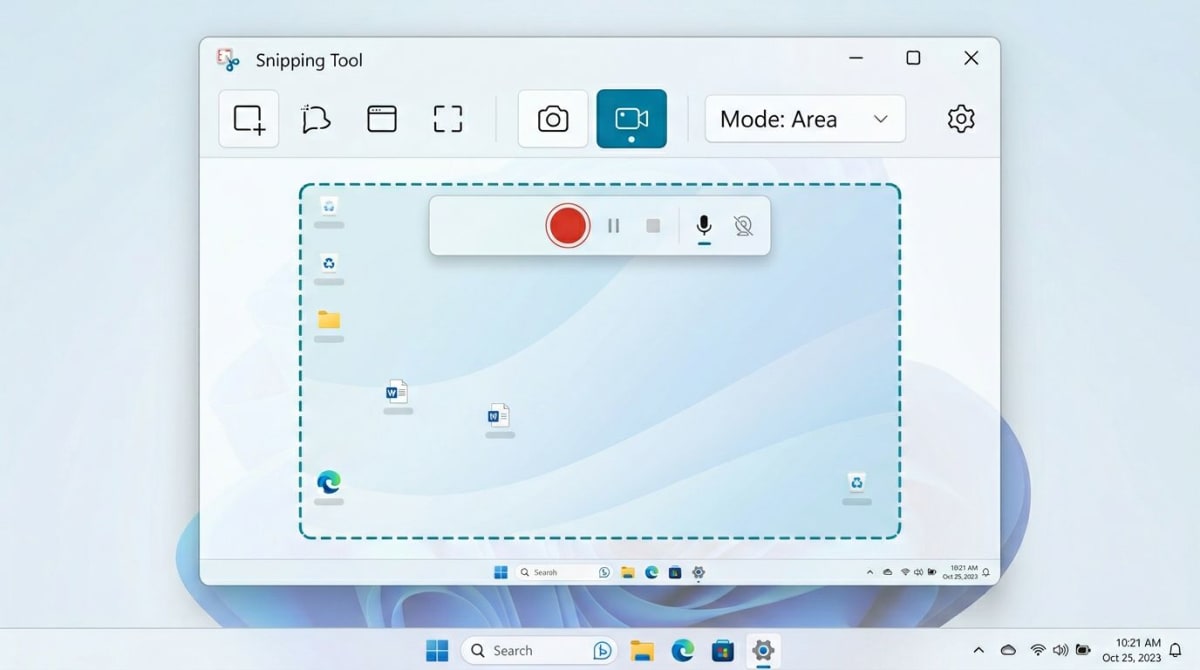
The Snipping Tool in Windows 11 gained screen recording capabilities in 2023. It is the simplest way to capture a quick video clip, but its audio support is limited compared to Xbox Game Bar.
Audio support: Starting with the Windows 11 24H2 update, Snipping Tool can capture both microphone and system audio. On earlier versions, audio recording may not be available or may be limited to microphone only. Check for updates if you do not see audio controls.
How to record with Snipping Tool
- Open Snipping Tool from the Start menu or press
Win + Shift + S, then open the full Snipping Tool app. - Click the video camera icon to switch to recording mode.
- Click + New and drag to select the area of your screen to record.
- Before clicking Start, toggle the microphone icon (for voice) and speaker icon (for system audio) as needed.
- Click Start to begin recording.
- Click Stop when finished.
- Save the recording as an MP4 file.
Key limitation: Snipping Tool recordings are area-based, meaning you select a rectangle on screen. It does not follow a specific window. If you need reliable audio capture, Xbox Game Bar or OBS Studio are better choices.
If you need screenshots instead of video, check out our roundup of the best screenshot tools for Windows -- several of them also handle quick screen recordings. And if you work on a Mac as well, our guide on how to screen record with audio on Mac covers the differences on that platform.
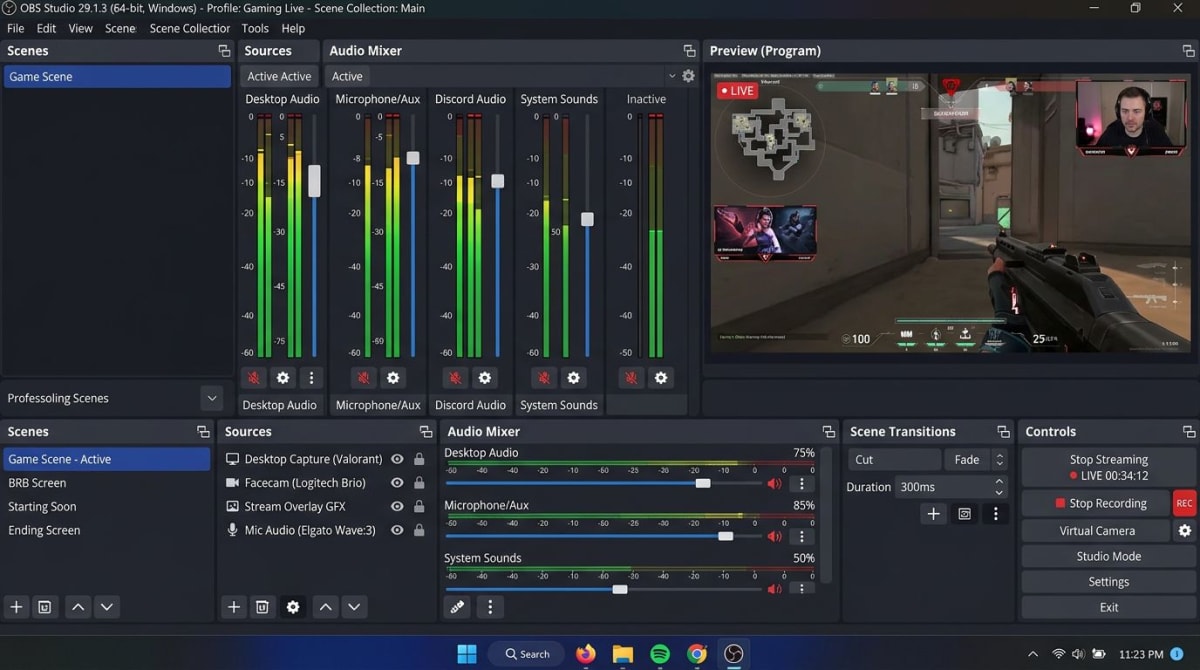
Method 3: OBS Studio (free, full control)
OBS Studio is a free, open-source screen recorder that gives you complete control over audio sources. It is the go-to choice for creators, streamers, and anyone who needs professional-quality screen recording with audio on Windows.
Audio support: Full independent control of system audio and microphone input. You can add multiple audio sources, adjust levels, apply filters, and monitor audio in real time.
How to set up OBS for screen recording with audio
- Download and install OBS Studio (free for Windows 10 and 11).
- On first launch, run the Auto-Configuration Wizard and select "Optimize just for recording."
- In the Sources panel at the bottom, click + and add Display Capture (full screen) or Window Capture (single app).
- OBS automatically adds Desktop Audio to capture system sound. Verify it in the Audio Mixer panel -- you should see level bars moving when sound plays.
- To add your microphone, click + in Sources and add Audio Input Capture. Select your microphone from the dropdown.
- Adjust audio levels in the Audio Mixer. A good starting point: Desktop Audio at -5 dB, Microphone at 0 dB.
- Click Start Recording in the lower-right corner.
- When finished, click Stop Recording. Files save to your Videos folder by default.
Recommended OBS audio settings
Go to Settings > Output > Recording:
- Recording Format: MKV (prevents corruption if OBS crashes -- remux to MP4 after)
- Audio Bitrate: 192 kbps for voice, 320 kbps for music/high-fidelity audio
- Audio Encoder: AAC
Go to Settings > Audio:
- Sample Rate: 48 kHz
- Desktop Audio: Select your default audio device
- Mic/Auxiliary Audio: Select your microphone
Pro tip: If your recordings have echo, you are likely capturing microphone audio through both Desktop Audio and a separate mic source. Mute one or the other in the Audio Mixer.
This is the same OBS Studio that many Mac users rely on for screen recording on Mac. The Windows version is identical in features.
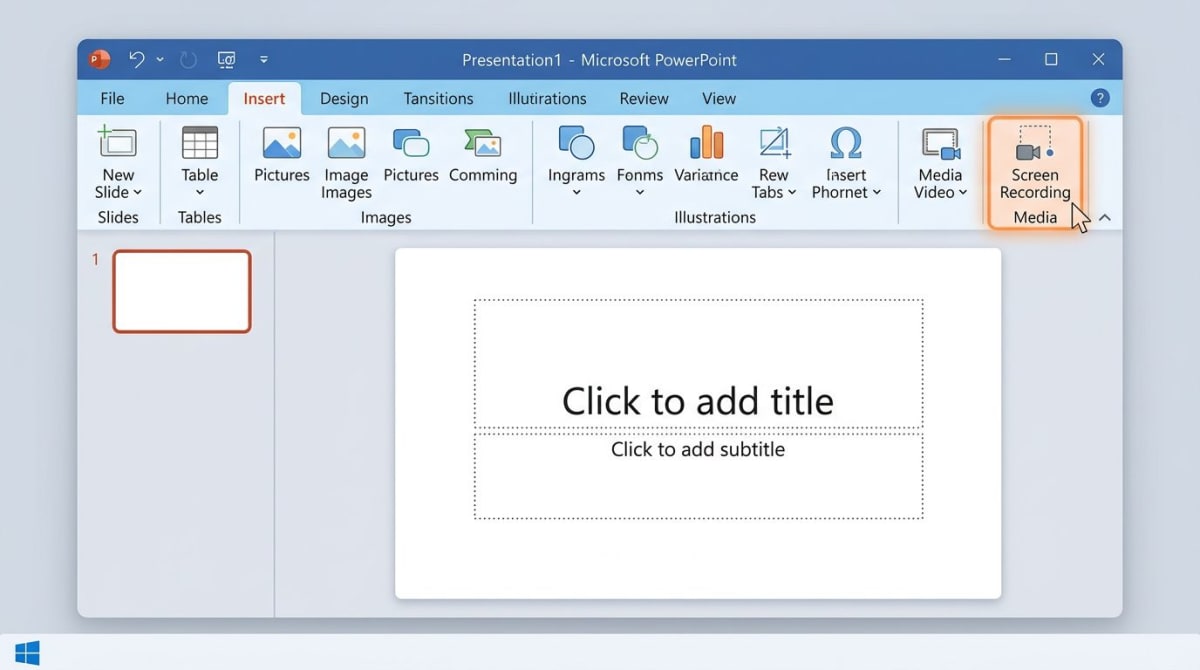
Method 4: PowerPoint (hidden feature)
Microsoft PowerPoint has a built-in screen recorder that most people never discover. If you already have Microsoft 365, this is a surprisingly capable option for recording your screen with audio -- no extra software needed.
Audio support: Records system audio and microphone simultaneously. Audio settings are straightforward with clear toggle buttons.
How to record your screen with PowerPoint
- Open PowerPoint and create a new blank presentation.
- Go to the Insert tab in the ribbon.
- Click Screen Recording in the Media group (far right of the ribbon).
- A small toolbar appears at the top of your screen. Make sure Audio is toggled on (it is on by default).
- Click Select Area and drag to choose the recording region, or press
Win + Shift + Fto record the full screen. - Click Record or press
Win + Shift + Rto start. - To stop, move your mouse to the top of the screen and click Stop, or press
Win + Shift + Q. - The recording embeds into your PowerPoint slide. Right-click it and select Save Media As to export as an MP4 file.
Key limitation: PowerPoint screen recording is designed for creating presentation content. It works well for tutorials and demos but lacks advanced features like scene switching or audio filters that OBS provides.
If you make a lot of tutorials, you might want to convert your recordings to GIFs for embedding in documentation or chat messages.
Tired of plain screenshots? Try ScreenSnap Pro.
Beautiful backgrounds, pro annotations, GIF recording, and instant cloud sharing — all in one app. Pay $29 once, own it forever.
See what it doesMethod 5: ScreenSnap Pro (simple and affordable)
ScreenSnap Pro is a screen recording and screenshot app for Windows and Mac that handles system audio, microphone, and webcam recording without the complexity of OBS. It is a one-time $29 purchase with no subscriptions.
Audio support: Full system audio and microphone capture. Toggle each source on or off before recording. Webcam overlay is also available for tutorials and presentations.
How to record with ScreenSnap Pro
- Download and install ScreenSnap Pro on Windows.
- Open ScreenSnap Pro and select the screen recording mode.
- Choose your capture area -- full screen, a specific window, or a custom region.
- Toggle system audio and microphone on or off depending on what you need.
- Optionally enable webcam overlay if you want a face cam in the corner.
- Click Record to start capturing.
- When finished, stop the recording. Your video saves as an MP4 or MOV file.
Why choose ScreenSnap Pro over free tools?
ScreenSnap Pro fills a gap between the limited built-in Windows tools and the overwhelming complexity of OBS:
- System audio + mic + webcam in one click -- no fiddling with audio sources or mixer panels.
- GIF recording -- record directly to GIF without converting video files. Useful for short demos in documentation or Slack.
- Screenshot tools built in -- capture, annotate, and share screenshots with 150+ wallpapers and 15 annotation tools.
- One-time $29 -- no monthly fees, no watermarks, lifetime updates.
- Cross-platform -- the same license works on both Windows and Mac (up to 2 computers).
If you only need short animated clips rather than full video, the built-in GIF recording mode saves a conversion step. For full-length recordings with audio, ScreenSnap Pro exports to MP4 or MOV.
Understanding audio formats and quality settings
Choosing the right audio format and bitrate prevents common issues like muffled voice, oversized files, or audio that cuts out mid-recording.
Audio bitrate explained
Audio bitrate determines how much data is used per second of audio. Higher bitrates mean better quality but larger files.
| Bitrate | Quality | Best for |
|---|---|---|
| 96 kbps | Low | Voice-only recordings where file size matters |
| 128 kbps | Good | General screen recordings, tutorials |
| 192 kbps | High | Professional content, mixed voice and music |
| 320 kbps | Maximum | High-fidelity audio capture |
For most screen recordings with voiceover, 128-192 kbps is ideal.
Recording format matters
The container format you choose affects both reliability and compatibility:
- MP4 is the most compatible format and plays everywhere. However, if your recording app crashes, the entire file may become corrupted.
- MKV is more resilient. If a crash occurs, you lose only the last few seconds. OBS Studio can remux MKV to MP4 losslessly after recording (File > Remux Recordings).
- WebM is lightweight and web-friendly but less widely supported in video editors.
For long sessions (over 30 minutes), use MKV and convert to MP4 afterward. For short clips, MP4 is fine.
Sample rate: 44.1 kHz vs. 48 kHz
Most recording tools default to 48 kHz, the standard for video production. Either rate works for screen recordings, but do not mix them -- mismatched sample rates between your microphone and recording software cause audio drift over time.
Troubleshooting: no audio in your screen recording
Audio issues are the most common problem when recording your screen on Windows. Here is how to fix the most frequent causes.
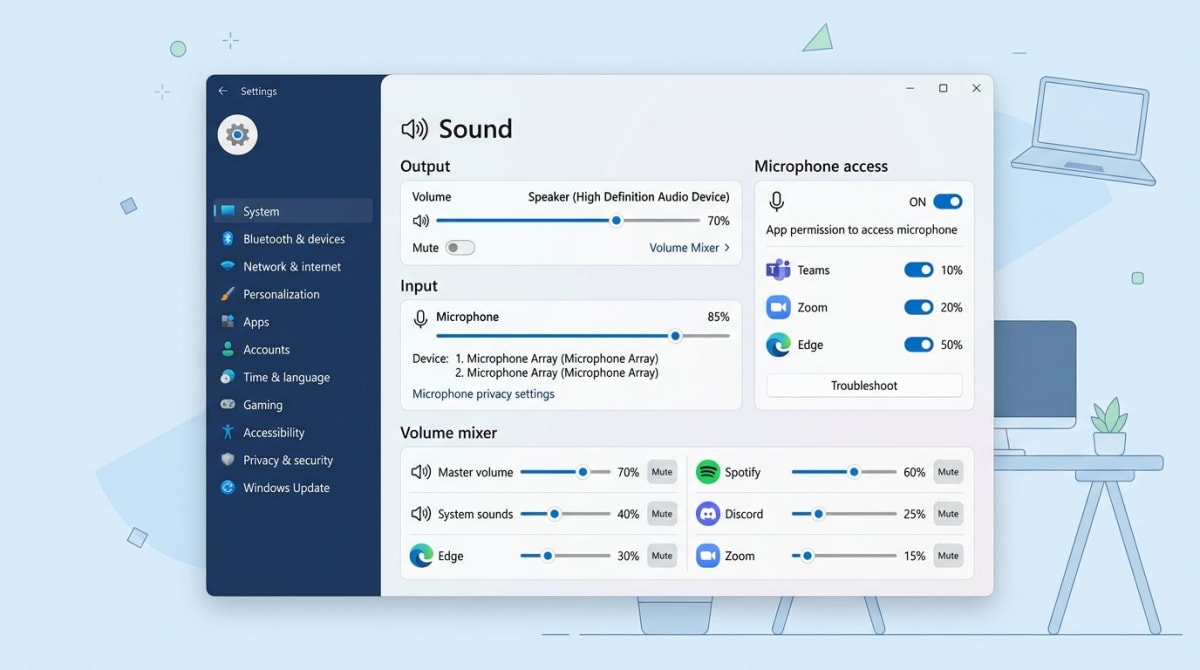
Check Windows sound settings
- Right-click the speaker icon in the taskbar and select Sound settings.
- Verify your output device is correct (speakers or headphones).
- Scroll down to Input and confirm your microphone is selected and working.
- Click Volume mixer and make sure the app you are recording is not muted.
Fix microphone permissions
Windows may block apps from accessing your microphone:
- Open Settings > Privacy & Security > Microphone.
- Make sure Microphone access is toggled on.
- Scroll down and verify the recording app (Xbox Game Bar, OBS, etc.) has microphone permission.
Fix audio driver issues
Outdated or corrupted audio drivers are a frequent cause of recording failures, especially after Windows updates:
- Right-click the Start button and select Device Manager.
- Expand Sound, video and game controllers.
- Right-click your audio device and select Update driver > Search automatically.
- If updating does not help, try Uninstall device, then restart your PC. Windows will reinstall the driver automatically.
Fix audio desync issues
If your audio drifts out of sync with video in longer recordings:
- In OBS Studio, go to Settings > Advanced and set the audio timestamps to "based on system timestamps."
- Try recording in MKV format instead of MP4, then remux to MP4 after recording (in OBS: File > Remux Recordings).
- Close other resource-heavy applications during recording to reduce CPU load.
Xbox Game Bar records no audio
- Press
Win + G, open Settings (gear icon), and make sure Audio to record is set to "All" instead of "Game." - Check that the
Windows screen recorder shortcut(Win + Alt + R) starts recording with the correct audio source selected. - Restart the Windows Audio service: open Services (search in Start), find "Windows Audio," right-click, and select Restart.
Tips for better screen recordings with audio
Beyond choosing the right tool, these practices improve the quality of your recordings.
Audio quality:
- Use an external microphone instead of your laptop's built-in mic for clearer voice.
- Record in a quiet room. Background noise is the biggest quality killer.
- Test your audio levels before starting a long recording. In OBS, the audio mixer shows live levels -- aim for green with occasional yellow, never red.
Video quality:
- Close unnecessary apps to free up CPU and memory.
- Set your display to the resolution you want in the final video (1080p is a good default).
- For tutorials, use a clean desktop background to reduce visual clutter.
- After recording, you may need to edit your screen recording to trim dead air or add annotations.
File management:
- Recordings can get large. A 10-minute 1080p recording with audio is typically 200-500 MB.
- Use the GIF to MP4 converter if you need to convert between video and GIF formats.
- Name your files descriptively before you accumulate dozens of "Capture_2026-04-17.mp4" files.
If you want one tool that handles both screen recording and screenshots, ScreenSnap Pro covers both on Windows and Mac. Record with system audio and mic, then capture and annotate individual frames -- all from the same app, with no subscription.
Windows 10 vs. Windows 11: screen recording differences
If you are wondering how to record screen on Windows 11 versus Windows 10, there are meaningful differences.
| Feature | Windows 10 | Windows 11 |
|---|---|---|
| Xbox Game Bar | Yes | Yes |
| Snipping Tool recording | No | Yes (2023+) |
| Snipping Tool audio | N/A | Yes (24H2+) |
| System audio capture | Via Game Bar | Via Game Bar + Snipping Tool |
| GIF export | No | Snipping Tool only |
Windows 10 users are limited to Xbox Game Bar for built-in screen recording. If you need more capabilities without installing OBS, upgrading to Windows 11 unlocks Snipping Tool video recording. Windows 11 also brings improved screenshot tools -- see our guide on how to take screenshots on Windows 11 for the full breakdown.
For a broader look at screen recording tools, our comparison of the best screen recorders covers several cross-platform options that also work on Windows. Mac users who also need to record on Apple hardware may find QuickTime screen recording useful as a built-in alternative.
Frequently Asked Questions
Morgan
Indie DeveloperIndie developer, founder of ScreenSnap Pro. A decade of shipping consumer Mac apps and developer tools. Read full bio
@m_0_r_g_a_n_