How to Edit a Screenshot on Windows (2026)
To edit a screenshot on Windows, open it in Snipping Tool, Paint, or any free editor and add your marks. You can draw arrows, type text, blur private data, and crop to the exact area you need. No Photoshop required — Windows ships with everything you need for basic edits, and dedicated apps like ScreenSnap Pro speed up the capture-and-annotate flow even more.
Took a screenshot but need to add context before sharing it? Maybe you want to circle a bug, blur a password, or label a button for a teammate. Here are five free ways to edit screenshots on Windows, ranked from quickest to most powerful.
Method 1: Edit with Snipping Tool (Windows 11)
Snipping Tool is the fastest way to edit a screenshot on Windows 11. You capture and edit in one step — no extra app needed. If you haven't used it yet, see our full guide on how to take a screenshot on Windows 11. Microsoft replaced the older Snip & Sketch tool with the current Snipping Tool, and the built-in editor has improved a lot since then.
Press Win + Shift + S to open the capture bar. Select a region, window, or full screen. Your screenshot opens inside the Snipping Tool editor right away. You can also open Snipping Tool from the Start menu if you prefer to set a delay timer before capturing.
Annotation tools in Snipping Tool
The editor gives you these options along the top toolbar:
- Ballpoint pen — draw freehand lines in any color. Adjust thickness from thin to bold
- Highlighter — mark areas with a transparent overlay. Great for calling out text in a document
- Ruler — place a straight edge on the canvas and draw along it for clean lines. Rotate the ruler by scrolling your mouse wheel
- Protractor — create curved arcs and circles. Resize it by scrolling, then draw along the curved edge
- Eraser — remove individual strokes you don't want. Right-click the eraser to clear all annotations at once
You can change the color and thickness of each pen tool by clicking its dropdown arrow. The color picker lets you choose from preset colors or enter a custom hex value.
How to save your edited screenshot
- Press
Ctrl + Sto save as a file - Choose PNG, JPG, or GIF format
- Pick your save location
You can also press Ctrl + C to copy the edited version and paste it into Slack, Teams, or an email. This is the fastest way to share — capture, mark, copy, paste. No file saving needed.
What Snipping Tool can't do
Snipping Tool handles freehand marks and highlights well, but it lacks arrows, text boxes, shapes, and blur. You can't add numbered steps or type a label. If you need those features, keep reading.
For a full breakdown of capture methods, check out our guide on how to crop a screenshot on Windows.
Method 2: Edit with Microsoft Paint
Paint has been on every Windows PC for decades. It's basic, but it handles the screenshot edits most people need: shapes, text, and cropping. Microsoft has also added new features to Paint over the past year, including layers and an AI-powered background removal tool.
How to open a screenshot in Paint
- Press
Win + Shift + Sto capture your screen - Open Paint from the Start menu (search "Paint")
- Press
Ctrl + Vto paste your screenshot - Or use File > Open to load a saved screenshot
If your screenshot was auto-saved to the Pictures > Screenshots folder (via Win + Print Screen), you can also right-click the file in File Explorer and choose Open with > Paint.
Key editing tools
Paint offers more editing options than Snipping Tool:
- Shapes — rectangles, ovals, arrows, lines, stars, callout bubbles. Pick an outline color and fill color for each shape
- Text — click the A button to add text anywhere on the image. Choose your font, size, bold, italic, and text color
- Brushes — freehand drawing with adjustable thickness. Options include oil brush, crayon, marker, and watercolor styles
- Select + Crop — drag a selection rectangle and click Crop to trim the image down to that area
- Fill — flood-fill areas with a solid color. Useful for blocking out sections you don't want visible
- Eraser — remove parts of the image by painting over them with the background color
- Resize — scale the entire image up or down by percentage or pixel count
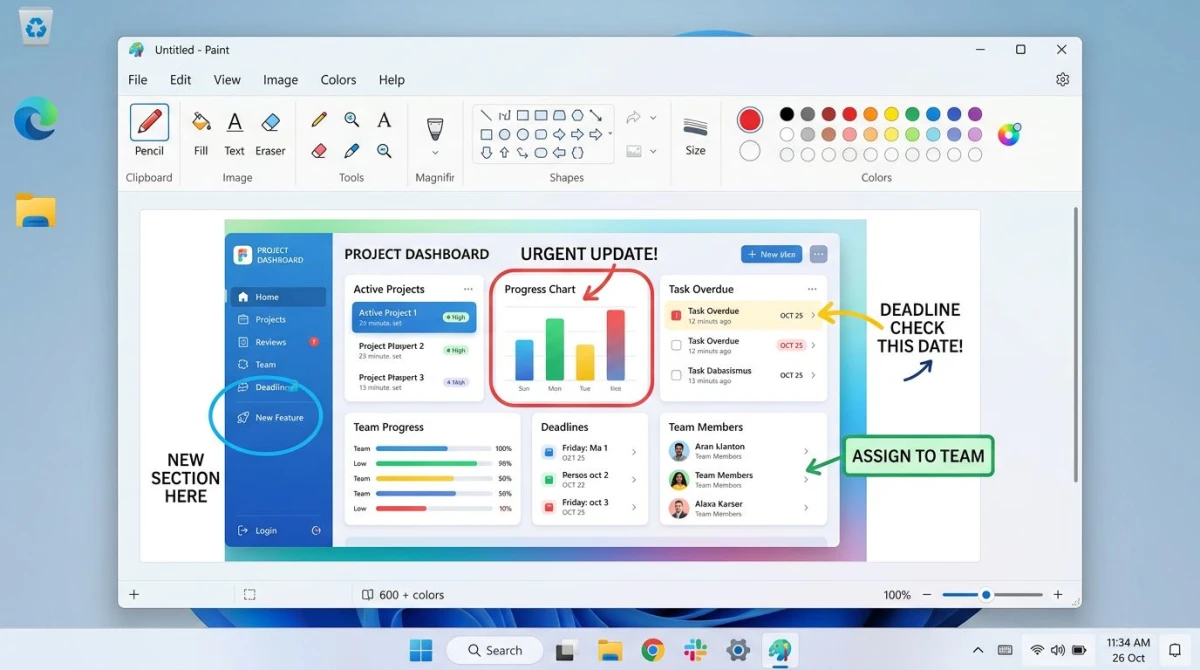
How to add an arrow in Paint
Arrows are the most common annotation for screenshots. Here's the fastest way:
- Click the Shapes dropdown in the toolbar
- Select the Arrow shape (right-pointing arrow)
- Pick your outline color from the color palette (red or bright yellow works best)
- Set the line thickness to 3-4px so it's visible
- Click and drag on your screenshot to place the arrow
- Drag the rotation handle to point it where you want
Pro tip: Use Paint's transparent selection
Click Select > Transparent selection to move parts of your image without carrying the white background along. This is handy when you're combining two screenshots into one.
Saving your work
Go to File > Save As and pick your format. PNG keeps the best quality for screenshots because it preserves sharp text and lines. JPG compresses the image but can blur fine details. For screenshots headed to the web, PNG is almost always the right choice.
Paint is reliable for arrows, text labels, and basic cropping. But it still can't blur, pixelate, or add numbered steps. If you need to hide private info, you'll need another tool.
Method 3: Edit with the Photos app
The Photos app on Windows 10 and 11 handles light photo editing. It's not built for screenshots, but it covers the basics when you need a quick adjustment. It's already set as the default image viewer on most Windows machines, so double-clicking a screenshot file will open it here.
What Photos can do
- Open your screenshot in the Photos app (right-click > Open with > Photos)
- Click Edit image in the toolbar (or press
Ctrl + E) - Use the available tools:
- Crop and rotate — trim edges, flip, or straighten. You can also pick an aspect ratio like 16:9 or 4:3
- Adjustments — tweak brightness, contrast, saturation, and warmth with sliders
- Filters — apply preset color filters to change the mood
- Markup — draw with a pen tool (basic freehand only)
- Background — remove or replace the image background using AI (Windows 11)
When to use Photos
Photos works best for simple crops and brightness fixes. If you took a screenshot of a chart or graph that looks too dark, the brightness slider can fix it in seconds. It's faster than opening Paint when you only need to trim or rotate.
The crop tool is especially useful when you captured the full screen but only need one window. Select your area, hit apply, and save.
It doesn't support arrows, text labels, shapes, or blur. For those, you'll need Paint or a dedicated screenshot editor for Windows.
Method 4: Edit with Paint 3D
Paint 3D ships with Windows 10 and was previously available as a free download on Windows 11. Microsoft has since removed it from the Store, but if you already have it installed, it still works. It offers more editing power than regular Paint, including stickers, 3D shapes, and a magic select tool.
Useful features for screenshot editing
- 2D shapes — arrows, circles, squares, stars, speech bubbles with full color and size control
- Text — flat or 3D text with font and color options. 3D text can be rotated and placed at angles
- Stickers — add emoji-style icons and pre-made decals to your screenshot
- Magic Select — cut out objects from your screenshot with an auto-detect outline. Useful for extracting a button or icon from a larger screen grab
- Canvas resize — expand or shrink the canvas to fit your edit. You can add white space around a screenshot for padding
How to edit a screenshot in Paint 3D
- Right-click your screenshot file and select Open with > Paint 3D
- Click 2D Shapes in the top menu for arrows and callouts
- Choose a shape, then click and drag on the canvas to place it
- Click Text to add labels — switch between 2D and 3D text at the top
- Use Magic Select to isolate part of the image if you need to cut something out
- Go to Menu > Save As > Image and choose PNG or JPG
When Paint 3D is worth using
Paint 3D is overkill for a quick pen mark, but its shape tools and stickers give you more options than regular Paint. Speech bubbles and star shapes work well for tutorial screenshots. The Magic Select tool is the closest thing to Photoshop's lasso that ships free with Windows.
One thing to keep in mind: Microsoft has slowed down updates to Paint 3D. Regular Paint is getting more features over time, so check what Paint can do before reaching for Paint 3D.
Tired of plain screenshots? Try ScreenSnap Pro.
Beautiful backgrounds, pro annotations, GIF recording, and instant cloud sharing — all in one app. Pay $39 once, own it forever.
See what it doesMethod 5: Edit with ScreenSnap Pro
If you edit screenshots often — for bug reports, tutorials, or team updates — a dedicated tool saves real time. ScreenSnap Pro captures your screen and opens the editor in one step.
What sets it apart
ScreenSnap Pro includes 15 annotation tools built for screenshot editing:
- Arrows and lines — straight, curved, with customizable heads
- Text labels — clean fonts with background colors
- Blur and pixelate — hide passwords, emails, or personal data in one click
- Shapes — rectangles, circles, and freeform highlights
- Counter tool — add numbered steps (1, 2, 3) for tutorials and walkthroughs
- Highlighter — draw attention to key areas
- Emoji stamps — add visual markers fast

Quick workflow
- Press your capture shortcut
- Select the area you want
- The editor opens with your screenshot loaded
- Add your annotations
- Click Share for an instant link, or save to disk
You also get 500+ gradient backgrounds to polish screenshots before sharing on social media or in presentations. Backgrounds turn a flat screenshot into something that looks designed, which is useful for pitch decks and marketing posts.
ScreenSnap Pro costs $39 once — no subscription. The license covers two computers, so you can use it on your work PC and home laptop. It works on both Windows and Mac.
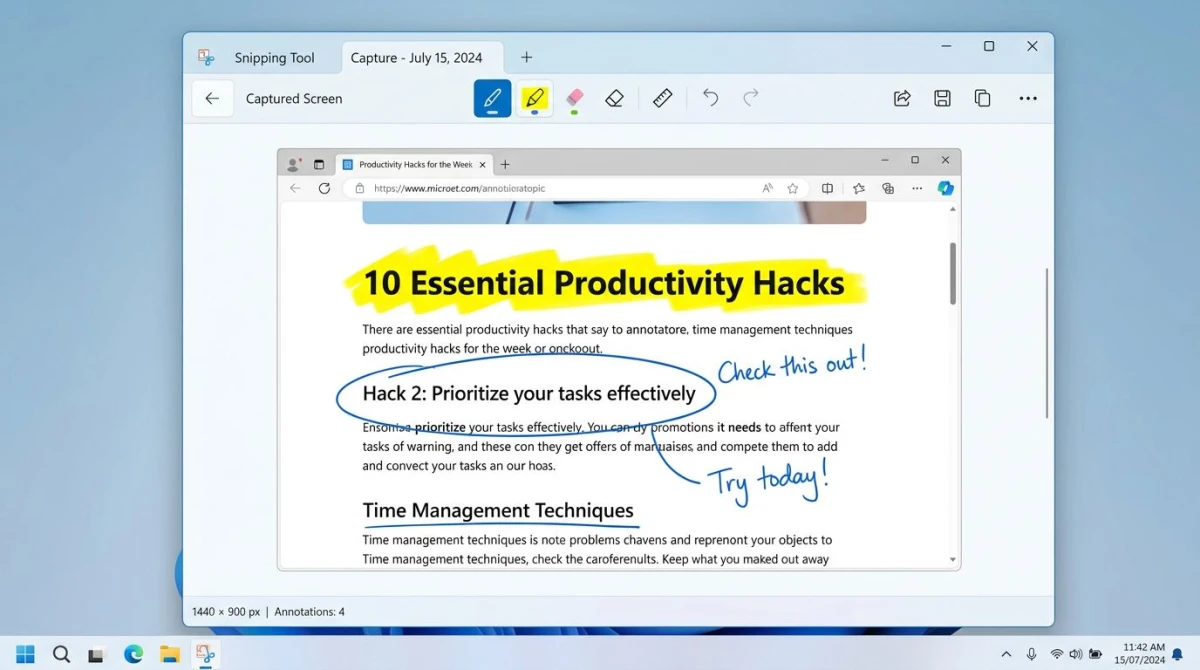
How to blur sensitive info in a screenshot
Blurring private data is one of the most common screenshot edits. Passwords, API keys, emails, phone numbers, and personal names should never appear in shared screenshots. If you're posting a screenshot in a bug report, Slack thread, or support ticket, check for anything private before hitting send.
Built-in options
Windows doesn't include a blur tool in Snipping Tool or Paint. Your workarounds:
- Paint — draw a filled rectangle over the sensitive area. Pick a solid color like black, white, or a shade that matches the background. Use the Fill bucket tool for a clean block of color
- Snipping Tool — scribble over the text with a thick pen stroke. This looks messy but works in a pinch
- Photos — no blur or redact option at all
These approaches get the job done, but they look rough. A solid color block screams "something was hidden here" and can make your screenshot look sloppy.
Better option: Dedicated blur tools
Apps like ScreenSnap Pro offer proper blur and pixelate effects. Select the area, pick your blur strength, and done. The text becomes unreadable but the screenshot still looks professional. You keep the visual context of what was behind the blur without exposing the actual data.
You can also annotate screenshots online for free using our browser-based tool — no install needed.
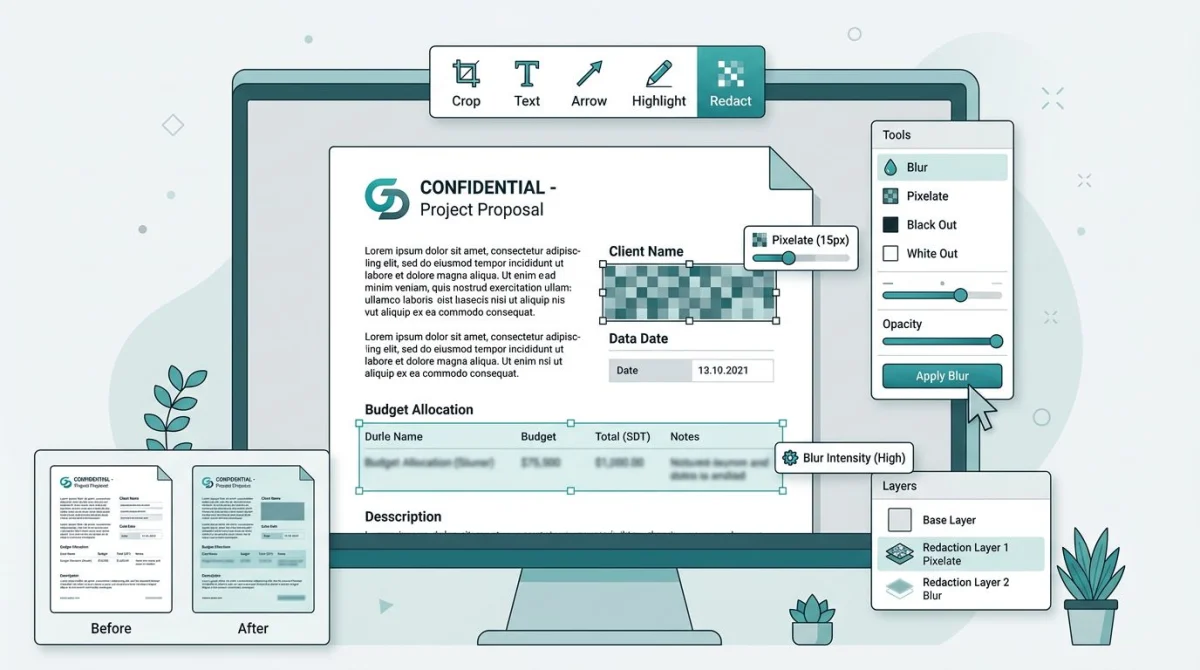
Common things to blur
Before sharing any screenshot, scan it for:
- Email addresses and usernames
- Passwords and API keys
- File paths that reveal your username (e.g.,
C:\Users\YourName\) - Browser tabs with private URLs
- Notification badges with message previews
- Other people's names or profile photos
Tips for better screenshot edits
A few habits make your edited screenshots clearer and more useful.
Capture only what you need
Before editing, crop your screenshot down to the relevant area. A focused screenshot needs fewer annotations. Press Win + Shift + S and use the region mode to grab only the part that matters.
Use arrows, not circles
Arrows point to one specific spot. Circles highlight an area but don't tell the viewer where to look first. When you want someone to notice a button or a line of text, use an arrow.
Keep text labels short
One to three words per label works best. "Click here" beats "You need to click on this button to proceed." Your annotation should add context, not replace the conversation.
Match your annotation color to the background
Red arrows on a red UI are invisible. Pick a color that contrasts with the content behind it. Yellow or green works on dark interfaces. Black or dark blue works on light ones.
Save as PNG for quality
JPG compression can smudge your annotations, especially thin text and arrows. PNG keeps every pixel sharp. If file size matters, compress the PNG afterward without losing quality.
Use numbered steps for walkthroughs
If you're explaining a multi-step process, add numbers next to each click or action. Most built-in tools don't have a counter feature, but you can fake it: type "1", "2", "3" inside colored circles using Paint's text and shape tools. Dedicated editors like ScreenSnap Pro have a built-in counter tool that does this in one click.
Crop before you annotate
Trimming the image first gives you a cleaner canvas. Less dead space means your arrows and labels are easier to read. If you captured the full desktop but only need a dialog box, crop your screenshot before adding any marks.
Which method should you pick?
Here's a quick comparison to help you decide:
| Method | Arrows | Text | Blur | Shapes | Steps | Best for |
|---|---|---|---|---|---|---|
| Snipping Tool | No | No | No | No | No | Quick highlights and pen marks |
| Paint | Yes | Yes | No | Yes | No | Basic shapes and text labels |
| Photos | No | No | No | No | No | Cropping and brightness only |
| Paint 3D | Yes | Yes | No | Yes | No | Stickers, 3D text, magic select |
| ScreenSnap Pro | Yes | Yes | Yes | Yes | Yes | Full annotation workflow |
If you only need to highlight one area, Snipping Tool is enough. For arrows and text, open Paint. For blur, numbered steps, and cloud sharing, a dedicated screenshot tool for Windows is worth the install.
Most people start with Snipping Tool, then move to Paint once they need text or shapes. If you find yourself editing more than a few screenshots per day, a dedicated tool pays for itself in time saved.
Need to capture a specific part of your screen first? Here's how to take a partial screenshot on Windows. And if you're also interested in extracting text from your screenshots, OCR tools can read the words right out of the image.
Frequently Asked Questions
Open your screenshot in Paint or Snipping Tool — both are pre-installed. Paint gives you shapes, text, and arrows. Snipping Tool offers freehand pen and highlighter marks. Neither requires a download.
Yes. Open your screenshot in Paint, click the A (text) button, then click anywhere on the image to start typing. You can change the font, size, and color from the toolbar. Snipping Tool does not support text — use Paint instead.
Windows built-in tools don't have a blur option. Your quickest free fix is to draw a filled rectangle in Paint over the area you want to hide. For a proper blur or pixelate effect, use a tool like ScreenSnap Pro or our free image annotation tool.
That depends on the app. Snipping Tool asks you to pick a save location when you press Ctrl + S. Paint defaults to your last-used folder. If you used Win + Print Screen, the original file is in Pictures > Screenshots — but edited versions save wherever you choose. Learn more about where screenshots go on Windows.
For built-in options, Paint offers the most editing features. For a more complete set of tools — including blur, numbered steps, and instant sharing — dedicated screenshot tools like ScreenSnap Pro, ShareX, or Greenshot give you a faster workflow without a subscription.
Morgan
Indie DeveloperIndie developer, founder of ScreenSnap Pro. A decade of shipping consumer Mac apps and developer tools. Read full bio
@m_0_r_g_a_n_