How to Resize Images on Mac Without Losing Quality 2026
Resizing an image on Mac means changing its pixel dimensions — width, height, or both — to fit a specific use case like email, web publishing, or social media. Your Mac includes free built-in tools that handle this without installing anything extra, and if you start from a fresh capture in ScreenSnap Pro, you can crop and export at the right size before resizing ever becomes a problem.
Whether you need to shrink a single photo for an email attachment or batch resize hundreds of product images, these four methods cover every scenario.
Why you might need to resize images on Mac
Large images cause real problems. A 4K photo from your iPhone can be 8MB+ — too big for most email providers, slow to load on websites, and overkill for a Slack message.
Common reasons to resize:
- Email attachments — Most providers cap attachments at 25MB. A few unresized photos hit that limit fast.
- Website performance — Google penalizes slow-loading pages. Oversized images are the #1 culprit.
- Social media uploads — Each platform has ideal dimensions. Uploading the wrong size means awkward cropping.
- Documentation — Screenshots for technical docs need consistent sizing.
- Storage — Retina screenshots on Mac are 2x resolution. A simple
⌘ + Shift + 3screenshot can be 5-10MB.
Method 1: Preview app (built-in, free)
Preview is the fastest way to resize a single image on Mac. No downloads, no sign-ups — it's already on your computer.
Step-by-step
- Open your image — Double-click the file. Preview opens by default for most image formats.
- Open the resize tool — Go to Tools > Adjust Size in the menu bar.
- Set your dimensions — Enter your target width or height. With "Scale proportionally" checked, the other dimension adjusts automatically.
- Check the result — Preview shows the resulting file size at the bottom of the dialog.
- Save — Press
⌘ + Sto overwrite, or File > Export to save as a new file (recommended).
Pro tip: Always use File > Export instead of Save if you want to keep the original. Preview overwrites the source file by default.
What to watch for
Preview resamples images when you reduce their size. For photos, this is barely noticeable. For screenshots with small text or UI elements, check that text stays readable after resizing.
If you need to crop a screenshot rather than resize the entire image, Preview handles that too — use the selection tool and press ⌘ + K.
Method 2: Batch resize multiple images with Preview
Need to resize 20, 50, or 100 images at once? Preview handles batch resizing without any extra software.
- Select all images in Finder — Click the first, then
⌘ + Ato select all (or⌘ + Clickfor specific files). - Open in Preview — Right-click > Open With > Preview.
- Select all thumbnails — In Preview's sidebar, press
⌘ + Ato select every image. - Resize — Go to Tools > Adjust Size, enter your dimensions, and click OK.
- Save all — Press
⌘ + Option + Sto save every image at once.
Important: This overwrites all original files. Create copies first if you need the originals. Select the files in Finder, press ⌘ + C, then ⌘ + V to duplicate them.
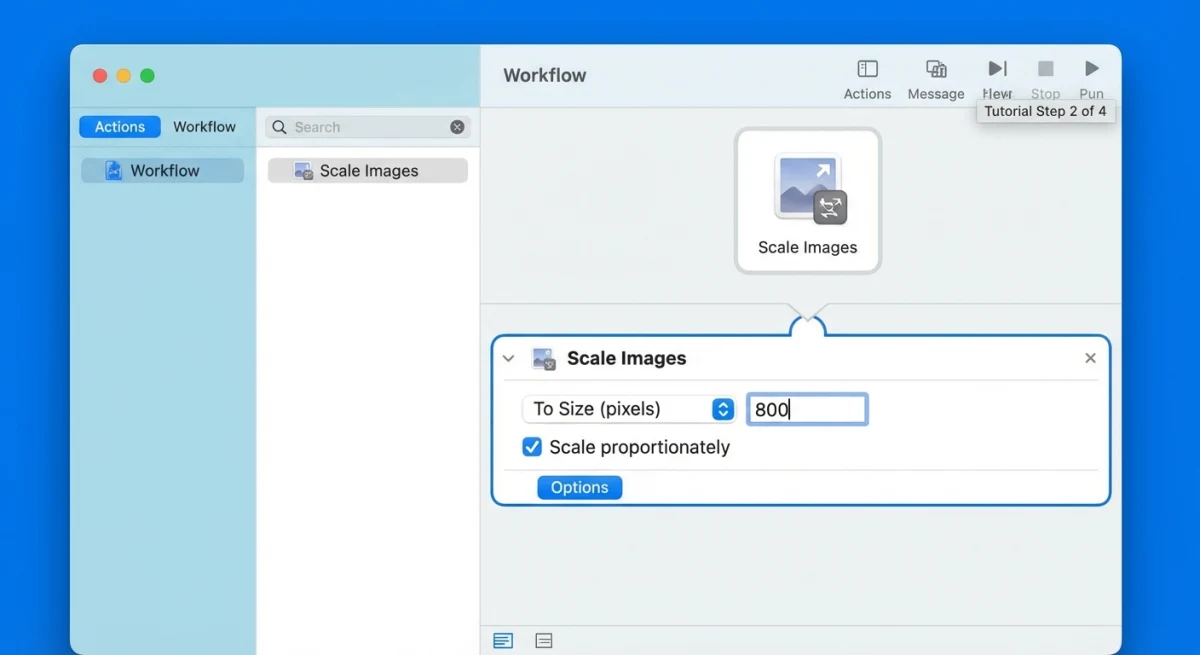
Method 3: Create a Quick Action with Automator (one-click resize)
Resize photos often for a blog, store, or social media? Automator lets you build a one-click resize button. It shows up right in your right-click menu.
Setting it up
- Open Automator — Find it in Applications or search with Spotlight (
⌘ + Space). - Choose Quick Action — Select "Quick Action" as the document type.
- Set the trigger — Set "Workflow receives current" to image files in Finder.
- Add Copy Finder Items — Drag this action from the library first. It keeps your originals safe by making a copy.
- Add Scale Images — Drag "Scale Images" from the library. Pick your target size (e.g., 1200 pixels wide).
- Save — Name it something clear like "Resize to 1200px".
Using it
Right-click any image in Finder > Quick Actions > Resize to 1200px. Done. Resized copies show up in the same folder. Works with multiple files too.
Most guides skip this method. Once set up, it's the fastest way to resize. No app to open. No dialog to tweak.
Tired of plain screenshots? Try ScreenSnap Pro.
Beautiful backgrounds, pro annotations, GIF recording, and instant cloud sharing — all in one app. Pay $39 once, own it forever.
See what it doesMethod 4: Terminal with sips command (advanced)
The sips command comes built into macOS. Short for "Scriptable Image Processing System," it's great for devs or anyone who likes Terminal.
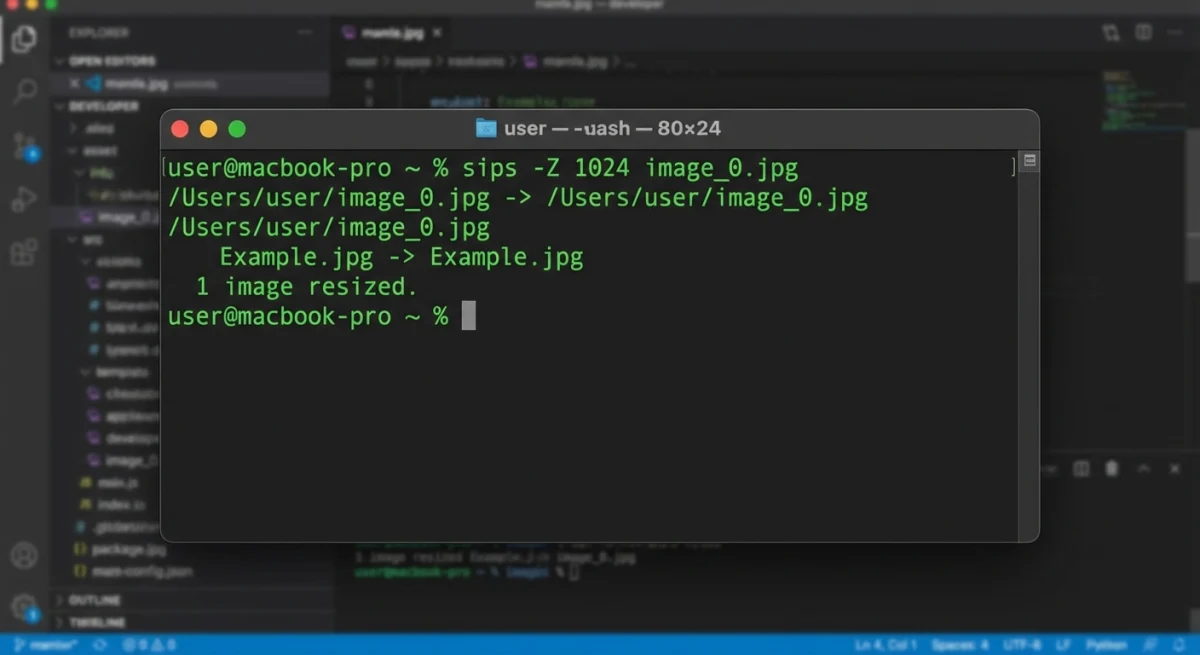
Basic commands
Resize to specific width (maintains aspect ratio):
sips --resampleWidth 1200 image.pngResize to specific height:
sips --resampleHeight 800 image.pngResize to exact dimensions (may distort):
sips -z 800 1200 image.pngBatch resize every PNG in a folder:
for file in *.png; do sips --resampleWidth 1200 "$file"; doneWhen to use Terminal
Terminal works best when you need to:
- Resize images inside a script or workflow
- Handle hundreds of files with no GUI
- Mix resizing with renaming or format changes
Need to convert image formats too? Use sips with the -s format flag. Or try our free online converter for a faster option. For a quick resize without Terminal, our free image resizer works right in your browser.
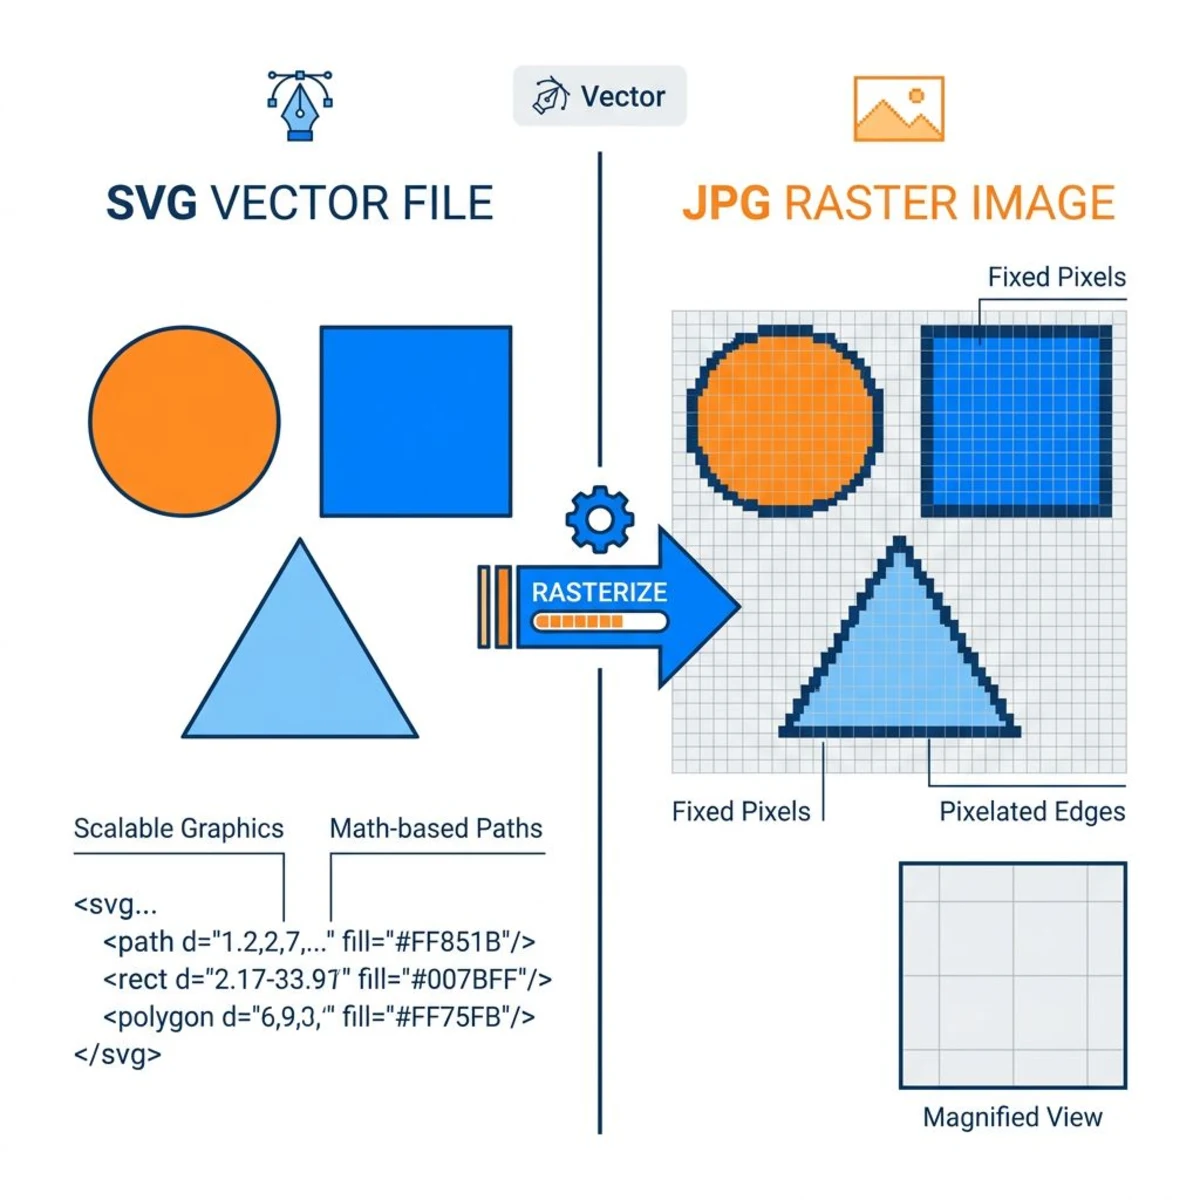
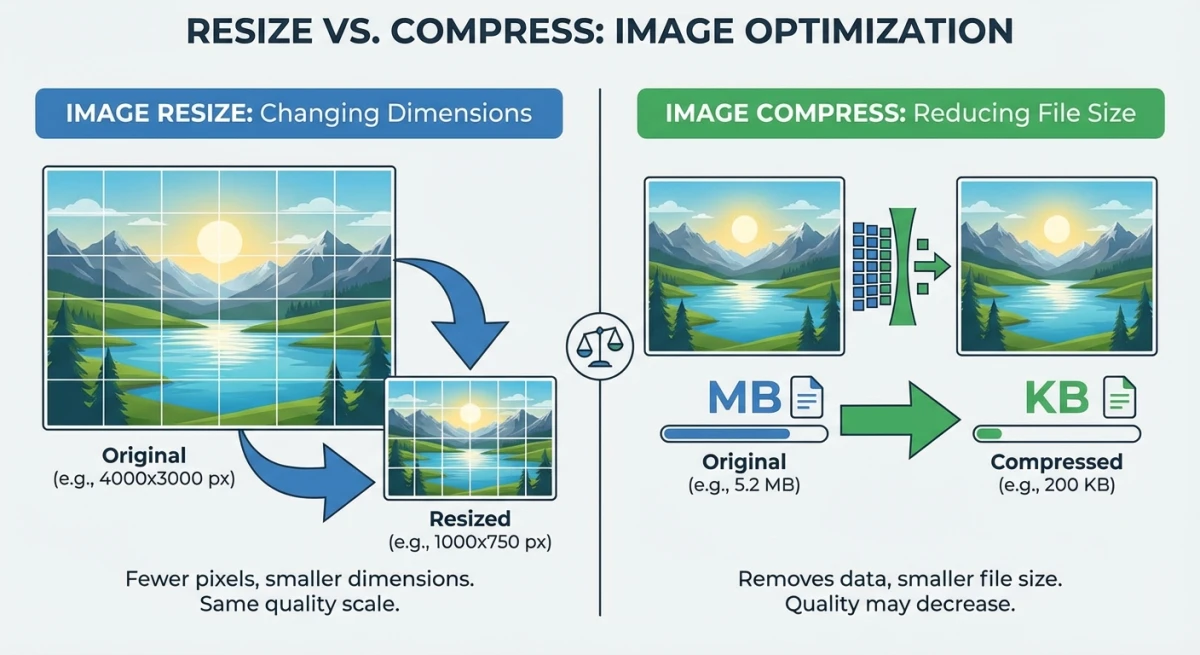
Resize vs compress: what's the difference?
These terms get mixed up constantly. Here's the distinction:
| Resize | Compress | |
|---|---|---|
| What changes | Pixel dimensions (width × height) | File size (KB/MB) |
| Visual impact | Image gets smaller/larger on screen | Image looks the same (mostly) |
| Quality loss | Minimal when downsizing | Depends on compression level |
| Best for | Fitting specific dimensions | Reducing file size for web/email |
| Mac tool | Preview > Adjust Size | Preview > Export (adjust quality slider) |
Often you want both. Resize to your target dimensions first, then compress to reduce file size further. For quick compression, our free image compressor handles it right in your browser.
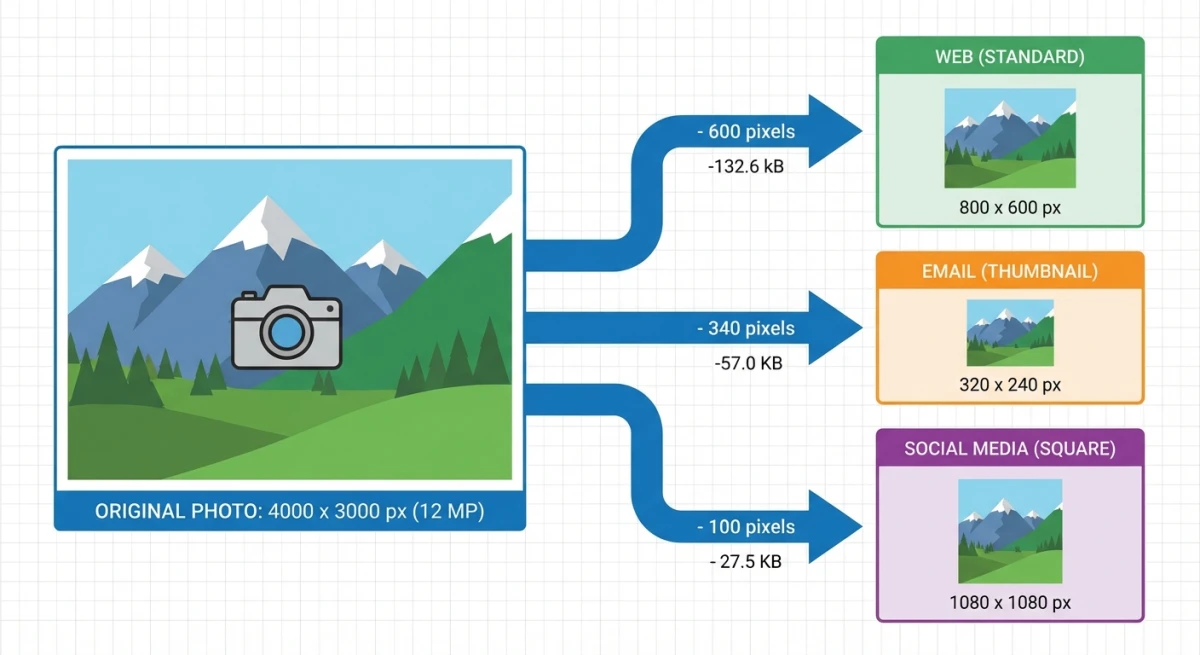
Optimal image sizes for common use cases
Stop guessing. Here are the dimensions that work:
| Use Case | Recommended Size | Why |
|---|---|---|
| Email attachment | 1200 × 800 px | Readable on all screens, stays under 1MB |
| Slack / Discord | 1000 × 600 px | Displays inline without scrolling |
| Blog / website | 1200 – 1600 px wide | Sharp on retina, fast loading |
| Instagram post | 1080 × 1080 px | Square format, platform native |
| Twitter/X post | 1200 × 675 px | 16:9 ratio, no cropping |
| LinkedIn post | 1200 × 627 px | Optimal for feed display |
| Presentation | 1920 × 1080 px | Full HD slide size |
For screenshots specifically: Mac Retina displays capture at 2x resolution. A full-screen screenshot on a 14" MacBook Pro is 3024 × 1964 pixels. For most uses, resizing to 1200–1600px wide is ideal.
If you need specific sizes for social media, our free resizer has presets for every platform.
How to resize without losing quality
"Without losing quality" is the real question. Here's what actually works:
Downscaling is (mostly) safe. Going from 4000px to 1200px removes pixels, but the visible quality difference is negligible for web and email use. The image still looks sharp.
Upscaling causes problems. Going from 800px to 2000px forces your Mac to invent pixels that don't exist. The result looks blurry or pixelated. Avoid this when possible.
Tips for preserving quality:
- Keep aspect ratio locked — Stretching distorts images. Always check "Scale proportionally" in Preview.
- Use PNG for screenshots — PNG is lossless. Resizing a PNG and saving as PNG preserves every detail.
- Use JPEG at 80-85% quality — For photos, this is the sweet spot between file size and visual quality.
- Resize in one step — Don't resize from 4000 → 2000 → 1200. Go directly from 4000 → 1200 for the best result.
- Save as a new file — Always export to a new file so you can go back to the original if needed.
Third-party apps worth considering
The built-in tools cover most needs, but dedicated apps add convenience for heavy use:
- ScreenSnap Pro — If you take screenshots frequently, ScreenSnap Pro captures and annotates in one step. Its export options let you control output size and format, which saves a separate resize step. One-time purchase, no subscription.
- Photobulk — Batch resize, rename, and watermark in one workflow.
- ImageOptim — Free, open-source compression tool. Great paired with Preview for resize + compress workflows.
For quick one-off tasks like converting HEIC photos from your iPhone or changing DPI for print, our free online tools handle it without any downloads.
Frequently Asked Questions
Morgan
Indie DeveloperIndie developer, founder of ScreenSnap Pro. A decade of shipping consumer Mac apps and developer tools. Read full bio
@m_0_r_g_a_n_