Steam Screenshot Folder Location on Mac, Windows, Linux (2026)
The Steam screenshot folder is buried inside Steam's userdata directory under a confusing numbered path. On Mac, it's at ~/Library/Application Support/Steam/userdata/. On Windows, check C:\Program Files (x86)\Steam\userdata\. On Linux, look in ~/.local/share/Steam/userdata/. If you'd rather skip the F12 default entirely, a dedicated capture app like ScreenSnap Pro saves screenshots wherever you tell it to.
Don't worry if that looks like gibberish. Below, you'll find the easiest way to locate your screenshots — plus how to change the default folder and shortcut key. (Regular captures behave differently — see where screenshots go on Windows and on Mac for the non-Steam defaults.)
How Steam screenshots work (the F12 default)
Press F12 during any game to take a Steam screenshot. You'll see a small notification in the bottom-right corner confirming the capture. Steam saves two copies:
- A compressed version uploaded to your Steam profile (viewable online)
- An uncompressed version stored locally on your hard drive
The local copy is the full-quality original. That's the one you want when sharing screenshots outside of Steam — on social media, Discord, Reddit, or in a blog post.
Steam organizes screenshots by game, but here's the catch: folders are named after each game's Application ID (a number like 730 for CS2), not the game's actual name. This makes finding them manually a real scavenger hunt.
Find screenshots through the Steam client (fastest method)
The quickest way to find any Steam screenshot is through the built-in Screenshot Manager. No folder hunting required.
- Open Steam
- Click View in the top menu bar
- Select Screenshots
- Choose the game from the dropdown at the top
- Click the folder icon (Show on Disk) to open the folder in your file manager
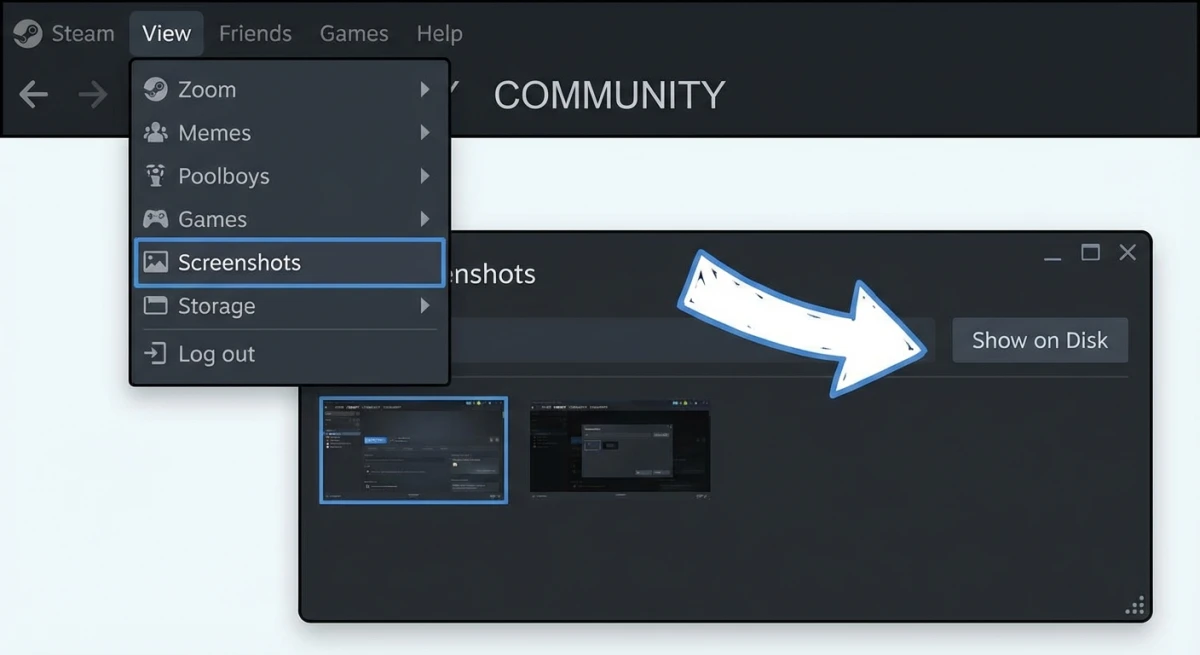
This opens the exact folder where Steam saved that game's screenshots. It works the same way on Mac, Windows, and Linux.
Pro tip: The Screenshot Manager shows your most recent screenshots first. If you took a screenshot moments ago, it'll be right at the top.
Steam screenshot folder paths by platform
If you prefer to navigate manually — or need to access screenshots when Steam isn't running — here are the exact paths for each operating system.
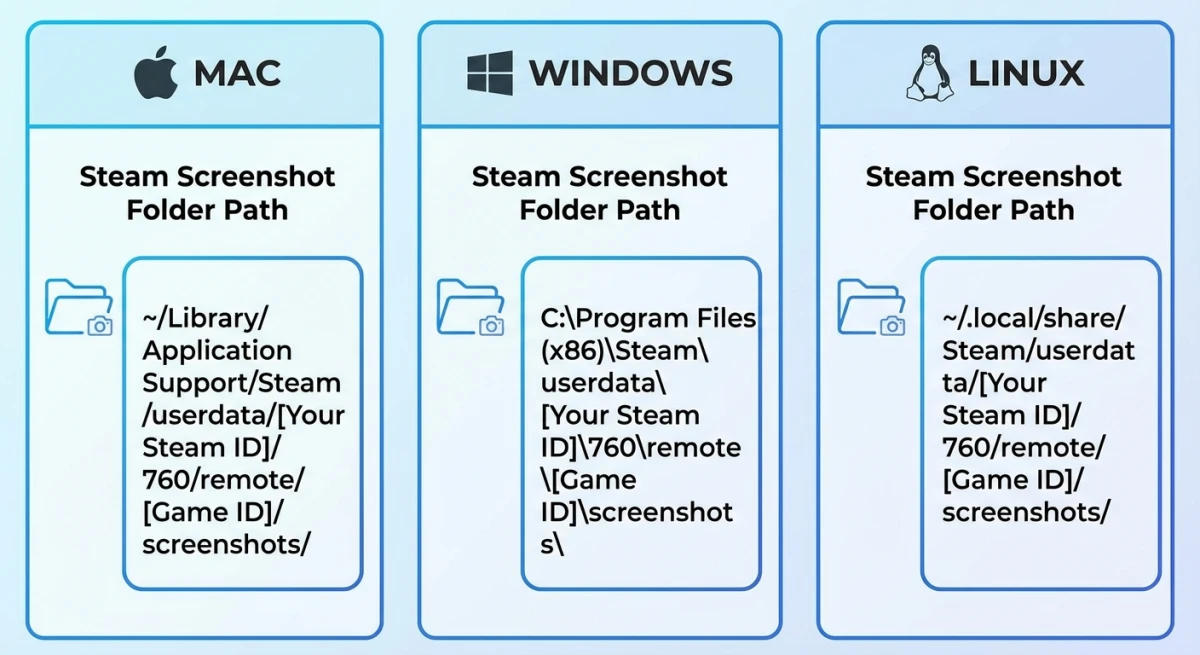
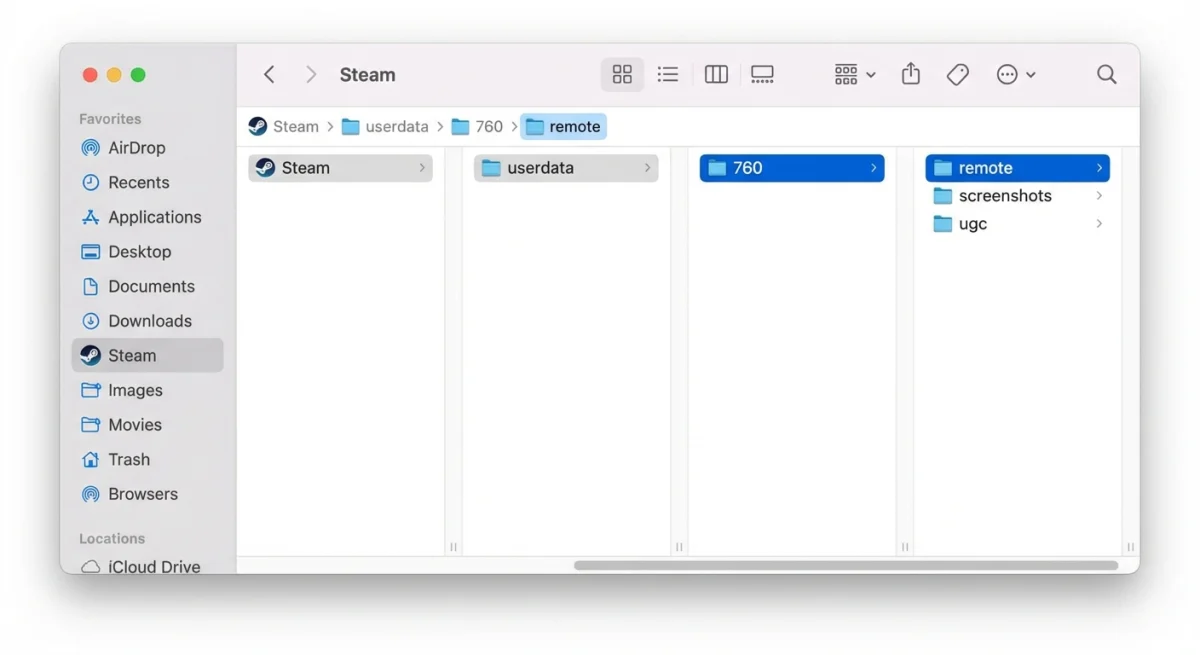
Mac screenshot folder location
~/Library/Application Support/Steam/userdata/<AccountID>/760/remote/<AppID>/screenshotsTo get there in Finder:
- Open Finder
- Press
⌘ + Shift + G(Go to Folder) - Paste:
~/Library/Application Support/Steam/userdata/ - Open the folder with your Account ID number
- Navigate to
760→remote→ find your game's App ID folder →screenshots
The Library folder is hidden by default on Mac. You can also reveal it by holding Option while clicking the Go menu in Finder. If you frequently change where screenshots are saved on Mac, you'll appreciate Steam's option to redirect its folder too (covered below).
Quick tip: If you want to annotate or mark up your Steam screenshots right after finding them, a tool like ScreenSnap Pro makes it easy to add arrows, text, and highlights without opening a heavy image editor.
Windows screenshot folder location
C:\Program Files (x86)\Steam\userdata\<AccountID>\760\remote\<AppID>\screenshotsOpen File Explorer and paste this path into the address bar. Replace
If you installed Steam to a custom location, replace the beginning of the path with wherever Steam lives on your system.
Linux screenshot folder location
~/.local/share/Steam/userdata/<AccountID>/760/remote/<AppID>/screenshotsOpen your file manager or terminal and navigate to this path. On Steam Deck, switch to Desktop Mode first, then open Dolphin file explorer and follow the same path.
Steam Deck screenshots
The Steam Deck runs Linux under the hood, so the path is identical:
~/.local/share/Steam/userdata/<AccountID>/760/remote/<AppID>/screenshotsSwitch to Desktop Mode by pressing the Steam button → Power → Switch to Desktop. Open the Dolphin file manager and navigate to the path above.
Understanding the folder structure
Steam's screenshot folder structure confuses most people because nothing is labeled with human-readable names. Here's what each part means:
| Folder | What it is | Example |
|---|---|---|
userdata | Contains all user profiles | — |
| Your Steam account number | 76561198 |
760 | Steam's internal screenshot app ID | Always 760 |
remote | Cloud-synced screenshots | — |
| The game's Application ID | 730 = CS2 |
screenshots | The actual image files | PNG files |
Finding your Account ID: Open Steam → click your username (top right) → Account Details. Your Steam ID is in the URL or listed on the page. You can also use SteamID Lookup. Valve's official Steam Support page also covers account recovery if you can't access your profile.
Finding a game's App ID: The easiest way is to visit the game's Steam store page. The number in the URL is the App ID. For example, store.steampowered.com/app/730/ means CS2's App ID is 730.
Here are some popular game App IDs for quick reference:
| Game | App ID |
|---|---|
| Counter-Strike 2 | 730 |
| Dota 2 | 570 |
| Team Fortress 2 | 440 |
| Portal 2 | 620 |
| Baldur's Gate 3 | 1086940 |
| Elden Ring | 1245620 |
| Cyberpunk 2077 | 1091500 |
| Stardew Valley | 413150 |
Tired of plain screenshots? Try ScreenSnap Pro.
Beautiful backgrounds, pro annotations, GIF recording, and instant cloud sharing — all in one app. Pay $39 once, own it forever.
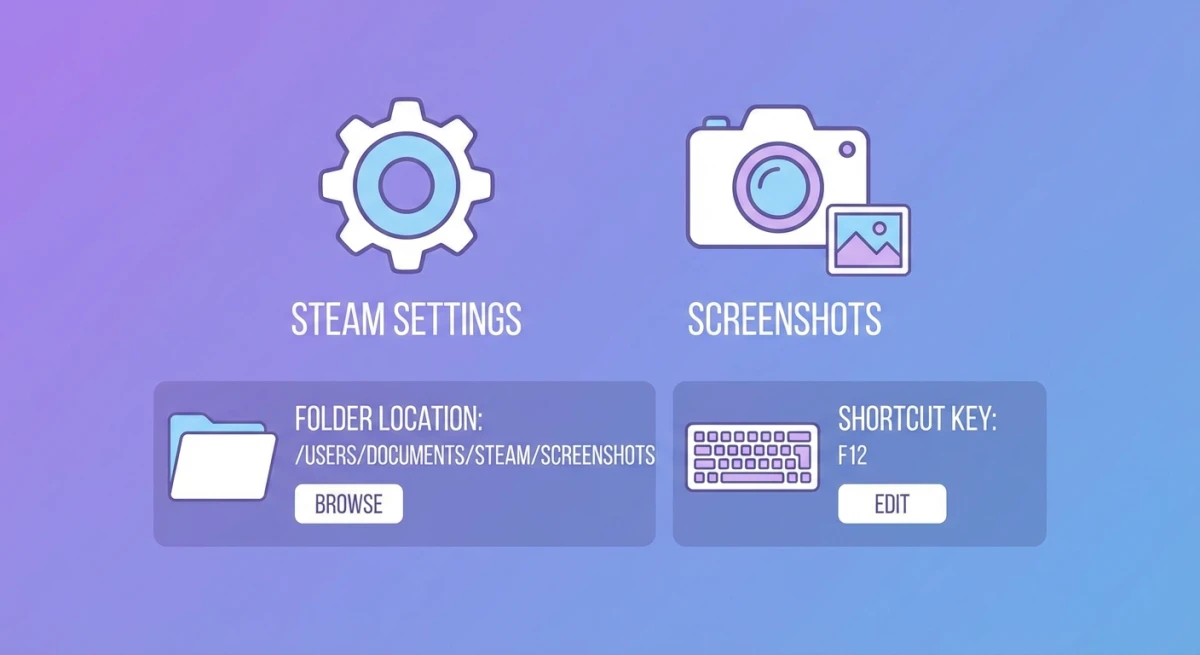
See what it doesHow to change the default screenshot folder
Tired of digging through nested folders? You can tell Steam to save screenshots somewhere more accessible, like your Desktop or a dedicated folder.
- Open Steam → Settings (or Steam → Preferences on Mac)
- Click In Game in the left sidebar
- Find the Screenshot Folder option
- Click Change Folder and choose your preferred location
- Click Select to confirm
Now all future screenshots will save to your chosen folder. Existing screenshots stay in the original location — Steam doesn't move them automatically.
Good folder choices:
~/Pictures/Steam Screenshots(Mac/Linux)C:\Users\YourName\Pictures\Steam Screenshots(Windows)- A cloud-synced folder like Dropbox or iCloud Drive
How to change the screenshot shortcut key
If F12 conflicts with another app or is awkward on your keyboard, you can remap it.
- Open Steam → Settings
- Click In Game
- Find Screenshot Shortcut Keys
- Click the field and press your preferred key combination
Popular alternatives include F5, PrintScreen (Windows), or ⌘ + F12 on Mac. Keep in mind that Mac screenshot keyboard shortcuts like ⌘ + Shift + 3 still work separately — they capture your entire screen through macOS, not through Steam.
Batch-organizing Steam screenshots
Once you find your screenshots, you might have hundreds of files scattered across numbered folders. Here are some quick ways to organize them:
On Mac, use Finder's search to find all .png or .jpg files inside the 760 folder. Sort by date modified to see your most recent captures across all games. You can also use Spotlight (⌘ + Space) and search for screenshots by date.
On Windows, open File Explorer and search inside the 760\remote folder for *.png. Group results by Date modified to sort chronologically regardless of which game they came from.
Bulk rename tip: If you're collecting screenshots for a specific project, copy them to a new folder and use your OS's batch rename feature. On Mac, select all files in Finder, right-click, and choose Rename. This lets you add prefixes like the game name.
For screenshots you plan to share online, consider running them through an image compressor first. Steam's uncompressed files can be quite large, and compressing them reduces upload times without noticeable quality loss.
Troubleshooting common Steam screenshot issues
Sometimes Steam screenshots don't work as expected. Here are the most common problems and quick fixes.
Screenshots not saving
If pressing F12 doesn't produce a notification or save a file, check these settings:
- Open Steam → Settings → In Game
- Make sure Enable the Steam Overlay while in-game is turned on
- Verify the Screenshot Shortcut Key is set (it should show
F12by default) - Check that your screenshot folder path is valid — if you pointed it to an external drive that's disconnected, Steam silently fails
Some games disable the Steam overlay for anti-cheat reasons. In that case, you'll need to use your operating system's built-in screenshot tools instead. On Mac, screenshot keyboard shortcuts like ⌘ + Shift + 3 work in any app, including fullscreen games.
Screenshots appear black or corrupted
This usually happens with games running in Vulkan or DirectX 12 rendering modes. The Steam overlay sometimes conflicts with newer graphics APIs. Try these fixes:
- Switch the game to DirectX 11 mode in its graphics settings
- Update your GPU drivers to the latest version
- Disable any other overlay software (Discord, GeForce Experience) that might conflict
Can't find screenshots after a Steam reinstall
When you reinstall Steam, it creates a fresh userdata folder. Your old screenshots may still exist in the previous installation directory. Check:
- Windows: Look in
C:\Program Files (x86)\Steam.bak\or any backup folders - Mac: Check
~/Library/Application Support/Steam.bak/or Time Machine backups - Cloud uploads: Any screenshots you previously uploaded to your Steam profile are safe on Valve's servers regardless of local installs
Screenshot quality looks poor
By default, Steam saves screenshots as compressed JPEG files. To get uncompressed PNG quality:
- Open Steam → Settings → In Game
- Enable Save an uncompressed copy
- The uncompressed version saves alongside the regular one in a
thumbnailssubfolder — but the full-quality file stays in the main screenshots directory
Keep in mind uncompressed screenshots are significantly larger (5-15 MB each vs 200-500 KB compressed). If storage is a concern, periodically move older screenshots to an archive folder or run them through an image compressor to reduce file size without visible quality loss.
Take better gaming screenshots with ScreenSnap Pro
Steam's built-in screenshot tool gets the job done, but the results are pretty basic. If you're sharing screenshots on social media or creating content, you might want more control.
ScreenSnap Pro gives you tools that Steam's screenshot feature doesn't:
- Instant annotation — add arrows, text, and highlights to mark up gameplay moments, perfect for bug reports or annotating screenshots professionally
- Gradient backgrounds — wrap your screenshot in a beautiful background for social sharing with our Screenshot Background Generator
- Direct cloud sharing — get a shareable link instantly without uploading to Steam or Imgur
- Blur sensitive info — hide your Steam ID, real name, or chat messages before sharing
For quick in-game captures, Steam's F12 works fine. But when you want polished screenshots worth sharing, a dedicated tool makes all the difference.
Frequently Asked Questions
Morgan
Indie DeveloperIndie developer, founder of ScreenSnap Pro. A decade of shipping consumer Mac apps and developer tools. Read full bio
@m_0_r_g_a_n_