Where Do Screenshots Go on Mac? Find & Change It (2026)
By default, Mac screenshots save to your Desktop, named "Screenshot date] at [time].png" (for example, "Screenshot 2026-02-02 at 3.45.12 PM.png"). If your Desktop looks empty, the screenshot may be on the clipboard (if you held Control), in a custom folder you set earlier, or saved by a third-party app like [ScreenSnap Pro into its own folder. Games are the exception too — a Steam screenshot never lands on your Desktop; it goes to Steam's own nested folder instead.
Let's explore exactly where your screenshots end up and the fastest ways to find them.
Where Mac screenshots are saved by default
The default mac screenshot folder depends on which version of macOS you're running:
| macOS Version | Default Location |
|---|---|
| Mojave (10.14) and later | Desktop |
| High Sierra and earlier | Documents folder |
| Any version with Control held | Clipboard (not saved as file) |
On modern Macs running macOS Mojave or newer, every screenshot you take with keyboard shortcuts lands on your Desktop as a PNG file. The naming convention is "Screenshot date] at [time].png" which makes them easy to identify. For the official rundown on macOS screenshot shortcuts and options, see [Apple's screenshot support guide.
Pro tip: If you pressed Control along with your screenshot shortcut (Control + Shift + Command + 3 or Control + Shift + Command + 4), your screenshot went to the clipboard instead of saving as a file. You'll need to paste it somewhere (like in an email or document) with Command + V to use it.
How to find screenshots on Mac using Finder
Can't spot your screenshot on the Desktop? The screenshot saved location mac might have been changed, or the file might be buried among other files. Here's how to find every screenshot on your Mac regardless of where it's stored.
Use Finder's powerful screenshot search
- Open Finder (click the Finder icon in your Dock or press
Command + Spaceand type "Finder") - Press
Command + Fto open a search window - Click This Mac to search your entire computer
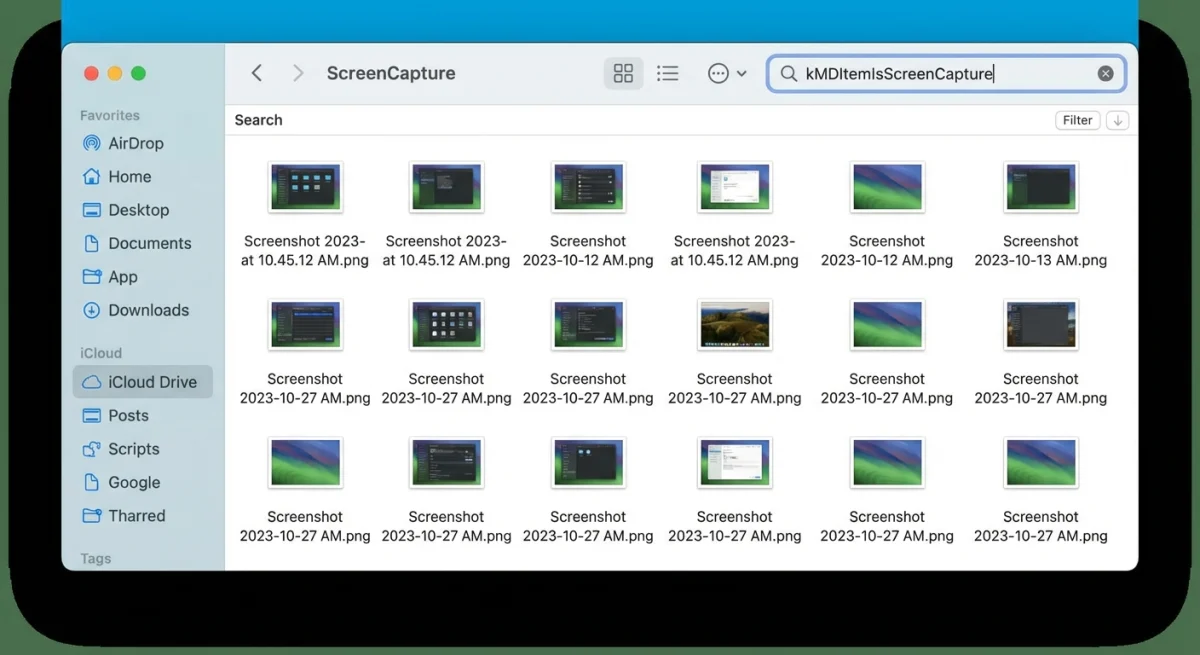
- In the search field, type:
kMDItemIsScreenCapture:1 - Press
Return
This search query uses macOS's metadata system to find every file tagged as a screenshot, no matter where it's saved. Starting with macOS Mountain Lion (10.8), every screenshot gets automatically tagged with this metadata flag.
Filter your search results
Once you see your results, you can narrow them down:
- By date: Click the Date Modified column to sort by newest or oldest
- By file type: The Image menu lets you filter by PNG, JPEG, or other formats
- By location: Look at the file path to see where each screenshot lives
Save this search for later
If you take lots of screenshots, save this search as a Smart Folder:
- After running your search, click Save in the top-right corner
- Name it something like "All Screenshots"
- Check Add to Sidebar
- Click Save
Now you'll have one-click access to all your screenshots from Finder's sidebar.
Find screenshots quickly with Spotlight
Need to find screenshot on mac without opening Finder? Spotlight is faster for quick lookups.
- Press
Command + Spaceto open Spotlight - Type
screenshotand wait a moment - Look under the Images section for your recent screenshots
- Use arrow keys to preview each result
- Press
Returnto open the selected screenshot
Spotlight shows previews right in the search window—just hover over or arrow to any result. To see the file's location, hold Command while a result is selected, and the full path appears at the bottom.
Quick date search: Looking for a screenshot from a specific day? Try typing something like screenshot 2026-02 to find all screenshots from February 2026.
Tired of plain screenshots? Try ScreenSnap Pro.
Beautiful backgrounds, pro annotations, GIF recording, and instant cloud sharing — all in one app. Pay $39 once, own it forever.
See what it doesWhy your screenshots might be missing
If your screenshot disappeared mac or you can't find it anywhere, here are the most common culprits:
1. iCloud Desktop sync moved them
If you have iCloud Drive Desktop & Documents enabled, your screenshots might sync to iCloud and temporarily disappear while uploading. They usually reappear once sync completes.
Check your iCloud status:
- Open System Settings (or System Preferences)
- Click your Apple Account > iCloud > iCloud Drive
- Look for Desktop & Documents Folders
If enabled, your "Desktop" folder is actually synced to iCloud. Your screenshots are still there—they're just stored in the cloud.
2. You changed the save location
At some point, you (or someone else) might have changed where screenshots save. The Screenshot app remembers your last location choice.
To check your current setting:
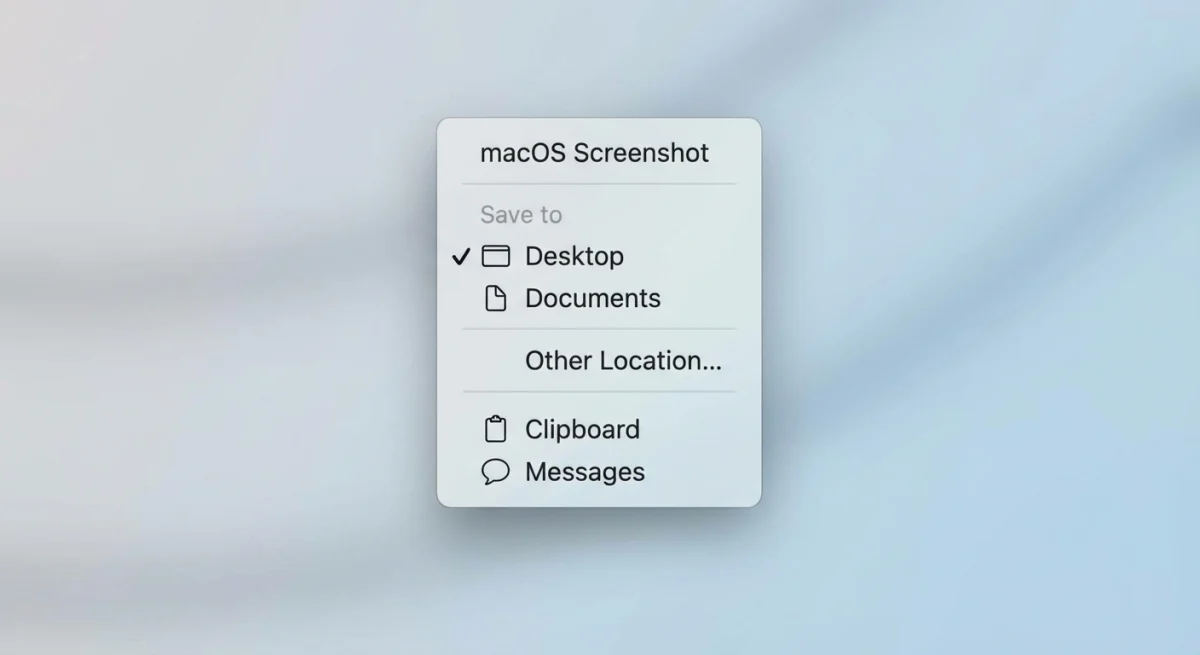
- Press
Command + Shift + 5to open the Screenshot toolbar - Click Options
- Look under Save to—your current location shows a checkmark
3. Screenshots are going to clipboard
If you're pressing Control with your screenshot shortcuts, nothing saves to disk. The screenshot goes straight to your clipboard, waiting to be pasted.
This is actually useful when you want to paste directly into an app without cluttering your Desktop. But if you want a file, skip the Control key.
4. Your Mac's storage is full
When your startup disk is nearly full, macOS might fail to save new screenshots. Check your storage:
- Click the Apple menu > About This Mac
- Click Storage (or More Info > Storage on newer macOS)
If you're low on space, free up some room and try your screenshot shortcut again. If it's still not working, there might be another issue.
How to change where screenshots are saved
Tired of screenshots cluttering your Desktop? Here's the quick way to pick a new mac screenshot location.
On macOS Mojave and later
- Press
Command + Shift + 5to open Screenshot - Click Options at the bottom of the toolbar
- Under Save to, choose:
- Desktop (default)
- Documents
- Clipboard (no file saved)
- Mail (attaches to new email)
- Messages (attaches to new message)
- Preview (opens for editing)
- Other Location... (pick any folder)
- Click anywhere to close the menu
Your choice is saved automatically. All future screenshots go to your new location.
For a complete walkthrough with all the methods (including Terminal commands for older Macs), see our full guide on changing screenshot location.
Create a dedicated Screenshots folder
For better organization, create a folder specifically for screenshots:
- Open Finder and go to your Documents folder (or wherever you prefer)
- Press
Command + Shift + Nto create a new folder - Name it Screenshots
- Open Screenshot (
Command + Shift + 5) > Options > Other Location - Select your new Screenshots folder
Now all your captures stay organized in one place instead of scattered across your Desktop.
Keep your screenshots organized
Once you know where your screenshots go, the next challenge is keeping them organized. Here are a few approaches:
Use Smart Folders
Create multiple Smart Folders in Finder for different time periods:
- "Recent Screenshots" (modified in last 7 days)
- "This Month's Screenshots" (modified this month)
- "Old Screenshots" (modified more than 30 days ago)
Rename files as you go
The default "Screenshot [date] [time]" naming isn't very descriptive. Get in the habit of renaming important screenshots right away:
- Click the screenshot file once to select it
- Press
Returnto edit the name - Type something descriptive like "bug-report-login-page.png"
Use a dedicated screenshot tool
The built-in Screenshot app works fine for basic captures, but dedicated tools offer more control. ScreenSnap Pro, for example, gives you instant cloud uploads so you never lose a screenshot—just capture and get a shareable link immediately. The Quick Access overlay also shows your recent captures without digging through folders.
Other helpful features include annotation tools for marking up screenshots before sharing, customizable save locations, and automatic organization by project or date.
Frequently Asked Questions
Morgan
Indie DeveloperIndie developer, founder of ScreenSnap Pro. A decade of shipping consumer Mac apps and developer tools. Read full bio
@m_0_r_g_a_n_