Best Free Screen Recorder Mac 2026 (No Watermark)
A free screen recorder for Mac lets you capture your screen without spending a dime. The best options don't add watermarks or limit recording time. Whether you're making tutorials, logging bug reports, or capturing gameplay, there's a free tool that fits — and if you outgrow them, paid apps like ScreenSnap Pro bundle screenshots, GIFs, and recording in one place.
The catch? Free tools vary widely in quality. Some are great. Others frustrate with hidden limits or dead updates. This guide shows you which free screen recording software for Mac is worth your time in 2026.
Quick answer: The best free screen recorder for Mac is QuickTime Player for simple captures, OBS Studio for advanced recording with system audio, and Kap for GIF creation. All three are completely free—no watermarks, no time limits.
Why Use a Free Screen Recorder?
Before diving into the tools, here's when a free screen recorder makes sense:
Free tools are perfect for:
- Occasional recording needs (a few times per week)
- Simple screen captures without heavy editing
- Trying out screen recording before committing to paid software
- Basic tutorials and demos
- Students and hobbyists on a budget
Consider paid alternatives when:
- You need professional-grade editing built-in
- Cloud storage and instant sharing matter
- You want GIF recording without conversion hassle
- Time is money (paid tools save hours on workflow)
That said, several free options on this list rival paid competitors. Let's explore them.
Best Free Screen Recorder Mac Options: Our Top 8 Picks
We tested dozens of free screen recording tools to find the ones that actually deliver. Here are the eight best options for 2026, ranked by overall usability and feature set.
QuickTime Player: The Built-In Option
Every Mac comes with QuickTime Player. It handles screen recording well for a bundled app. Apple has included it as a core macOS feature since OS X 10.6.
How to record with QuickTime:
- Open QuickTime Player from Applications
- Click File → New Screen Recording (or press
Control + Command + N) - Select full screen or drag to choose a portion
- Click Record and capture away
Pros:
- Zero installation required
- No watermarks or time limits
- Native macOS integration
- Outputs to MOV format (excellent quality)
Cons:
- Cannot capture system audio without third-party plugins
- No annotation tools
- Basic editing (trim only)
- No GIF export
QuickTime is ideal for quick captures when you just need to record screen mac free without fussing with settings. For detailed walkthroughs, check our QuickTime screen recording guide.
Best for: Quick, one-off recordings without audio requirements.
QuickTime Recording Tips
To get the most from QuickTime screen recordings:
- Use Control+Cmd+Shift+4 to copy directly to clipboard for instant pasting
- Set a timer in Options to give yourself time to prepare before recording starts
- Enable "Show Mouse Clicks" when creating tutorials—it helps viewers follow along
- Record to an external drive if capturing long sessions to avoid filling your boot drive
QuickTime saves files as MOV by default. This format has great quality but large file sizes. You can convert to smaller formats using built-in tools or other apps.
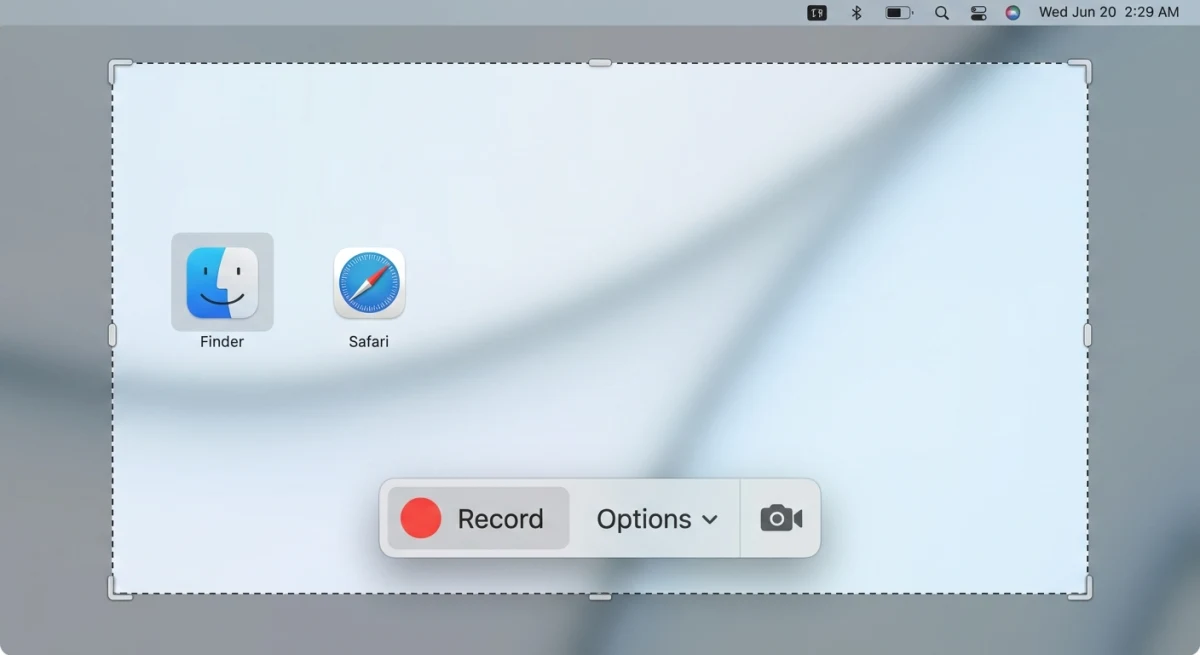
Screenshot Toolbar: The Fastest Method
macOS Mojave and later includes a built-in screen recording tool. It's part of the Screenshot toolbar—the same tool you use for Mac screenshot shortcuts.
How to access it:
- Press
Command + Shift + 5 - Choose "Record Entire Screen" or "Record Selected Portion"
- Click Options to set microphone, save location, and timer
- Hit Record
Pros:
- Fastest launch time (just a keyboard shortcut)
- No app to open
- Timer option for self-capture
- Show mouse clicks option
Cons:
- Same limitations as QuickTime (no system audio)
- No editing capabilities
- Files save as MOV only
Best for: Instant captures when speed matters more than features.
Screenshot Toolbar vs QuickTime
Both tools use the same tech under the hood. The Screenshot Toolbar is just faster to launch. Here are the key differences:
| Aspect | Screenshot Toolbar | QuickTime |
|---|---|---|
| Launch speed | Instant (keyboard) | Requires app launch |
| Recording options | Same | Same |
| Playback | Opens in QuickTime | Opens in QuickTime |
| Best for | Quick captures | When already editing video |
For most users, the Screenshot Toolbar is the better pick for one-off recordings. You skip the step of opening an app.
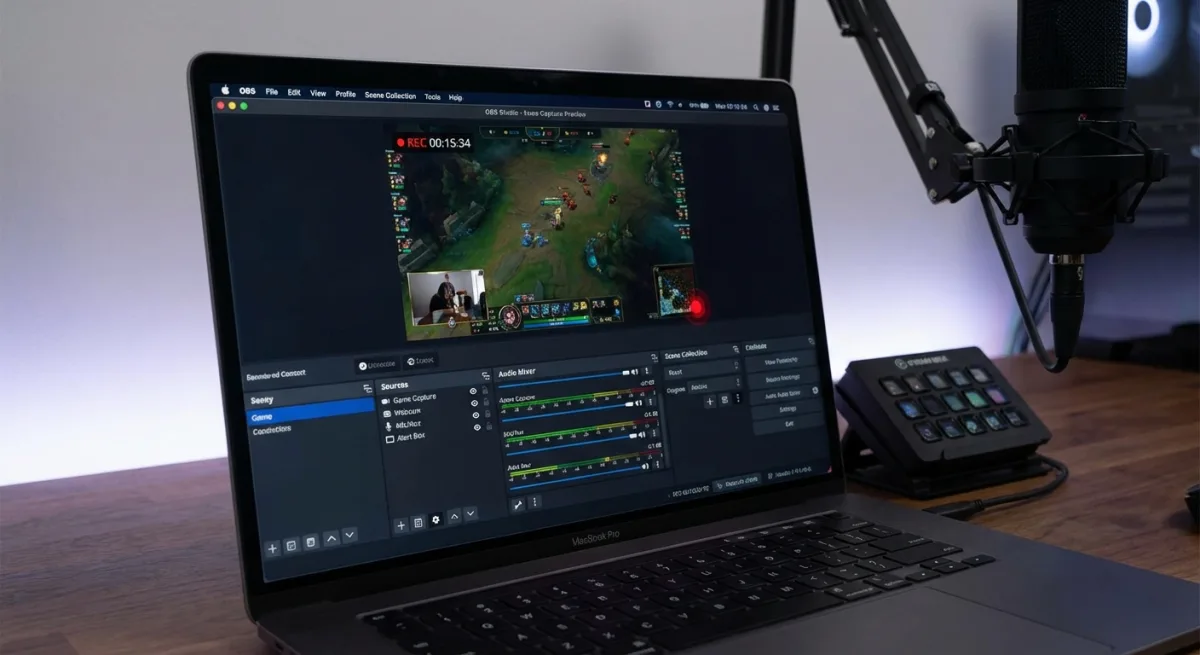
OBS Studio: The Open Source Powerhouse
Need serious free screen recording software for Mac? OBS Studio has features that rival paid tools. It's fully open source. Millions of streamers and content creators trust it daily.
Key features:
- Multiple sources (screens, windows, webcam, images)
- Audio mixing with multiple tracks
- Scenes for switching between layouts
- Virtual camera for video calls
- Live streaming support
- No watermarks, no time limits
Pros:
- Professional-grade recording quality
- Captures system audio natively
- Highly customizable
- Active community and plugins
- Completely free (open source)
Cons:
- Steeper learning curve
- Interface feels cluttered for simple recordings
- Resource-intensive on older Macs
- Overkill for basic screen captures
Best for: Power users, streamers, and anyone needing advanced multi-source recording. If you also need to screen record with audio on Mac, OBS handles it natively.
Getting Started with OBS
OBS looks complex, but basic recording is simple:
- Download from obsproject.com (official site)
- Run the auto-configuration wizard when prompted
- Add a "Display Capture" source for your screen
- Click "Start Recording"
The learning curve shows up when you add multiple sources, custom layouts, or streaming. For simple recordings, ignore 90% of the buttons. Just hit record.
Pro tip: OBS lets you record and stream at the same time. This is great if you want to go live while keeping a high-quality local copy.
Kap: The Elegant Open Source Choice
Kap is what happens when devs build a screen recorder they want to use. It's minimal, clean, and focused. No watermarks, no bloat.
Key features:
- Direct GIF export (no conversion needed)
- MP4, WebM, and APNG formats
- Highlight clicks
- Plugin system for customization
- Keyboard shortcuts
Pros:
- Clean, distraction-free interface
- Native GIF recording
- Open source and free
- Lightweight on system resources
- Trimming built-in
Cons:
- No webcam overlay
- Limited editing features
- macOS only (no cross-platform)
- No system audio capture
Best for: Developers and designers who want quick, clean screen recordings and GIFs without bloat. If GIFs are your focus, also see our guide on how to record GIFs on Mac.
Why Developers Love Kap
Kap was built by devs for devs, and it shows:
- Direct GIF export — share demos on GitHub, Slack, or docs with no conversion
- Custom frame rate — balance file size and quality
- Plugins — add features without bloating the core app
- Keyboard-first — fast workflow that respects your time
The app sits in your menu bar until you need it. No splash screens. No setup wizards. Just capture and go. For devs making docs or sharing quick feature demos, Kap is the sweet spot of simple and capable.
ScreenPal (Screencast-O-Matic): Feature-Rich Free Tier
ScreenPal (formerly Screencast-O-Matic) has a solid free tier. Many users find it covers their basic needs.
Free tier includes:
- Record screen, webcam, or both
- 15-minute recordings (plenty for most tutorials)
- Basic trimming
- Drawing tools during recording
- Direct sharing
Pros:
- Picture-in-picture webcam
- Draw and zoom while recording
- Cloud hosting included
- Easy sharing links
- Cross-platform
Cons:
- 15-minute limit on free tier
- Watermark on free recordings
- Editing features locked behind paywall
- Pushes upgrades frequently
Best for: Quick tutorials and demos where you need webcam overlay but don't mind the time limit and watermark.
ScreenPal Free vs Paid
The free tier covers many use cases. Here's what you miss out on:
| Feature | Free | Paid |
|---|---|---|
| Recording limit | 15 min | Unlimited |
| Watermark | Yes | No |
| Editing | Basic trim | Full editor |
| Export formats | Limited | All formats |
| Remove backgrounds | No | Yes |
| Priority support | No | Yes |
Free ScreenPal works fine for short tutorials under 15 minutes. Just know the watermark in the corner marks your content as "made with a free tool."
Tired of plain screenshots? Try ScreenSnap Pro.
Beautiful backgrounds, pro annotations, GIF recording, and instant cloud sharing — all in one app. Pay $39 once, own it forever.
See what it doesCap: The Modern Free Recorder
Cap is a newer entrant that's gained popularity for its polished experience and focus on privacy.
Key features:
- HD recording quality
- Open source
- Local-first (recordings stay on your Mac)
- Clean interface
- MP4 and GIF export
Pros:
- Modern, intuitive design
- Privacy-focused (no cloud required)
- Fast and lightweight
- No watermarks
- Active development
Cons:
- Younger project (fewer features than established tools)
- Limited editing capabilities
- Smaller community
Best for: Privacy-focused users who want a modern, clean screen recorder with no strings attached.
How to Get Started with Cap
Getting started takes under a minute:
- Download Cap from cap.so
- Grant screen recording and mic access when asked
- Pick your capture area (full screen or a region)
- Hit record
The app runs from your menu bar. No bloated dashboard. No account needed. Click the icon, choose your settings, and start recording. Files save to your Mac by default.
Cap's Privacy-First Approach
Most cloud-first tools upload your recordings right away. Cap doesn't. Your files stay on your Mac unless you choose to share them. This matters for:
- Recording private work content
- Capturing client calls or demos
- Users who don't trust cloud storage
- Teams with strict compliance rules
The open-source code means anyone can check what the app does. No hidden tracking or surprise uploads.
Cap also stands out with its export options. You can save as MP4 for video or GIF for quick shares. The quality stays sharp even at lower file sizes. For a newer tool, it punches well above its weight.
Loom: Free Tier with Cloud Sharing
Loom is mainly a paid product. But its free tier works well for light use.
Free tier includes:
- Up to 25 videos
- 5-minute recordings
- Screen + webcam
- Automatic cloud upload
- Share links instantly
Pros:
- Incredibly easy to use
- Instant shareable links
- Viewer analytics
- Emoji reactions
- Cross-platform
Cons:
- 5-minute limit on free
- 25 video storage limit
- Requires account
- Recordings live on Loom's servers
Best for: Quick async video messages for work. Less ideal for tutorials or longer content.
Is Loom's Free Tier Worth It?
Loom shines for work chats, not content creation. The free tier works when:
- Your videos are under 5 minutes
- You're sending quick updates to teammates
- Cloud sharing matters more than local files
- You don't mind storage limits
For longer content like tutorials or courses, the time cap gets in the way. You end up rushing to beat the clock instead of making clear content.
ScreenRec: Lightweight Cloud Option
ScreenRec focuses on instant sharing with automatic cloud uploads.
Features:
- Instant share links
- Screenshot annotation
- Screen + webcam
- Cloud storage (2GB free)
Pros:
- Very easy workflow
- Instant sharing
- No watermarks
- Annotation tools
Cons:
- Cloud-dependent
- Limited local control
- Fewer export options
- Privacy concerns (always uploads)
Best for: Teams that need quick bug reports or feedback videos with instant sharing.
How ScreenRec's Workflow Works
ScreenRec is built for speed. The whole process looks like this:
- Click the ScreenRec icon in your menu bar
- Select the area you want to record
- Hit record (add webcam if needed)
- Stop recording when done
- Get a share link copied to your clipboard right away
The instant link is the big draw here. There's no upload step you have to wait for. As soon as you stop, the link is ready to paste into Slack, email, or a bug tracker.
You also get basic tools to mark up screenshots. Draw arrows, add text, or highlight areas. This is handy for bug reports where you need to point out what went wrong.
The free tier gives you 2GB of cloud space. That holds roughly 50-60 short recordings. Once you hit the limit, you'll need to delete old files or upgrade.
One thing to note: ScreenRec always uploads to the cloud. There's no local-only mode. If privacy is a concern, look at Cap or Kap instead.
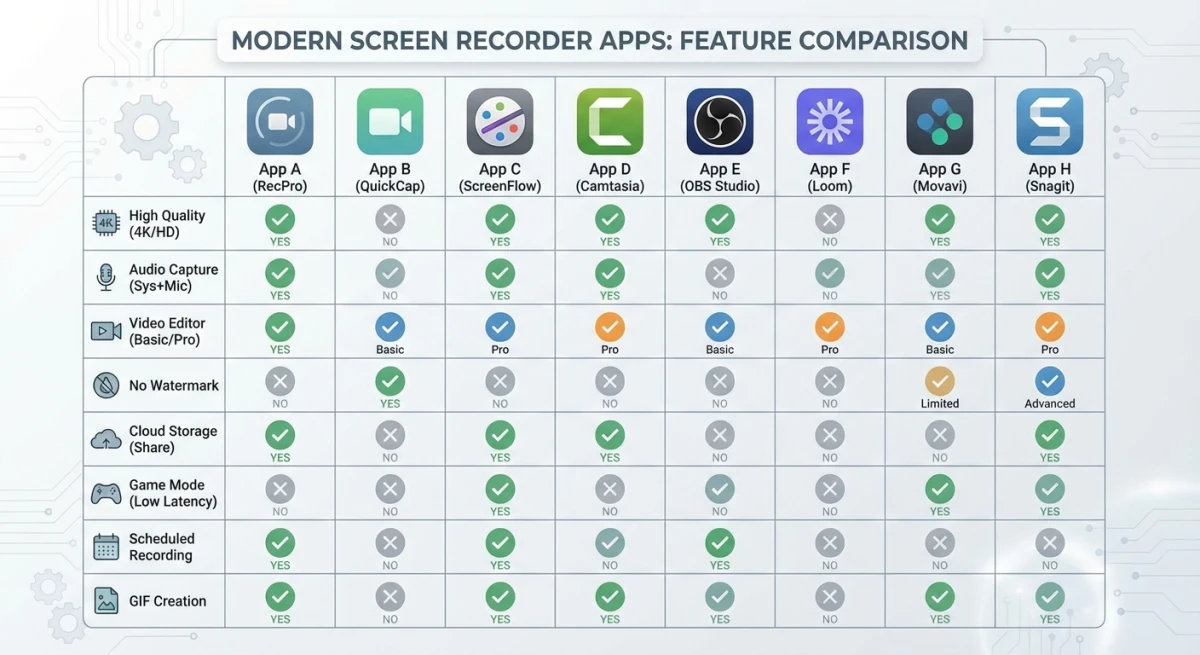
Feature Comparison Table
Here's how these free screen recorders for Mac stack up:
| Tool | Watermark | Time Limit | System Audio | GIF Export | Webcam | Price |
|---|---|---|---|---|---|---|
| QuickTime | No | None | No* | No | No | Free |
| Screenshot Toolbar | No | None | No* | No | No | Free |
| OBS Studio | No | None | Yes | Via plugin | Yes | Free |
| Kap | No | None | No | Yes | No | Free |
| ScreenPal | Yes (free) | 15 min | Yes | No | Yes | Freemium |
| Cap | No | None | Yes | Yes | Yes | Free |
| Loom | No | 5 min | Yes | No | Yes | Freemium |
| ScreenRec | No | None | Yes | No | Yes | Freemium |
*Requires third-party plugins like Soundflower or BlackHole
Best Free Option by Use Case
Different workflows need different tools. Here's the best free screen capture for each scenario:
For Quick, No-Fuss Recordings
Winner: Screenshot Toolbar
Press Command + Shift + 5 and you're recording. Nothing to install, no accounts to create. Perfect when you just need to capture something fast.
For GIF Creation
Winner: Kap
Native GIF export without conversion makes Kap the obvious choice for developers sharing quick demos on GitHub or Slack. For more GIF tips, see how to convert MOV to GIF on Mac.
For Professional Tutorials
Winner: OBS Studio
When quality matters and you need system audio, multiple scenes, or streaming capability, OBS is unmatched in the free tier.
For Async Team Communication
Winner: Loom
The 5-minute limit works fine for quick updates, and instant sharing makes collaboration seamless.
For Privacy-First Recording
Winner: Cap or Kap
Both are open source and keep recordings local by default—no cloud accounts required.
For Webcam + Screen Combo
Winner: OBS Studio or ScreenPal
If picture-in-picture is essential, these handle it best (though ScreenPal adds a watermark on free).
When to Upgrade to Paid
Free tools handle most basic needs, but you'll hit walls eventually. Consider upgrading when:
- You need GIF recording with markup: Most free tools skip GIFs or lack markup tools. ScreenSnap Pro offers native GIF recording with 15 markup tools and clean backgrounds.
- Cloud sharing matters: Free cloud tiers fill up fast. Paid tools give you more space with instant links.
- You're tired of workarounds: Free audio recording on Mac needs extra plugins and setup. Paid tools just work out of the box.
- You want polished output: A one-time purchase like ScreenSnap Pro ($39) pays for itself fast if you record often.
For users wanting more than free tiers offer, check our guide to editing screen recordings on Mac to get the most from your captures.
Frequently Asked Questions
Final Thoughts
The best free screen recorder for Mac depends on what you need. For quick captures, use the built-in tools. For GIFs, grab Kap. For pro-level recording, install OBS Studio.
But if free tools keep slowing you down—no GIFs, audio hacks, missing markup—your time has value. ScreenSnap Pro gives you instant capture, native GIF recording, cloud sharing, and 15 markup tools. One-time price. No monthly fees.
Now you know which free options are worth your time in 2026. Happy recording!
Morgan
Indie DeveloperIndie developer, founder of ScreenSnap Pro. A decade of shipping consumer Mac apps and developer tools. Read full bio
@m_0_r_g_a_n_