How to Blur Faces in Photos on Mac (4 Methods) 2026
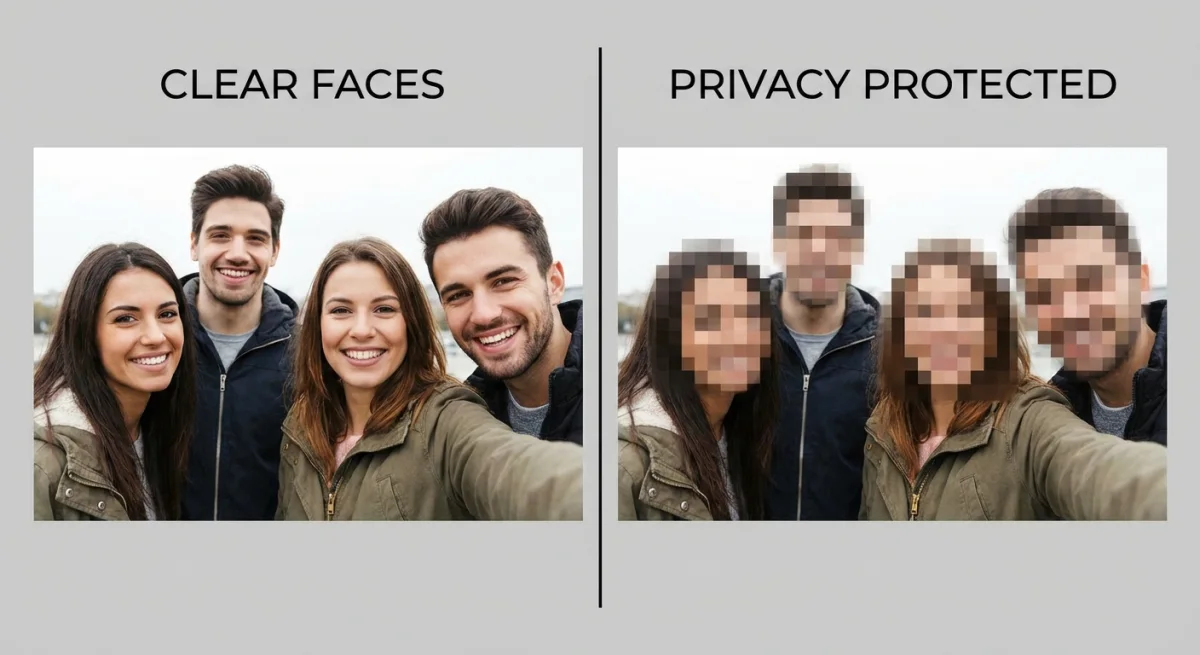
Need to blur faces in photos before sharing online? Whether you're a street photographer protecting bystander privacy, a content creator preparing social media posts, or a professional anonymizing sensitive documents, blurring faces on Mac takes less than a minute with the right tool — like ScreenSnap Pro.
Here are four methods ranked from fastest to most advanced — pick the one that fits your workflow. (Looking for a screenshot app for Mac with built-in blur tools? We've got a full roundup.)
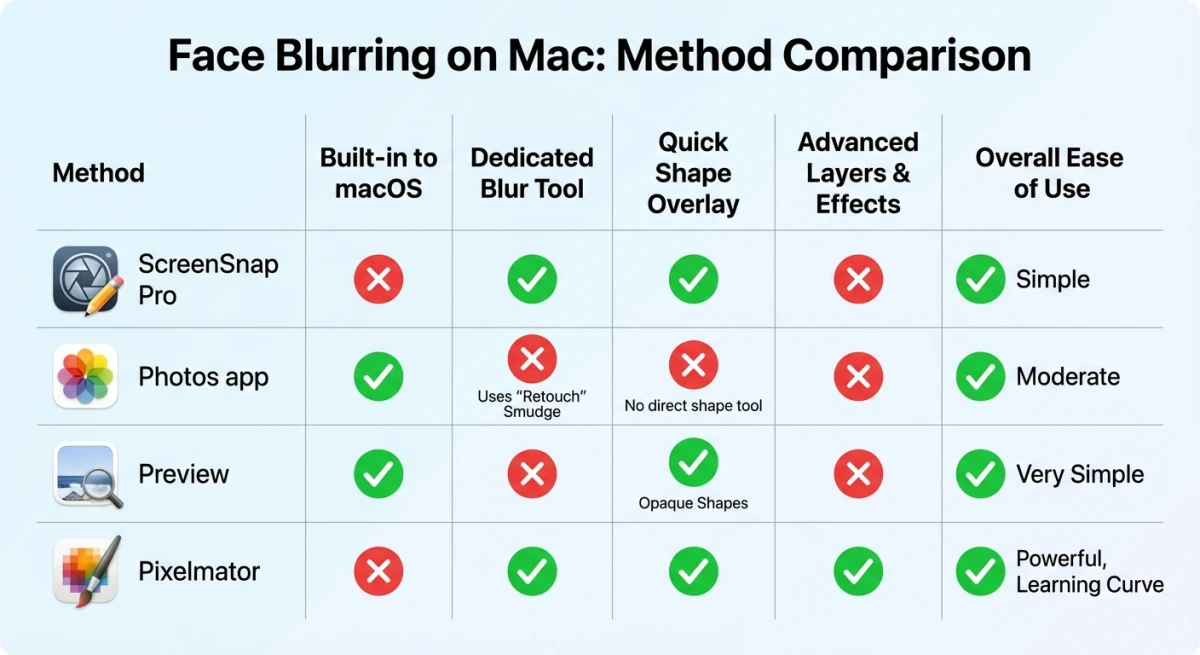
Quick comparison:
| Method | Cost | Speed | Best for |
|---|---|---|---|
| ScreenSnap Pro | $39 once | ⚡ 15 sec | Fastest blur-and-share |
| Photos Clean Up | Free | Fast | Apple Silicon Macs |
| Preview | Free | Medium | Quick cover-up, any Mac |
| Pixelmator Pro | $50 once | Slower | Pro photo editing |
Why you need to blur faces in photos
Blurring faces isn't just nice to have — in many cases, it's required. Here's when it matters:
- Privacy laws. In the EU, posting clear faces without consent can break GDPR rules. Many other countries have similar laws.
- Street photography. Taking candid shots is legal in most public spaces, but blurring passersby shows respect and avoids issues.
- Social media. Posting group photos with strangers in them — beach shots, events, restaurant backgrounds — can create awkward moments.
- Work documents. HR teams, doctors, and teachers often need to hide faces in photos before sharing them.
- Kid safety. Parents sharing family photos may want to blur other kids' faces.
The good news: every method below takes under two minutes once you know the steps.
Blur vs. pixelate: understanding your options
Before picking a method, it helps to know the two main ways to hide faces.
Standard blur (also called Gaussian blur) smooths out the pixels, making the area look soft and out of focus. It's the most common choice for social media because the result looks natural — like the camera missed focus on that spot.
Pixelation swaps groups of pixels for single-color blocks, making a mosaic look. News outlets and law enforcement use this style because it's much harder to undo. If privacy is your top concern, go with pixelation.
Most face blur apps on Mac offer both. The methods below note which type each tool has so you can pick the right one.
Method 1: Using ScreenSnap Pro (fastest option)
If you already use ScreenSnap Pro for screenshots, you can blur faces in any image — not only screenshots. The built-in blur and pixelate tools work on any photo you open.
Steps to blur a face
- Open your photo in ScreenSnap Pro (drag it onto the app icon or use File → Open).
- Select the Blur tool from the annotation toolbar (or switch to Pixelate for stronger anonymization).
- Draw over the face you want to hide. Adjust the brush size for precision.
- Repeat for additional faces if needed.
- Save or share directly — the blurred version is ready in seconds.
Why this works well: ScreenSnap Pro's markup tools include both standard blur and pixelation. You can adjust the strength and brush size without opening a full image editor. The whole thing takes about 15 seconds per face.
Pro tip: Use pixelate when blur alone doesn't hide enough detail. It breaks up facial features more strongly, making it nearly impossible to recover the original face.
Method 2: macOS Photos app Clean Up tool (free, built-in)
Starting with macOS Sequoia 15.1, the Photos app has a Clean Up tool powered by Apple Intelligence. It was made to remove objects, but it has a hidden bonus — it pixelates faces when it sees you're trying to remove a person.
Requirements
- macOS Sequoia 15.1 or later
- A Mac with Apple Silicon (M1 chip or newer)
- Apple Intelligence enabled in System Settings → Apple Intelligence & Siri
Steps to pixelate faces
- Open the photo in Photos.
- Click Edit in the toolbar.
- Select the Clean Up tool (eraser icon).
- Brush over the face you want to anonymize.
- Photos detects it's a face and applies a pixelation filter instead of removing the person entirely.
- Click Done to save.
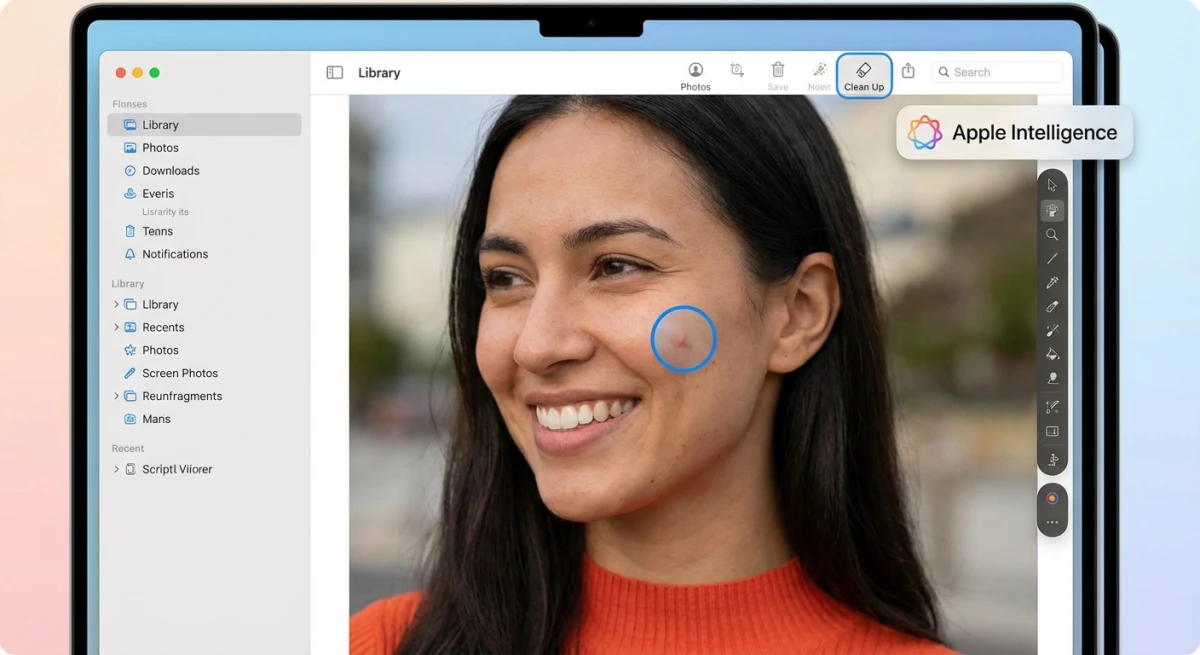
Limits: This only works on Macs with Apple Silicon. If you have an Intel Mac, skip to Method 3 or 4. You can't adjust the pixelation level — Apple sets the strength for you.
Method 3: Preview markup workaround (basic free option)
Preview doesn't have a blur tool, but you can draw a shape over a face to hide it. This works on every Mac no matter which chip or macOS version you have.
Steps to cover faces in Preview
- Open the photo in Preview (right-click → Open With → Preview).
- Click the Markup Toolbar button (pencil icon) or press
⌘ + Shift + A. - Select the Shapes tool and choose a rectangle or oval.
- Draw the shape over the face you want to hide.
- Set the fill color to match the surrounding area (or use solid black/white).
- Adjust opacity if you want a semi-transparent cover.
- Save with
⌘ + S.
The tradeoff: This doesn't blur — it covers. The result looks less polished than a real blur, but it gets the job done when you have no other tools. For more editing tips in Preview, check our full guide.
Tired of plain screenshots? Try ScreenSnap Pro.
Beautiful backgrounds, pro annotations, GIF recording, and instant cloud sharing — all in one app. Pay $39 once, own it forever.
See what it doesMethod 4: Pixelmator Pro (advanced editing)
For photographers and designers who need fine control, Pixelmator Pro offers several blur types with adjustable strength. It's a one-time buy from the Mac App Store.
Steps to blur faces in Pixelmator Pro
- Open your photo in Pixelmator Pro.
- Use the Selection tool (press
S) to select the face area. The Elliptical Selection works well for faces. - Go to Format → Effects → Blur in the menu bar.
- Choose your blur type:
- Gaussian Blur — smooth, natural-looking blur (best for most uses)
- Pixelate — blocky effect for stronger hiding
- Motion Blur — directional blur for artistic effect
- Adjust the Radius slider to control blur intensity.
- Click outside the selection to apply.
- Export with File → Export.
When to use this: Pixelmator Pro shines when you need to blur faces in large, high-res photos where details matter. It's overkill for quick social posts but perfect for pro photo work.
Batch blur with Pixelmator Pro
If you have a whole folder of photos that need faces blurred:
- Open Pixelmator Pro and go to File → New from Automation → Image Workflow.
- Add a Blur step to the workflow. Set the blur type and strength.
- Define the region where faces typically appear (works best when faces are in a similar spot across all photos — event photos, webcam grabs, etc.).
- Drag your folder of images onto the workflow.
- Pixelmator Pro runs the blur on each image and saves the results.
This won't be as precise as doing each one by hand, but it saves hours when you have 50+ photos from the same event or camera angle.
Blur vs. pixelate: which should you choose?
Now that you've seen all four methods, here's a closer look at blur vs. pixelate:
| Feature | Gaussian Blur | Pixelation |
|---|---|---|
| Look | Smooth, soft | Blocky, mosaic |
| Privacy strength | Good at high intensity | Stronger — harder to reverse |
| Professional feel | More natural in photos | Common in news/media |
| Reversibility risk | Low-moderate | Very low |
| Best for | Social media, portfolios | Legal docs, journalism |
The short answer: Use pixelation when privacy really matters (legal docs, news, HR files). Use standard blur when you want a cleaner, more natural look (social media, portfolio shots).
Studies from the University of Texas showed that some AI tools can partly recover lightly blurred faces. To stay safe, crank the blur up as high as looks good to you, or switch to pixelation for anything sensitive.
Which method should you choose?
| Method | Price | Speed | Precision | Batch Support |
|---|---|---|---|---|
| ScreenSnap Pro | $39 one-time | ⚡ Fastest | High | No |
| Photos Clean Up | Free | Fast | Auto | No |
| Preview | Free | Medium | Low | No |
| Pixelmator Pro | $50 one-time | Slow | Highest | Yes |
- Choose ScreenSnap Pro if you want the fastest blur-and-share workflow. Pay once, use forever.
- Choose Photos Clean Up if you have an Apple Silicon Mac and want a free built-in option.
- Choose Preview if you need a quick cover-up without installing anything.
- Choose Pixelmator Pro if you're editing professional photos and need advanced blur controls.
For most people, ScreenSnap Pro or the Photos app handles face blurring in seconds. If you're working with screenshots specifically, we have a dedicated guide for that.
Privacy laws: when face blurring is required
Rules about posting photos with faces vary by region. Here's a quick look:
- EU (GDPR): You need consent to publish a clear photo of someone. Fines for violations can reach millions of euros. Blur first, ask questions later.
- United States: There's no single federal law. Most states allow photos in public spaces, but using someone's face for ads or profit may need a model release. California's CCPA adds extra rules for personal data.
- United Kingdom: Similar to GDPR post-Brexit. The UK Data Protection Act covers photos of people as personal data.
- Australia: No broad right to privacy in public, but publishing photos that harass or defame someone can lead to legal trouble.
- Japan/South Korea: Both have strong privacy norms. In Japan, posting clear photos of strangers without consent can violate portrait rights.
The safe bet: If you're sharing photos online and there are people in the frame you don't know, blur their faces. It takes seconds and avoids any legal gray area.
Batch face blurring: handling multiple photos
When you need to hide faces across dozens or hundreds of photos, doing them one at a time isn't realistic. Here are your options:
Pixelmator Pro workflows. As shown in Method 4 above, Pixelmator Pro lets you build custom workflows. Set up a blur action, define the area, and run it on a whole folder. This works best when faces show up in roughly the same spot across photos (event shots, webcam grabs).
ImageMagick via Terminal. For developers comfortable with the command line, ImageMagick can batch-blur specific regions:
magick input.jpg -region 200x200+300+100 -blur 0x20 output.jpgThis blurs a 200×200 pixel area starting at coordinates (300, 100). Combine it with a shell loop to process entire folders.
Online tools. If you'd rather not install anything, our free blur tool handles single images right in your browser. For larger batches, desktop tools are still faster.
For photos you've already cropped on Mac, you can apply blur as a second step without re-cropping.
Tips for natural-looking face blur
Getting a clean blur that doesn't look sloppy takes a few extra seconds:
- Match the blur area to the face shape. Use an elliptical selection instead of a rectangle — faces aren't square.
- Feather the edges. A hard blur boundary looks unnatural. In Pixelmator, increase the feather radius. In ScreenSnap Pro, the blur brush naturally feathers edges.
- Don't over-blur. You only need enough blur to make the face unrecognizable. Going overboard draws more attention to the blurred area.
- Check at full size. Zoom to 100% before saving. Blur that looks sufficient when zoomed out may not hide enough detail at full resolution.
- Cover identifying features beyond the face. Name tags, distinctive tattoos, or unique clothing can identify someone even with a blurred face.
If you need to blur sensitive info in screenshots like email addresses or account numbers, the process is similar but the tool selection differs slightly.
Need to share the blurred photo online? You can use our free blur tool directly in your browser — no download required.
Frequently Asked Questions
Morgan
Indie DeveloperIndie developer, founder of ScreenSnap Pro. A decade of shipping consumer Mac apps and developer tools. Read full bio
@m_0_r_g_a_n_