How to Watermark Photos on Mac (5 Methods) - 2026 Guide
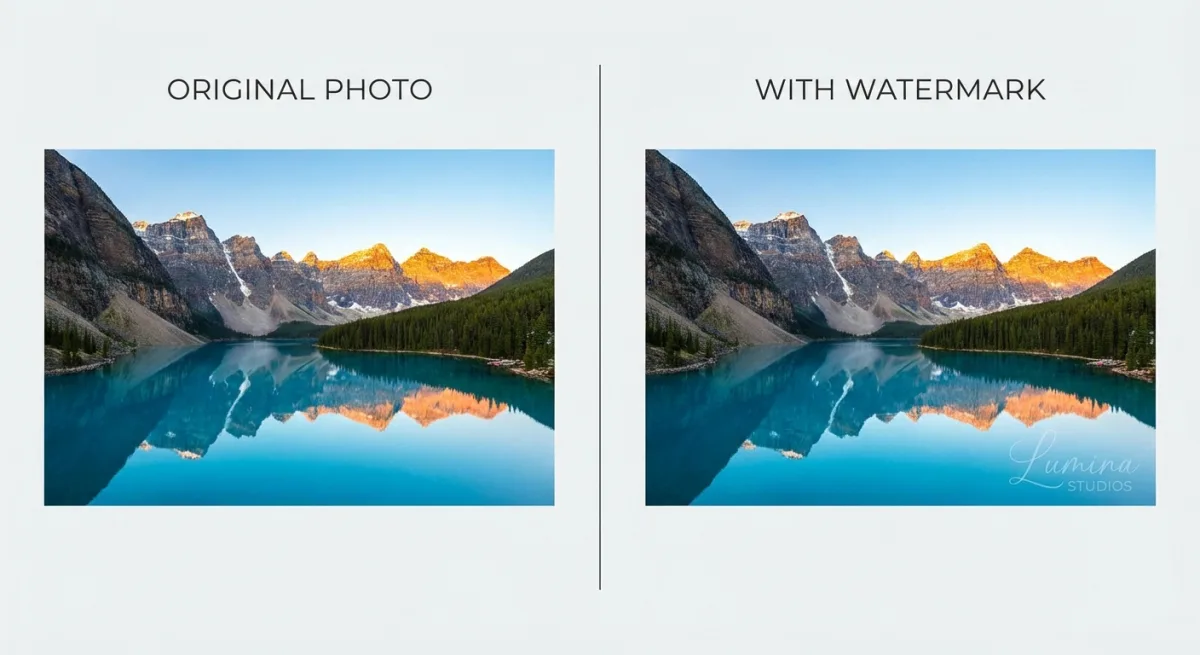
A watermark is a semi-transparent text or logo overlay placed on photos to identify ownership and discourage unauthorized use. Whether you're a photographer, designer, or content creator, watermarking your images on Mac takes just a few clicks with apps like ScreenSnap Pro — no expensive software required.
Here are five methods to watermark photos on Mac, from free built-in tools to dedicated apps that handle batch processing.
Quick comparison: 5 ways to watermark photos on Mac
| Method | Cost | Batch support | Opacity control | Best for |
|---|---|---|---|---|
| ScreenSnap Pro | One-time purchase | No | Yes | Screenshots & quick edits |
| Preview | Free (built-in) | No | No | One-off watermarks |
| Photos app | Free (built-in) | No | No | Photos library images |
| Shortcuts app | Free (built-in) | Yes | No | Bulk watermarking |
| Dedicated apps | $10–$30 | Yes | Yes | Pro workflows |
Why add watermarks to your photos?
Before jumping into the methods, here's why watermarking matters:
- Show ownership. A watermark tells the world the image is yours. It makes theft harder to deny.
- Build your brand. A logo watermark acts as free marketing every time someone views your photo.
- Share contact info. Add your website or social handle so viewers can find you.
- Stop casual theft. Most people won't bother removing a watermark. They'll just find a different image instead.
Watermarks aren't perfect. A skilled editor can crop or clone them out. But they stop most casual misuse. And that's what matters for most creators.
According to Apple's guidelines on intellectual property, protecting your work starts with clear ownership. A watermark is one of the simplest ways to show that an image is yours.
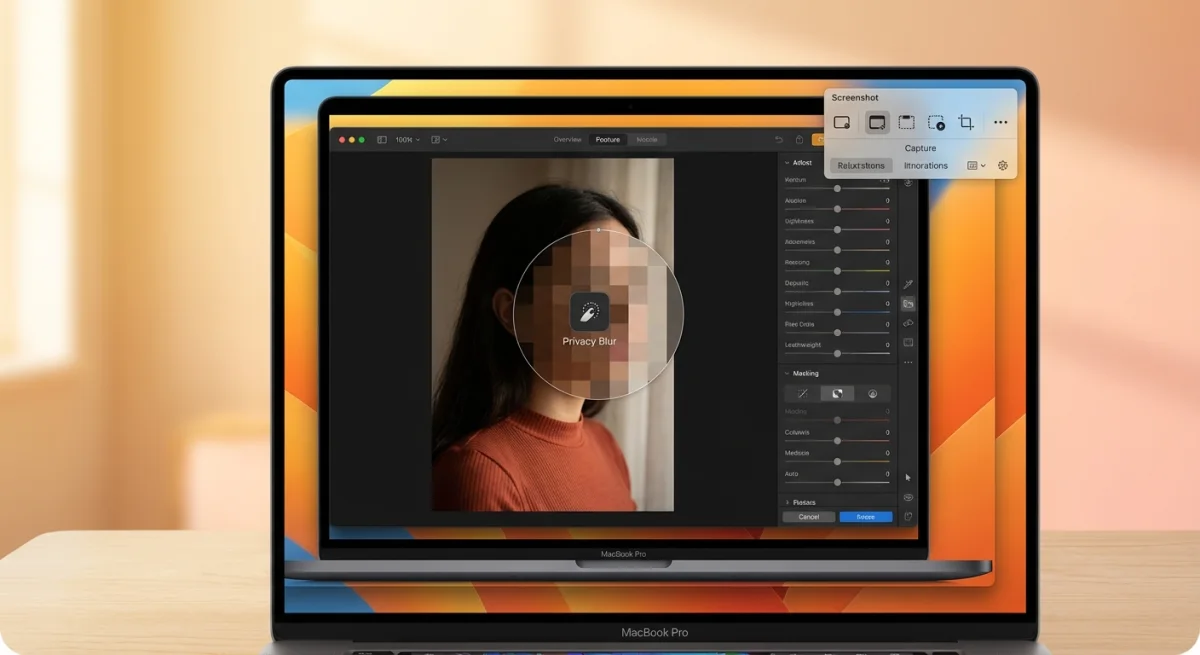
Method 1: Add a text watermark with ScreenSnap Pro
The fastest way to watermark photos on Mac is using ScreenSnap Pro's annotation tools during your screenshot workflow.
Here's how it works:
- Capture your screenshot with ScreenSnap Pro (
⌘ + Shift + 2for area capture). - Click the Text annotation tool in the overlay editor.
- Type your watermark text (name, URL, or "© 2026 Your Name").
- Reduce the opacity to 30–50% for a professional look.
- Position it in a corner or across the center.
- Save or share — the watermark is baked into the image.
This works great when you're already taking screenshots for docs, social posts, or blog content. No need to open a second app. You can also use the image annotation tool on any image you already have saved.
Want to add a logo instead of text? Drop your logo PNG onto the editor, resize it, and lower the opacity. It takes about 10 seconds.
If you haven't set up your Mac screenshot shortcuts yet, that guide covers all the keyboard combinations you need.
The advantage? You add watermarks to photos inline — no separate step, no extra app. If you regularly take screenshots for client work or social content, this saves real time.
Method 2: Use Preview's markup tools (free)
Every Mac comes with Preview, and it handles basic watermarking surprisingly well.
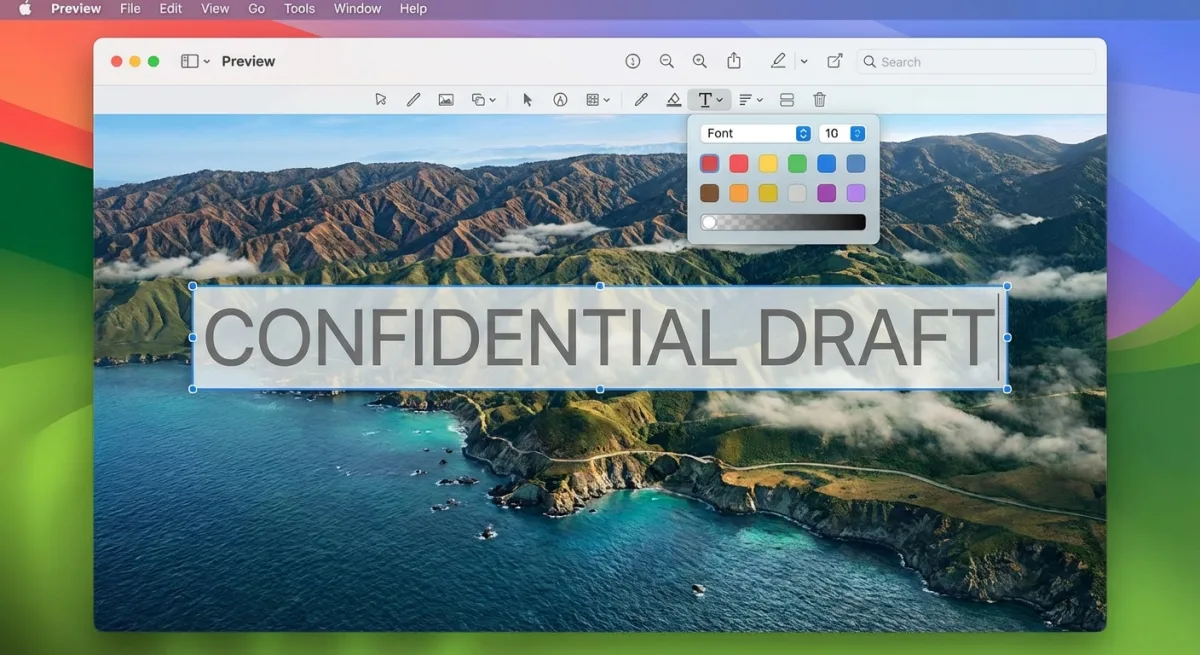
Preview handles basic photo editing, watermarking, and even cropping screenshots without installing anything extra. Here's how to add watermarks with it.
Add a text watermark
- Open your photo in Preview.
- Click the Markup toolbar button (pen tip icon) or press
⌘ + Shift + A. - Click the Text tool (the "T" icon).
- Type your watermark text.
- Adjust the font, size, and color using the toolbar options.
- Drag the text to your preferred position.
- Save with
⌘ + S.
Pro tip: Use a light color like white or light gray. Preview doesn't have an opacity slider for text, so choose a color that looks semi-transparent against your image.
Add a logo watermark
- Open your logo file in Preview and copy it (
⌘ + C). - Open your target photo in Preview.
- Paste the logo (
⌘ + V). - Resize and reposition the logo.
- Save the file.
Important: Preview saves changes right to the original file. Always work on a copy first. Press ⌘ + D in Finder to make a duplicate.
Preview is great for one-off jobs. The downside? No batch mode. If you need to watermark 10 or 100 photos at once, keep reading.
Preview limitations to know about
Preview has no opacity slider for text. You also can't save watermark templates for reuse. Each image needs manual setup from scratch. For a few photos, that's fine. For a large photo shoot, it gets tedious fast.
Method 3: Use the Photos app with markup
If your images live in the Photos app, you can add watermarks without leaving:
- Open the photo in Photos.
- Click Edit in the top-right corner.
- Click the Extensions button (three dots) and select Markup.
- Use the Text tool to add your watermark.
- Adjust size, font, and position.
- Click Save Changes.
This works well if you keep your images in Apple Photos. It uses the same Markup tools as Preview. So the same limits apply — no opacity slider and no batch mode.
One perk: edits in Photos are non-destructive. You can tap "Revert to Original" at any time to undo your watermark. That's a nice safety net Preview doesn't offer.
For better results, you can edit screenshots on Mac with more advanced tools that offer proper opacity and layering controls.
Tired of plain screenshots? Try ScreenSnap Pro.
Beautiful backgrounds, pro annotations, GIF recording, and instant cloud sharing — all in one app. Pay $39 once, own it forever.
See what it doesMethod 4: Watermark photos in batch with Shortcuts
Here's where it gets interesting. The macOS Shortcuts app can watermark entire folders of images automatically.
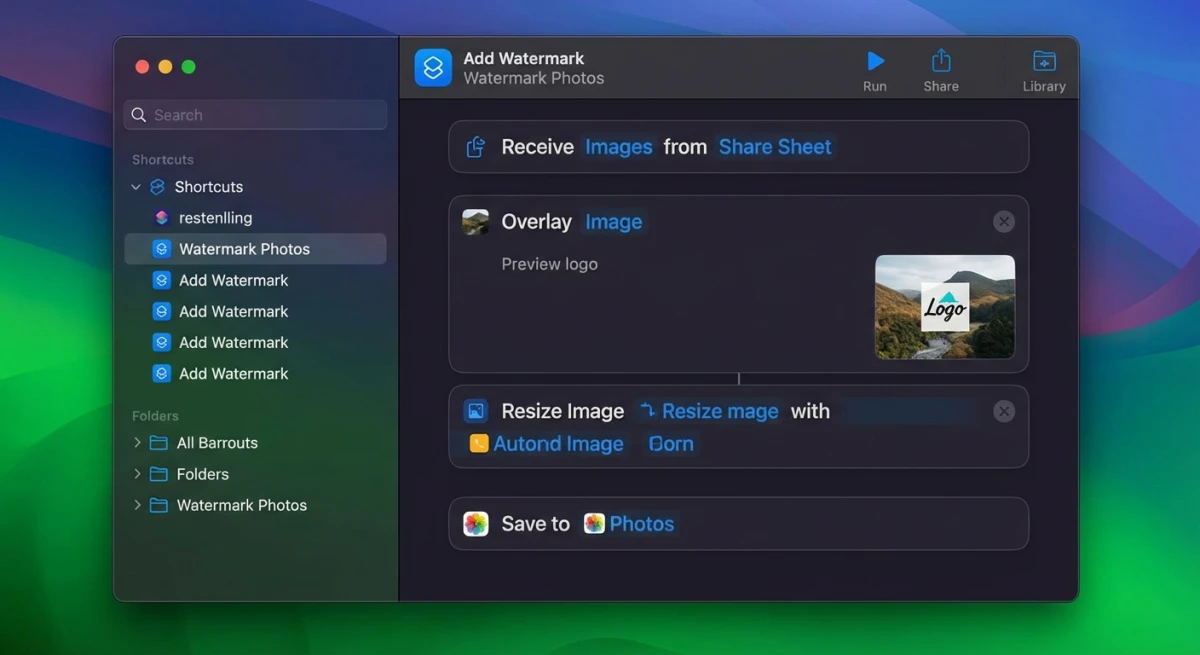
The Shortcuts method is especially powerful because it runs as a Finder Quick Action. You can watermark photos right from the right-click menu — no need to open any app. And unlike Preview, it handles multiple images at once.
Set up the watermark shortcut
- Open Shortcuts (search in Spotlight).
- Click + to create a new shortcut.
- Name it "Add Watermark."
- Add these actions in order:
- Receive Input → Set to "Images" from Quick Actions.
- Get File → Select your pre-made watermark PNG (transparent background).
- Overlay Image → Set the watermark file on top of the input image.
- Save File → Choose your output folder.
- Enable Use as Quick Action in Finder.
Use the shortcut
- Select one or more images in Finder.
- Right-click → Quick Actions → Add Watermark.
- Your watermarked copies appear in the output folder.
Creating your watermark PNG: Use Preview or any image editor to create a transparent PNG with your text or logo. Keep it around 200×50 pixels for corner placement, or larger if you want it across the center.
This is the best free option for batch watermarking photos on Mac. Once set up, it takes two clicks to watermark hundreds of images. Apple's Shortcuts User Guide covers the basics if you're new to the app.
Method 5: Use dedicated watermark apps
For professional batch watermarking with more control, dedicated apps offer features Preview and Shortcuts can't match:
PhotoBulk
- Batch processing with drag-and-drop.
- Text and image watermarks with full opacity control.
- Auto-scaling watermarks to fit different image sizes.
- Price: $9.99/month via Setapp or one-time purchase.
Watermark PRO
- Templates for reusable watermark styles.
- Batch export with custom naming.
- Tiling watermarks across the entire image.
- Price: Free basic version, paid pro features.
When do you need a dedicated app?
- You watermark more than 20 images at a time regularly.
- You need consistent watermark sizing across different photo dimensions.
- You want tiled watermarks (repeating pattern across the image).
- You need precise opacity and positioning controls.
For the odd photo here and there, Preview or Shortcuts do the job. Dedicated apps make sense when watermarking is a daily task.
How to choose the right app
Look for these features before you buy:
- Batch drag-and-drop. Drop a folder of images and watermark them all at once.
- Template saving. Store your go-to watermark style so you don't set it up each time.
- Auto-scaling. The app should resize your watermark to match each photo's dimensions.
- Export options. Pick your output format, quality, and naming pattern.
Most paid apps offer free trials. Test before you commit.
Looking for the best screenshot apps for Mac? Many include markup tools that double as quick watermark solutions.
Tips for effective watermarks
Getting the watermark right matters as much as adding one. A badly placed watermark either ruins the image or is too easy to crop out.
Opacity: 30–50% is the sweet spot
Too opaque and it distracts from the photo. Too transparent and it's invisible. Aim for 30–50% opacity — visible enough to deter theft, subtle enough to look professional.
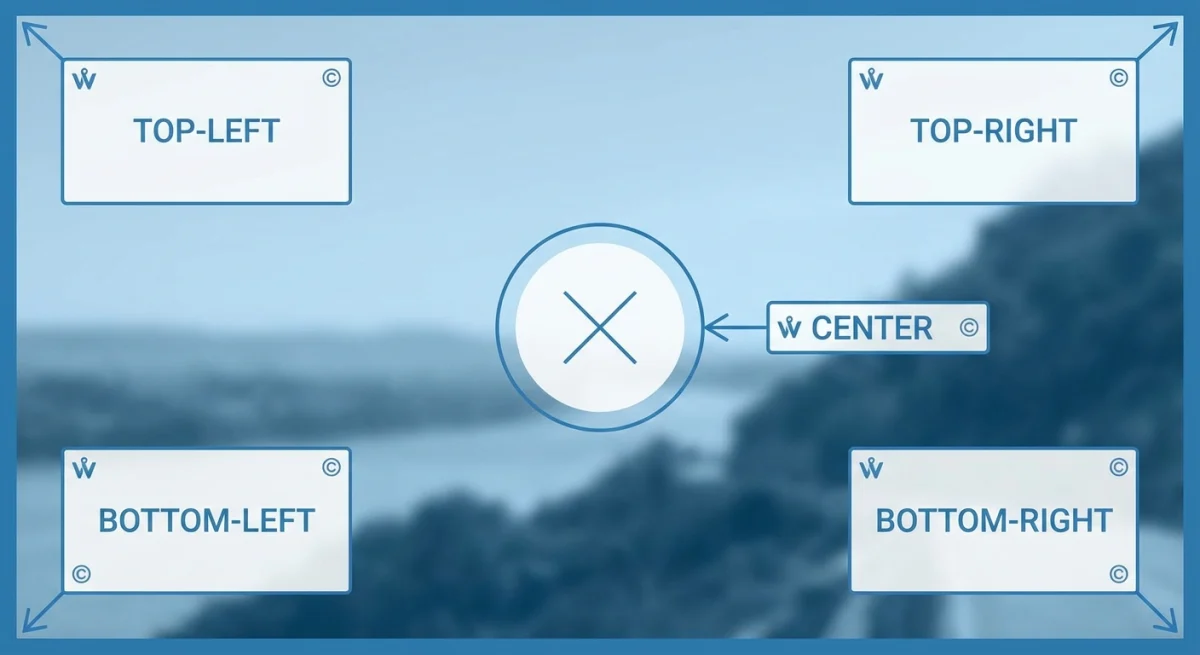
Placement matters
- Bottom-right corner — traditional, clean, easy to crop out.
- Center of the image — hardest to remove but most intrusive.
- Diagonal across the image — great for preview/proof images.
- Tiled pattern — repeating small watermarks, nearly impossible to remove cleanly.
For portfolio previews, go with center or diagonal. For published work where you want subtle branding, bottom-right or bottom-left works best.
Text vs. logo watermarks
| Aspect | Text watermark | Logo watermark |
|---|---|---|
| Setup time | Instant — type and go | Need to create logo first |
| Branding | Moderate — name/URL | Strong — visual identity |
| Visibility | Easy to read at any size | May need larger placement |
| Best for | Quick protection | Professional branding |
Size and contrast
Keep watermarks readable but not dominant. White text works on dark images, dark text on light images. A thin outline or drop shadow helps watermarks stay visible against any background.
Need to add watermarks to screenshots specifically? You can annotate screenshots on Mac with text overlays, arrows, and shapes — all of which work as watermarking tools.
If you frequently blur or pixelate sensitive information in screenshots, watermarking follows a similar workflow — both use overlays to modify the original image.
Can watermarks be removed?
Yes, they can. Photoshop and AI tools can strip them out. But that doesn't make them useless:
- Most theft is lazy. People grabbing images from Google won't fire up Photoshop.
- It proves ownership. If someone steals your marked image, you have clear proof.
- It looks professional. Clients see you take your work seriously.
Think of a watermark like a lock on your door. A pro can pick it. But it stops everyone else.
For an extra layer of protection, consider adding decorative backgrounds to your screenshots — it makes them harder to repurpose and adds professional polish at the same time.
Frequently Asked Questions
Protect your images the easy way
Watermarking doesn't need to be complicated. For quick, one-off watermarks, Preview gets the job done. For batch processing, the Shortcuts app automates the entire workflow. And if you're already capturing screenshots for your work, ScreenSnap Pro lets you add text watermarks during the capture process — no extra steps needed.
Pick the method that fits your workflow and start protecting your images today. Your future self will thank you when someone tries to use your photo without credit.
Morgan
Indie DeveloperIndie developer, founder of ScreenSnap Pro. A decade of shipping consumer Mac apps and developer tools. Read full bio
@m_0_r_g_a_n_