How to Change Screenshot Format on Mac (2026 Guide)
Mac screenshots save as PNG by default. That's great for quality but terrible for file size. A single 4K screenshot can weigh over 10 MB. Need smaller files for email or web uploads? Changing the default format to JPG takes less than a minute — or use a screenshot app like ScreenSnap Pro that lets you pick the format per capture.
Here are three ways to convert screenshot to JPG or any other format on your Mac.
TL;DR: Open Terminal and rundefaults write com.apple.screencapture type jpg; killall SystemUIServer. Every future screenshot saves as JPG. To revert, swapjpgforpngand run again.
Why Change Your Mac Screenshot Format?
The default PNG format preserves every pixel perfectly. But that quality comes at a cost:
- File size: A PNG screenshot can be 5–12 MB. The same image as JPG? Often under 500 KB.
- Upload limits: Slack, email, and CMS platforms all cap file sizes. Large PNGs hit those limits fast.
- Loading speed: JPG files load much faster in blog posts and docs. Your readers will thank you.
- Compatibility: Some workflows need specific formats. PDF for presentations. HEIC for Apple storage. JPG for the web.
The good news is macOS gives you full control over the save screenshot as JPEG, PDF, GIF, HEIC, or TIFF format.
Method 1: Terminal Command (Permanent Change)
This is the fastest way to change screenshot format on Mac. One command changes it permanently. Every future screenshot saves in your chosen format.
Step 1: Open Terminal
Press ⌘ + Space to open Spotlight. Type Terminal and hit Enter. You'll find it in Applications > Utilities too.
Step 2: Enter the Format Command
Copy and paste the command for your preferred format:
Save screenshots as JPG:
defaults write com.apple.screencapture type jpg; killall SystemUIServerSave screenshots as PDF:
defaults write com.apple.screencapture type PDF; killall SystemUIServerSave screenshots as GIF:
defaults write com.apple.screencapture type gif; killall SystemUIServerSave screenshots as HEIC:
defaults write com.apple.screencapture type heic; killall SystemUIServerSave screenshots as TIFF:
defaults write com.apple.screencapture type tiff; killall SystemUIServerPress Return to execute. The killall SystemUIServer part restarts the screenshot service. Your change takes effect right away.
Step 3: Verify It Worked
Take a test screenshot with ⌘ + Shift + 3. Select the file on your desktop and press ⌘ + I. The Kind field should show your new format.
How to Revert to PNG
Changed your mind? Run this command to switch back:
defaults write com.apple.screencapture type png; killall SystemUIServerThe command structure stays the same. Just swap the format name at the end. Works on macOS Sequoia, Sonoma, Ventura, and earlier.
Method 2: Convert Screenshot to JPG with Preview
Only need a different format once in a while? Preview lets you convert screenshots one at a time. No need to change your default.
Step 1: Open Your Screenshot in Preview
Double-click any screenshot file. Doesn't open in Preview? Right-click and choose Open With > Preview.
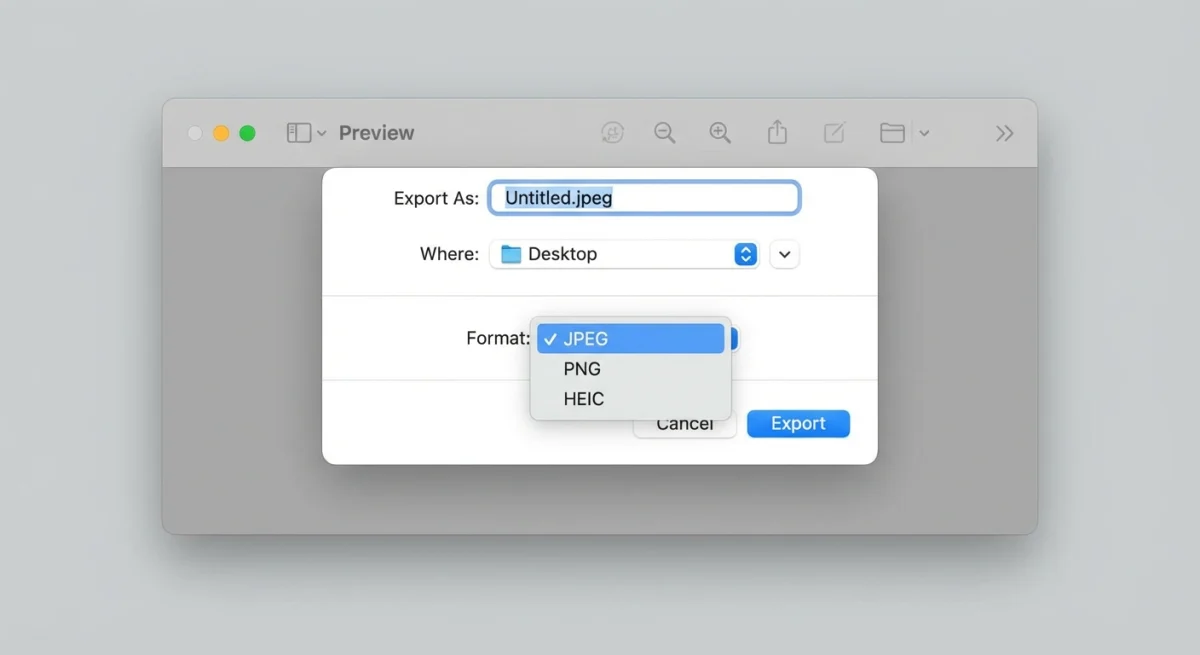
Step 2: Export in a New Format
- Click File > Export (or press
⌘ + Shift + S) - Click the Format dropdown
- Choose from: JPEG, PNG, HEIC, TIFF, PDF, or JPEG-2000
- Adjust the Quality slider (for lossy formats like JPEG)
- Click Save
Pro tip: Hold Option while clicking the Format dropdown. You'll see extra formats like BMP and OpenEXR.
This works great for one-off conversions. Need a PDF for a presentation? Or a JPEG for a web upload? Preview handles it.
Method 3: Third-Party Screenshot Apps
Both methods above work but have trade-offs. Terminal changes every screenshot globally. Preview requires manual conversion each time. Third-party apps give you more control.
ScreenSnap Pro lets you capture and export in your preferred format. No Terminal needed. You also get instant annotation, beautiful backgrounds, and cloud sharing. One-time purchase — no subscription.
Taking screenshots daily for work? A dedicated tool saves real time over manual conversion.
Tired of plain screenshots? Try ScreenSnap Pro.
Beautiful backgrounds, pro annotations, GIF recording, and instant cloud sharing — all in one app. Pay $39 once, own it forever.
See what it doesPNG vs JPG: Which Screenshot Format Should You Use?
Choosing the right format depends on what you're screenshotting and where it's going.
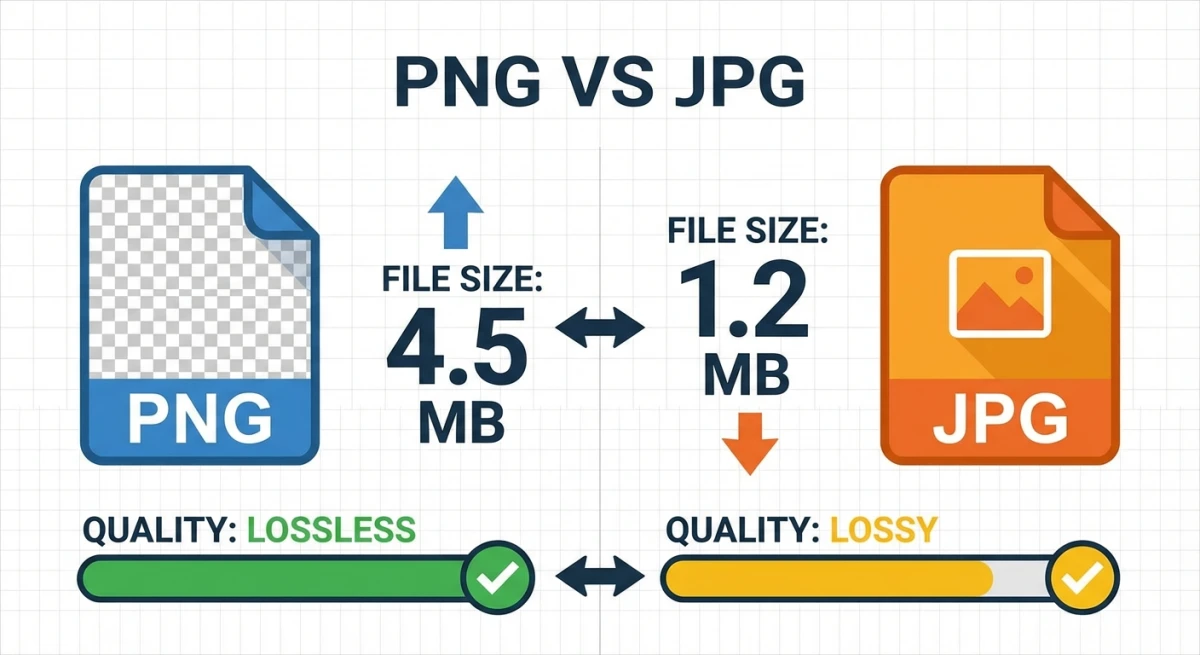
| Feature | PNG | JPG |
|---|---|---|
| File size | Large (5–12 MB) | Small (200–800 KB) |
| Quality | Lossless (pixel-perfect) | Lossy (slight compression artifacts) |
| Transparency | ✅ Supported | ❌ Not supported |
| Best for | Text, UI elements, code | Photos, gradients, web uploads |
| Text clarity | Sharp and crisp | Can blur around text edges |
| Web loading | Slower | Much faster |
When to Use PNG
- Screenshots with text, code, or UI elements where clarity matters
- Images that need transparent backgrounds
- Graphics you plan to edit later (no quality loss on re-save)
- App Store screenshots that need pixel-perfect rendering
When to Use JPG
- Screenshots of photos, videos, or gradient-heavy content
- Web uploads where file size matters more than pixel perfection
- Email attachments (smaller = faster delivery)
- Social media posts (platforms re-compress anyway)
- Blog images where loading speed impacts SEO
What About Other Formats?
- HEIC: Apple's modern format. Half the size of JPG at similar quality, but limited compatibility outside Apple devices.
- PDF: Ideal for multi-page documents or screenshots destined for presentations. Not great for web use.
- GIF: Limited to 256 colors, so screenshots look washed out. Better for recording short animations than static captures.
- TIFF: Highest quality, largest files. Used mainly for print workflows.
Batch Convert Screenshots to JPG on Mac
Already have dozens of PNG screenshots? You don't need to convert them one by one.
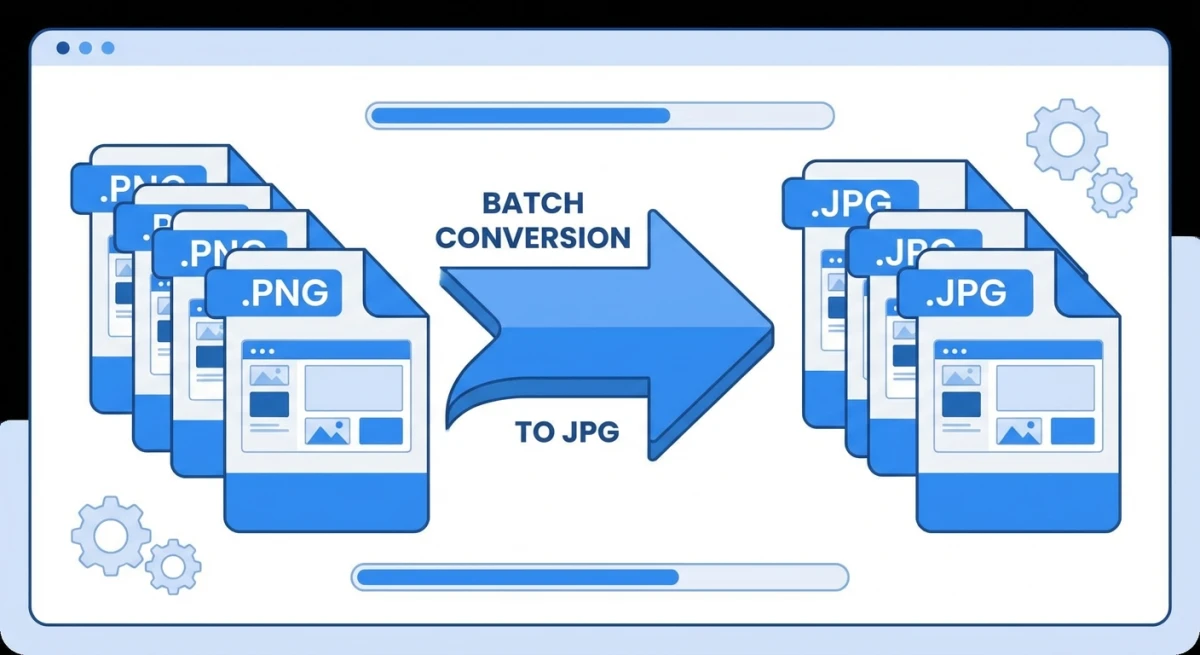
Using Preview (Built-in)
- Select all the screenshots you want to convert in Finder
- Right-click and choose Open With > Preview
- Press
⌘ + Ato select all in Preview's sidebar - Click File > Export Selected Images
- Choose the output format and destination folder
Using sips (Terminal Power Move)
The sips command can convert image formats directly from Terminal:
cd ~/Desktop
for file in *.png; do
  sips -s format jpeg "$file" --out "${file%.png}.jpg"
done
This converts every PNG on your Desktop to JPG in seconds. You can also use our free Image Format Converter tool for quick browser-based conversion without installing anything.
Using Automator (Reusable Workflow)
For a drag-and-drop solution:
- Open Automator and create a new Quick Action
- Add the Change Type of Images action
- Set the output format to JPEG
- Save it — now you can right-click any image and convert it instantly
Choosing the Right Format for Every Situation
Not sure which format to pick? Here's a quick guide based on common real-world tasks.
Work and Business Use
For Slack messages and team chat, use JPG. Most workplace screenshots show UI elements or quick references. JPG keeps files small enough that Slack won't complain about upload limits.
For client deliverables and reports, stick with PNG. Clients expect crisp, clean visuals. The larger file size is worth it when quality matters.
For presentations and pitch decks, PDF works best. You can drag a PDF screenshot straight into Keynote or PowerPoint. It scales cleanly at any size without getting blurry.
Personal and Creative Use
For social media posts, JPG is your best bet. Platforms like Instagram and Twitter re-compress images anyway. Starting with a smaller JPG means faster uploads and fewer surprises.
For design mockups, use PNG. Transparency support matters when you're layering screenshots in Figma or Photoshop. You also avoid compression artifacts around UI elements.
For sharing with iPhone or iPad, try HEIC. It's Apple's native format. Files are tiny, and quality stays high across all Apple devices. Just know that Windows users may struggle to open HEIC files without extra software.
Developer and Technical Use
For bug reports, PNG is the safe choice. You want every pixel preserved so the dev team can spot exact rendering issues. A JPG might blur the very artifact you're trying to show.
For documentation and tutorials, it depends on the content. Text-heavy screenshots need PNG for sharp lettering. If you're showing a general workflow or dashboard overview, JPG saves space without losing clarity.
For web optimization, consider WebP format. While macOS doesn't support WebP as a screenshot format natively, you can convert PNG screenshots to WebP using our free Image Format Converter for up to 30% smaller files than JPG.
Troubleshooting Common Issues
Format Change Not Working After Terminal Command
Still saving as PNG after the Terminal command? Try these fixes:
- Make sure you included
killall SystemUIServer - Log out and back in to refresh processes
- On macOS Sequoia, run
killall screencaptureuiinstead - Check System Preferences for MDM policies that might override your setting
Apple's official screenshot guide covers keyboard shortcuts but skips format changes. The defaults command writes directly to macOS preference files.
Screenshots Look Blurry After Switching to JPG
JPG uses lossy compression. Some quality loss is normal around sharp text edges. Blurry text bothering you? Keep PNG for text-heavy screenshots. Use JPG for photo-like captures.
Adjust quality in Preview's Export dialog. Set the slider to 80–90% for a good balance. Below 70%, text gets noticeably soft.
Can't Find Screenshots After Changing Format
Format changes don't affect save location. Screenshots still go to your default screenshot location. Changed that too? Check that folder instead of the Desktop.
Frequently Asked Questions
Morgan
Indie DeveloperIndie developer, founder of ScreenSnap Pro. A decade of shipping consumer Mac apps and developer tools. Read full bio
@m_0_r_g_a_n_