How to Crop a Video on Windows (2026)
To crop a video on Windows, open Clipchamp (built into Windows 11), import your clip, drag it onto the timeline, then use the Crop tool in the right sidebar to trim the frame. Export as MP4 when done. The whole process takes under two minutes and keeps your original file untouched.
But Clipchamp is just one of six free ways to crop a video on Windows. Some are faster. Some handle huge files better. One is a single command line you can reuse forever.
This guide walks through every method, explains when to use each, and covers the aspect ratios you actually need for YouTube, TikTok, and Instagram.
Cropping vs Trimming: Know the Difference
People mix these up all the time. They're not the same thing.
Cropping cuts the video frame — the picture itself. You remove pixels from the edges to change the shape or zoom in. A wide 16:9 clip becomes a square 1:1 clip. The length stays the same.
Trimming cuts the timeline — the duration. You remove seconds from the start or end. A 30-second clip becomes a 15-second clip. The frame size stays the same.
This guide is about cropping. If you need to shorten a clip instead, most of these tools handle trimming too, and the Clipchamp steps below include a quick note on how.
Quick Comparison: Best Ways to Crop Video on Windows
| Tool | Price | Best For | Learning Curve |
|---|---|---|---|
| Clipchamp | Free (built into Windows 11) | Most users | Easy |
| VLC Media Player | Free | Quick one-off crops | Medium |
| DaVinci Resolve | Free | Precise frame control | Hard |
| Shotcut | Free, open-source | Lightweight editing | Medium |
| Clideo / Kapwing | Free online | No install needed | Easy |
| FFmpeg | Free command line | Batch cropping | Hard |
All six options are genuinely free. No trials, no watermarks on the free tiers listed here.
Method 1: Clipchamp (Built Into Windows 11)
Clipchamp ships with Windows 11 out of the box. Microsoft bought it in 2021 and now it's the default video editor, available right from the Microsoft Store. No download, no install — just open it.
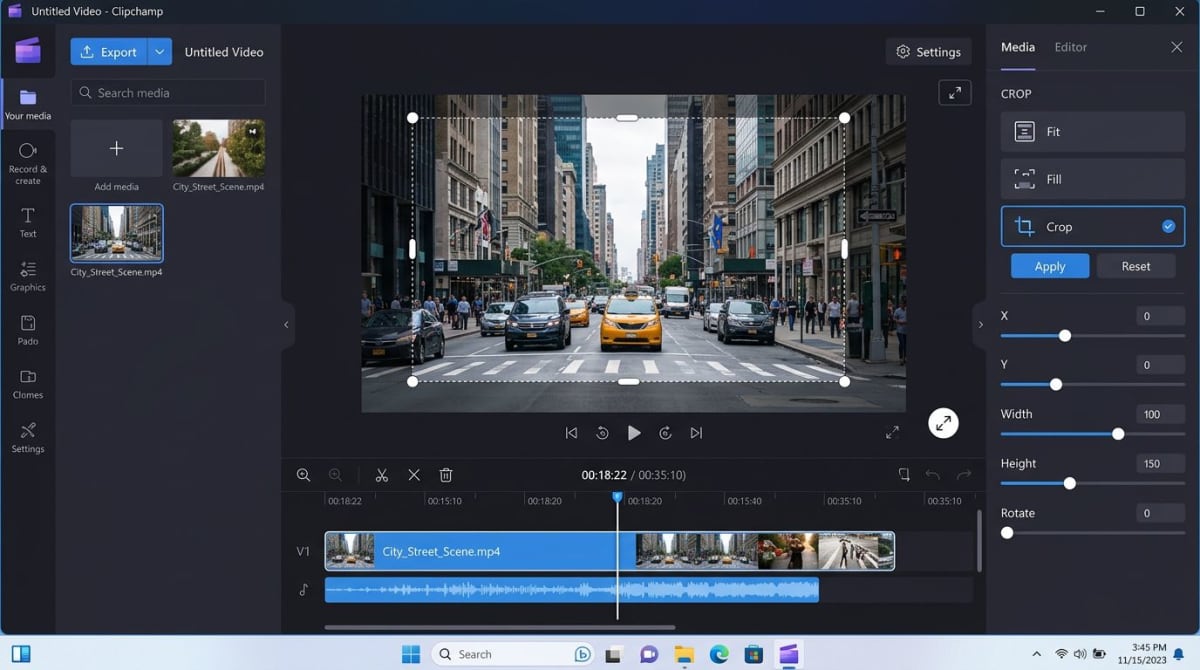
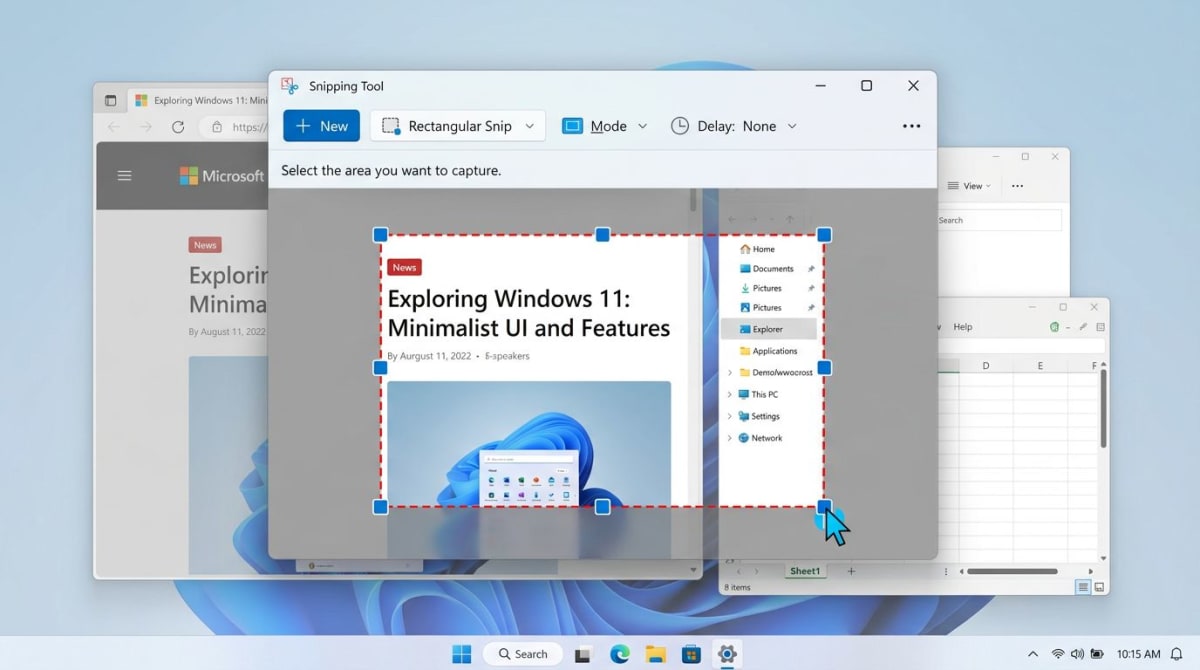
How to crop a video in Clipchamp
- Open Clipchamp — press the Windows key, type "Clipchamp", and hit Enter
- Click Create a new video on the home screen
- Import your video — drag the file into the media panel or click Import media
- Drag the clip to the timeline at the bottom
- Click the clip on the timeline to select it
- Click the Crop icon in the floating toolbar above the preview (it looks like a dashed rectangle)
- Drag the corners of the crop box in the preview window to frame the part you want to keep
- Click Done to lock in the crop
- Click Export in the top right and choose 1080p or your preferred resolution
Clipchamp saves the file as an MP4 to your Downloads folder by default.
Clipchamp pros and cons
Pros:
- Built into Windows 11, no install needed
- Free with no watermark on basic exports
- Handles common formats like MP4, MOV, AVI
Cons:
- Free tier caps exports at 1080p (no 4K without a paid plan)
- Sign-in with a Microsoft account is required
- Slow with very long files on older hardware
For a broader look at video editing tools, see our Camtasia alternatives for Windows roundup.
Method 2: VLC Media Player
VLC is mostly known as a video player, but it has a hidden crop feature. It's fiddly, but it works without installing anything extra if VLC is already on your system.
How to crop a video in VLC
- Open VLC and load your video file (File > Open File)
- Go to Tools > Effects and Filters (or press
Ctrl + E) - Click the Video Effects tab, then the Crop sub-tab
- Enter pixel values for Top, Left, Right, and Bottom to cut from each edge
- Click Save to apply
- Now record the playback — go to Media > Convert/Save
- Add your original file again, click Convert/Save, and choose a profile (MP4 is fine)
- Tick Deinterlace if needed and set a destination file
- Click Start — VLC re-encodes the cropped output
VLC is awkward because the crop preview shows live but you need a second conversion pass to save it. It's best when you already use VLC and don't want another app.
VLC's official documentation covers advanced filter chains if you want to automate this.
Method 3: DaVinci Resolve (Free, Pro-Grade)
DaVinci Resolve is a full Hollywood-grade editor that happens to be free. It's overkill for a quick crop, but the output quality is unmatched and you get pixel-perfect control.
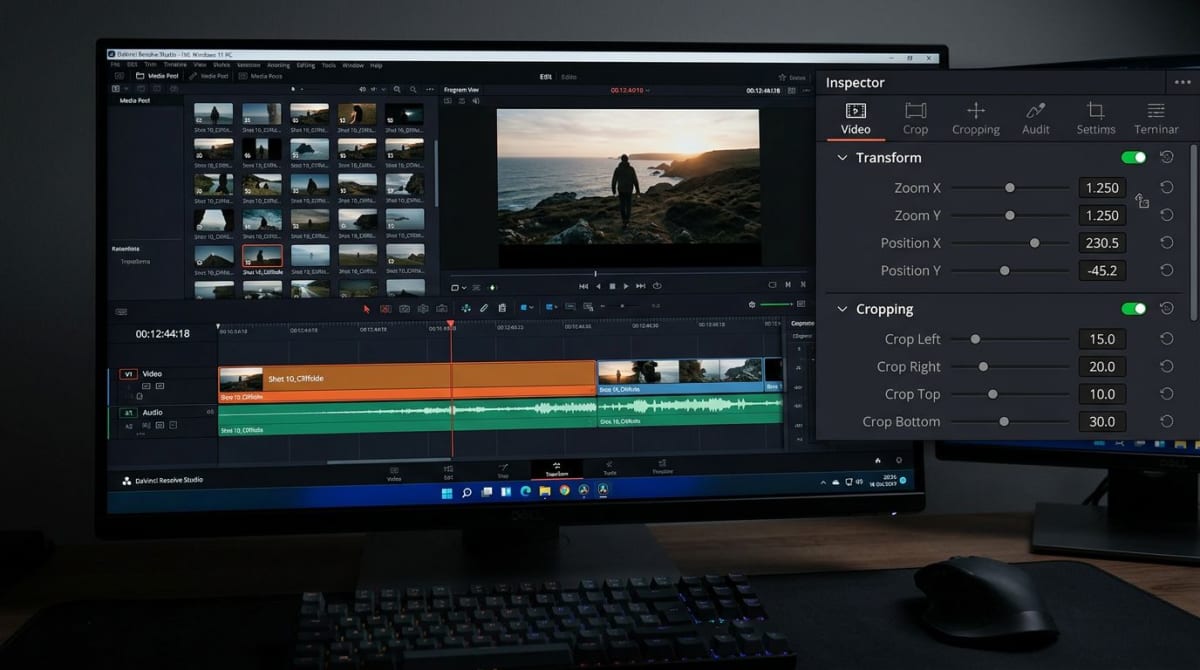
How to crop a video in DaVinci Resolve
- Download DaVinci Resolve from the Blackmagic Design site — pick the free version, not Studio
- Open Resolve and click New Project
- Go to the Media tab and drag your video file into the media pool
- Switch to the Edit tab (bottom of the screen)
- Drag the clip from the media pool to the timeline
- Click the clip on the timeline to select it
- Open the Inspector (top right) and scroll to Cropping
- Adjust Left, Right, Top, Bottom sliders to trim the frame
- Or use Transform > Zoom and Position to crop by scaling instead
- Go to the Deliver tab to export — choose H.264 MP4 and click Add to Render Queue
The free version of DaVinci Resolve gives you 4K export, which beats Clipchamp's free tier.
When Resolve is worth it
If you crop videos once a year, skip it. If you crop videos weekly or need 4K output, the steep learning curve pays off fast.
Method 4: Shotcut (Free, Open-Source)
Shotcut is a lightweight free editor that runs on anything. It's simpler than DaVinci Resolve and more flexible than Clipchamp.
How to crop a video in Shotcut
- Download Shotcut from shotcut.org
- Open Shotcut and click Open File to load your video
- Drag the clip to the timeline
- With the clip selected, click Filters in the top toolbar
- Click the + icon and pick Crop: Rectangle (or Crop: Source for simple edge-based cropping)
- Drag the rectangle in the preview or type exact pixel values
- Click File > Export Video and pick a preset like YouTube or Default
Shotcut has no watermark, no sign-in, and works on older PCs that struggle with DaVinci Resolve. It's our pick if you want free and simple without Clipchamp's Microsoft account requirement.
Tired of plain screenshots? Try ScreenSnap Pro.
Beautiful backgrounds, pro annotations, GIF recording, and instant cloud sharing — all in one app. Pay $29 once, own it forever.
See what it doesMethod 5: Online Tools (Clideo, Kapwing, EZGIF)
Online croppers work in your browser. No install. Just upload, drag the crop box, download.
They're fine for short clips under 500MB. Anything longer and you'll hit upload size limits or painful wait times.
How to crop a video online
- Go to Clideo.com/crop-video or Kapwing's free cropper
- Click Choose File and upload your video
- Drag the crop handles over the preview to set the frame
- Pick a preset aspect ratio like 1:1 or 9:16, or set it custom
- Click Crop and wait for processing
- Download the cropped file
Heads up on privacy. Your video goes to a third-party server. Don't upload anything sensitive — client footage, internal demos, or personal clips you'd rather keep private. Stick to local tools for those.
Kapwing adds a watermark on free exports. Clideo doesn't, but it caps free users at 500MB per file.
Method 6: FFmpeg (One Command, Infinite Reuse)
FFmpeg is a free command-line video tool. One line crops any video on Windows with zero quality loss if you pick the right settings.
How to crop a video with FFmpeg
- Download FFmpeg from ffmpeg.org and extract it
- Add FFmpeg to your PATH (or run from the extracted folder)
- Open PowerShell or Command Prompt
- Navigate to your video folder with
cd - Run the crop command:
ffmpeg -i input.mp4 -filter:v "crop=w:h:x:y" -c:a copy output.mp4Replace w:h:x:y with:
w— width of cropped area in pixelsh— height of cropped area in pixelsx— starting X pixel from lefty— starting Y pixel from top
Example: to crop a 1920x1080 video to a 1080x1080 square (centered):
ffmpeg -i input.mp4 -filter:v "crop=1080:1080:420:0" -c:a copy output.mp4The -c:a copy flag keeps the audio stream untouched, which makes the crop fast and avoids quality loss on the sound.
FFmpeg is the fastest option for batch work. Wrap it in a PowerShell loop and you can crop 100 files in the time Clipchamp takes to open.
Best Aspect Ratios for Social Platforms
Crop to the wrong shape and your video shows black bars or gets cut off by the platform. Here's what to target.

| Platform | Aspect Ratio | Pixel Size |
|---|---|---|
| YouTube (standard) | 16:9 | 1920x1080 |
| YouTube Shorts | 9:16 | 1080x1920 |
| TikTok | 9:16 | 1080x1920 |
| Instagram Feed (square) | 1:1 | 1080x1080 |
| Instagram Feed (portrait) | 4:5 | 1080x1350 |
| Instagram Reels / Stories | 9:16 | 1080x1920 |
| Twitter / X | 16:9 | 1280x720 |
| LinkedIn Feed | 1:1 or 16:9 | 1080x1080 |
| Slack / email | 16:9 | 1280x720 |
When in doubt, crop to 16:9 for desktop viewing and 9:16 for mobile-first feeds.
Preventing Quality Loss When Cropping
Cropping itself doesn't hurt quality — you're just removing pixels. What hurts quality is the re-encode that happens when you export.
Five tips to keep videos sharp
- Start with the highest-resolution source you can get. Cropping a 4K video to 1080p looks amazing. Cropping a 720p video to 360p looks rough.
- Export at the same resolution as the cropped area. If you cropped to 1080x1080, export at 1080x1080. Upscaling adds nothing but file size.
- Use the H.264 codec at a bitrate of 8-12 Mbps for 1080p. Higher if your source is clean.
- Avoid cropping twice. Each re-encode costs a little quality. Crop once and save.
- Use DaVinci Resolve or FFmpeg for anything important. Clipchamp's free tier sometimes re-encodes at a lower bitrate than you'd like.
If you're making GIFs instead of videos, compress those GIFs with a free online tool to shrink file size without losing frames.
Crop Before You Record (The Smartest Shortcut)
Here's a truth nobody mentions in these guides: the best crop is the one you never have to do.
If you're recording your screen, set the capture region before you hit record. A dedicated screen recorder like ScreenSnap Pro lets you draw a custom capture area — any aspect ratio, any size — so what you record is already cropped. Save it as MP4, upload, done. No re-encoding step, no quality loss.
ScreenSnap Pro is a recording companion, not a video editor — once the file exists, you'll still use Clipchamp, DaVinci Resolve, or FFmpeg to crop it. But for screen captures, cropping before the record is always cleaner than cropping after.
For more recording-side tips, see our free screen recorder for Windows guide or our screen recording with audio on Windows walkthrough.
Frequently Asked Questions
Final Take
Six methods. One winner depends on how you work.
Crop once? Open Clipchamp. You already have it.
Crop a lot? Learn one FFmpeg command.
Need 4K? DaVinci Resolve, free tier.
Crop on a locked-down PC? Clideo in your browser.
And if you're cropping screen recordings, consider cropping at capture time instead. A clean recording beats a clean edit every time. ScreenSnap Pro handles the capture side for a $29 one-time purchase — no subscription, no watermark — and pairs with any of the editors above for the actual cropping.
Morgan
Indie DeveloperIndie developer, founder of ScreenSnap Pro. A decade of shipping consumer Mac apps and developer tools. Read full bio
@m_0_r_g_a_n_