How to Change Image DPI Free: Mac & Windows Guide
# How to Change Image DPI: The Complete Guide for Mac and Windows
Knowing how to change image DPI lets you control how your photos and graphics print — sharper details, correct sizing, and no more blurry output. Whether you need 300 DPI for a business card or 150 DPI for a poster, you can change image DPI for free using built-in tools on Mac, Photoshop, GIMP, or online tools — no paid software required. (If your source is a screenshot, capture it at the right size first with ScreenSnap Pro so the DPI math lands cleanly.)
Printing a photo that looks perfect on screen but comes out blurry on paper? The culprit is almost always DPI. This guide walks you through every free method to check, change, and increase image DPI on both Mac and Windows.
What is DPI and why does it matter?
DPI stands for dots per inch. It tells your printer how many ink dots to place in each inch of the printed image. More dots means sharper prints — fewer dots means larger but lower-quality output.
Here's the key relationship:
Print size = Pixel dimensions ÷ DPI
So a 3000 × 2400 pixel image printed at 300 DPI produces a 10 × 8 inch photo. The same image at 150 DPI prints at 20 × 16 inches — double the size, but half the sharpness.
This matters for anyone who prints photos, designs marketing materials, submits images to print shops, or creates professional documentation with screenshots.
How to check DPI of image on Mac and Windows
Before changing anything, you need to know your image's current DPI.
Check DPI on Mac
- Right-click the image file in Finder
- Select Open With → Preview
- Go to Tools → Adjust Size (or press
⌘ + Option + I) - Look at the Resolution field — that's your DPI
Check DPI on Windows
- Right-click the image in File Explorer
- Select Properties → Details
- Scroll to the Image section
- Find Horizontal Resolution and Vertical Resolution
Check DPI online
Upload your image to a free DPI converter tool — most display the current DPI before converting. You can also use our free image metadata viewer to check DPI without changing anything.
Method 1: Change DPI with Mac Preview (free, built-in)
Mac Preview is the easiest way to change image DPI if you're on macOS. No downloads needed.

- Open your image in Preview (double-click or right-click → Open With → Preview)
- Go to Tools → Adjust Size
- Uncheck "Resample image" — this is critical. With resampling off, changing DPI won't alter pixel count
- Type your desired DPI in the Resolution field (e.g., 300)
- Notice the Width and Height (in inches/cm) change automatically
- Click OK and save with
⌘ + S
Pro tip: If you keep "Resample image" checked, Preview will add or remove pixels to maintain the physical print size. Uncheck it to simply change the DPI metadata without touching image quality.
This method works great for photos you need to submit at a specific DPI. Apple's Preview documentation covers additional options like batch resizing if you need to process multiple images.
For screenshots, tools like ScreenSnap Pro capture at Retina resolution (2x), giving you print-ready images right from the start.
When to use Mac Preview for DPI changes
- Submitting photos to print shops that require 300 DPI files
- Preparing images for self-publishing platforms (Amazon KDP, Blurb)
- Converting web screenshots to print-ready resolution
- Quick one-off DPI changes without installing extra software
Preview handles JPEG, PNG, TIFF, and HEIC files. For RAW files or other formats like WebP, you may need to convert first.
Method 2: Change DPI in Photoshop
Photoshop gives you the most control over DPI changes.
- Open your image and go to Image → Image Size (or
Alt + Ctrl + Ion Windows,Option + ⌘ + Ion Mac) - Uncheck "Resample" at the bottom
- Set Resolution to your target DPI (e.g., 300 pixels/inch)
- The document dimensions (inches) update to reflect the new print size
- Click OK
If you need to maintain a specific print size and increase DPI, check "Resample" and choose Preserve Details 2.0 as the upscaling method. Photoshop will add pixels using AI interpolation — though results vary depending on the source image.
Method 3: Change image DPI with free online tools
No software? These free online tools let you change image DPI in seconds.
Convert Town
- Go to convert.town/image-dpi
- Enter your target DPI
- Upload your image
- Download the converted file
Convert Town only changes the DPI metadata — it won't resize or resample your image. Fast and simple for basic needs.
ScreenSnap Pro DPI Converter
Our free DPI converter tool runs entirely in your browser. No uploads to external servers, and it handles batch conversions too. Just drag your images, set the target DPI, and download.
Clideo
Clideo's DPI converter offers a visual interface where you can preview how DPI changes affect print dimensions before downloading.
Photoshop DPI tips
- For metadata-only changes: Uncheck Resample. The pixel count stays the same, and only the print dimensions change.
- For true upscaling: Check Resample and choose Preserve Details 2.0. Set your target dimensions and DPI together.
- Batch processing: Use File → Automate → Batch with an action that changes DPI to process an entire folder at once.
- Check before exporting: Always verify DPI in File → File Info → Camera Data before sending files to a print shop.
Tired of plain screenshots? Try ScreenSnap Pro.
Beautiful backgrounds, pro annotations, GIF recording, and instant cloud sharing — all in one app. Pay $29 once, own it forever.
See what it doesMethod 4: Change DPI in GIMP (free)
GIMP is the best free desktop alternative to Photoshop for DPI changes.
- Open your image in GIMP
- Go to Image → Print Size
- Next to X Resolution, enter your target DPI (e.g., 300)
- Y Resolution updates automatically
- Click OK
This changes the DPI metadata without altering pixels — exactly what you want for print submissions. If you need to actually upscale, use Image → Scale Image instead, and set both the resolution and pixel dimensions.
GIMP vs Photoshop for DPI changes
For basic DPI metadata changes, GIMP works identically to Photoshop — there's zero difference in output quality. Where Photoshop pulls ahead is in AI-powered upscaling (Preserve Details 2.0) and batch processing workflows. If you're only changing DPI values, save your money and use GIMP.
You can download GIMP free from gimp.org. It runs on Mac, Windows, and Linux.
How to increase DPI without losing quality

Here's the truth most guides skip: you can't truly increase DPI without either adding pixels or reducing print size. Changing the DPI number in metadata doesn't add detail to your image.
To make an image 300 DPI while keeping the same print size, you need more pixels. Here are your options:
Option 1: Reduce print size (free)
The simplest approach. A 2000 × 1500 pixel image at 72 DPI would print at 27.8 × 20.8 inches. Change it to 300 DPI (without resampling) and it prints at 6.7 × 5 inches — smaller, but perfectly sharp.
Option 2: AI upscaling
Tools like Let's Enhance, Topaz Photo AI, and Photoshop's neural filters can upscale images 2-4x while maintaining reasonable quality. Results work well for photos but can introduce artifacts on graphics or text.
Here's how each compares for DPI upscaling:
| Tool | Max upscale | Best for | Price |
|---|---|---|---|
| Let's Enhance | 16x | Photos, product images | Free tier + paid plans |
| Topaz Photo AI | 6x | Professional photography | $299 one-time |
| Photoshop (Preserve Details 2.0) | 2-4x | Integrated workflows | Subscription |
| Real-ESRGAN (open source) | 4x | Tech-savvy users, batch processing | Free |
Real-ESRGAN deserves a special mention — it's a free, open-source AI upscaler that runs locally on your Mac. You can install it via Homebrew (brew install real-esrgan) and process images from the terminal. Quality rivals paid tools for photographic content.
For best results with any AI upscaler, start with the cleanest source image you can find. JPEG compression artifacts get amplified during upscaling, so work from PNG or TIFF originals whenever possible. If file size is a concern after upscaling, you can compress images without losing quality to keep files manageable for email and web sharing.
Option 3: Start with high-resolution captures
The best strategy is capturing at high resolution from the start. If you regularly need print-ready screenshots, use a Retina display Mac and a capture tool that preserves full resolution. Our guide on taking high-quality screenshots on Mac covers the best settings for maximum pixel density. This gives you 2x resolution out of the box.
For professional screenshot workflows — annotating images, adding backgrounds, or sharing via cloud links — a dedicated tool saves significant time over manual DPI adjustments.
The math behind DPI and print size
Use this formula to calculate whether your image has enough pixels:
Required pixels = Print size (inches) × DPI
For example, to print an 8 × 10 inch photo at 300 DPI:
- Width: 8 × 300 = 2400 pixels
- Height: 10 × 300 = 3000 pixels
- Total: 7.2 megapixels minimum
Most modern phone cameras (12+ MP) and Mac Retina screenshots exceed this easily. But if you're working with older images, web downloads, or heavily cropped screenshots, you may fall short.
Troubleshooting common DPI problems
Changing DPI doesn't always go smoothly. Here are the most common issues and how to fix them.
Image looks the same after changing DPI
This is expected if you changed DPI without resampling. The image looks identical on screen because your monitor displays pixels, not inches. The difference only shows when printing. To verify the change took effect, check the DPI in the file metadata (Tools → Adjust Size in Preview, or Image → Image Size in Photoshop).
Print shop rejects my file as "low resolution"
Print shops check both DPI and pixel dimensions. Setting a 500 × 400 pixel image to 300 DPI doesn't make it high-res — it just means it'll print at 1.7 × 1.3 inches. You need enough pixels for your target print size. Use the formula: required pixels = print inches × 300.
DPI changes don't save in Preview
Make sure you're saving with ⌘ + S after making changes. If the file is read-only (downloaded from email or web), duplicate it first (File → Duplicate) and save the copy. Also check that you haven't accidentally locked the file in Finder (Get Info → uncheck Locked).
HEIC files won't open in DPI tools
Many online DPI converters don't support Apple's HEIC format. Convert to JPEG or PNG first using Preview (File → Export → choose JPEG) or our free HEIC to JPG converter. Then change the DPI on the converted file.
DPI shows different values in different apps
Some apps display DPI differently. Photoshop and Preview read the embedded metadata, while Windows Properties sometimes rounds values. If you set 300 DPI in Preview but Windows shows 299 or 301, that's a rounding issue and won't affect print quality.
How paper type affects your DPI choice
The surface you print on changes how DPI looks in practice.
Glossy paper holds ink dots tightly, so each dot stays small and sharp. This means 300 DPI on glossy paper looks crisp with fine detail. Photo prints and magazine pages use glossy stock for this reason.
Matte or uncoated paper absorbs ink, causing dots to spread slightly. A 300 DPI image on matte paper may look similar to 250 DPI on glossy. For matte prints, 300 DPI is still the safe target, but you won't see the same level of fine detail as on glossy stock.
Canvas prints have a textured surface that hides minor resolution gaps. You can often get away with 150-200 DPI on canvas, especially for large prints viewed from across a room.
Fabric printing (t-shirts, tote bags) works differently. Most fabric printers use a much coarser dot pattern, so 150 DPI is typically the standard. Going higher than 200 DPI rarely improves the result on fabric.
When a print shop asks for "300 DPI minimum," they usually mean glossy or semi-glossy paper. Ask about the paper type before preparing files — you might be able to use a lower DPI and save yourself the trouble of upscaling.
DPI vs PPI: What's the difference?

These terms get used interchangeably, but they're different:
| Term | Stands for | Applies to | Measures |
|---|---|---|---|
| DPI | Dots Per Inch | Printers | Ink dots per inch on paper |
| PPI | Pixels Per Inch | Screens | Pixels per inch on display |
DPI is a printer setting. Your printer physically places dots of ink on paper. 300 DPI means 300 dots in every inch.
PPI is a display setting. Your monitor shows pixels on screen. A Retina MacBook Pro has 227 PPI — meaning 227 pixels per inch of screen.
In practice: When you set "300 DPI" in Photoshop or Preview, you're technically setting PPI (pixels per inch for the digital file). The printer then maps those pixels to its own dot pattern. For everyday use, treating them as the same thing works fine.
Common DPI settings and when to use them
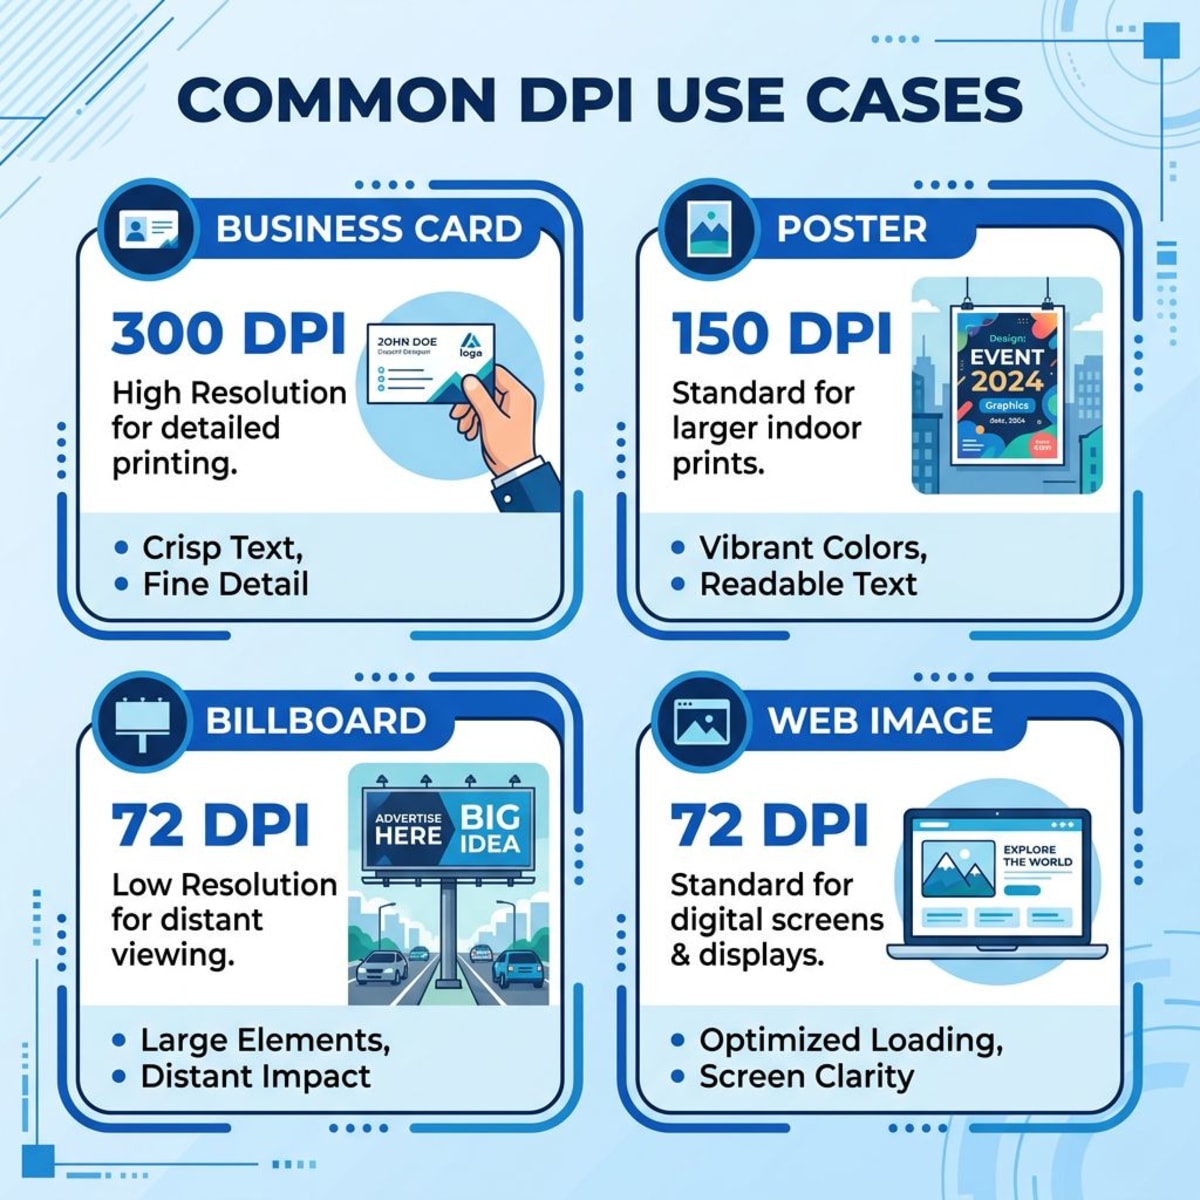
| DPI | Best for | Quality |
|---|---|---|
| 72 | Web images, email, social media | Screen-only (won't print well) |
| 150 | Draft prints, internal docs, posters viewed from distance | Acceptable for non-critical prints |
| 200 | Framed prints, wall art viewed from 2+ feet | Good — edges smooth at viewing distance |
| 300 | Photos, business cards, brochures, magazines | Professional standard — the sweet spot |
| 600 | Fine art prints, detailed technical drawings | Highest practical quality |
Quick reference for print sizes at 300 DPI
| Print size | Pixels needed |
|---|---|
| 4 × 6 inches | 1200 × 1800 |
| 5 × 7 inches | 1500 × 2100 |
| 8 × 10 inches | 2400 × 3000 |
| 11 × 14 inches | 3300 × 4200 |
| 16 × 20 inches | 4800 × 6000 |
If your image doesn't have enough pixels for 300 DPI at your desired print size, either reduce the print size or use AI upscaling. Printing below 200 DPI for anything held in hand (photos, cards) will look noticeably soft.
Frequently Asked Questions
Morgan
Indie DeveloperIndie developer, founder of ScreenSnap Pro. A decade of shipping consumer Mac apps and developer tools. Read full bio
@m_0_r_g_a_n_