Reduce Video File Size on Windows (2026)
# How to Reduce Video File Size on Windows (2026) Without Losing Quality
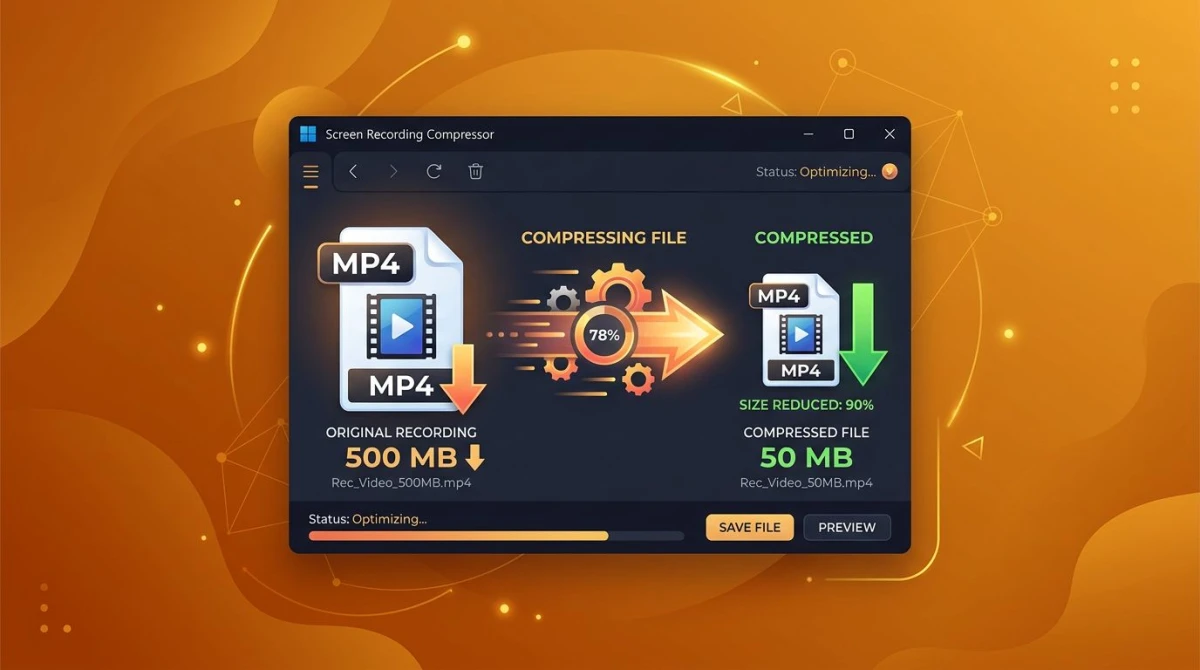
You tried to email a 500 MB screen recording. Your client said the file was too big. Sound familiar?
To reduce video file size on Windows, re-encode the file with HandBrake using the H.265 codec at a constant quality (CRF) of 22-24. This cuts most videos by 50-70 percent with no visible quality loss. For a fast one-off, drag the file into an online tool like Clideo. For bigger batches, use FFmpeg with a single command.
This guide walks through five proven methods, from point-and-click apps to power-user tools. Pick the one that fits your file and your patience.
Why videos get so big in the first place
Three things drive file size: resolution, bitrate, and codec. A 10-minute 4K clip at 60 fps can hit 2 GB easily. The same clip at 1080p with a smarter codec drops under 200 MB with no visible loss.
Resolution sets the pixel count per frame. A 4K frame has four times the pixels of 1080p. Every extra pixel adds data.
Bitrate is how many bits per second the encoder uses. High bitrate means more detail but bigger files. Low bitrate means smaller files but muddy motion.
The codec is the compression engine. Old codecs like H.264 are fast but less efficient. Newer ones like H.265 (HEVC) and AV1 squeeze the same quality into half the space.
Screen recordings have it worse. Tools that save in raw or "lossless" modes can use 500 MB per minute. Re-encoding after capture is the quickest win.
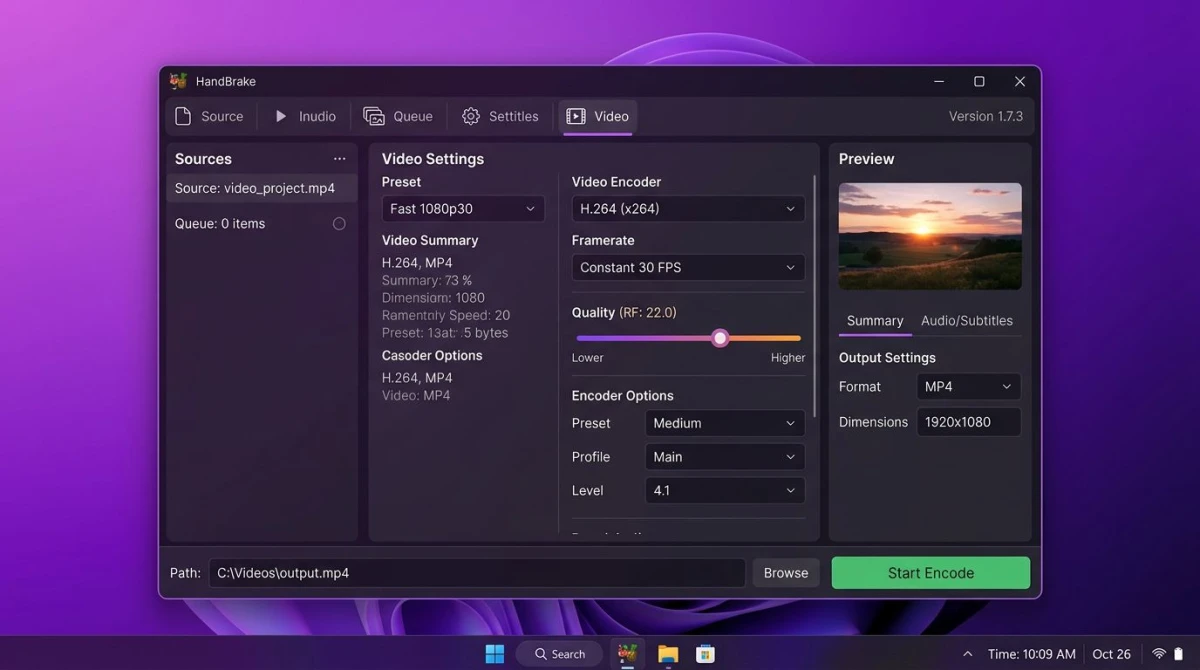
Method 1: HandBrake (free, widely used)
HandBrake is a widely used free video converter on Windows. It is open source, offline, and built for compression work.
Step-by-step:
- Download HandBrake from the official site and install it.
- Open HandBrake and drag your video into the window.
- On the right, pick a preset. "Fast 1080p30" is a safe default.
- Click the Video tab. Set Video Encoder to H.265 (x265).
- Set Quality to RF 22 (lower = bigger file, higher = smaller).
- Click Start Encode at the top.
A 500 MB clip often drops to 100-150 MB with no visible loss. For a bigger cut, push RF to 26 or 28. Above 30, you start seeing smudges in fast motion.
HandBrake is slow compared to online tools. A 10-minute 1080p clip can take 5-15 minutes depending on your CPU. But the output quality is hard to beat.
Method 2: VLC re-encode (already installed)
If you have VLC Media Player, you already have a compressor. It is not fancy, but it works in a pinch.
Step-by-step:
- Open VLC. Click Media > Convert / Save.
- Click Add, pick your video, then click Convert / Save at the bottom.
- Under Profile, choose "Video - H.265 + MP3 (MP4)".
- Click the wrench icon to tweak bitrate. Try 2000 kbps for 1080p.
- Pick a save path and click Start.
VLC is simple but gives you fewer knobs than HandBrake. The output is good for sharing screen recordings and casual footage. For final-quality work, use HandBrake instead.
Method 3: Online compressors (Clideo, Veed)
Sometimes you just need a smaller file right now. Online compressors are the fastest path.
Top picks:
- Clideo — Drag and drop, pick a size target, download. Free tier adds a small watermark on the largest tier.
- Veed — Browser-based, clean interface, good for short clips.
- FreeConvert — No watermark on free tier, up to 1 GB uploads.
- Online-Convert — Lots of format options, slower than the others.
Tradeoffs: Upload and download take real time on big files. A 1 GB file can take 10-20 minutes over a normal home connection. Quality is often fine for web sharing but not for final work.
Never upload private or confidential video to an online service. Corporate footage and internal meetings should stay on your machine.
Method 4: FFmpeg one-liner (power users)
FFmpeg is the Swiss Army knife of video. It runs from the command line, handles batches, and has no limits on file size or length.
Install: Download the Windows build from the FFmpeg site and add it to your PATH.
The magic command:
ffmpeg -i input.mp4 -vcodec libx265 -crf 24 output.mp4This re-encodes any file to H.265 at CRF 24. Lower CRF means higher quality and bigger file. Start at 24, then adjust.
For batch work:
for %f in (*.mp4) do ffmpeg -i "%f" -vcodec libx265 -crf 24 "compressed_%f"Run that from Command Prompt inside a folder of videos. FFmpeg burns through them one by one. No clicks needed.
FFmpeg is also the fastest to script. If you compress videos often, writing a .bat file saves hours.
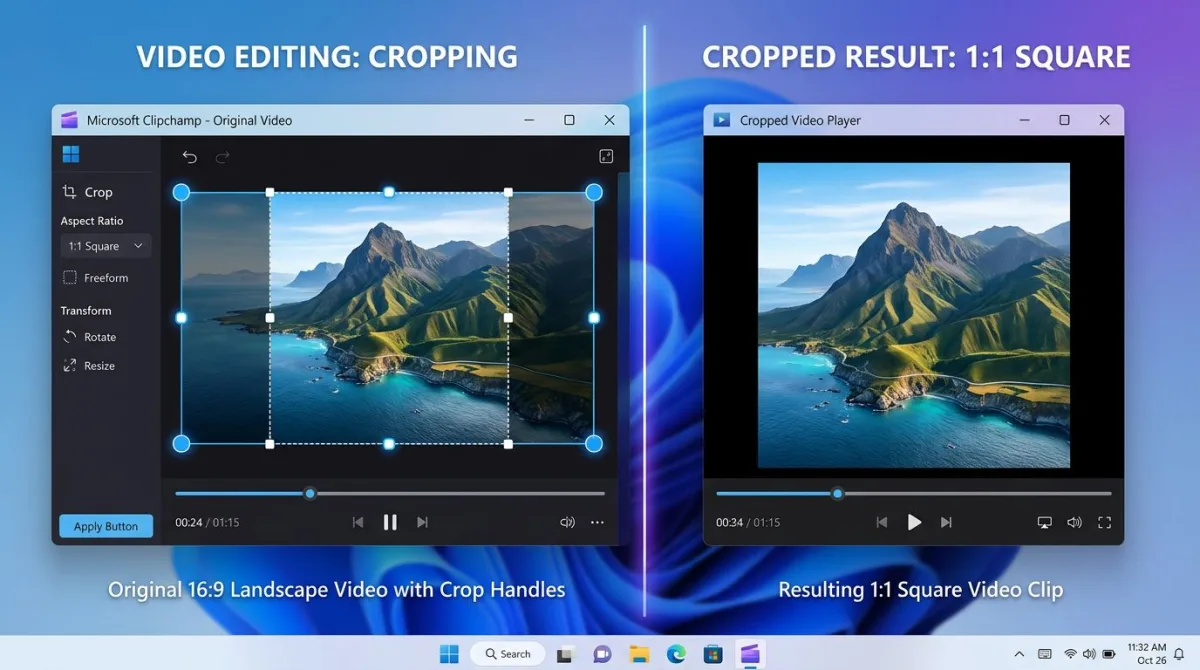
Method 5: Windows Photos and Clipchamp export
Windows 11 ships with two built-in tools that can export smaller videos.
Photos (legacy): The old Photos app has a basic video editor. Open your clip, trim if needed, then export at 720p. This alone cuts 1080p files by about 60 percent.
Clipchamp: Microsoft's newer tool is built into Windows 11. It offers more export presets — 480p, 720p, 1080p — plus a "quality" slider. Sign in with a free Microsoft account to use it.
Neither tool gives you codec control. They are fine for quick cuts and social media exports. For serious compression, stick with HandBrake or FFmpeg.
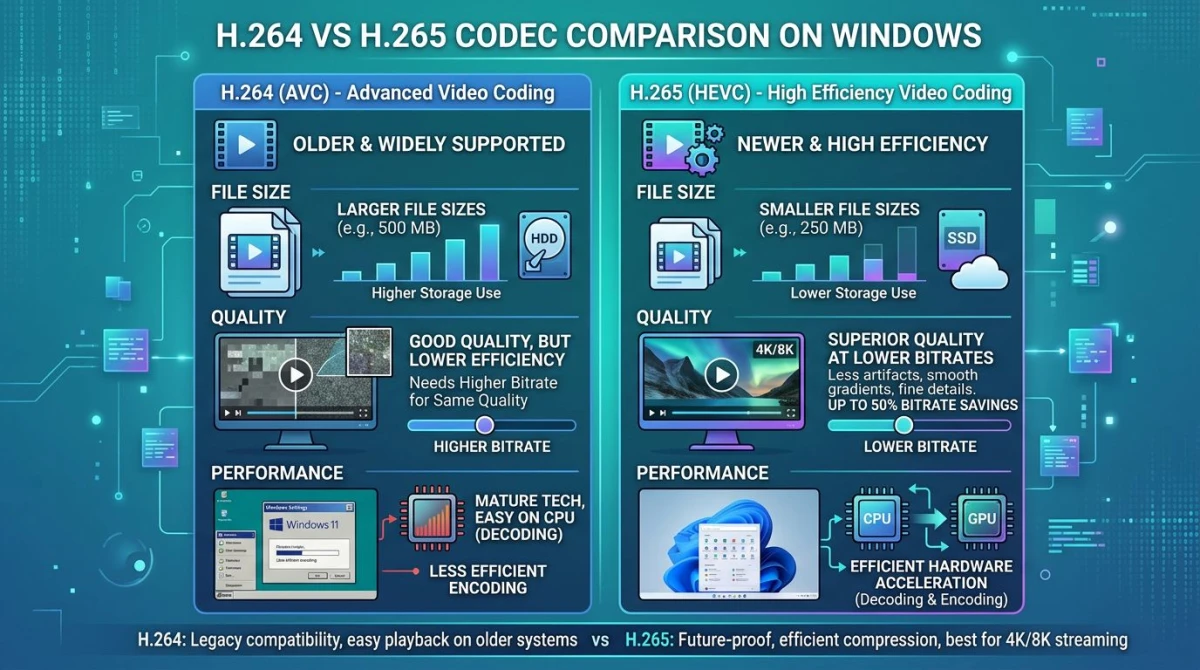
Best codec for small size and good quality: H.264 vs H.265
The codec choice matters more than any other setting.
| Codec | File size | Quality | Speed | Compatibility |
|---|---|---|---|---|
| H.264 | Baseline | Great | Fast | Works everywhere |
| H.265 (HEVC) | 40-50% smaller | Same | Slower | Most modern devices |
| AV1 | 50-60% smaller | Same | Very slow | Newer devices only |
| VP9 | 40% smaller | Great | Slow | Web browsers |
When to use H.264: Sharing with clients on older devices. Uploading to platforms that re-encode anyway (YouTube, Instagram). Fast encoding on slower PCs.
When to use H.265: Archiving, private sharing, screen recordings, anything going to modern devices. This is the best pick for most 2026 workflows.
When to use AV1: Archiving huge libraries where encode time does not matter. Still a niche choice in 2026.
Tired of plain screenshots? Try ScreenSnap Pro.
Beautiful backgrounds, pro annotations, GIF recording, and instant cloud sharing — all in one app. Pay $39 once, own it forever.
See what it doesResolution vs bitrate: which to lower first
You have two knobs to shrink a file. Which one you turn first matters.
Lower bitrate first if the content looks clean. Modern codecs handle aggressive bitrate cuts well. A 1080p clip at 2000 kbps often looks as good as one at 5000 kbps. You save 60 percent and nobody notices.
Lower resolution first if the video is mostly still — screen recordings of static slides, talking heads, whiteboard sessions. Drop from 1440p to 1080p, or 1080p to 720p. The viewer will not see the difference on a laptop screen.
Never lower both at once on your first pass. Change one, check the output, then adjust. Stacking cuts can turn fine video into a mess.
Reducing screen recording file size specifically
Screen recordings are a special case. They are usually long, usually 1080p or higher, and usually saved in fat codecs by default.
Why they are so big:
- Many recorders save in raw or near-raw formats
- Default bitrate is often 8000-15000 kbps
- 60 fps doubles the file versus 30 fps
- Audio tracks add 200-400 MB per hour
Quick wins:
- Record at 30 fps unless you need smooth motion. Screen content is mostly still, so 30 fps looks identical to 60 fps.
- Record at 1080p, not 4K, unless the viewer will watch on a big screen.
- Re-encode after capture. Pass the file through HandBrake at RF 24 H.265.
- Trim dead time. Cut intros, pauses, and mistakes before compressing.
- Use a smarter recorder. Screen recorders for Windows vary wildly in output size.
If you record often, using a tool that outputs efficient files saves hours on compression. ScreenSnap Pro records in H.264 at smart bitrates, so raw output is already 40-60 percent smaller than OBS defaults. At $39 one-time with 500+ wallpapers and 15 annotation tools, it is a one-time fix for the bloat problem.
For workflows where you record screen with audio on Windows, the audio codec also matters. AAC at 128 kbps is plenty. Uncompressed WAV tracks can add hundreds of megabytes for nothing.
Common mistakes that make files bigger, not smaller
People compress videos the wrong way all the time. These pitfalls waste time and ruin quality.
Re-encoding twice. Each pass degrades quality a bit. If a file came from YouTube or a messaging app, it is already compressed. Compressing again rarely helps much and often makes motion look worse.
Picking the wrong container. MP4 is the best default for H.264 and H.265. MKV works too but some email clients reject it. Do not save as AVI in 2026 — the format is old and inefficient.
Leaving multiple audio tracks. Some recorders save mic and system audio as two separate tracks. Merge them in a video editor or use FFmpeg to drop the one you do not need. Each track can add 50-200 MB per hour.
Using old presets. HandBrake ships with H.264 presets by default for compatibility. Switch to H.265 manually for smaller files. The presets labeled "Fast" also use higher bitrates — "Very Slow" presets compress better but take longer.
Compressing already-short clips. A 30-second 1080p clip is usually 10-20 MB. Compressing it saves maybe 5 MB and takes 30 seconds. Not worth the hassle for tiny files.
How to test if your compressed file still looks good
After compression, do a quick quality check before sharing.
- Play both files back to back. Open the original and the compressed version in your video player. Seek to a busy scene — lots of motion, gradients, or fine detail. If you spot blockiness or smearing, lower your CRF or bitrate target.
- Check file size and length match. A compressed 10-minute clip should still be 10 minutes. If not, the encoder cut frames.
- Test the audio. Compressed audio at low bitrates sounds tinny. AAC at 128 kbps is a safe floor for speech. For music, use 192 kbps or higher.
- Open it on the target device. A video that plays on your desktop may stutter on a phone. Test before sending.
If the compressed file fails any test, go back and loosen the settings. Small files are worthless if they look bad.
Quick recipe cheat sheet
| Use case | Best method | Target size |
|---|---|---|
| Email attachment | HandBrake H.265 RF 26 | Under 25 MB |
| Slack or Discord | HandBrake H.265 RF 24 | Under 100 MB |
| Client review | HandBrake H.264 RF 22 | 200-500 MB |
| YouTube upload | Skip — YouTube re-encodes | As-is fine |
| Archive | FFmpeg H.265 CRF 22 | 40-50% of original |
| Phone sharing | Online tool, 720p | Under 50 MB |
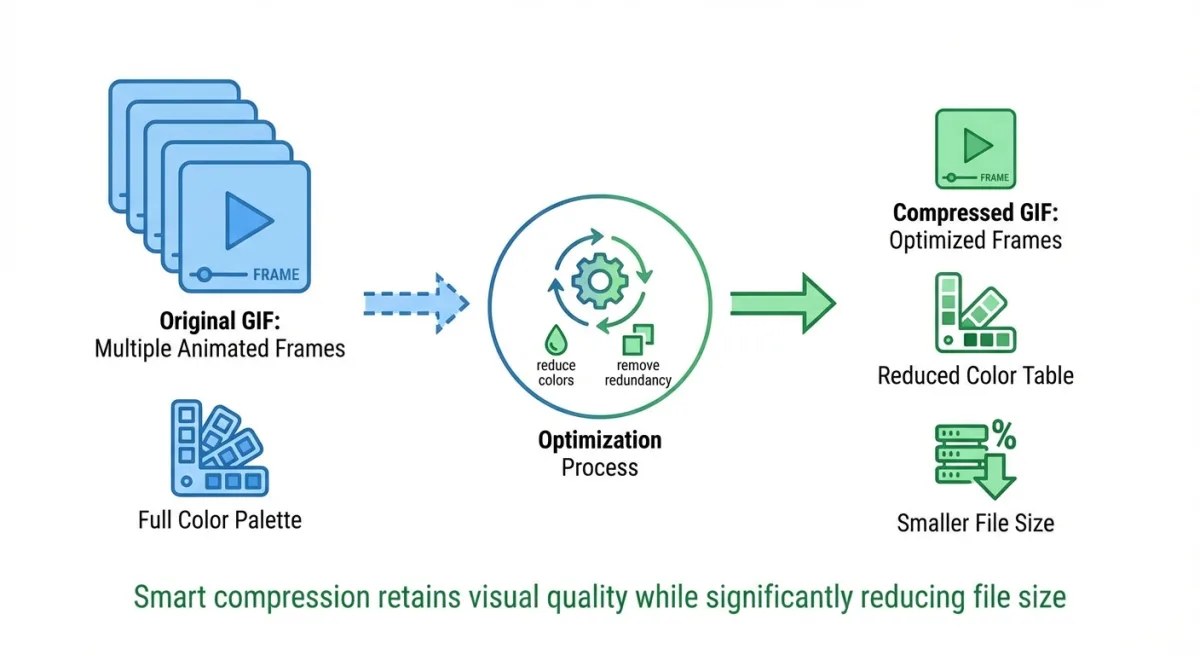
If you also need to reduce GIF file size, the same logic applies — smaller frames, lower frame rate, smarter encoder.
For related tasks, see our guide on free screen recorders for Windows and how to record screen with audio on Windows. If you work with GIFs too, check out how to capture GIFs on Windows.
Frequently Asked Questions
When compression is not the answer
Sometimes shrinking a file is the wrong move. Know when to pick a different tool.
For sending huge files — use a file transfer service. WeTransfer, Google Drive, and Dropbox all handle big videos fine. Compressing a 5 GB file down to 2 GB still leaves you with 2 GB to send. A link in a message is easier than an attachment.
For team review — upload to a private cloud and share a link. Reviewers can stream without downloading. This beats sending compressed copies back and forth.
For long-term archive — keep the original. Storage is cheap. A $30 external drive holds thousands of hours of video. Compressing just to save space risks quality loss you cannot undo.
For live streams and meetings — use the platform's built-in tools. Zoom, Teams, and OBS handle compression on the fly. Re-compressing after only makes things worse.
Compression is a trade. You lose some quality to save space. If space is not the real problem, do not pay the quality cost.
Bottom line
Start with HandBrake. Pick H.265, set RF to 24, and encode. This single workflow handles 90 percent of Windows video compression needs — from screen recordings to client uploads.
For faster jobs, use VLC or an online tool. For batches and automation, learn one FFmpeg command. For the rest, keep things simple and the files small.
If you record screens often, the best compression is recording smaller in the first place. A good recorder like ScreenSnap Pro produces efficient H.264 files at capture time, so you spend less time shrinking them later.
Morgan
Indie DeveloperIndie developer, founder of ScreenSnap Pro. A decade of shipping consumer Mac apps and developer tools. Read full bio
@m_0_r_g_a_n_