Screenshot YouTube Video on Windows (2026)
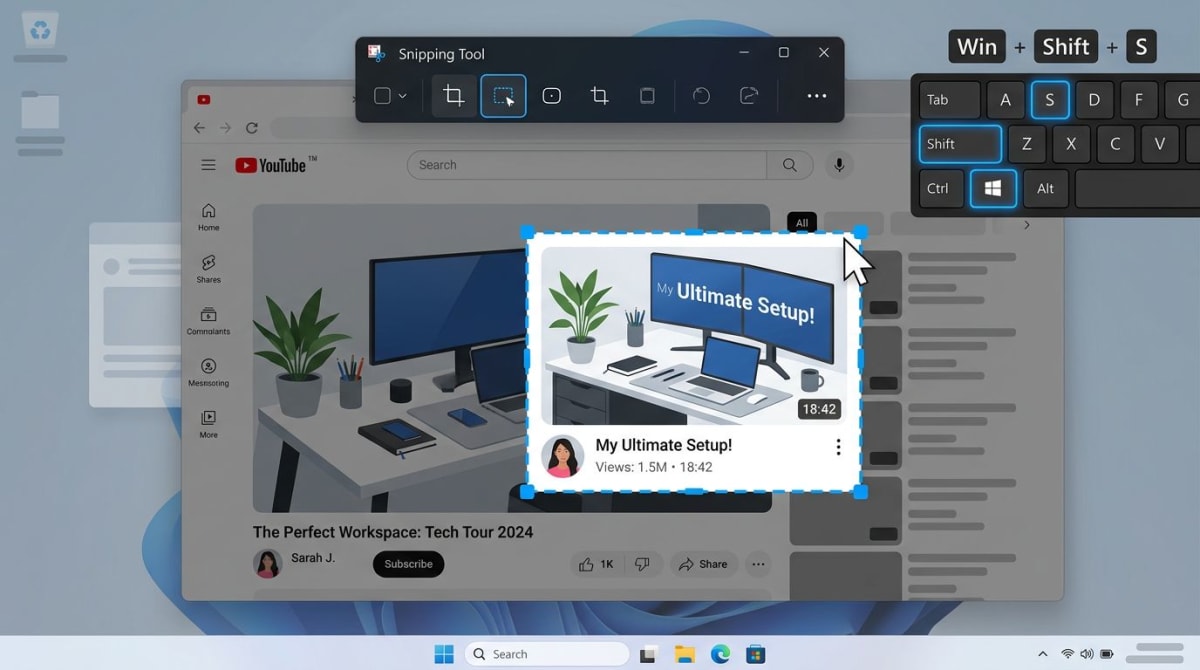
Want to grab a clean screenshot from YouTube video playback on Windows? The fastest way is simple. Pause the video, press Win + Shift + S, then drag a box around the frame. Your clip lands in the clipboard, ready to paste anywhere.
But there's a catch most guides skip: sometimes you get a black rectangle instead of the video. That's hardware acceleration playing tricks. This guide shows five proven methods that always work on Windows 10 and 11 — plus the one setting fix that stops black screens for good.
Why YouTube screenshots sometimes show a black screen
This is the number-one frustration for Windows users. You pause a video, snip the frame, and paste a pure black box. No video. Just the YouTube chrome around it.
The culprit is hardware acceleration. Modern browsers offload video decoding to your GPU. When the screenshot tool grabs a frame, it pulls from your system's regular display buffer — but the video lives in a separate GPU layer. The result is a transparent (black) hole where the video should be.
Two fixes work:
- Turn off hardware acceleration in your browser (detailed below).
- Use a method that captures the GPU layer correctly, like right-click "Save video frame as" in Chrome.
Both work. Which you pick depends on how often you screenshot videos. If it's a daily thing, turn off hardware acceleration. If it's once a week, the right-click method is faster.
Method 1 — Pause + Snipping Tool (Win + Shift + S)
This is the default method on every modern Windows machine. It's built in, free, and takes two seconds.
Steps:
- Open your YouTube video in any browser.
- Set the quality to the highest option (click the gear icon, pick 1080p or 4K).
- Pause at the frame you want.
- Press
Win + Shift + Sto open the Snipping Tool overlay. - Drag a rectangle around the video area.
- The frame copies to your clipboard. Press
Ctrl + Vin any app to paste.
Pro tip: Press F on the YouTube player to go fullscreen first. You get a bigger, cleaner image with no browser chrome. Then press Esc to exit when done.
If you see a black box, jump to the hardware acceleration fix below. For a full tour of every snip mode on Windows 11, see our Windows 11 screenshot guide.
Method 2 — Print Screen + crop
The classic fallback. Every Windows keyboard has a Print Screen key (sometimes labeled PrtScn). It captures the whole screen to your clipboard, and you crop from there.
Steps:
- Pause the YouTube video at the frame you want.
- Press
Print Screento grab the full screen. - Open Paint, Photos, or any image editor.
- Paste with
Ctrl + V. - Crop to just the video area.
This method is less elegant, but it works on every Windows version — even ancient ones. It's also handy when the Snipping Tool is being weird. See our full rundown of Windows screenshot shortcuts for every keyboard combo you should know.
Quick crop options:
- Paint — Select tool, drag around the video, right-click, "Crop"
- Photos app — Click "Edit", use the crop tool, save
- Free online tool — Use our image cropper for a quick browser crop, no install needed
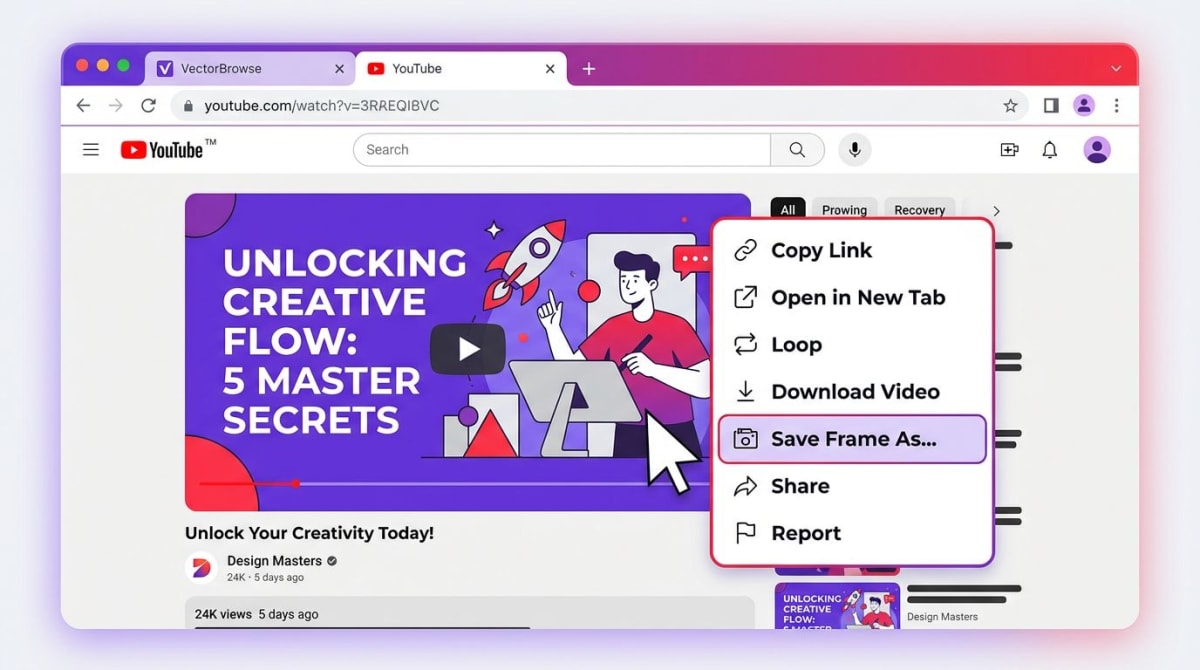
Method 3 — Right-click "Save video frame as" (Chrome, Edge, Brave)
Here's the hidden gem most people miss. Since 2024, Chromium browsers (Chrome, Edge, Brave, Opera, Arc) have a built-in frame saver. It captures the video at full native resolution — even 4K — skipping the black-screen problem entirely.
Steps:
- Open the YouTube video in Chrome, Edge, or Brave.
- Pause at the frame you want.
- Right-click twice on the video. The first click shows YouTube's menu. The second shows the browser menu.
- Pick "Save video frame as..." or "Copy video frame".
- Save the file or paste it where you need it.
Why this rocks: You get the video's full resolution, not your screen's. A 4K video gives you a sharp 3840×2160 PNG, even on a 1080p monitor. No cropping. No quality loss.
Heads up: Firefox and older Edge versions don't have this yet. Use Method 1 there.
Method 4 — YouTube screenshot browser extensions
If you grab frames every day, a dedicated extension saves time. It adds a camera button right on the YouTube player.
Popular choices:
- Screenshot YouTube (Chrome, Edge) — Free. Adds a camera icon next to the fullscreen button. One click saves the current frame at native video resolution. Works great for thumbnails.
- Fireshot — More general, but lets you capture any web page area.
- Awesome Screenshot — Freemium. Has a YouTube-specific capture mode.
How to install Screenshot YouTube:
- Open the Chrome Web Store (or Edge Add-ons).
- Search for "Screenshot YouTube".
- Click Add to Chrome.
- Go to any YouTube video — you'll see a new camera icon in the player controls.
- Click it. The frame downloads as a PNG to your default folder.
Extensions can bloat your browser, so only install ones you'll actually use. If you screenshot YouTube once a month, stick with the built-in methods.
Tired of plain screenshots? Try ScreenSnap Pro.
Beautiful backgrounds, pro annotations, GIF recording, and instant cloud sharing — all in one app. Pay $29 once, own it forever.
See what it doesMethod 5 — ScreenSnap Pro with window capture
For creators who need clean thumbnails for tutorials, reaction content, or reference images, a dedicated app wins. ScreenSnap Pro lets you capture the browser window with one shortcut, annotate instantly, and share a link — all without leaving the video.
What makes it better than the Snipping Tool for YouTube:
- Window mode crops to just the browser, skipping taskbars and background clutter
- 150+ gradient backgrounds make thumbnails pop for social posts
- 15 annotation tools for arrows, text, blur, and highlight
- Instant cloud link for sharing in Slack or Discord without attachments
- No watermarks, ever
- $29 one-time — no subscription, works on 2 computers (Windows or Mac)
Steps:
- Pause the YouTube video.
- Press your ScreenSnap Pro shortcut (default:
Ctrl + Shift + 5). - Pick Window mode and click the browser.
- The capture opens in the editor. Add arrows, blur info, or drop a background.
- Copy, save, or share.
For reaction videos, tutorials, and YouTube thumbnails, this workflow cuts minutes from your process. Compare pricing models in our best screenshot tools for Windows roundup.
How to disable hardware acceleration to prevent black screen
If you keep getting black boxes instead of video frames, turn off hardware acceleration in your browser. It's a five-second fix.
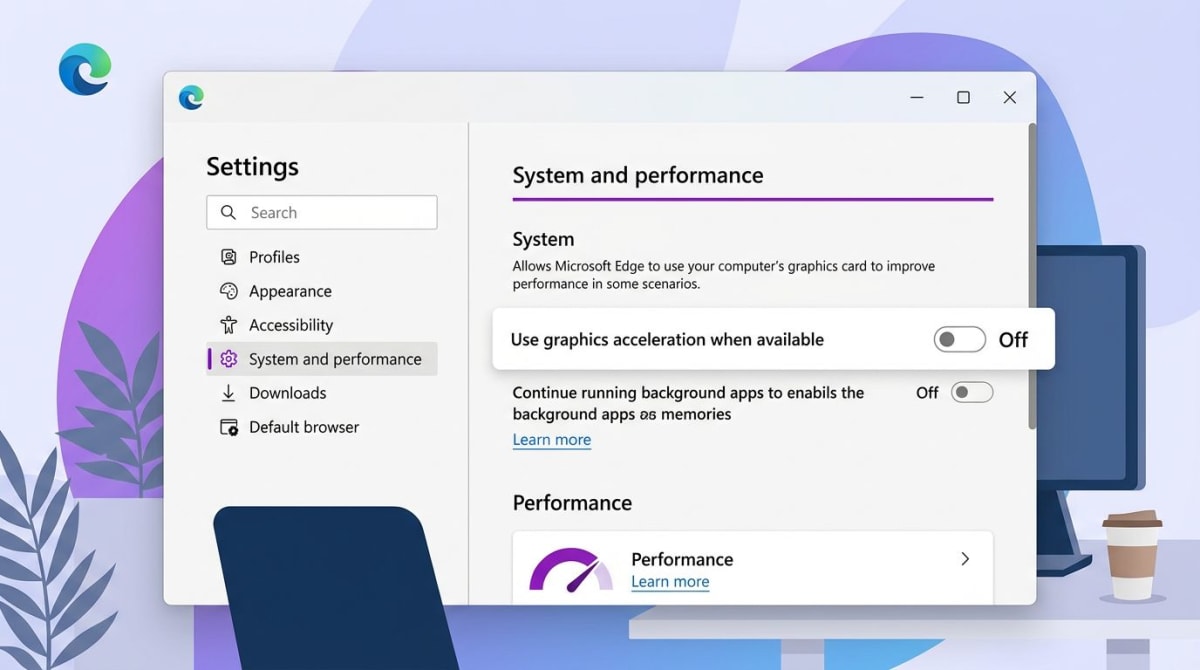
In Chrome or Edge
- Click the three-dot menu (top right).
- Go to Settings → System (in Chrome) or Settings → System and performance (in Edge).
- Toggle off "Use hardware acceleration when available".
- Click Restart to apply.
In Firefox
- Click the menu → Settings.
- Scroll to Performance.
- Uncheck "Use recommended performance settings".
- Uncheck "Use hardware acceleration when available".
- Restart Firefox.
In Brave
Same path as Chrome: Settings → System → Use hardware acceleration.
Tradeoff: Video playback uses a bit more CPU without GPU acceleration. On newer PCs, you won't notice. On older laptops, it may run warmer. If it bothers you, turn it back on when you're done taking screenshots. Microsoft covers the tradeoff in their display settings docs.
Capturing YouTube thumbnails directly
Want the official thumbnail, not a screenshot? YouTube stores thumbnails at fixed URLs. You can grab the highest-quality version in one step — no tools needed.
URL trick: Every YouTube video has a thumbnail at https://img.youtube.com/vi/VIDEO_ID/maxresdefault.jpg.
Steps:
- Copy the video URL. It looks like
https://www.youtube.com/watch?v=dQw4w9WgXcQ. - Grab the video ID — the characters after
v=. In the example, that'sdQw4w9WgXcQ. - Paste it into this template:
https://img.youtube.com/vi/dQw4w9WgXcQ/maxresdefault.jpg - Open that URL in a new tab.
- Right-click the image → Save image as.
Quality options (swap maxresdefault for others):
| URL suffix | Size | Best for |
|---|---|---|
maxresdefault.jpg | 1280×720 | Sharing, reposts |
hqdefault.jpg | 480×360 | Quick reference |
mqdefault.jpg | 320×180 | Small previews |
sddefault.jpg | 640×480 | Balance quality and size |
Some videos don't have a maxresdefault version (older uploads). If that URL shows a broken image, fall back to hqdefault.jpg.
Best quality vs file size
Not every screenshot needs to be 4K. A quick reference shot for Slack can be way smaller. Here's how to pick:
| Use case | Resolution | Format |
|---|---|---|
| Social media thumbnail | 1280×720 | JPG, 80% quality |
| Blog post hero | 1920×1080 | WebP or PNG |
| Print reference | 3840×2160 (4K) | PNG |
| Slack or Discord share | 1280×720 | JPG |
| Archive or editing | Full 4K | PNG |
Rules of thumb:
- PNG — lossless, best for text and UI elements. Bigger files.
- JPG — smaller, fine for photos and video frames without text.
- WebP — modern format, 30% smaller than JPG at the same quality.
If your screenshot is too big to share, run it through an image compressor to shrink it without visible quality loss. A 4K PNG can drop from 5 MB to under 500 KB with no visible change.
Want to convert a video clip to a GIF instead of a single frame? Our Windows GIF capture guide walks through the best tools.
FAQ
Wrap-up
For quick YouTube screenshots on Windows, Win + Shift + S paired with the right-click "Save video frame as" trick covers 95% of use cases. Turn off hardware acceleration once, and black screens stop being a problem forever.
If you capture YouTube frames often — for tutorials, reaction videos, or content reference — a dedicated app like ScreenSnap Pro speeds things up with window-mode capture, instant annotation, and shareable cloud links. One-time purchase, no subscription, works on both Windows and Mac.
Morgan
Indie DeveloperIndie developer, founder of ScreenSnap Pro. A decade of shipping consumer Mac apps and developer tools. Read full bio
@m_0_r_g_a_n_