How to Recover Deleted Screenshots on Windows and macOS
Accidentally deleted an important screenshot and can't find it anywhere? Depending on how and where it was deleted, you may still have several ways to get it back. We'll show you how to recover deleted files in Windows and Mac and explain which options you can use to restore screenshots in different situations.
Where Are Screenshots Saved on Windows and Mac?
Before we talk about recovery methods, we recommend checking the usual screenshot locations first. Your screenshot may still be on the computer, just not where you expected it to be.
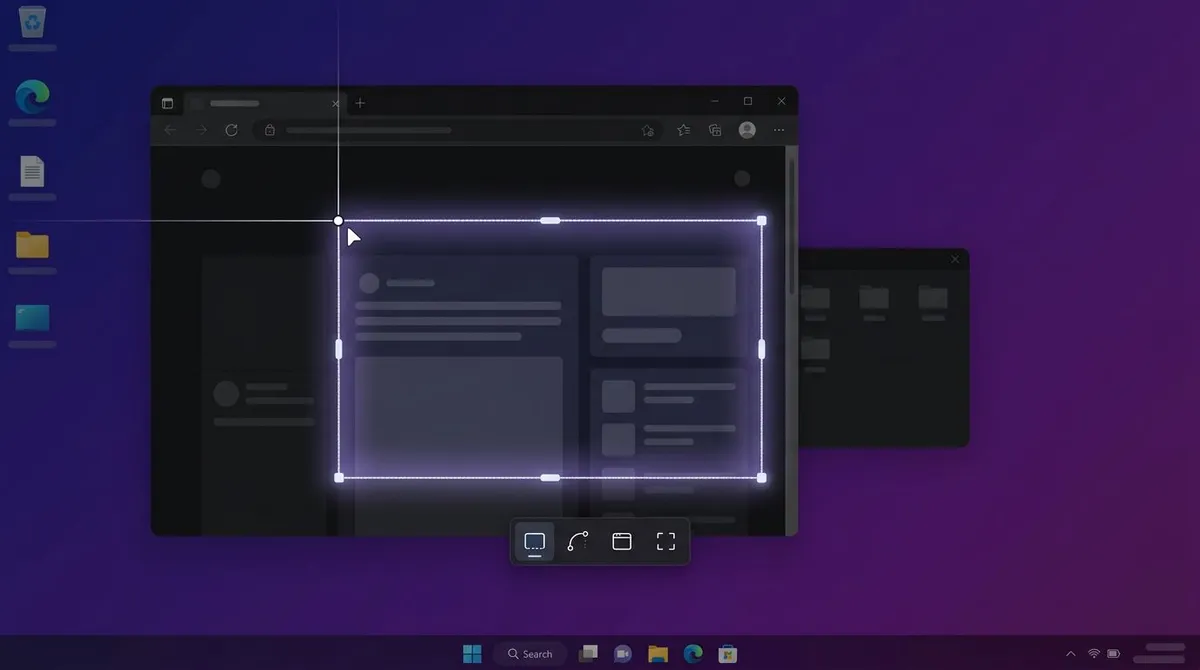
- Windows: Screenshots taken with Windows + Print Screen usually appear in Pictures > Screenshots. The Snipping Tool can also save screenshots there automatically, although you can choose a different folder. If you press Print Screen alone, Windows may only copy the screenshot to the clipboard.
- Mac: macOS saves screenshots to the Desktop by default. Press Command + Shift + 5 and select Options to see the current save location or choose a different one. If you add Control to a screenshot shortcut, macOS copies the image to the clipboard instead of creating a file.
If you don't see the screenshot in the usual folder, that doesn't necessarily mean it was deleted. Try a quick search first. On Windows, open File Explorer and search for terms like Screenshot or file types such as PNG and JPG. On Mac, use Spotlight or Finder to search for Screenshot and narrow the results by date if necessary. You may find the file in another folder before you need to try any recovery methods.
How to Recover Deleted Screenshots on Windows
Now, let's start with Windows. We've put together several options you can try to get your deleted screenshots back, and all of them work with both Windows 10 and Windows 11. Pick whichever method feels most suitable for you and follow the steps below.
Method 1: Restore Screenshots from the Recycle Bin
The Recycle Bin is always worth checking first, since Windows typically sends deleted files there instead of erasing them right away. As long as you haven't emptied it since, getting your screenshot back is usually just a few clicks away.
- Double-click the Recycle Bin icon on your desktop.
- Look through the files for the screenshot you want to recover. If there are a lot of items, use the Search Recycle Bin box in the upper-right corner to search for its name.
- Right-click the screenshot and select Restore. To recover several screenshots at once, select them first, then right-click the selection and choose Restore.
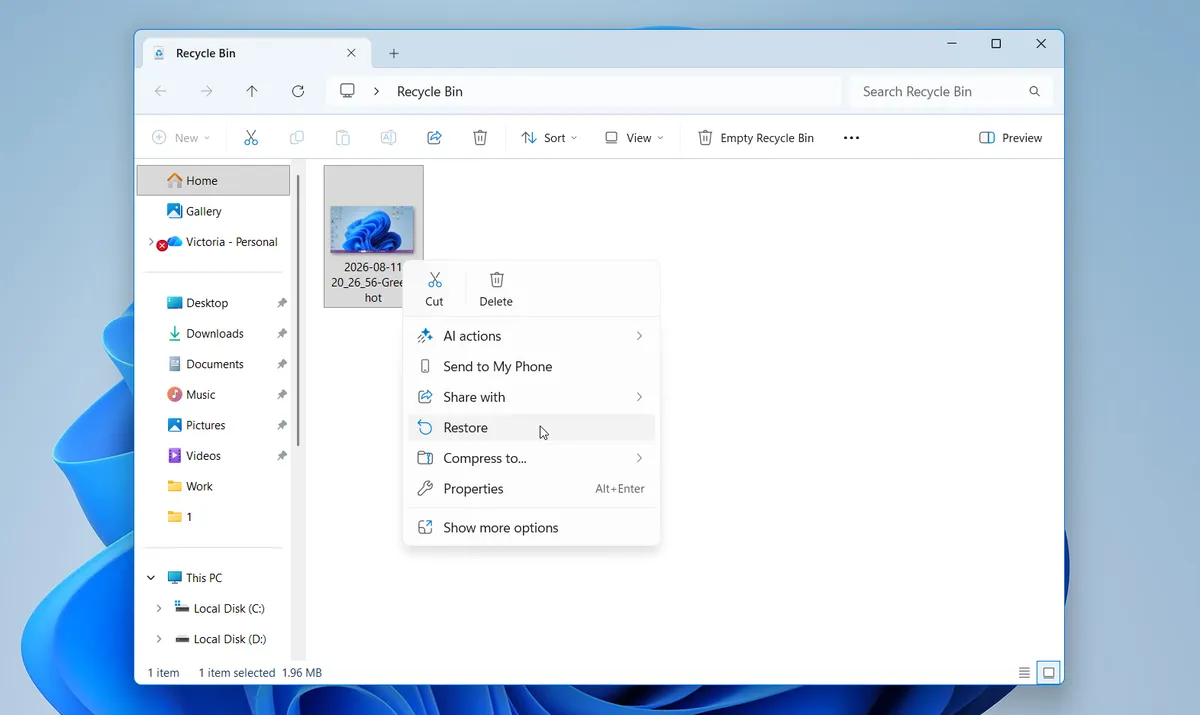
- Windows will return the screenshot to the folder where it was stored before you deleted it.
If you can't find the screenshot in the Recycle Bin, it may have been permanently deleted or you have already emptied Recycle Bin. If so, you'll need to try another recovery option.
Method 2: Recover Permanently Deleted Screenshots With Data Recovery Software
If the screenshots aren't in the Recycle Bin, data recovery software is the next option worth trying. Permanently deleted files can remain on the drive until Windows overwrites their data, so there may still be time to recover them. For this method, we recommend Disk Drill data recovery software. It is one of the most reliable tools available and works with Windows 10 and Windows 11, supports common screenshot formats such as PNG, JPG, JPEG, GIF, and TIFF, and lets you preview found images before recovery.
Note: Try not to save new files to the affected drive before you start. New data can overwrite deleted screenshots and reduce the chances of recovery. If you have another drive available, install Disk Drill there instead.
Here is how to recover deleted screenshots using Disk Drill:
- Download Disk Drill, install it, and open the application.
- Select the drive where the screenshots were stored, most commonly the C: system drive, and click Search for lost data.
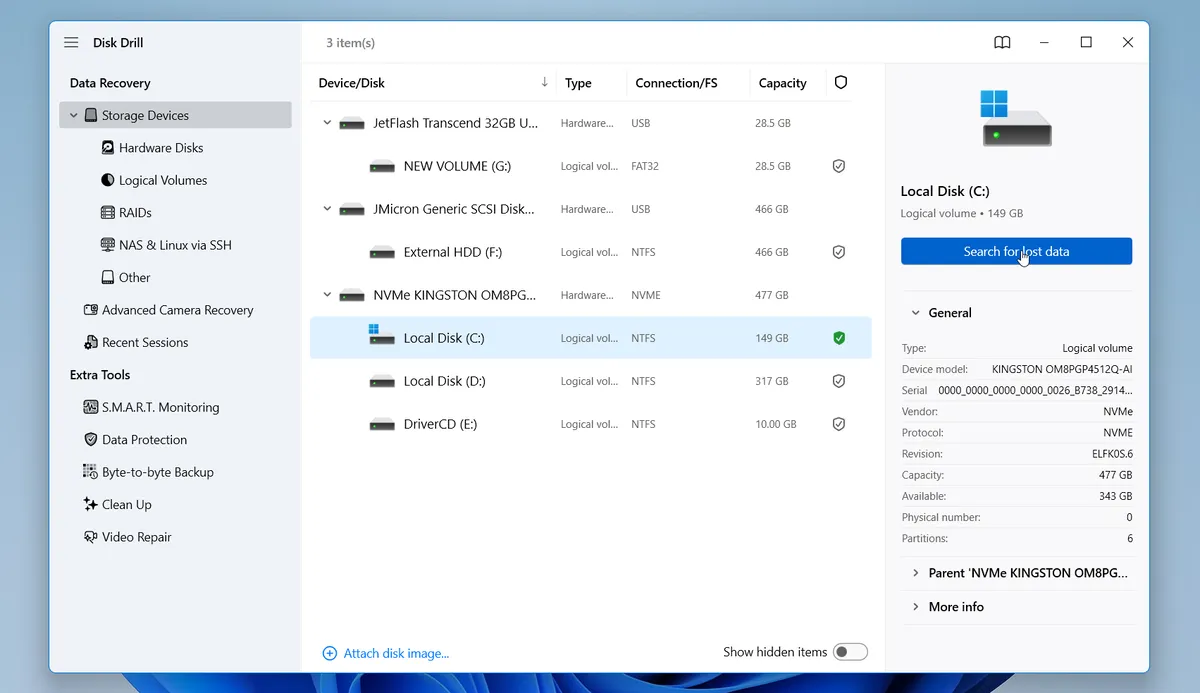
- Let the scan run. You can wait until it finishes or click Review found items to look through the results while Disk Drill continues the scan.
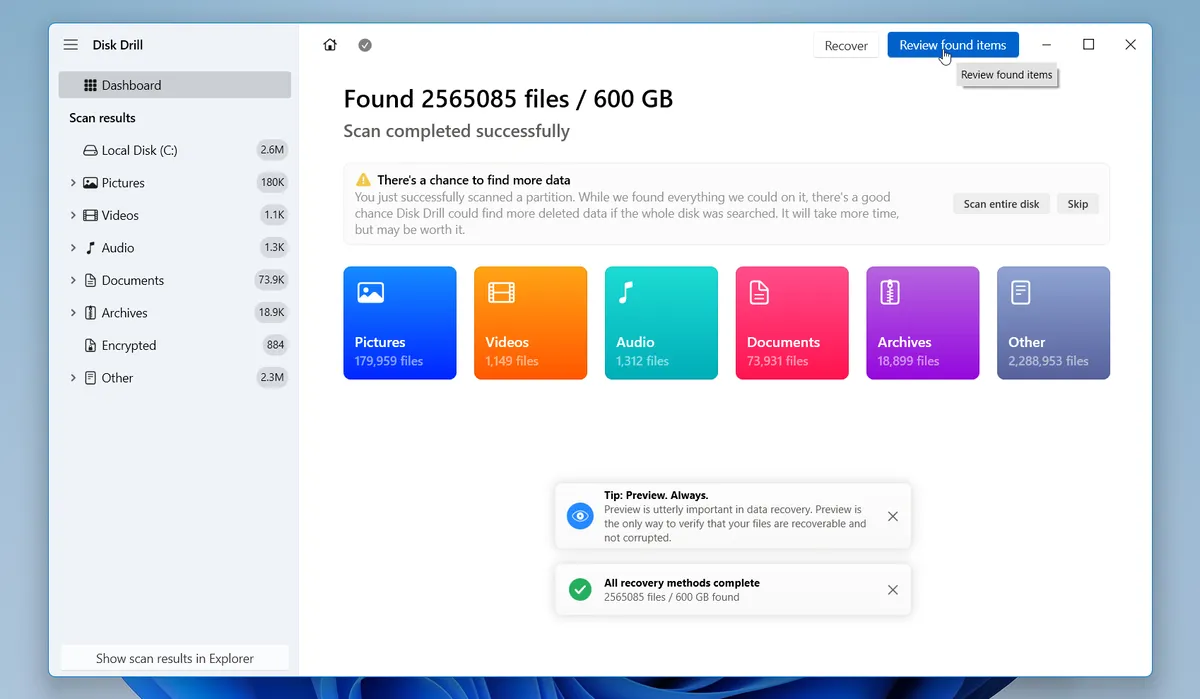
- Open Pictures to narrow the results to image files. You can also use the search box and available filters to look for screenshot names or formats such as .png and .jpg.
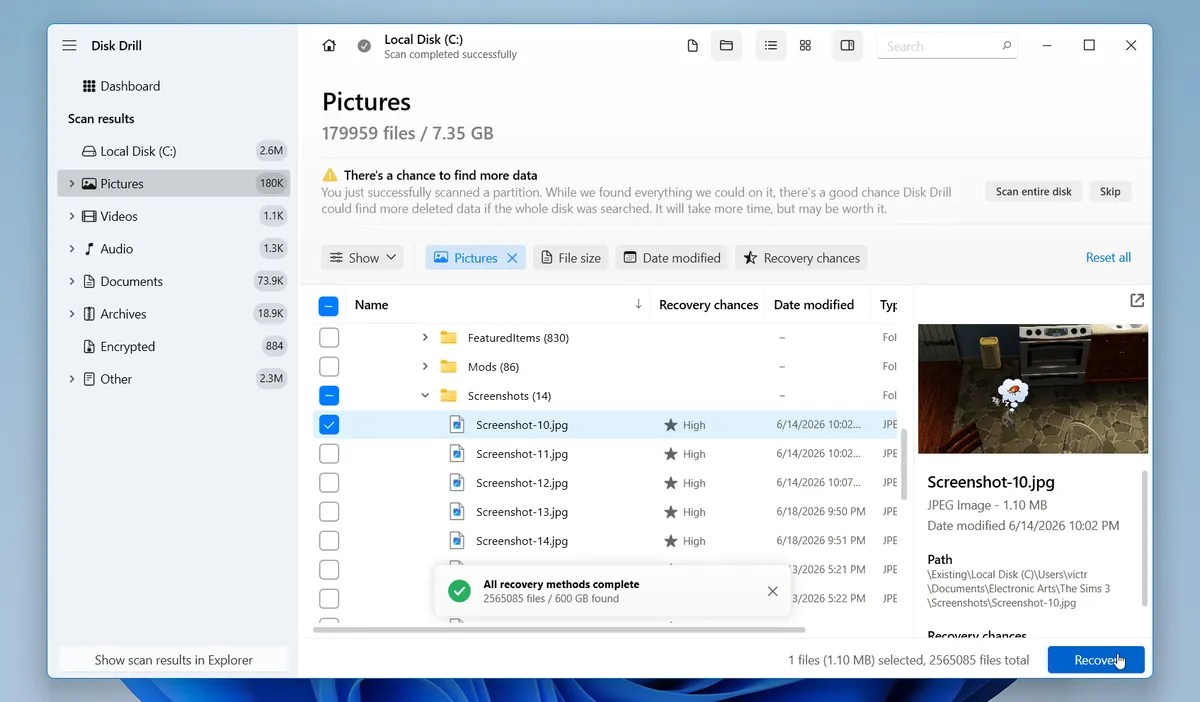
- Click a screenshot to preview it. Preview is particularly useful here because screenshot filenames may be lost or changed after deletion, while the image itself can still be recognizable. Check the boxes next to the screenshots you want and click Recover.
- Choose a folder on a different drive as the recovery destination and confirm.
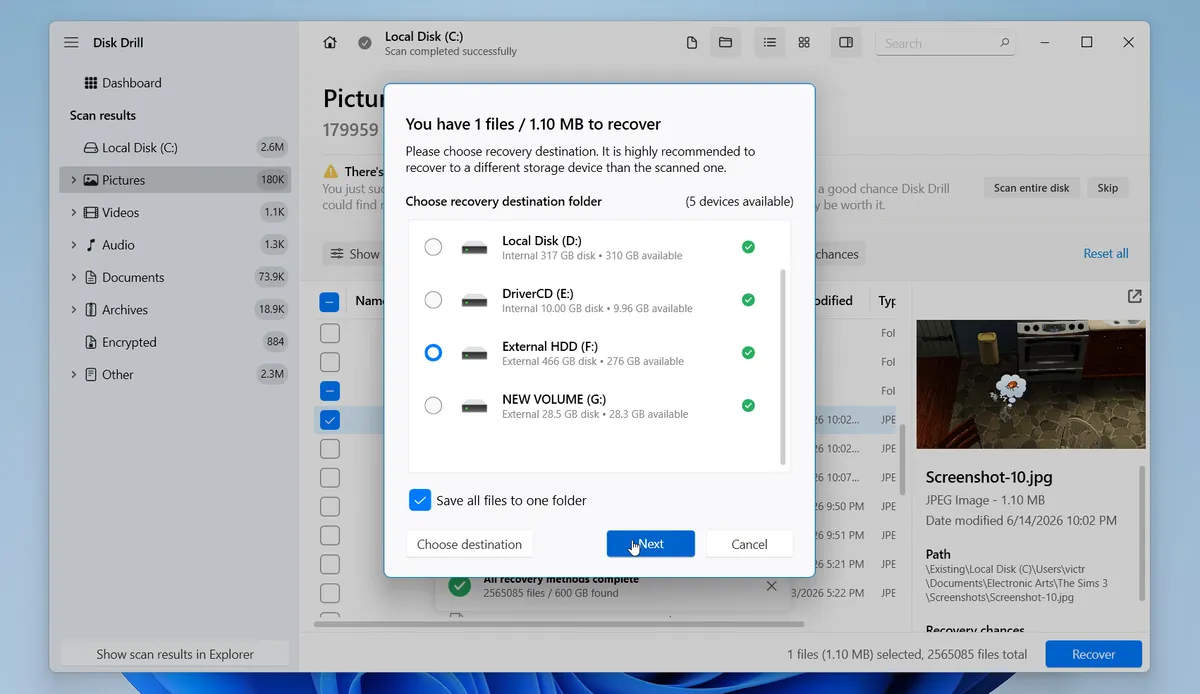
The Windows version of Disk Drill also includes up to 100 MB of free recovery, which can be enough to restore quite a few screenshots. After Disk Drill finishes, open the destination folder and check your recovered screenshots.
Method 3: Restore Screenshots With File History
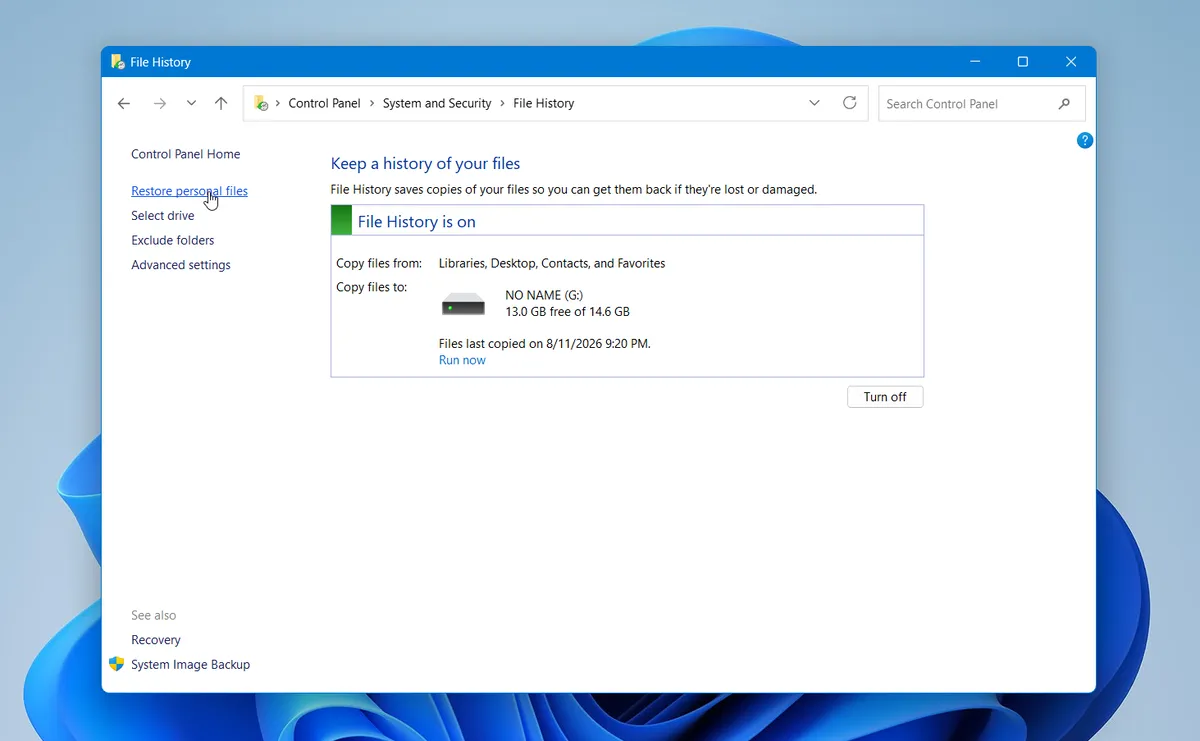
If File History was set up on your Windows PC before the screenshots were deleted, you may be able to restore an older copy from your backup. File History backs up files from selected Windows folders, including Pictures, so it may contain a copy of screenshots saved in the default Pictures > Screenshots folder.
Here's how to check your available backups:
- Open the Start menu, type Control Panel, and open it.
- Select System and Security > File History.
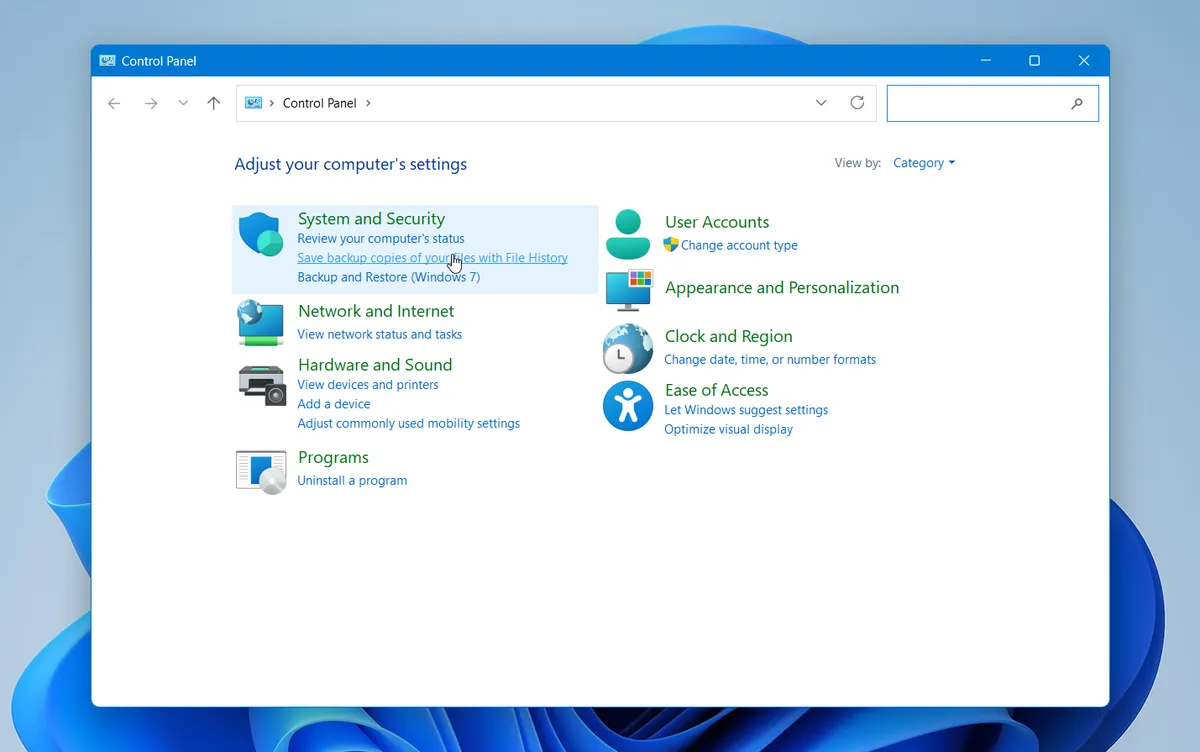
- Click Restore personal files in the left sidebar.
- Browse to the folder where your screenshots were stored. For the default location, open Pictures > Screenshots.
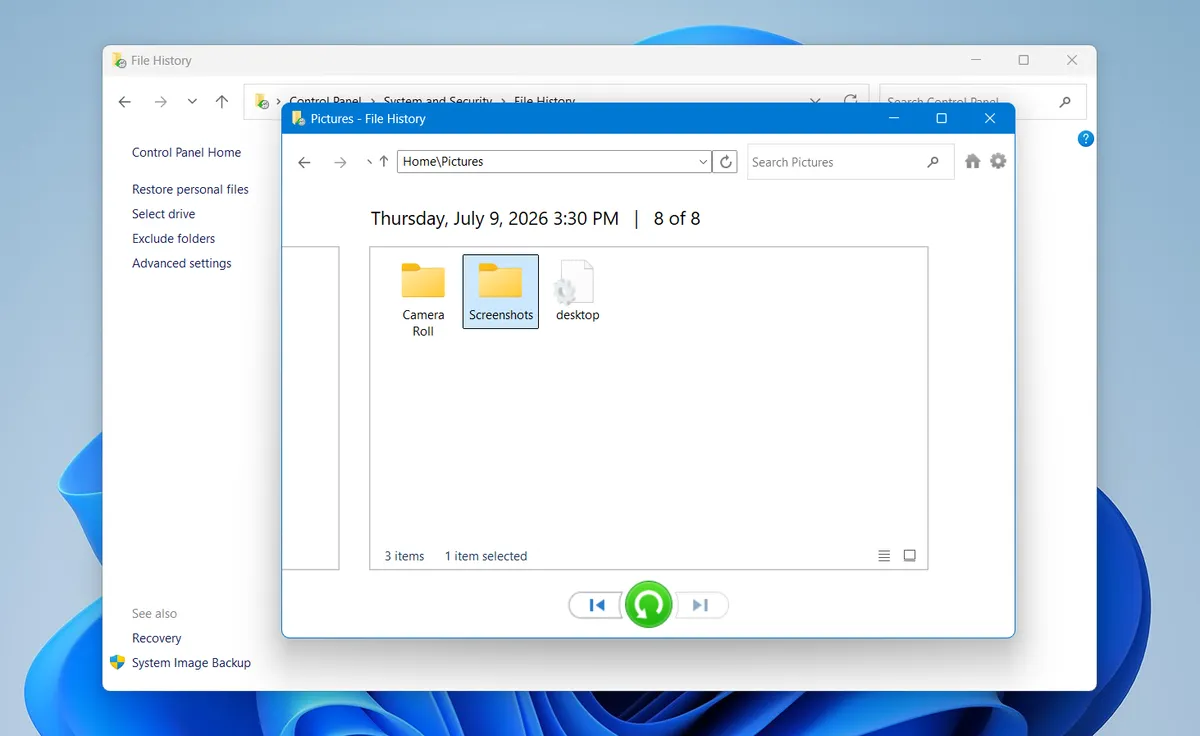
- Use the left and right arrows at the bottom to move between available backup versions until you find the screenshots you need.
- Select the screenshots and click the green Restore button to return them to their original location.
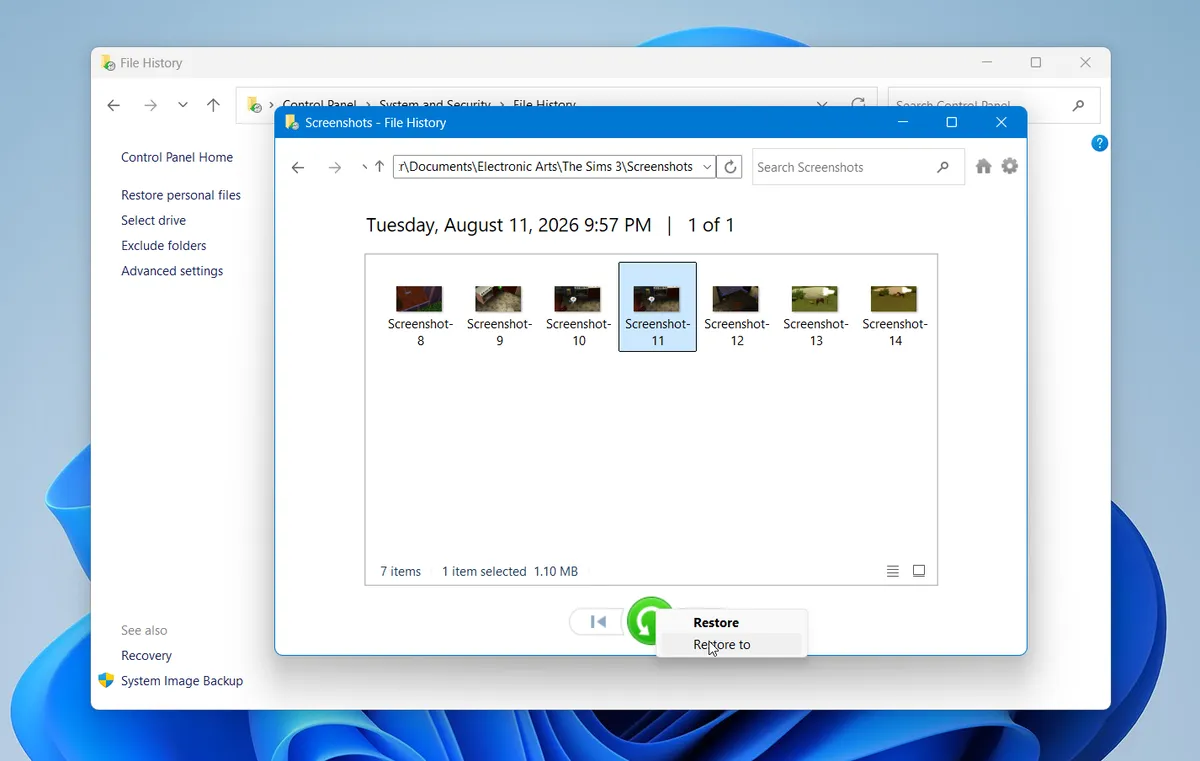
You'll only find your screenshots here if File History captured them before they were deleted. If they aren't in any of the available backups, try another method.
How to Recover Deleted Screenshots on a Mac
Let's move on to macOS. The recovery options look a bit different than on Windows, but you've still got several solid ways to get your screenshots back. These methods work on recent macOS versions, whether your screenshots were saved to the Desktop or somewhere else on your Mac.
Method 1: Restore Deleted Screenshots From Trash
Just like the Recycle Bin on Windows, Trash on Mac temporarily holds most files you delete normally. If it's not emptied and your screenshot is still there, you can return it to its original location in just a few clicks.
- Click the Trash icon on the right side of the Dock.
- Look for the screenshot you want to restore. Mac screenshots usually have names that start with Screenshot, followed by the date and time, which can make them easier to spot.
- Right-click the screenshot and select Put Back.
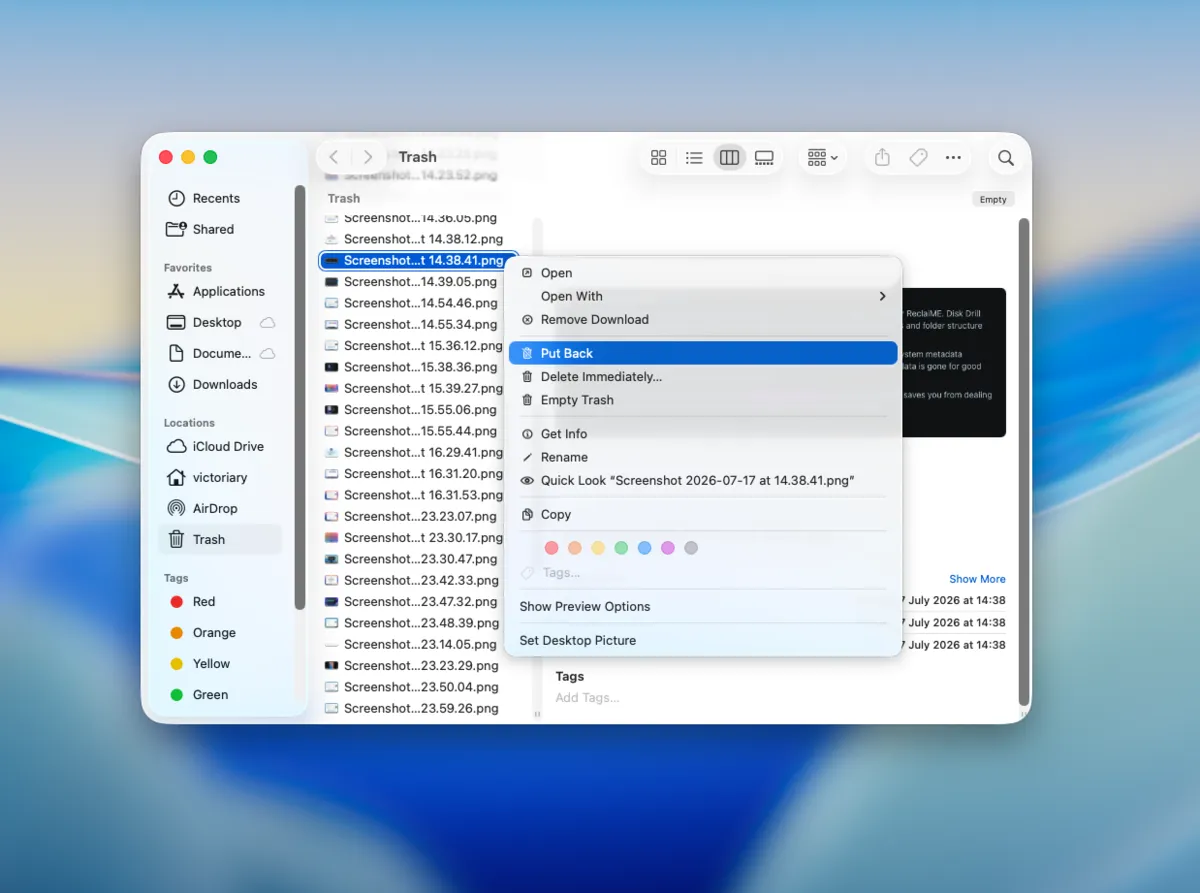
- macOS will restore the file to the location it was deleted from, such as the Desktop.
You can also select multiple screenshots, right-click them, and choose Put Back to restore them together.
Method 2: Recover Permanently Deleted Screenshots With Data Recovery Software
If your screenshots are no longer in Trash, you can use Disk Drill to scan your Mac for deleted files. Since we already covered the main details about the software in the Windows section, here's how the process looks on macOS:
- Download and install Disk Drill on your Mac. If possible, install it on a different drive from the one where the screenshots were stored.
- Open Disk Drill and grant the required permissions. macOS may ask you to provide Full Disk Access before the app can scan your storage.
- Select the drive that contained the screenshots. For screenshots stored on your Mac's internal drive, select Macintosh HD, then click Search for lost data.
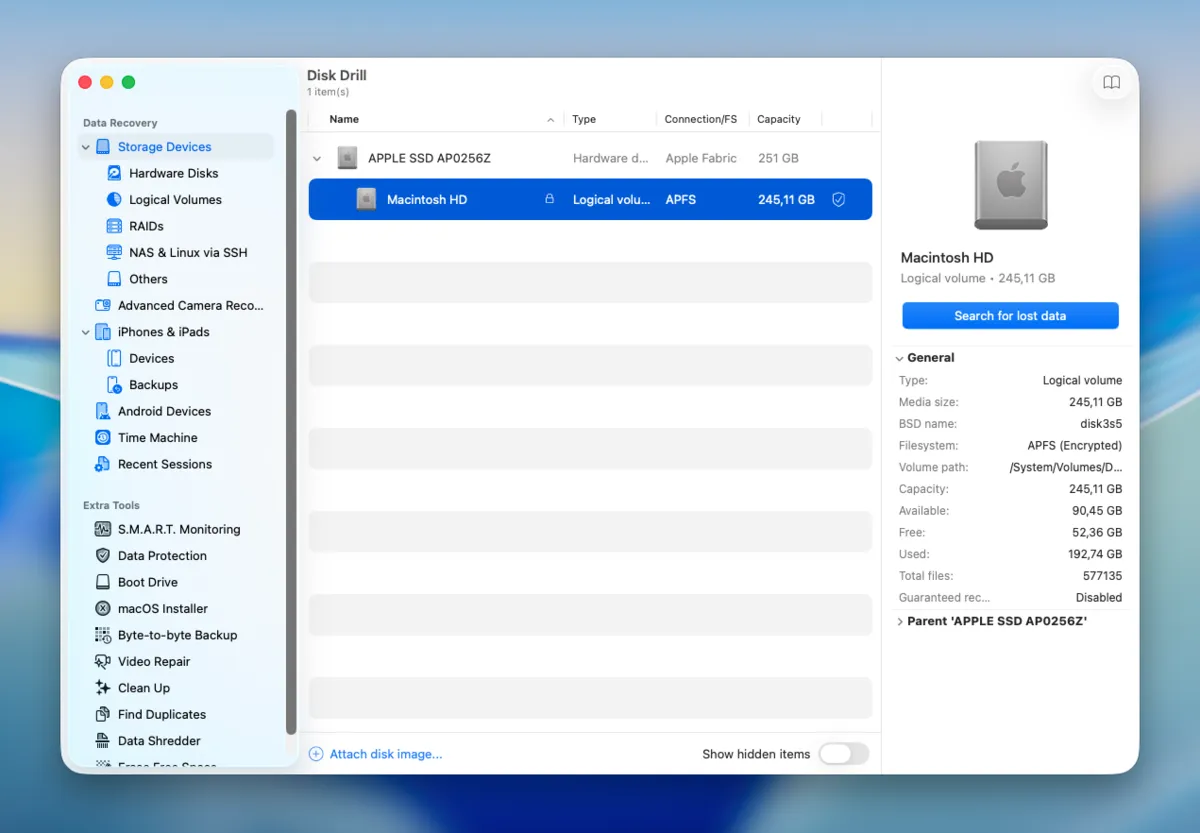
- Let the scan finish, or click Review found items if you want to check the results while the scan continues.
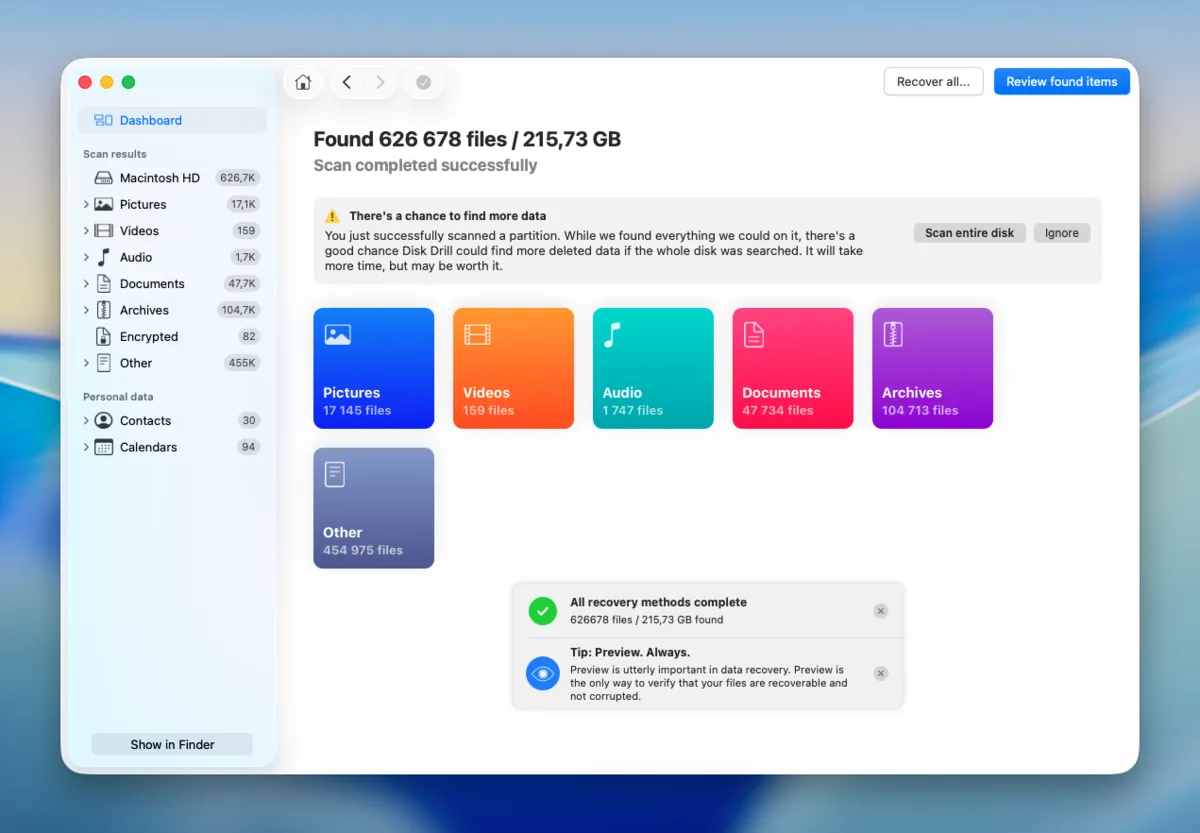
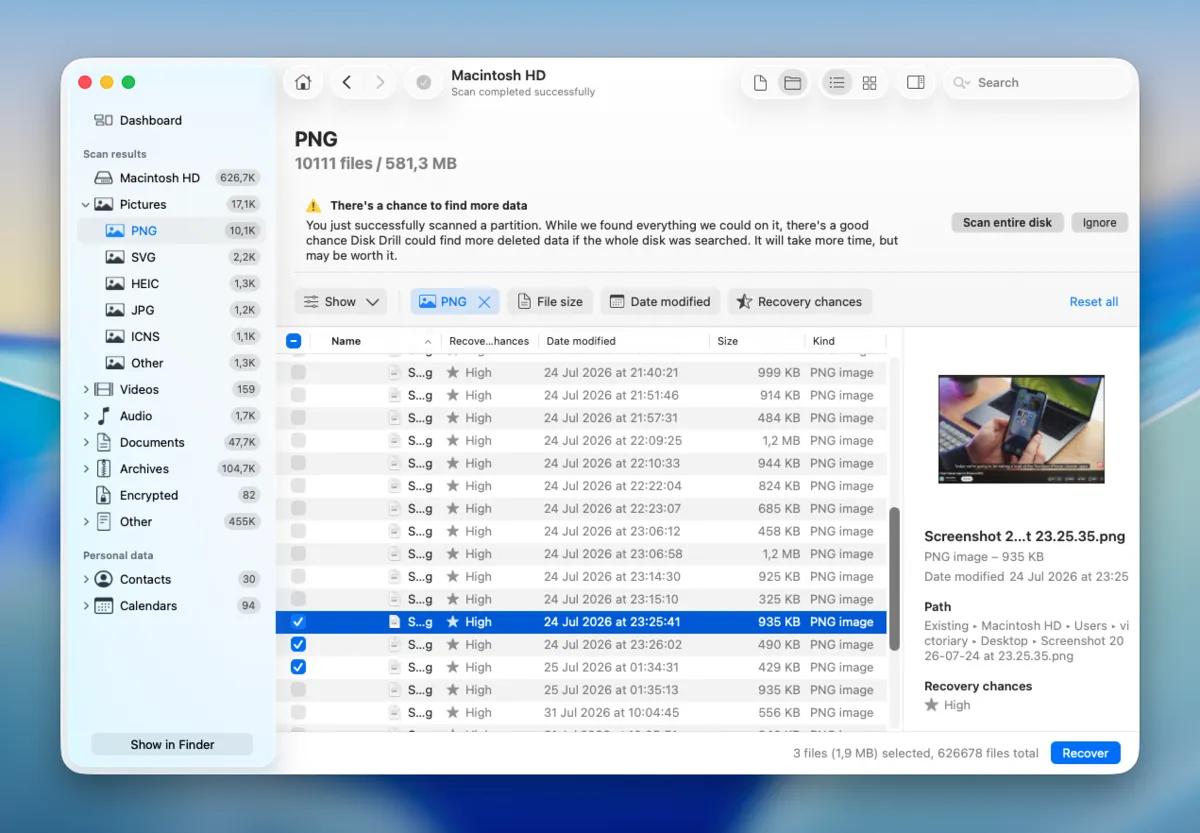
- Open Pictures to narrow the results to image files. Use the search box and filters to look for PNG, JPG, or other relevant formats.
- Preview the results and select the screenshots you want to restore. Click Recover.
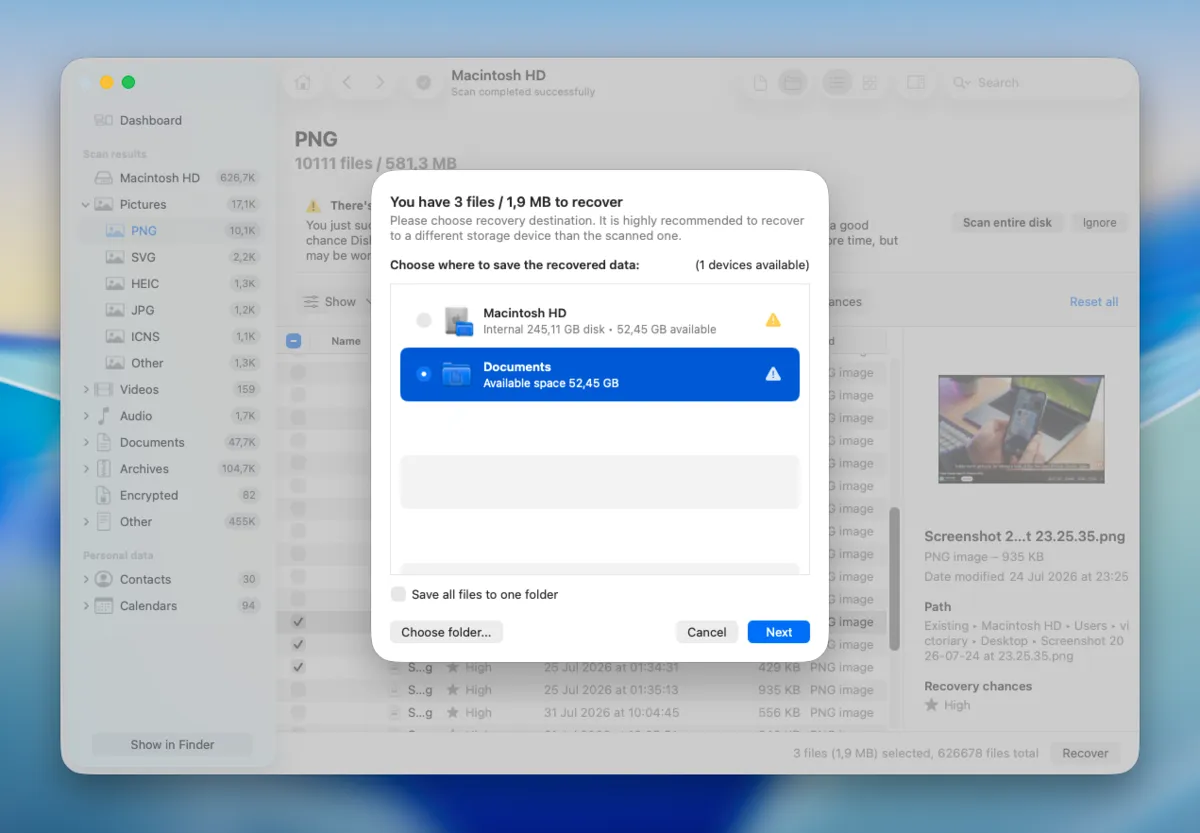
- Choose a folder on a different drive as the recovery destination. Confirm the recovery, then open the destination folder and check the restored screenshots.
If you don't find the screenshots right away, return to the scan results and check other image files with the search, filters, and preview options. Unlike the Windows version, Disk Drill for Mac only allows you to scan for deleted files and preview recoverable items for free. You'll need to upgrade to the paid version to actually recover them.
Method 3: Restore Deleted Screenshots With Time Machine
Your Time Machine backups may contain copies of screenshots that are no longer on your Mac. It keeps previous copies of files and folders included in your backups, so you can return to an earlier version of the Desktop or another screenshot folder and restore only the files you need.
To restore your screenshots with Time Machine:
- Connect the drive you use for Time Machine backups to your Mac, if it isn't already connected.
- Open Finder and navigate to the folder where the screenshots were stored. If you used the default screenshot location, open the Desktop.
- Open Time Machine from the menu bar or search for it with Spotlight.
- Use the timeline and arrows to browse backups from before the screenshots were deleted.
- Find and select the screenshots you want to recover.
- Click Restore. Time Machine will copy the selected screenshots back to their original location.
Don't be surprised if a recently created screenshot doesn't appear in Time Machine. A backup needs to have taken place while the file was still present on your Mac.
Why Can't You Find the Deleted Screenshots?
If you've tried the recovery options but still can't find the screenshots you need, there are several possible reasons. In some cases, the screenshot may not have been deleted at all. In others, the file may no longer be available for recovery.
Here are some of the most common explanations:
- The screenshot was saved somewhere else. Windows and macOS let you change where screenshots are stored, so the file may be in another folder rather than deleted.
- The screenshot was only copied to the clipboard. Some screenshot shortcuts copy the image without creating a file. If you never saved or pasted it, there may be no file on the drive to recover.
- The deleted file was overwritten. Once new data takes the storage space previously occupied by a deleted screenshot, recovery software can no longer reconstruct the original file.
- SSD TRIM removed the deleted data. Windows PCs and Macs with SSDs commonly use TRIM, which can make permanently deleted files unavailable to recovery software.
- No backup contains the screenshot. File History and Time Machine can only restore files captured in an earlier backup. A screenshot created and deleted between backups may never appear there.
- Cloud sync affected the file. If your screenshot folder syncs with OneDrive, iCloud Drive, or another cloud service, deletion may also sync across your devices. However, the service's deleted-files area may still contain a copy for a limited time.
If you're not certain the screenshot was actually deleted, search your entire computer and check your current screenshot save location. It's worth ruling out a misplaced file before you conclude that it can't be recovered.
Closing Notes
Deleted screenshots are often recoverable, but it helps to act as soon as you notice they're missing. The Recycle Bin or Trash may be all you need for a recent deletion, while File History and Time Machine give you another option if you already have backups. For permanently deleted screenshots, a tool like Disk Drill can scan the drive and help you find files that are no longer accessible through Windows or macOS.
Of course, recovery is much easier when you have a backup ready. Consider setting up File History on Windows or Time Machine on Mac, and keep important screenshots in a folder that regularly backs up to another drive or cloud storage. It's also worth checking your screenshot save location from time to time so you always know where new files end up.
And while we concentrated on screenshots here, the same techniques can also help with other types of data. If you ever need to know how to recover deleted files on a Mac or Windows PC, many of these options also work for lost photos, videos, documents, and other files.

Morgan
Indie DeveloperIndie developer, founder of ScreenSnap Pro. A decade of shipping consumer Mac apps and developer tools. Read full bio
@m_0_r_g_a_n_