Screen Recording
Record a whole display or a selected area on Mac or Windows, use the recording controls, and find your saved recording afterwards.
How screen recording works
ScreenSnap Pro records a whole display or an area you select, either as a video or as a GIF. You can open a video recording in the built-in video editor to trim it, add zoom-ins, a background and your webcam, then export an MP4 or GIF. Screen recording needs an active ScreenSnap Pro license. Without one, the app opens the license prompt instead of starting a recording.
Start a recording from the capture controls
The capture controls are a small floating bar with three modes: "Screenshot", "Screen Recording" and "Web Capture". In Screen Recording mode you choose the format, what to record, and which camera and audio sources to include.
- 1Click the ScreenSnap Pro icon in the menu bar (Mac) or right-click it in the system tray (Windows) and choose "Record Screen". The capture controls open in Screen Recording mode. You can also choose "Open Capture Controls…" and switch to Screen Recording.
- 2Open the format menu (it shows "Video" or "GIF") and choose the format you want.
- 3Optionally pick a camera, a microphone and "System audio". See Audio and Webcam Setup for details.
- 4Click "Display" to record a whole screen, or click "Area" and drag to select the part of the screen you want.
- 5If you have more than one display and clicked "Display", click the display you want to record ("Click to record this display"). Press
Escto cancel. - 6If "Countdown" is on (the default), a 3 second countdown runs, then recording starts.
Changed your mind? Press Esc or click the close button to close the capture controls without recording.
Start with a keyboard shortcut
Recording shortcuts are not assigned by default, unless you set one during the first-run setup. Open Settings > Shortcuts, click the field next to an action and press the key combination you want. Include a modifier such as Cmd (Mac) or Ctrl (Windows) and pick keys that other apps do not already use. Each shortcut also has an on/off switch.
- 1"Record Screen": starts recording the display under your pointer right away, without a picker. Press it again to stop and save.
- 2"Record Area": lets you drag to select an area, then starts recording.
- 3"Record Display": records a whole display. When several displays are connected, you choose one first.
Shortcuts use the format, camera and audio choices you last made in the capture controls. Set them up once, then record straight from the keyboard.
Countdown and recording options
Click the gear button ("Recording settings") on the right side of the capture controls for two options.
- 1"Countdown": "Count down 3 seconds before recording starts". It is on by default. During the countdown, click the countdown or press
Escto skip it and start right away. If a "Preparing…" step appears first, clicking it or pressingEscthere cancels the recording. - 2"Hide desktop icons": temporarily hides Finder desktop icons while recording. This works on Mac only. Finder restarts briefly to hide the icons, and again to bring them back when you stop.
While you record an area, everything outside it is dimmed so you can see exactly what is captured. The dimming is not part of your video. If you use several displays and want the others left untouched, turn on "Dim Recording Display Only" in Settings > Screen Recording.
Recording controls
While you record, a small control bar stays on screen. It is kept out of your video.
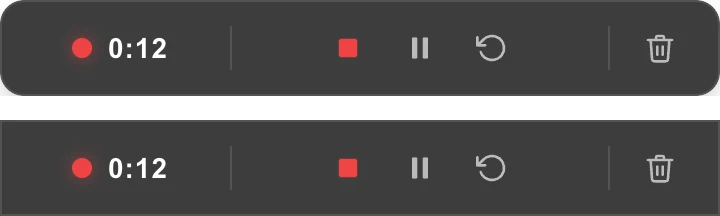
- 1Timer with a red dot: shows how long you have been recording. Click it to stop and save.
- 2Red square ("Stop and save"): stops and saves the recording.
- 3"Pause": pauses the recording. Click it again to resume.
- 4"Restart": throws away what you recorded so far and starts over.
- 5"Delete": stops and discards the recording.
GIF recordings show a 1:00 limit next to the timer and stop and save automatically when they reach it.
After you stop
A video recording is saved as a recording project in your save folder (Settings > General > "Save Folder"), named with your "File Name Pattern". To open that folder later, choose "Open Screenshots Folder" from the menu bar icon (Mac) or the tray icon's right-click menu (Windows). Right after you stop, a Quick Preview thumbnail appears in the corner of your screen with these actions:
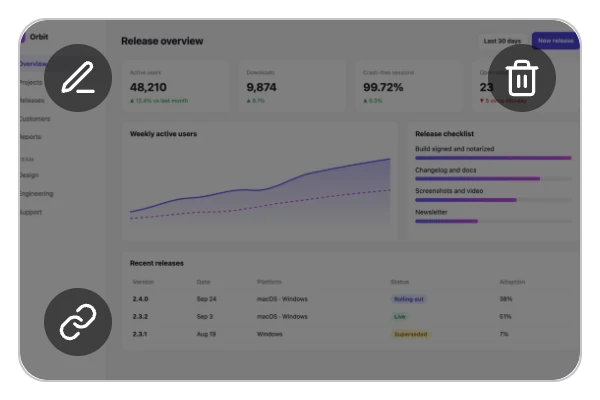
- 1"Open Video Editor": opens the recording in the video editor. Clicking the thumbnail does the same.
- 2"Create Link": makes an MP4, uploads it to ScreenSnap Cloud and copies a share link you can paste anywhere.
- 3"Delete Recording": moves the whole recording to the Trash (Recycle Bin on Windows).
If you let the preview close without choosing an action, ScreenSnap Pro saves a plain MP4 with the same name next to the recording project. It contains the screen, your webcam if you recorded one, and the audio, without any editor styling, so you can share it right away.
Recording projects
A recording project is a .ssproj package that keeps the screen video, webcam, microphone and pointer movement as separate tracks, together with your edits. That is why you can restyle a recording at any time. On Mac, a .ssproj looks like a single file: double-click it in Finder to open it in ScreenSnap Pro. On Windows it is a folder. On both platforms you can open it with "Open project…" in the video editor (on Windows, select the .ssproj folder itself).
Settings > Screen Recording has a "Keep Recordings" option (default "Forever"): "Recording projects in the app's library that you haven't opened or edited for this long are moved to the Trash (recoverable). Projects saved to your own folders are never touched." New recordings are saved to your save folder, so this option does not remove them.
Troubleshooting
If a recording does not start or does not look right, check these first.
- 1Nothing happens when you press a recording shortcut: recording shortcuts start unassigned. Set them in Settings > Shortcuts and make sure their switch is on.
- 2Recording is locked: "Screen Recording and Web Capture require premium access." Activate your license key in Settings > General.
- 3Mac asks for Screen Recording permission or the recording does not start: in ScreenSnap Pro, open Settings > Permissions and click "Allow Screen Recording", or turn on ScreenSnap Pro in System Settings > Privacy & Security > Screen & System Audio Recording. Then quit and reopen ScreenSnap Pro.
- 4Windows captures come out black: this is usually caused by HDR displays, dual-GPU laptops, remote sessions or graphics driver issues. When ScreenSnap Pro detects a black capture it offers "Relaunch in Compatibility Mode". If captures are still black, turn off HDR (Settings > System > Display > Use HDR), update your graphics driver, and on a dual-GPU laptop set ScreenSnap Pro to "Power saving" in Settings > System > Display > Graphics.
- 5The app or your computer quit during a recording: on the next launch, ScreenSnap Pro recovers the footage and shows a "Recording Recovered" notification. The project is saved in your save folder with "Recovered" at the start of its name.