Permissions on macOS and Windows
Which permissions ScreenSnap Pro needs on macOS (Screen Recording, Accessibility, Microphone, Camera), how to fix a denied one, and Windows capture fixes.
What ScreenSnap Pro asks for on a Mac
macOS protects your screen, microphone and camera behind privacy permissions. ScreenSnap Pro uses four: Screen Recording (required to capture your screen, and also covers system audio in recordings), Accessibility (the app uses it for global keyboard shortcuts such as Cmd + Shift + 1), Microphone (optional, to record your voice) and Camera (optional, to show your webcam in recordings). The setup shows all four once. After that, the app only requests a permission when you start something that needs it.
macOS may occasionally ask you to confirm that ScreenSnap Pro can keep accessing your screen. Allow it to keep capturing.
Check your permissions in Settings
The Permissions tab shows the state of all four permissions and lets you request any that are missing.
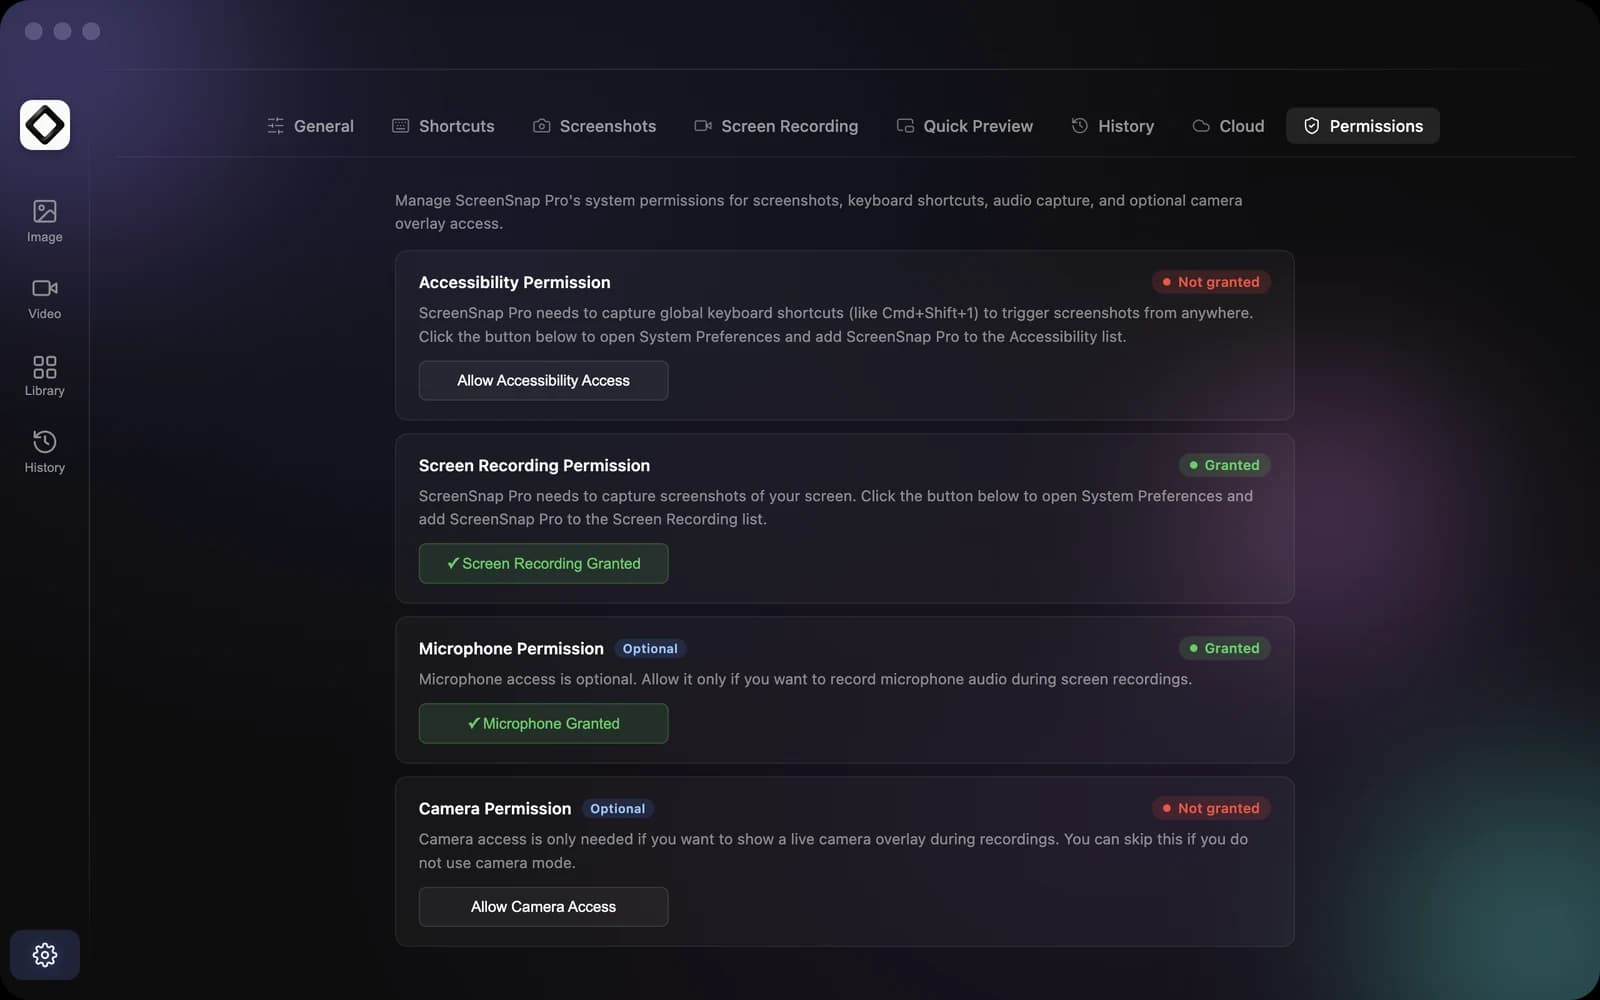
- 1Open the editor and click the gear icon, or choose
Settings...from the menu bar icon. - 2Open the
Permissionstab. Each row showsGrantedorNot granted. - 3Click the button of a missing permission, for example
Allow Screen RecordingorAllow Microphone Access. - 4Allow access in the macOS prompt, or switch ScreenSnap Pro on in the System Settings window that opens.
- 5Come back to ScreenSnap Pro. The status refreshes when its window is active again.
The Permissions tab only exists on macOS. Windows does not use these permissions.
Screenshots fail: fix Screen Recording
If macOS has denied Screen Recording, a capture shows Screen Recording Permission Required instead of taking the screenshot.
- 1Click
Open System Preferencesin that dialog, or open System Settings > Privacy & Security > Screen & System Audio Recording yourself. - 2Switch on ScreenSnap Pro. If it is not in the list, click the plus button and add it from the Applications folder.
- 3Click the ScreenSnap Pro icon in the menu bar, choose
Quit ScreenSnap Pro, then open the app again. macOS applies this permission after a restart.
Still failing although ScreenSnap Pro is switched on? Select it in the list, remove it with the minus button, add it again from Applications and restart the app.
Shortcuts do nothing
First make sure the shortcut is actually assigned. Out of the box only Capture Area (Cmd + Shift + 1 on Mac, Ctrl + Shift + 1 on Windows) and Capture Area (Editor) (Cmd + Shift + 2 or Ctrl + Shift + 2) have one. Every other action, such as Capture Screen, Capture Window, Recognize Text or Record Screen, needs a shortcut you set in Settings > Shortcuts, or you can start it from the menu bar or tray menu. On a Mac, also check the Accessibility Permission row in Settings > Permissions. Grant it with Allow Accessibility Access or in System Settings > Privacy & Security > Accessibility, then try again, restarting the app if needed. If another app already uses the same combination, ScreenSnap Pro shows Shortcut Unavailable when it cannot register it, and you can pick a different combination in Settings > Shortcuts.
No voice or webcam in recordings
Microphone and camera access are requested the first time you use them, or with Allow Microphone Access and Allow Camera Access in Settings > Permissions. If you clicked Don't Allow earlier, macOS will not show the prompt again. Switch ScreenSnap Pro on in System Settings > Privacy & Security > Microphone (or Camera) and try again. If it still is not picked up, quit and reopen ScreenSnap Pro. System audio does not need the microphone permission; it is covered by Screen Recording.
Windows: no permission prompts
Windows does not ask for screen capture permission, so ScreenSnap Pro can capture right after installation and has no Permissions tab. If your microphone or webcam is missing from a recording, open Windows Settings > Privacy & security > Microphone (or Camera) and make sure desktop apps are allowed to use it. On Windows 10 the same switches are under Settings > Privacy.
Windows: captures come out black
HDR displays, laptops with two graphics chips, remote sessions and graphics driver problems can make captures completely black. ScreenSnap Pro detects this and shows a Screen Capture Problem dialog.
- 1Click
Relaunch in Compatibility Mode. ScreenSnap Pro restarts with a slower but more compatible capture method. - 2If captures are still black, ScreenSnap Pro tells you that the cause is on this computer. Turn off HDR in Settings > System > Display > Use HDR.
- 3Update your graphics driver.
- 4On a laptop with two graphics chips, set ScreenSnap Pro to Power saving in Settings > System > Display > Graphics.
- 5Remote Desktop and some security or banking software can also block capture. If the Windows Snipping Tool captures black too, the problem is system-wide.
Windows: Print Screen or Recognize Text unavailable
You can use Print Screen as a ScreenSnap Pro shortcut, but Windows may already claim it. If you see Print Screen is already in use, search Windows Settings for "Use the Print Screen button to open screen capture" and turn it off, or close Snipping Tool and other screenshot apps. If Recognize Text is missing from the tray menu, Windows usually has no OCR language pack installed: add a language under Settings > Time & Language > Language & region, then restart ScreenSnap Pro. On some company-managed PCs, text recognition is blocked by policy and stays unavailable.