How to Find Screenshots on Mac Using Finder and Spotlight (2026)
Can't find a screenshot you just took on your Mac? Start with the Desktop. If it isn't there, Finder and Spotlight can search your entire Mac in seconds.
The quickest Finder trick is to press Command + F, choose This Mac, and search for kMDItemIsScreenCapture:1. For a faster search, press Command + Space and type Screenshot into Spotlight.
Those methods work for most screenshots. But renamed files, third-party screenshot apps, missing metadata, and Spotlight indexing problems can make things less straightforward.
Here's how to find them.
Where Mac Screenshots Go Before You Start Searching
By default, on macOS Mojave and later, screenshots taken with Shift + Command + 3, Shift + Command + 4 and the Screenshot toolbar land on the Desktop as PNG files named Screenshot [date] at [time].png.
Before searching your entire Mac, check where new screenshots are currently going:
- Press Command + Shift + 5.
- Click Options.
- Look under Save to.
- Open the selected folder in Finder.
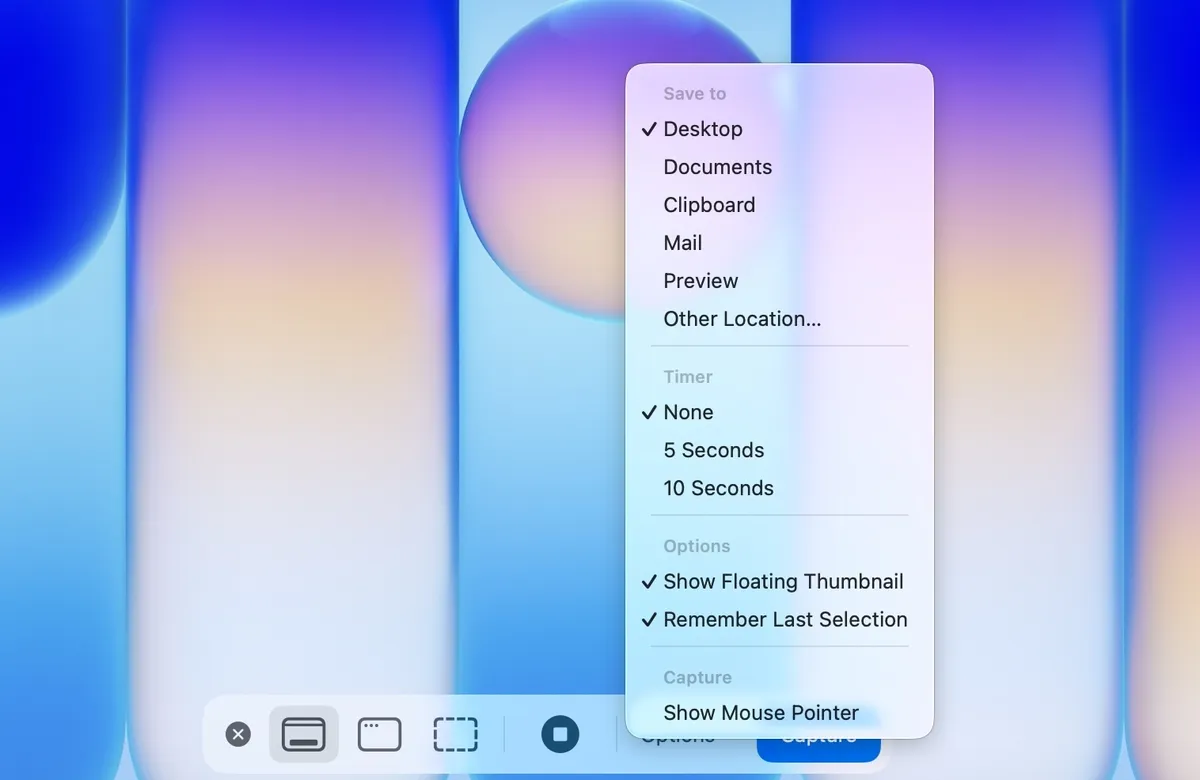
Your Mac remembers the last location you chose, so screenshots may be going to Documents or a custom folder without you realizing it. If you want to move future captures somewhere easier to manage, see how to change the screenshot save location on Mac.
For most cases, though, here's how to find screenshots on Mac even when you have no idea where they were saved.
How to Find Screenshots on Mac: 5 Methods
Which method should you use?
| Situation | Best method |
|---|---|
| You just took the screenshot | Spotlight |
| You don't know where it was saved | Finder metadata search |
| You search for screenshots often | Smart Folder |
| The screenshot was renamed or edited | Finder filters |
| You want a list of every matching file | Terminal |
Start with Finder if you're not sure what happened to the file.
Method 1: Find Screenshots in Finder
Finder has a useful trick that goes beyond searching filenames.
Screenshots created by macOS are normally tagged with a metadata attribute called kMDItemIsScreenCapture. Finder can search for that tag directly.
Here's how to find screenshots in Finder:
- Click the desktop, or open Finder. Clicking first makes Finder the active app, so the shortcut opens a search window rather than Find in whatever you were using.
- Press Command + F.
- Click This Mac near the top of the window.
- Type kMDItemIsScreenCapture:1 into the search field.
- Press Return.
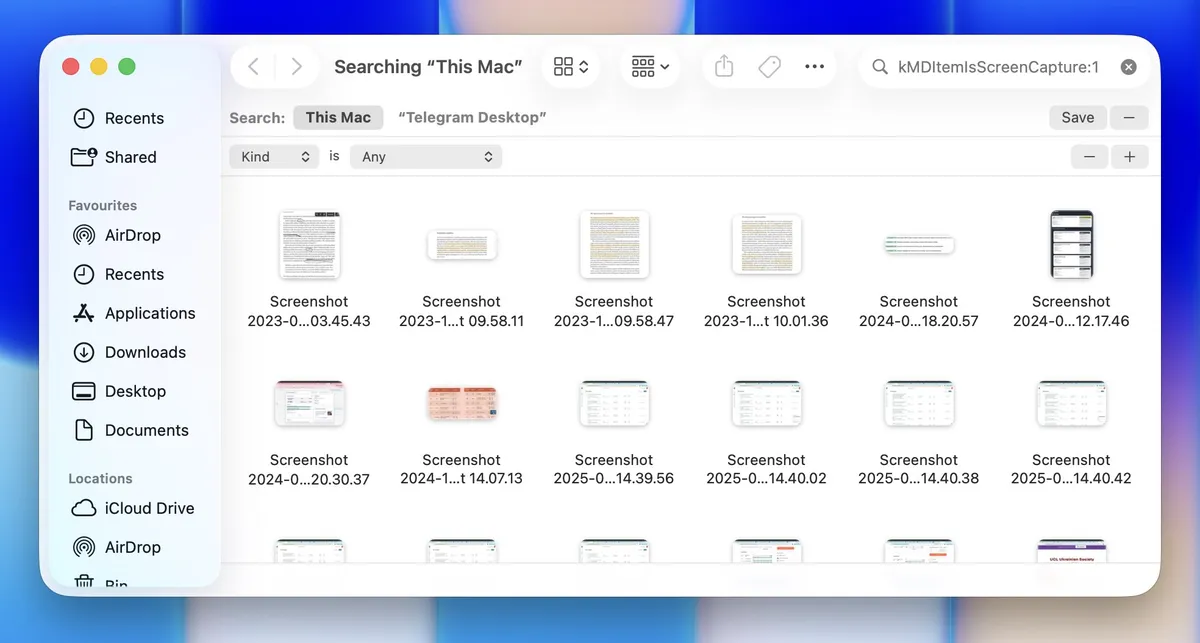
Finder should now show screenshots stored across your Mac, not just those sitting on the Desktop.
Switch to List view if you have lots of results. You can then sort by Date Created, Date Modified, or location to find the right file faster.
Select any screenshot and press the Space bar for Quick Look. There's no need to open each image individually.
Why this works
macOS adds screenshot-specific metadata to captures made with its built-in tools. That means Finder can recognize a screenshot even if you rename Screenshot 2026-09-14 at 10.42.18 PM.png to checkout-error.png. The filename changed, but the screenshot metadata can still be there.
There is a catch, though.
That metadata isn't guaranteed to survive forever. It may disappear if the image is exported as a new file, recreated from the Clipboard, or transferred through a service or file system that doesn't preserve Mac extended attributes.
Screenshots created with third-party apps may not have Apple's screenshot tag in the first place.
We'll deal with those files in Method 4.
Method 2: Save Your Search as a Smart Folder
If you take screenshots every day, you don't need to run the same Finder search again and again.
Turn it into a Smart Folder instead.
After searching for kMDItemIsScreenCapture:1:
- Click Save in the Finder window.
- Name the search All Screenshots.
- Enable Add to Sidebar.
- Click Save.
You'll now have an All Screenshots shortcut in Finder.
The useful part is that a Smart Folder isn't a normal folder. It doesn't move or duplicate anything. Finder simply keeps showing files that match your search.
New screenshots appear automatically once Spotlight indexes them.
One thing to watch: make sure This Mac is selected before saving the search. Otherwise, your Smart Folder may only search the folder you happened to be viewing at the time.
Method 3: Find Screenshots With Spotlight
Finder is better for browsing lots of files. Spotlight is faster when you only need one.
- Press Command + Space. On macOS Tahoe and later, Command + 2 jumps straight to the Files view, stripping out apps and web suggestions.
- Type your query. Plain screenshot matches the default filename, kMDItemIsScreenCapture:1 matches the metadata, and screenshot 2026-09 matches a month's worth.
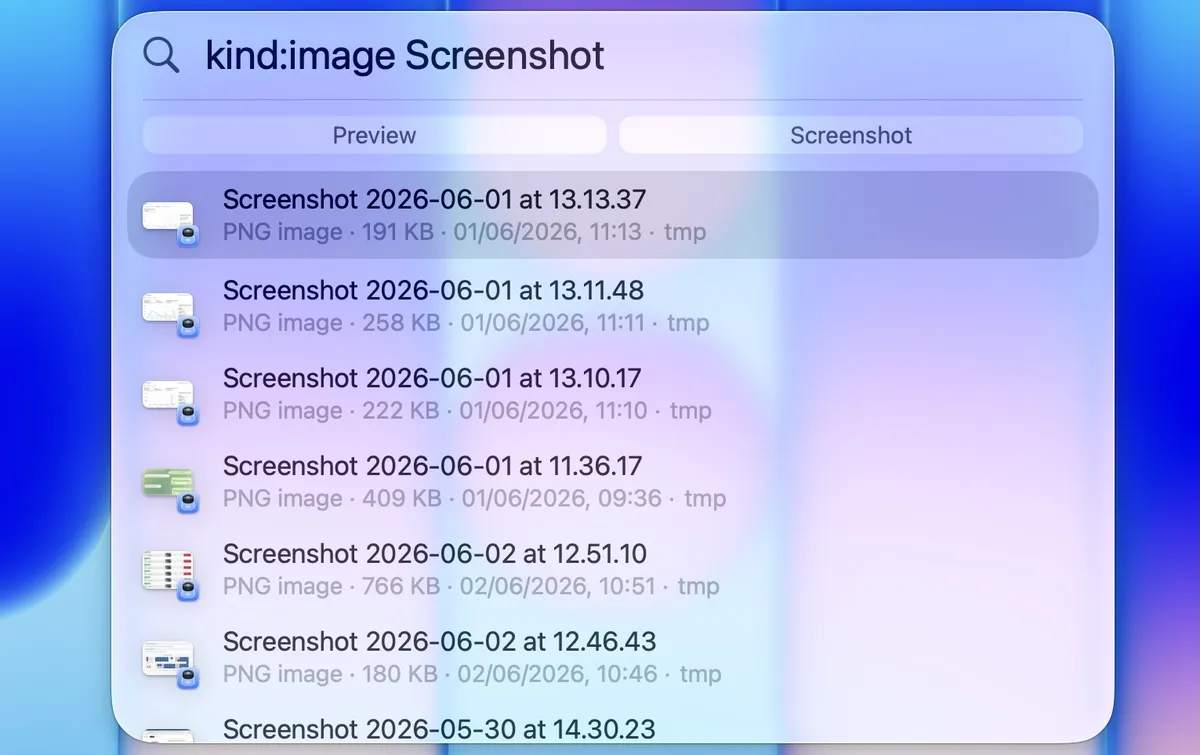
- Press Space to preview it with Quick Look. Hold Command to see where the file is stored.
- Press Command + R to reveal it in Finder. Command + Return does the same reveal.
This makes Spotlight one of the quickest ways to access screenshots on Mac when you know roughly what you're looking for.
Search for text inside the screenshot
Spotlight can also find text recognized inside images on supported Macs.
Say you took a screenshot of a settings page but can't remember the filename. You do remember that it contained the words Battery Health.
Try searching for those words in Spotlight.
This doesn't work perfectly with every image, but it can be surprisingly useful when the screenshot itself gives you a better clue than its filename.
Method 4: Find Screenshots That Finder's Metadata Search Misses
kMDItemIsScreenCapture:1 is useful, but it won't necessarily find every image that you consider a screenshot.
You may have:
- edited and exported the screenshot;
- copied it through another app;
- downloaded it from email;
- synced or transferred it in a way that removed Mac metadata;
- taken it with a third-party screenshot app.
In those cases, search for the file as an image instead.
- Open Finder, press Command + F, and choose This Mac.
- Click the
+button and add Kind is Image. That removes documents, archives and anything matching on filename alone. - Narrow the results by Created Date or Modified Date. If you know you took the screenshot yesterday, searching yesterday's images is often much faster than trying different filenames.
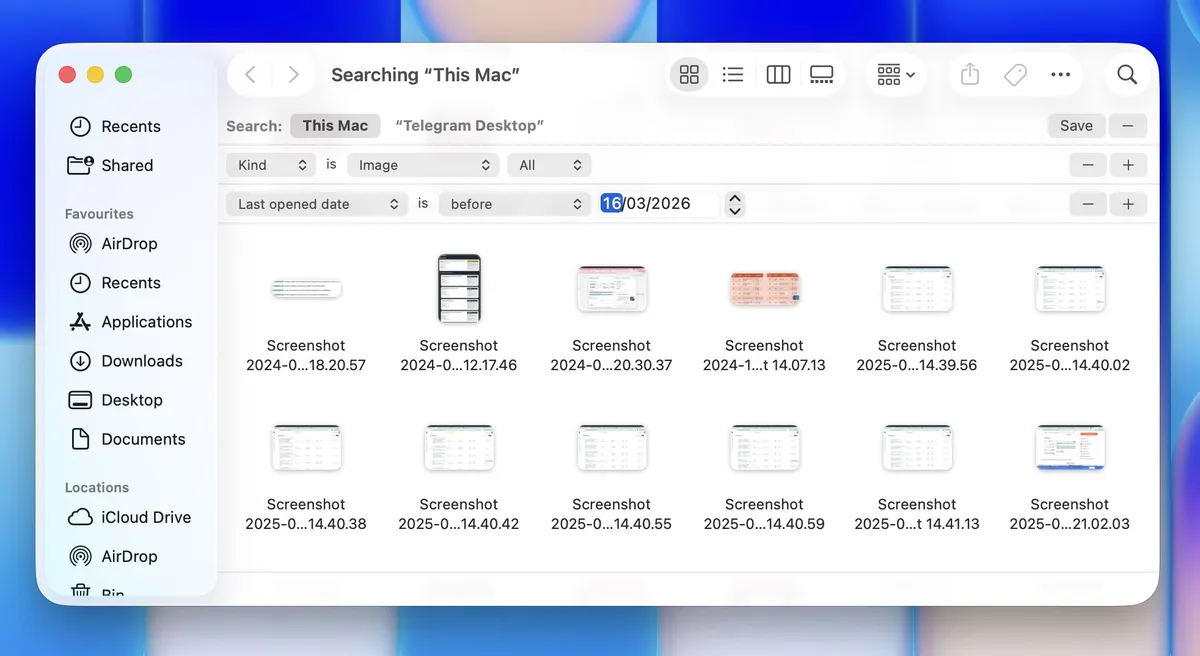
- Add a row for Pixel Width and set it to your display's resolution. A full-display screenshot will often have dimensions related to your Mac's display, although Retina scaling means the actual pixel dimensions may be larger than the resolution shown in display settings.
- Sort by size. Interface screenshots are mostly flat color, so they compress small. For example, a 900 KB PNG among 6 MB photos could be the one you want.
If the screenshot came from another app, check that app's settings too. Screenshot utilities, games, browsers, and other tools can use their own folders instead of the macOS default.
Method 5: Find Screenshots Using Terminal
You don't need Terminal for normal screenshot searches. But it can be useful if you want a simple list of matching files and their paths.
- Open Terminal. It's in Applications, Utilities, or press Command + Space and type its name.
- Run
mdfind kMDItemIsScreenCapture:1. You get a plain list of full paths, one per line, ready to paste into a message or a script. - Add
-countfor a number instead of a list.mdfind -count kMDItemIsScreenCapture:1tells you how many captures are on the machine. - Add
-onlyinto restrict the search.mdfind -onlyin ~/Documents kMDItemIsScreenCapture:1searches one folder tree, much faster on a full disk.
There is one important limitation: mdfind uses the same Spotlight index as Finder and Spotlight.
So if Spotlight indexing is the problem, Terminal won't bypass it.
Useful Screenshot Search Filters
You can narrow a large screenshot collection without scrolling through hundreds of images.
Here are some useful searches:
| Search | What it finds |
|---|---|
| kMDItemIsScreenCapture:1 | Files tagged as macOS screenshots |
| kMDItemScreenCaptureType:"display" | Full-screen captures |
| kMDItemScreenCaptureType:"window" | Window captures (Shift + Command + 4, then space) |
| kMDItemScreenCaptureType:"selection" | Selected-area captures |
| kind:image Screenshot | Images matching the word Screenshot |
| name:Screenshot | Files with Screenshot in the filename |
| kind:image created:9/14/26 | Images created on a specific date |
The kMDItemScreenCaptureType filter is especially handy when you remember how you took the screenshot.
For example, if you know it was a window capture rather than a selected area, searching for:
kMDItemScreenCaptureType:"window"
can cut down the results quickly.
These work in the Finder search field, in Spotlight and in mdfind, and they combine: separate terms with a space to require both.
How to Access a Screenshot Once You Find It
You don't always need to open the folder containing a screenshot.
From a Spotlight result: hold Command to see the path, press space bar for Quick Look, Return to open it, Command + R to show it in Finder. You can also drag a result straight out of Spotlight into Mail, Messages, Slack, a browser upload window, or another folder. From a Finder result, Command + R reveals and Command + I gives you the path as text.
If you're trying to work out how to access screenshots on Mac quickly, Quick Look is usually the fastest option. Pressing Space lets you check several images without opening and closing Preview every time.
What If Finder and Spotlight Find Nothing?
An empty result doesn't necessarily mean the screenshot has been deleted.
Finder, Spotlight, and mdfind all depend on the Spotlight index. If a location hasn't been indexed properly, the file can exist while search fails to show it.
Check Spotlight Search Privacy
Check the exclusion list first. Open System Settings, then Spotlight, and look at Search Privacy (on older releases, Siri & Spotlight, then Spotlight Privacy).
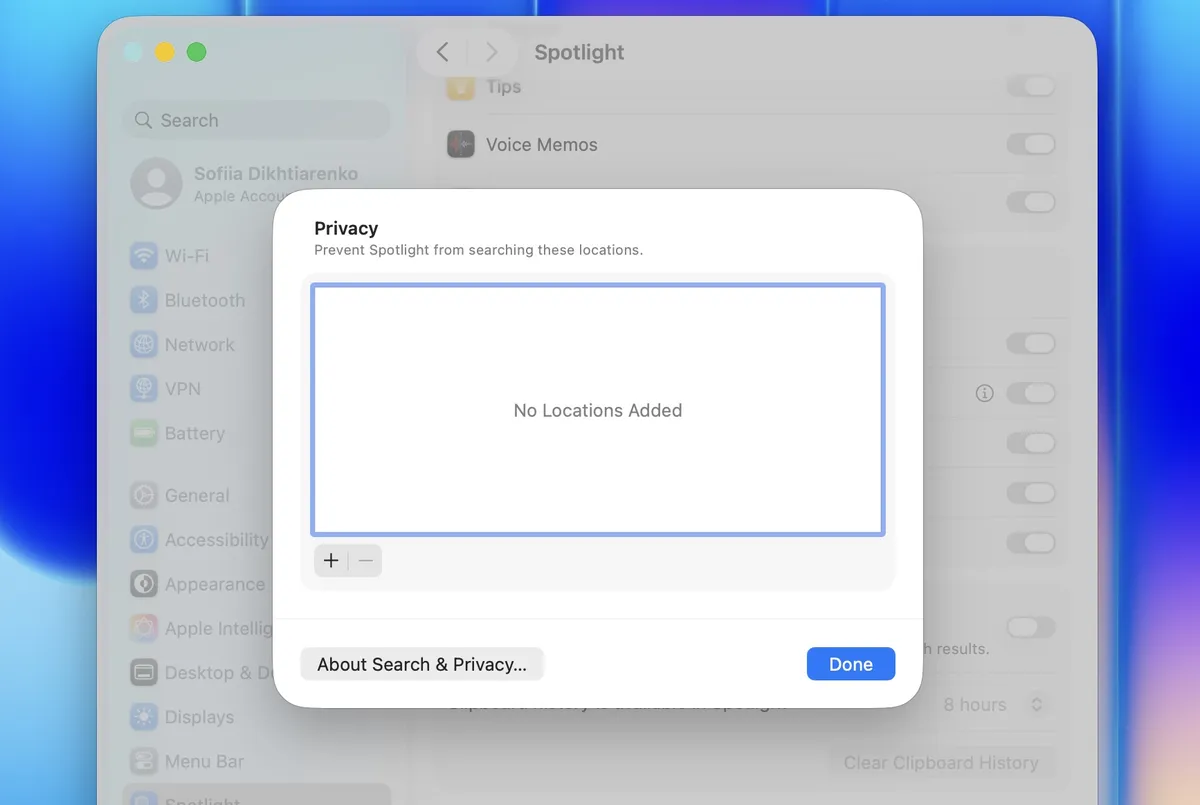
Anything listed there is invisible to Finder, Spotlight and mdfind alike. Drives sometimes land on that list during a migration without anyone putting them there.
Make sure the folder or drive containing your screenshots isn't listed there.
Spotlight may still be indexing
Spotlight rebuilds or updates its index after major system changes, including macOS upgrades.
Apple says indexing can take hours or even days depending on how much data is stored on the Mac. During that time, search results can be incomplete.
If Spotlight results remain wrong, you can ask macOS to reindex a folder or drive:
- Open System Settings, Spotlight, and Search Privacy.
- Add the affected folder or disk.
- Wait a few seconds.
- Remove it again.
Spotlight will start indexing that location again.
External and network drives can cause their own search problems too. If you're troubleshooting an unusual case, the Macgasm forum has discussions from Mac users dealing with Finder, storage, and recovery issues.
What If the Screenshot Was Actually Deleted?
If Finder and Spotlight return nothing, first make sure you're dealing with a deleted screenshot rather than one that's simply hard to find. If you know the file existed and was later removed, this guide explains how to recover deleted screenshots on Mac using the main recovery options available on macOS.
First, open Trash (or Bin). If the screenshot is there, right-click it and choose Put Back. macOS will return it to its original folder.
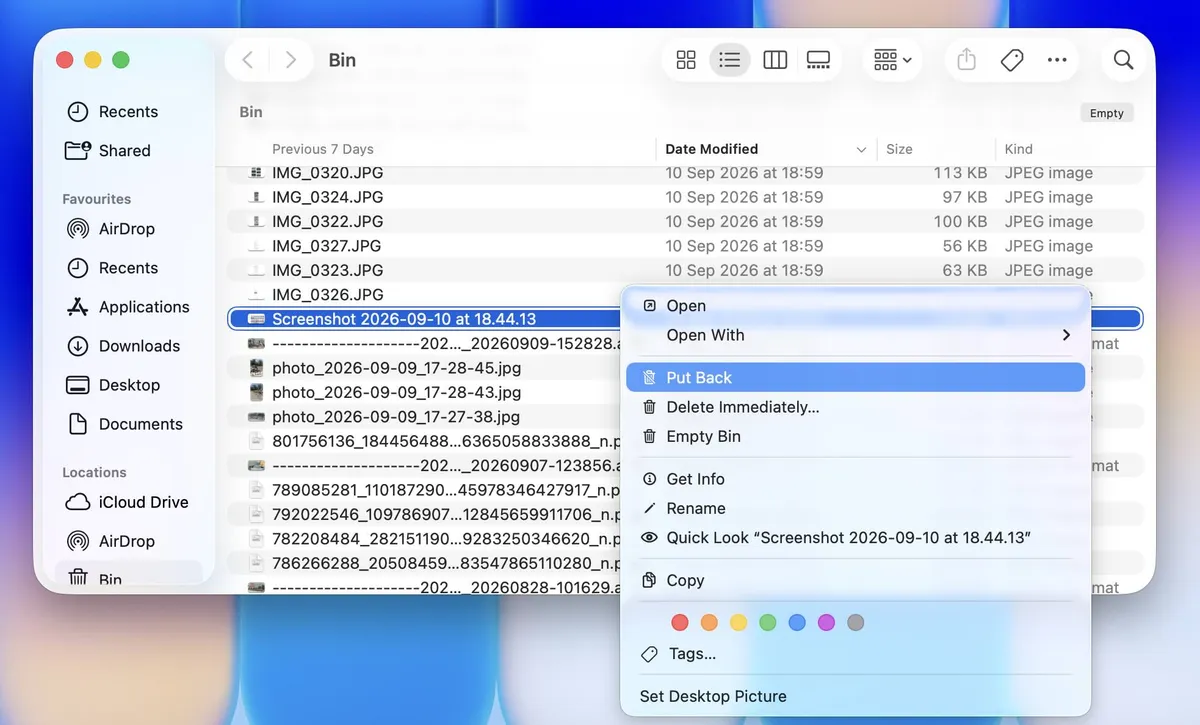
If it isn't in Trash, check Time Machine or any cloud backup you use.
If none of these methods work, the file may have been permanently deleted.
Recovery from a modern Mac isn't guaranteed. Internal Mac storage uses technologies such as APFS, SSD storage, encryption, and TRIM, which can make permanently deleted data difficult or impossible to restore. If the screenshot is important, avoid creating or downloading unnecessary files while you decide what to do next.
At this point, you can compare reputable data recovery software for Mac to see which tools support your Mac and storage device.
For another overview of commonly used recovery tools, this Reddit wiki page is worth checking before installing anything.
Frequently Asked Questions
Final Word
If you're trying to find a Mac screenshot, don't search folders manually.
Start with Spotlight for a recent file. Use kMDItemIsScreenCapture:1 in Finder when you need to search the whole Mac. If that misses the image, switch to image and date filters.
And if Finder, Spotlight, Trash, and your backups all come up empty, you're no longer dealing with a search problem. You're dealing with a deleted file.

Morgan
Indie DeveloperIndie developer, founder of ScreenSnap Pro. A decade of shipping consumer Mac apps and developer tools. Read full bio
@m_0_r_g_a_n_