Clipboard History Windows 11: How to Enable & Use (2026)
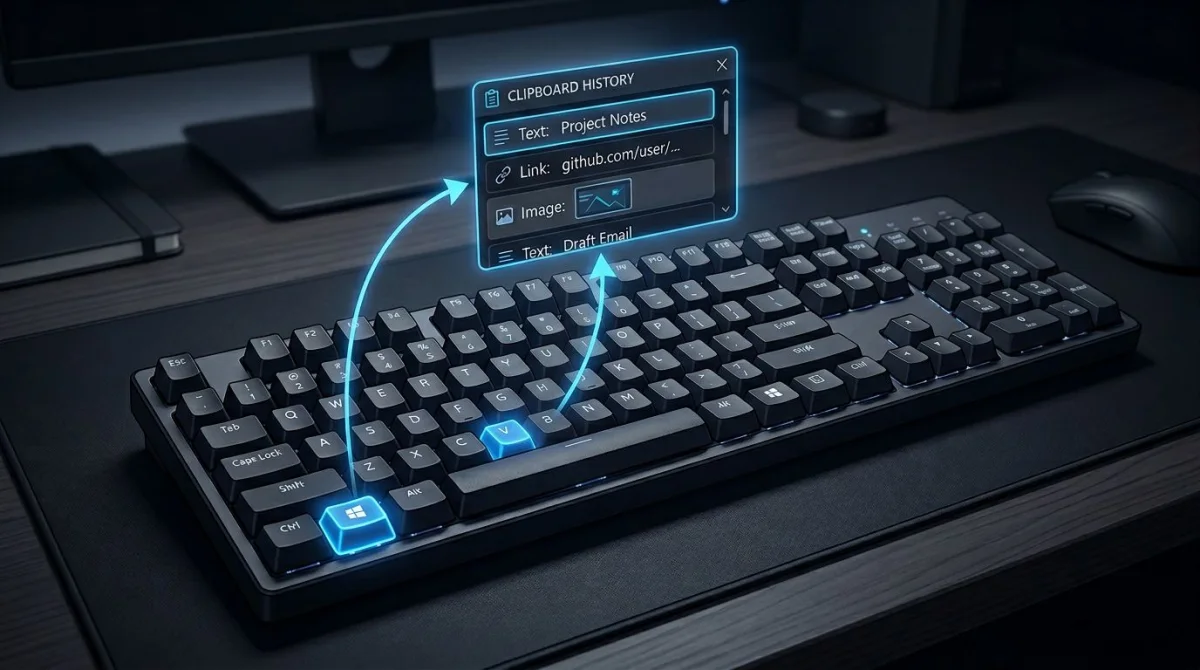
Clipboard history windows is a built-in Windows 11 feature that stores your last 25 copied items (text, links, and images), so you can paste any of them later with Win + V. Most users never turn it on, even though it's been there since Windows 10. Once you enable it, you'll wonder how you lived without it.
The fastest way to start: press Win + V right now. If this is your first time, Windows will prompt you to turn it on with one click. That's it: every copy from here on is saved.
What is Clipboard History on Windows 11?
Clipboard History is a small panel that remembers multiple items you've copied, instead of just the last one. When it's off, Ctrl + C overwrites the previous copy. When it's on, every copy stacks up in a list you can open with Win + V.
Here's what it holds:
- Text. Anything you copy from a browser, doc, or chat
- Links. URLs stay clickable when pasted
- Images. Screenshots from Snipping Tool, or bitmap copies from some apps
- Up to 25 items. Newest on top, oldest drop off
- 4 MB per item max. Small images and long text both fit fine
The panel clears when you restart your PC. Anything you pin sticks around.
Quick answer: how to enable Clipboard History
You have two ways to turn it on. Both take about five seconds.
Method 1: The `Win + V` shortcut (fastest)
- Press
Win + Vanywhere on your desktop. - A small panel pops up with a "Turn on" button.
- Click Turn on.
- Copy something, then press
Win + Vagain to see it saved.
Method 2: Through Settings
- Press
Win + Ito open Settings. - Go to System > Clipboard.
- Toggle Clipboard history to On.
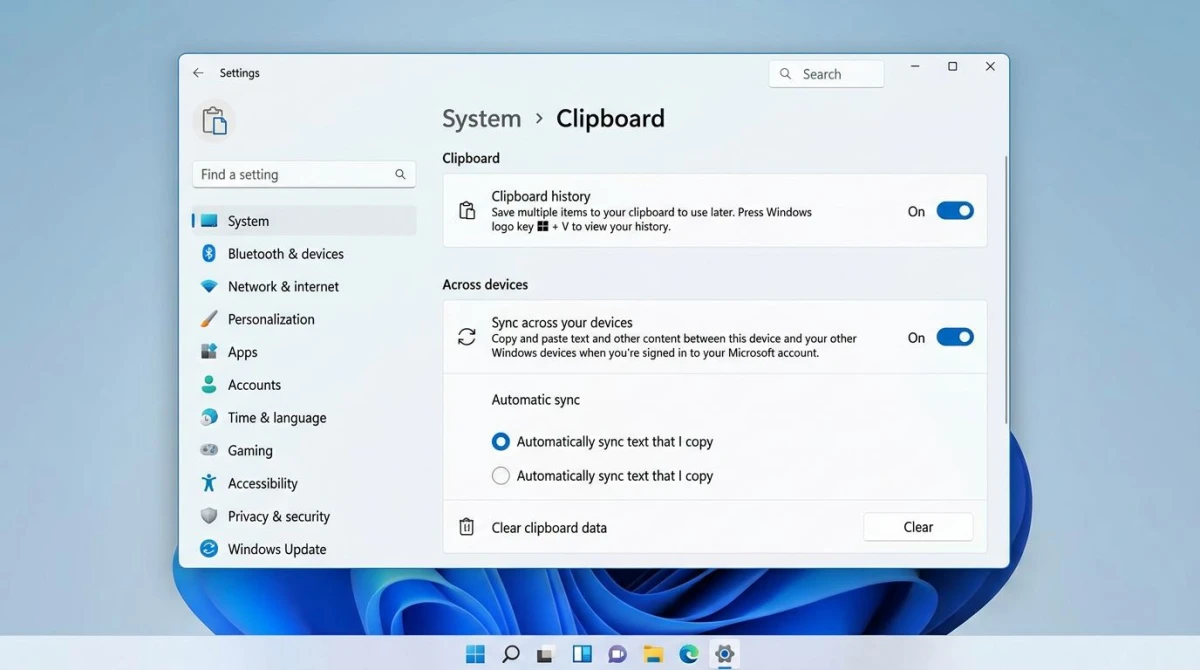
The Settings method is handy if you also want to turn on sync across devices, which we cover below. For day-to-day use, Win + V is all you need.
Using Clipboard History in any app
Once enabled, the win v shortcut works in every app: Word, Slack, Chrome, Teams, Figma, Notepad. The workflow is simple:
- Copy several things in a row with
Ctrl + C. - Click where you want to paste.
- Press
Win + V. - Click any item in the list. It pastes at your cursor.
Paste as plain text
One underused option: the three-dot menu on any item has a Paste as text choice. This strips fonts, colors, and tables, which is perfect when you're pulling content from a webpage into an email without the messy formatting.
Search within history
The top of the Win + V panel has a search box. Type a word or phrase and it filters the list. Great when you've got 20 items in there and need to find that Zoom link from earlier.
Pinning items: make them permanent
The 25-item cap and the restart reset are both real limits. Pinning gets around both.
To pin an item:
- Press
Win + V. - Hover over the item you want to keep.
- Click the pushpin icon in the top-right corner.
Pinned items stay at the top of the list. They survive restarts. They survive "Clear all" (with one exception, covered below). Use them for:
- Your email signature
- A mailing address you paste into forms
- A meeting room link you share daily
- Boilerplate apology text for support replies
- Your company's bank details
When you need to unpin, click the same icon again. The item rejoins the regular list and will age out like any other.
Screenshots and Clipboard History: the combo most people miss
This is the part almost every guide skips. Clipboard History is incredibly useful with Windows screenshot tools, but only for specific capture methods.
What works:
Win + Shift + S(Snipping Tool overlay): images land directly in Clipboard History as small thumbnails. See our full screenshot Windows 11 guide for the complete capture workflow.- Print Screen in Windows 11 (which now opens Snipping Tool by default) behaves the same way.
Alt + PrtScn. The active window copies to clipboard and shows up in history.- ScreenSnap Pro and other tools that copy screenshots to the clipboard show up there as well.
What doesn't work:
- Copying a
.jpgor.pngfile from File Explorer: the file gets copied, but the image itself won't show as a thumbnail inWin + V. - Copying images from some older apps that use unusual clipboard formats.
The practical win: snap three things with Win + Shift + S, open Teams, press Win + V, and paste any of them in any order. No saving files, no re-capturing. See our full guide to Windows screenshot shortcuts for every capture method and how they behave with the clipboard.
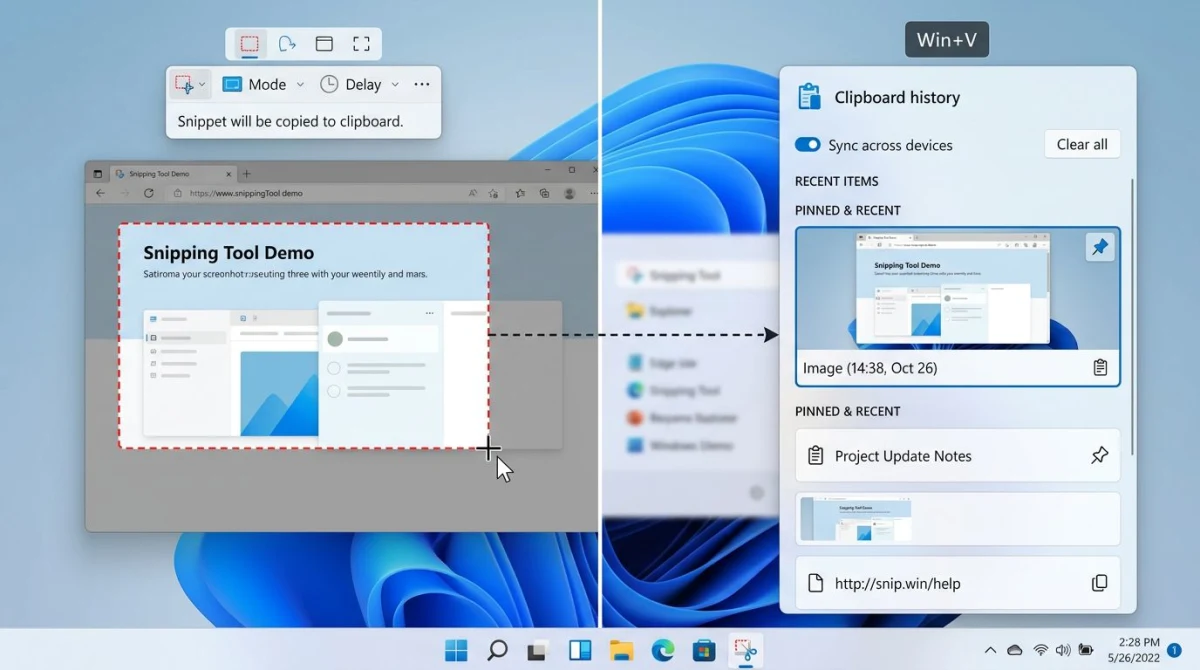
If you need the screenshots saved as actual files too, check where do screenshots go on Windows, because the clipboard and the Screenshots folder are separate systems.
Clearing Clipboard History
You've got three ways to clear, from targeted to nuclear.
Delete one item
- Press
Win + V. - Click the three-dot menu next to the item.
- Select Delete (or click the trash icon).
The item disappears. Everything else stays.
Clear all unpinned items
- Open
Win + V. - Click Clear all at the top right of the panel.
- Unpinned items vanish. Pinned items stay.
This is the one you want after a work session where you copied sensitive info but want to keep your pinned essentials.
Nuclear option: clear everything
- Go to Settings > System > Clipboard.
- Scroll to Clear clipboard data and click Clear.
This wipes both the clipboard itself and any cloud-synced copies tied to your Microsoft account. Pinned items survive this on the local device, but the synced versions on other PCs get wiped.
A reboot also clears everything except pinned items, so that's always an option too.

Tired of plain screenshots? Try ScreenSnap Pro.
Beautiful backgrounds, pro annotations, GIF recording, and instant cloud sharing, all in one app. Pay $39 once, own it forever.
See pricing and featuresSync clipboard across PCs
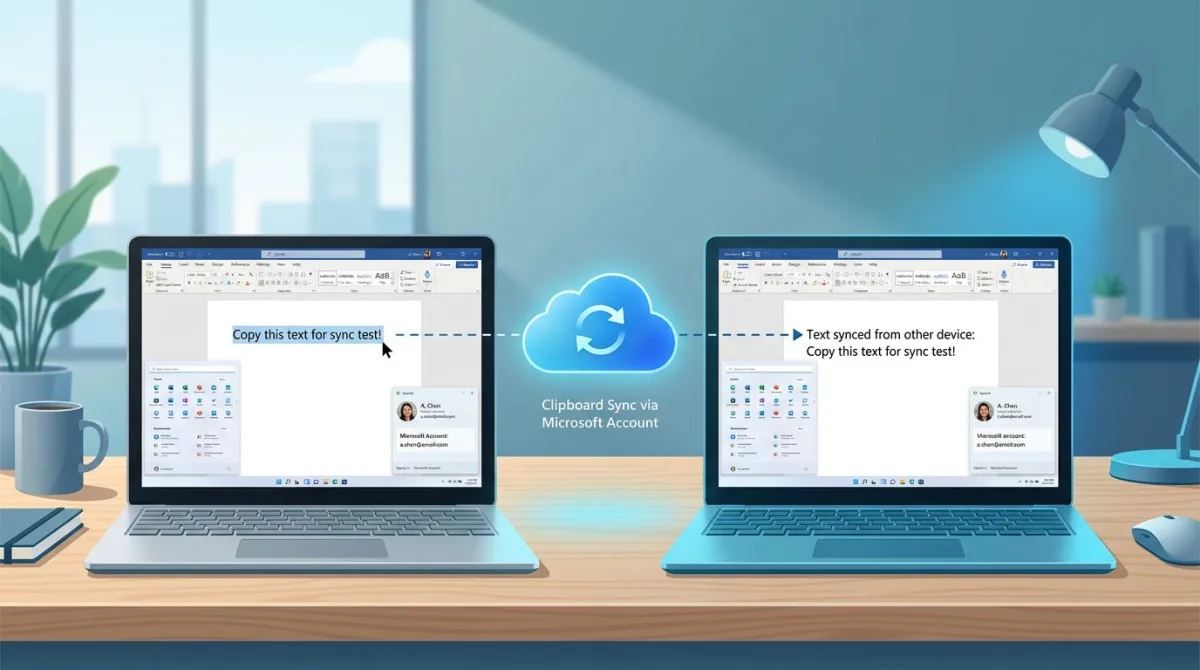
If you use two or more Windows PCs with the same Microsoft account, you can sync your clipboard between them. Copy a link on your desktop, walk to your laptop, paste.
How to enable clipboard sync
- Press
Win + I> System > Clipboard. - Toggle Clipboard history across your devices to On.
- Pick your sync mode:
- Automatically sync text that I copy. Everything goes across instantly.
- Manually sync text that I copy. You choose which items to push, from the
Win + Vmenu.
Sign in with the same Microsoft account (or work account) on every PC. For security details, see Microsoft's official clipboard guide.
What syncs and what doesn't
- Text. Yes, always.
- Links. Yes.
- Images. No. Screenshots stay on the device that took them.
- Pinned items. Local only, not synced.
That image limitation catches people off-guard. If you need a screenshot on another machine, upload it to OneDrive or use a cloud tool that gives you a shareable link.
Limits you should know about
Clipboard History has a few hard caps. Microsoft hasn't changed these much since the feature launched in Windows 10.
| Limit | Value | Workaround |
|---|---|---|
| Total items | 25 | Pin important ones |
| Size per item | 4 MB | Save large content as a file |
| Survives restart | No (except pinned) | Pin it |
| Syncs images | No | Use OneDrive or another cloud tool |
| Works in secure fields | No | By design (password fields are excluded) |
The 25-item limit is the biggest complaint. If you regularly need 50+ recent copies, a third-party clipboard manager windows app will serve you better. We cover those below.
Security and privacy considerations
Your clipboard is not a safe place for secrets. Anything you copy is briefly available to every app running on your PC. With Clipboard History on, sensitive items linger in the panel until cleared or aged out.
Practical rules:
- Don't copy passwords through Clipboard History. Use a password manager's auto-fill instead. Bitwarden, 1Password, and LastPass automatically skip clipboard history.
- Clear before sharing your screen. If you're about to present via Teams or Zoom, hit
Win + V> Clear all first. Pinned items stay, so unpin any you don't want visible. - BitLocker matters. If your drive isn't encrypted, a stolen device gives an attacker access to pinned clipboard items on reboot. Turn BitLocker on from Settings > Privacy & security > Device encryption.
- Sync widens the attack surface. Cloud-synced items live in Microsoft's infrastructure. If you work with regulated data (healthcare, finance, legal), check your company's policy before enabling sync.
Before you paste a recent snippet into a public document, press Win + V and scan the list. More than once, I've almost pasted a 2FA code where a meeting link should've gone.
Clipboard History not working? Troubleshooting
If Win + V does nothing or saves only one item, run through these in order.
1. Is it actually enabled?
Go to Settings > System > Clipboard and check the toggle. If it got turned off (a Windows update, a new profile, group policy), it silently stops saving.
2. Are you on Windows 10 or 11?
Clipboard History needs Windows 10 version 1809 or later. Every Windows 11 build supports it. Check with Settings > System > About.
3. Group policy block
On work PCs, IT sometimes disables clipboard features via group policy. Press Win + R, type gpedit.msc, and navigate to Computer Configuration > Administrative Templates > System > OS Policies. Look for Allow Clipboard History. If it's set to Disabled, that's your answer, and you'll need IT to flip it.
4. Corrupted clipboard service
Restart the clipboard service:
- Press
Win + R, typeservices.msc, press Enter. - Find Clipboard User Service.
- Right-click > Restart.
This fixes freezes where Win + V opens but doesn't show new items.
5. Registry reset
Last resort. Open Registry Editor (regedit) and navigate to:
HKEY_CURRENT_USER\Software\Microsoft\ClipboardDelete the Clipboard key, then reboot. Windows rebuilds it fresh. Back up the registry first (File > Export) so you can roll back.
If none of that works, a clean reinstall of Windows is the full fix, but it's rarely needed. Most people land on the group policy cause, or a temporary service crash. And if the problem is actually with screenshot capture rather than the clipboard itself, see our guide on Snipping Tool not working on Windows.
Third-party clipboard managers for power users
If 25 items isn't enough, or you want richer search, macros, and synced images across PCs, swap to a dedicated clipboard manager. Here are the three worth trying:
Ditto (free, open source)
The classic. Ditto holds thousands of items, searches by content, syncs encrypted clipboard data across PCs on your network, and supports keyboard shortcuts for every item. It's the power user default on Windows. Free forever.
ClipClip (free)
Friendlier UI than Ditto. Organizes clips into folders, supports OCR on copied images, and has a "merge clips" feature that combines multiple items into one paste. Windows only.
1Clipboard (free, cross-platform)
If you bounce between Windows and Mac, 1Clipboard syncs through Google Drive. Fewer features than Ditto, but it's the easiest cross-platform option. Development has slowed, so try Ditto first.
Most users never outgrow the built-in one. But if you paste templates all day, a third-party manager pays for itself in the first week.
For screenshot-heavy workflows
If your daily work involves lots of captures (bug reports, tutorials, design reviews, support tickets), the combo of Clipboard History and a fast screenshot tool is hard to beat.
Our app ScreenSnap Pro is built for this. It copies captures directly to the clipboard (no saving to disk first), so they flow straight into Win + V. Then you can:
- Capture three versions of the same UI.
- Open Slack or Jira.
- Press
Win + V, pick the right one, paste.
It also runs on Mac and Windows from one $39 one-time license, with no subscriptions. The 15 annotation tools and 500+ gradient backgrounds come in handy when you need the screenshot to look professional before it hits the clipboard. If you'd rather annotate in the browser, our free image annotation tool works too.
For a full capture-tool comparison, see the best screenshot tools for Windows.
Frequently asked questions
Start using it today
Clipboard History is one of those features that quietly changes how you work. Hit Win + V once, turn it on, and for the next week pay attention to how often you copy something and wish you hadn't lost the previous copy. That's the feature saving you, every time.
Then pin the three things you paste most often (your address, your signature, your go-to response), and the panel becomes a tiny, always-there productivity boost.
If you want the full screenshot + clipboard workflow, ScreenSnap Pro plays perfectly with Clipboard History on both Windows and Mac. Pay once, own forever: $39, no subscriptions, and it works alongside every other tip in this guide.

Morgan
Indie DeveloperIndie developer, founder of ScreenSnap Pro. A decade of shipping consumer Mac apps and developer tools. Read full bio
@m_0_r_g_a_n_