How to Screen Grab on Mac: Complete Guide (2026)
A screen grab on Mac (also called a screenshot or screengrab) captures whatever is currently displayed on your screen as an image file. Whether you need to document a bug, save a receipt, or share something funny with friends, macOS has several built-in ways to capture your screen—plus some powerful third-party alternatives.
Here's a quick reference table if you just need the shortcuts:
| Action | Keyboard Shortcut |
|---|---|
| Capture entire screen | ⌘ + Shift + 3 |
| Capture selected area | ⌘ + Shift + 4 |
| Capture specific window | ⌘ + Shift + 4, then Space |
| Open Screenshot toolbar | ⌘ + Shift + 5 |
| Copy to clipboard (add) | Hold Control with any shortcut |
Now let's break down each method so you can choose the right one for your situation.
Method 1: Keyboard Shortcuts (Fastest Way to Screen Grab on Mac)
The quickest way to grab your screen on Mac is using keyboard shortcuts. These work instantly and save directly to your desktop. Once you memorize these combinations, you'll capture screens in under a second.
All Mac screenshot shortcuts follow a pattern: ⌘ + Shift + [number]. The number determines what type of capture you're making.
Capture Your Entire Screen
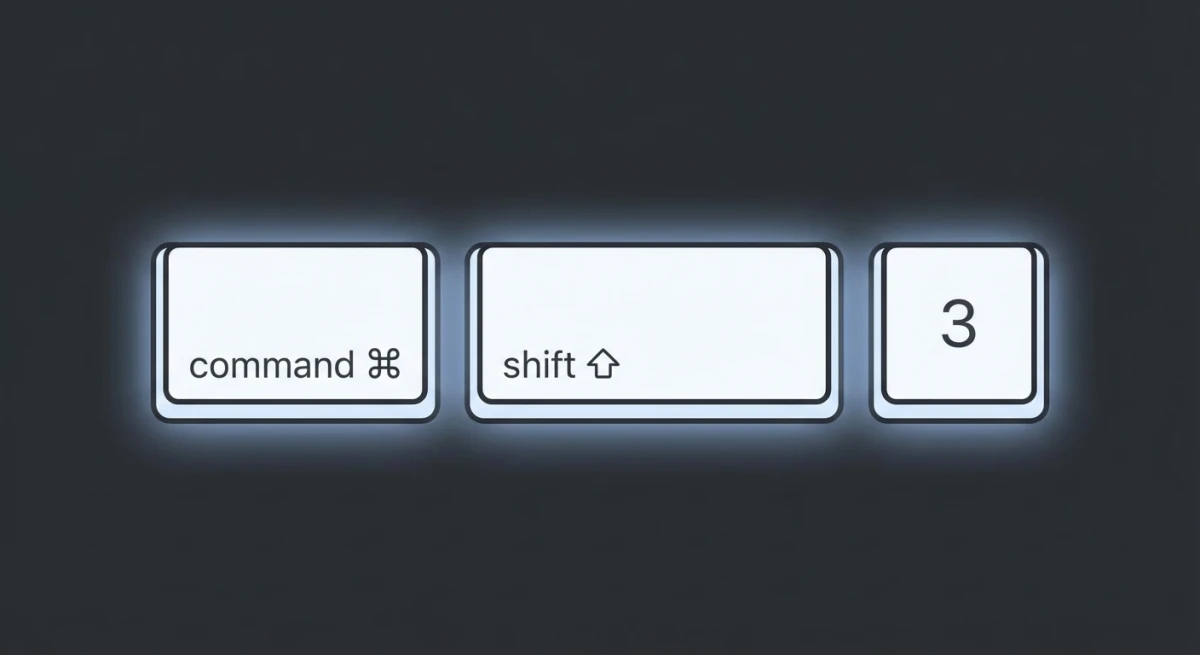
Press ⌘ + Shift + 3 to capture everything visible on your screen.
The screenshot saves to your desktop immediately. You'll see a thumbnail preview in the bottom-right corner—click it to edit, or let it disappear to save as-is.
Best for: Quick captures when you need everything visible, multi-monitor setups where you want all screens.
Capture a Selected Area
Press ⌘ + Shift + 4 to turn your cursor into a crosshair.
Click and drag to select the exact area you want to capture. Release to take the screenshot.
Pro tips while selecting:
- Press
Spaceto move your selection without resizing it - Press
Shiftto lock one axis (horizontal or vertical) - Press
Escapeto cancel
This is the most commonly used Mac screenshot shortcut because it gives you precise control. Check out our complete guide to taking partial screenshots on Mac for advanced selection techniques.
Capture a Specific Window
Press ⌘ + Shift + 4, then press Space.
Your cursor turns into a camera icon. Hover over any window and click to capture just that window—complete with a subtle drop shadow that makes it look polished.
Pro tip: Hold Option while clicking to remove the shadow. This is useful when you need a clean capture for documentation or design work.
For more window capture techniques, see our guide on how to screenshot a window on Mac.
Capture the Touch Bar (Older MacBook Pro)
If you have a MacBook Pro with Touch Bar (2016-2020 models), you can capture what's displayed on it:
Press ⌘ + Shift + 6 to save a wide, thin screenshot of your Touch Bar.
This is niche but useful for creating tutorials or documenting custom Touch Bar setups.
Capture to Clipboard Instead of File
Sometimes you don't need a saved file—you just want to paste the screenshot somewhere.
Add Control to any screenshot shortcut:
⌘ + Control + Shift + 3— Full screen to clipboard⌘ + Control + Shift + 4— Selection to clipboard
Then paste with ⌘ + V into Messages, Slack, email, or any app.
This is one of the most underrated features for capturing your Mac screen efficiently. We've written a dedicated guide on copying screenshots to clipboard on Mac with more tips.
Method 2: Screenshot Toolbar (Most Control)
If keyboard shortcuts feel overwhelming, the Screenshot toolbar provides a visual interface for all your screen clipping needs on Mac.
Press ⌘ + Shift + 5 to open the Screenshot toolbar—a floating panel that gives you visual buttons for all capture options. This method was introduced in macOS Mojave (2018) and has become the preferred way for many users to capture their Mac screen.
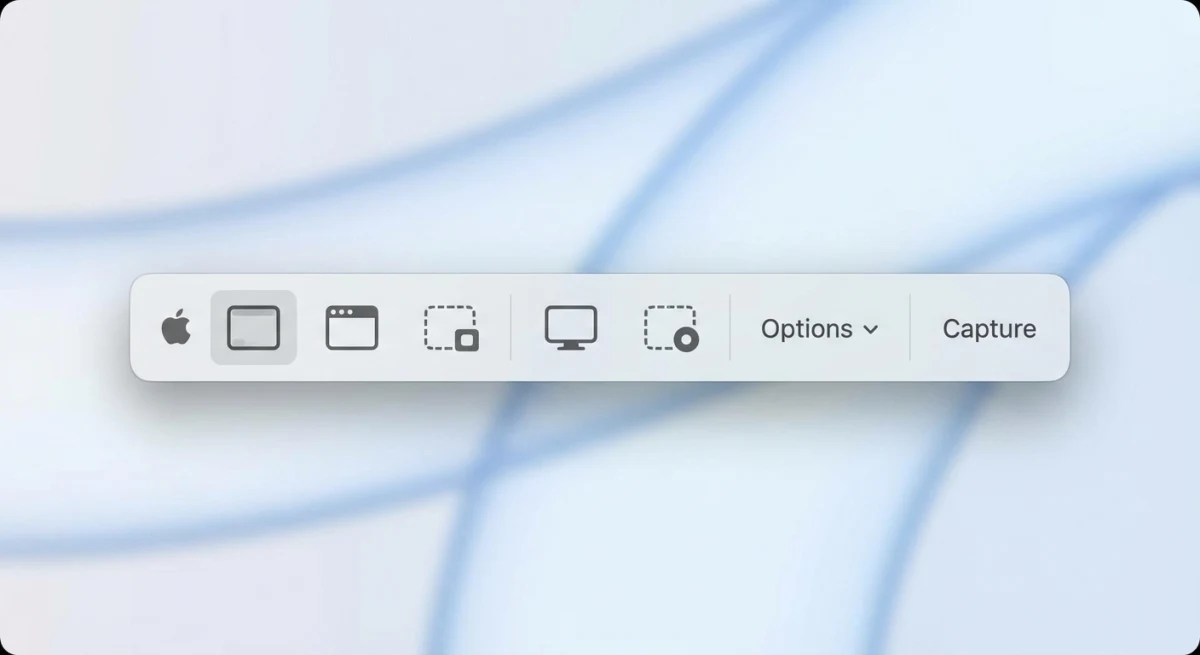
The toolbar includes:
- Capture Entire Screen — Same as
⌘ + Shift + 3 - Capture Selected Window — Same as
⌘ + Shift + 4+Space - Capture Selected Portion — Same as
⌘ + Shift + 4 - Record Entire Screen — Video recording
- Record Selected Portion — Video recording of an area
Screenshot Toolbar Options
Click Options in the toolbar to access settings:
Save to:
- Desktop (default)
- Documents
- Clipboard
- Messages
- Preview
- Other Location...
Timer:
- None
- 5 seconds
- 10 seconds
This timed screenshot feature on Mac is perfect for capturing dropdown menus, tooltips, or anything that disappears when you press keys.
Other options:
- Show Floating Thumbnail — That preview in the corner
- Remember Last Selection — Keeps your previous selection area
- Show Mouse Pointer — Include cursor in screenshots
- Capture Format (macOS Tahoe+) — SDR or HDR
The Screenshot toolbar is technically an app called Screenshot.app. You can find it in Applications > Utilities > Screenshot, but the keyboard shortcut is faster.
Method 3: Preview App
Preview isn't just for viewing PDFs—it can also take screenshots.
- Open Preview (in Applications or via Spotlight:
⌘ + Space, type "Preview") - Go to File > Take Screenshot
- Choose from:
- From Selection
- From Window
- From Entire Screen
This method is useful when you want to immediately edit the screenshot in Preview's markup tools. You can crop, annotate, and adjust colors before saving.
Preview works well for basic edits. For more advanced annotation options—like adding beautiful backgrounds, arrows, and shapes—tools like ScreenSnap Pro offer a more streamlined workflow.
Method 4: Third-Party Screenshot Tools
The built-in methods cover most use cases, but third-party tools add features like:
- Instant cloud sharing — Get a shareable link immediately
- Scrolling capture — Screenshot entire web pages
- GIF recording — Capture motion without video files
- Annotation tools — Add arrows, text, blur sensitive info
- Custom backgrounds — Make screenshots look professional
- OCR text extraction — Copy text from any screenshot
- Pin screenshots — Keep captures visible while working
- Quick editing — Crop, resize, and adjust without separate apps
When Built-In Tools Are Enough
For occasional screenshots—saving receipts, capturing error messages, sharing something quick with a friend—macOS has everything you need. The keyboard shortcuts are fast, free, and work everywhere.
When to Consider Upgrading
If any of these describe you, a third-party tool might be worth exploring:
- You take more than 10 screenshots per day
- You frequently annotate before sharing
- You share screenshots in team communication tools
- You need GIF recording for demos or tutorials
- You want cleaner, more professional-looking captures
If you frequently share screenshots in Slack, Discord, or documentation, a dedicated tool can save significant time. ScreenSnap Pro, for example, lets you capture, annotate, and share with a single shortcut—no hunting for files on your desktop.
For a comprehensive comparison, see our guide on the best screenshot apps for Mac.
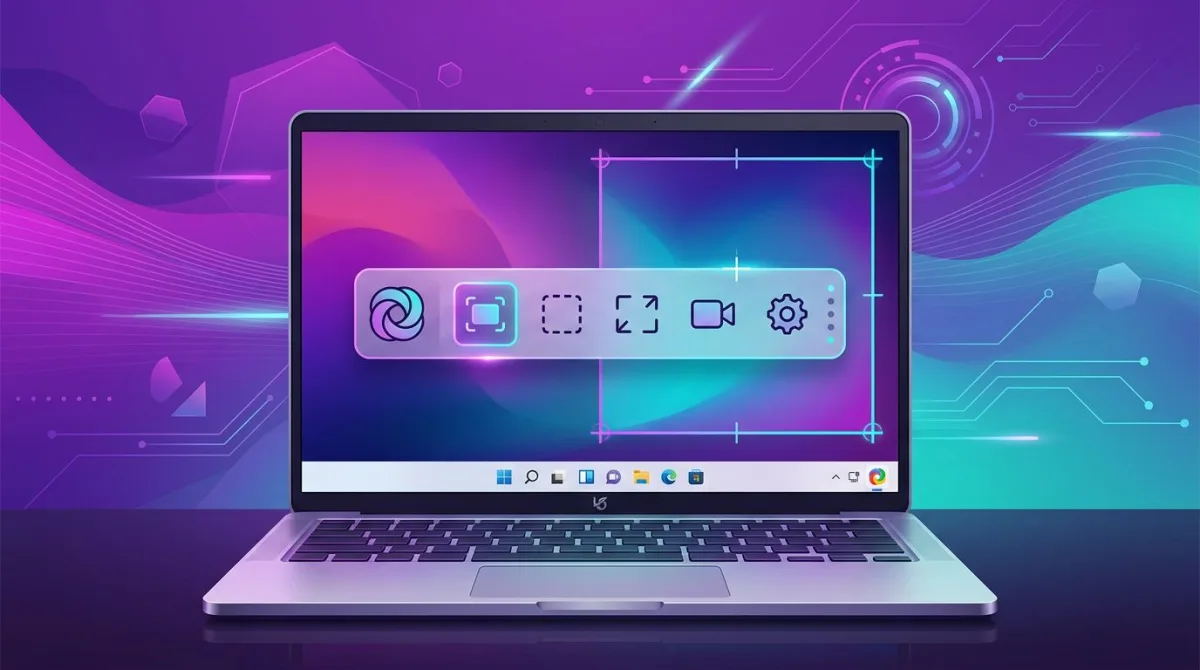
Tired of plain screenshots? Try ScreenSnap Pro.
Beautiful backgrounds, pro annotations, GIF recording, and instant cloud sharing — all in one app. Pay $29 once, own it forever.
See what it doesWhere Do Screen Grabs Go on Mac?
One of the most common questions after taking a mac screen grab is: where did it go?
By default, screenshots save to your Desktop with names like:
Screen Shot 2026-02-03 at 2.30.15 PM.pngIf you don't see it, check:
- Your Desktop folder in Finder (sometimes files hide behind windows)
- Whether you accidentally saved to clipboard instead (did you hold
Control?) - The iCloud Desktop sync (if enabled, files might still be uploading)
Change the Default Save Location
Method 1: Using Screenshot toolbar
- Press
⌘ + Shift + 5 - Click Options
- Under "Save to," choose a folder
Method 2: Using Terminal
defaults write com.apple.screencapture location ~/Pictures/Screenshots
killall SystemUIServer
Replace ~/Pictures/Screenshots with your preferred path. You'll need to create the folder first.
Change the Default File Name
The default naming is verbose. To change it:
defaults write com.apple.screencapture name "Screenshot"
killall SystemUIServer
Your files will now be named Screenshot 2026-02-03 at 2.30.15 PM.png.
How to Change Screenshot Format (PNG vs JPG)
Mac saves screenshots as PNG by default—high quality but larger files. This works great for most uses, but you might want to change it depending on your workflow.
PNG files are larger because they're lossless (no quality is lost). JPG files are smaller but slightly reduce quality—usually unnoticeable for screenshots.
Switch to JPG
defaults write com.apple.screencapture type jpg
killall SystemUIServer
Switch Back to PNG
defaults write com.apple.screencapture type png
killall SystemUIServer
Other Supported Formats
You can also use: pdf, tiff, gif, bmp, or heic (HDR on supported Macs).
When to use each:
- PNG — Best quality, supports transparency, ideal for most uses
- JPG — Smaller files, good for photos, no transparency
- PDF — When you need to send to someone who might print it
- HEIC — HDR content on newer Macs
For a deep dive on format options and when to use each, check out Apple's screenshot documentation.
Troubleshooting: Screenshot Not Working on Mac?
If your screen grab shortcuts aren't working, don't panic. Most issues have simple solutions. Work through these fixes in order—the most common problems come first.
1. Check Keyboard Shortcuts Are Enabled
This is the most common fix. macOS lets you disable or remap screenshot shortcuts.
- Open System Settings > Keyboard > Keyboard Shortcuts
- Select Screenshots in the sidebar
- Make sure all shortcuts are checked
Look for any shortcuts that show as "None" or have been changed. You can click "Restore Defaults" at the bottom to reset everything.
Common culprit: The "Save picture of screen as a file" shortcut sometimes gets accidentally disabled. Make sure it shows ⌘ + Shift + 3.
2. Check for Conflicting Apps
Many apps intercept screenshot shortcuts for their own features. This is especially common with:
- Screen recording software (OBS, ScreenFlow, Loom)
- Remote desktop apps (TeamViewer, AnyDesk, Parallels)
- Clipboard managers (Alfred, Paste, Pastebot)
- Screenshot tools (CleanShot, Lightshot, Skitch)
- Gaming software (Discord, Steam overlay)
To identify the conflict:
- Quit all non-essential apps
- Test if screenshots work
- Reopen apps one by one until you find the culprit
Once identified, check that app's settings for shortcut customization. Most let you change or disable their screenshot shortcuts.
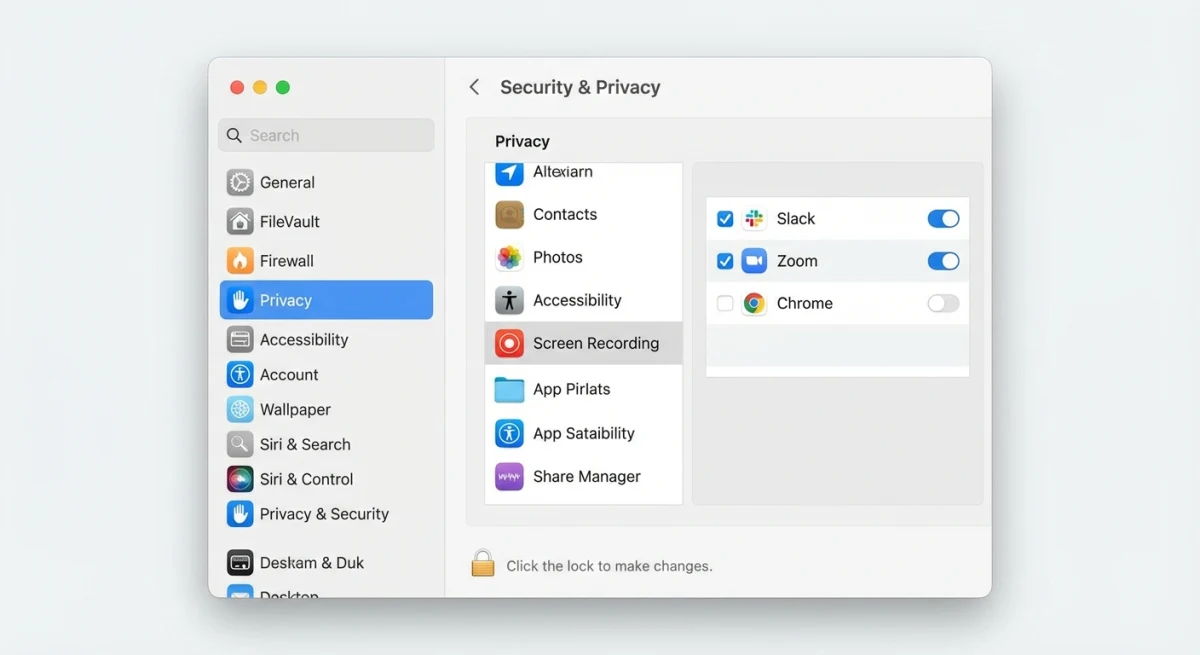
3. Check Screen Recording Permissions
Starting with macOS Catalina, apps need permission to record your screen. This can affect screenshot functionality.
- Open System Settings > Privacy & Security > Screen Recording
- Look for any apps that might be interfering
- Try toggling permissions off and on
If you've recently denied screen recording permission to an app, it might have affected system-wide screenshot behavior. Restarting your Mac after changing permissions often helps.
4. Check App-Specific Restrictions
Certain apps block screenshots for security or copyright reasons:
- Apple TV app — Prevents captures during playback
- Netflix, Disney+, Hulu — Black out video during screenshots
- Banking apps — Some block screenshots of sensitive data
- DRM-protected content — Any video with HDCP protection
This isn't a bug—it's intentional protection. The screenshot works everywhere else. You'll notice the capture succeeds, but the protected area shows as black.
5. Reset the NVRAM/PRAM
NVRAM stores settings like display resolution and startup disk selection. Corrupted NVRAM can cause screenshot issues.
For Intel Macs:
- Shut down your Mac completely
- Turn it on and immediately hold
Option + Command + P + R - Keep holding for about 20 seconds
- Release and let Mac boot normally
For Apple Silicon Macs (M1/M2/M3):
NVRAM resets automatically during restart. Simply shut down, wait 30 seconds, then restart.
After resetting, your Mac may take slightly longer to boot. This is normal.
6. Check Disk Space
Screenshots can't save if your disk is full. Even if you have "some" space, macOS needs breathing room.
- Click Apple Menu > About This Mac > More Info > Storage
- Ensure at least 5-10 GB free space
If space is tight, move files to external storage or use Apple Menu > About This Mac > Storage > Manage to find large files to delete.
Quick tip: Screenshots are PNG files, typically 2-5 MB each. A nearly-full disk might save some but fail on others.
7. Restart Finder
Finder handles file operations, including saving screenshots. A frozen Finder can cause silent failures.
- Press
⌘ + Option + Escape(Force Quit menu) - Select Finder from the list
- Click Relaunch
Your Dock will flicker briefly. This refreshes all Finder processes without losing your work in other apps.
Alternative method: Hold Option, right-click the Finder icon in your Dock, select "Relaunch."
8. Boot into Safe Mode
Safe Mode loads only essential system software, helping identify third-party conflicts.
For Intel Macs:
- Shut down completely
- Press power button and immediately hold
Shift - Release when you see the login window
- Log in (it may be slower than usual)
For Apple Silicon Macs:
- Shut down completely
- Press and hold the power button until "Loading startup options" appears
- Select your startup disk
- Hold
Shiftand click "Continue in Safe Mode"
Test screenshots in Safe Mode. If they work, a third-party app or login item is causing the problem. Check your Login Items in System Settings > General > Login Items.
9. Create a New User Account
If nothing else works, test with a fresh user account:
- Open System Settings > Users & Groups
- Click the + button to add a new user
- Log into the new account
- Test screenshots
If screenshots work in the new account, the issue is in your user settings—likely a corrupted preference file. You can try deleting ~/Library/Preferences/com.apple.screencapture.plist in your main account.
10. Reinstall macOS (Last Resort)
If you've tried everything and screenshots still fail, a macOS reinstall may be necessary. This keeps your files but refreshes system software.
- Back up with Time Machine first
- Restart while holding
⌘ + R(Intel) or power button (Apple Silicon) - Select "Reinstall macOS" from Recovery options
- Follow the prompts
This takes 30-60 minutes but fixes deep system issues.
Pro Tips for Better Screen Grabs on Mac
After years of taking screenshots, here are the techniques that save the most time. These tips work with all the screengrab methods covered above.
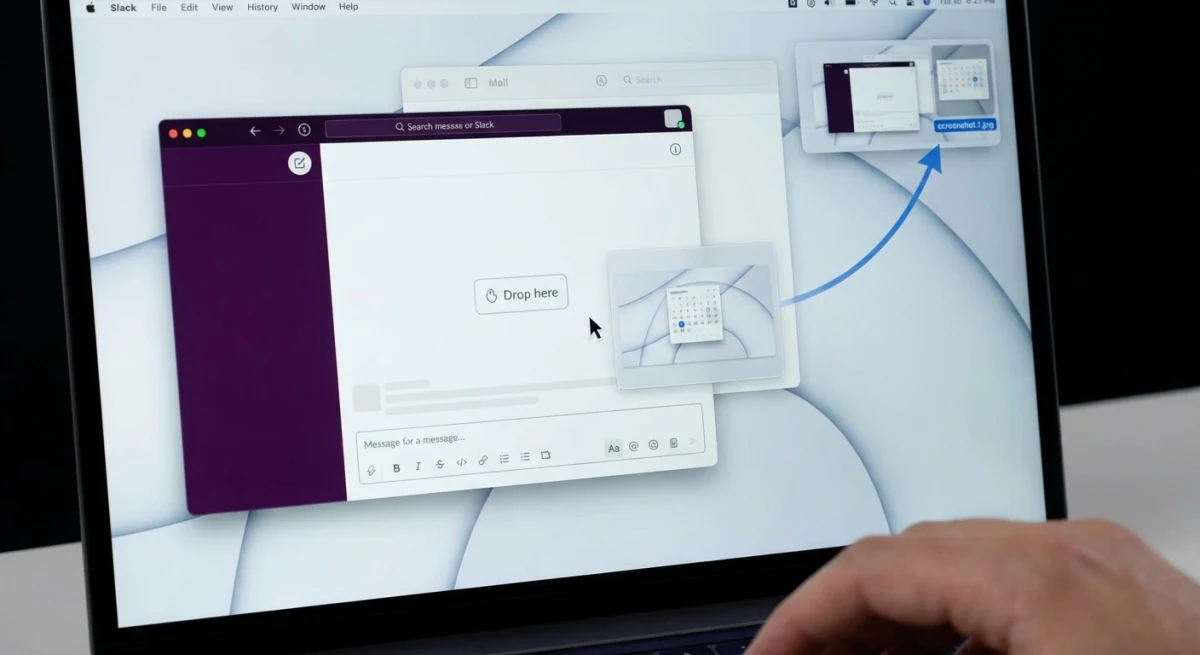
Drag the Thumbnail Directly
When the floating thumbnail appears after a screenshot, you can drag it directly into:
- Messages conversations
- Email compose windows
- Slack channels
- Finder folders
- Any app that accepts images
No need to wait for the file to save, then hunt for it on your desktop. This single tip saves more time than any other.
Quick Delete Bad Screenshots
Took a screenshot and immediately realized it's wrong? Click the thumbnail, then press ⌘ + Delete to trash it before it saves. Keeps your desktop clean without manual cleanup later.
Use Quick Look for Fast Review
Select any screenshot file and press Space to preview it instantly. Press Space again to close. This is faster than opening in Preview or any other app.
Bonus: In Quick Look, press ⌘ + L to rotate the image or use arrow keys to flip through multiple selected screenshots.
Create a Screenshots Folder
Instead of cluttering your desktop:
- Create a folder:
~/Pictures/Screenshots - Set it as default location (see above)
- Add to Dock or Finder sidebar for quick access
Your desktop stays clean, and all captures live in one searchable location.
Use the Timer for Tricky Captures
For dropdown menus, hover states, or anything that disappears when you press keys:
- Press
⌘ + Shift + 5 - Click Options > 5 Seconds
- Click Capture
- You have 5 seconds to set up the perfect shot
This is the only reliable way to capture context menus, notification banners, and tooltip popups.
Capture Retina Screenshots at Half Size
Retina displays capture at 2x resolution. A 1000-pixel wide selection becomes a 2000-pixel image. Great for quality, but sometimes too large.
To get 1x screenshots (matching your visual display):
- Change display scaling in System Settings > Displays
- Or resize after capture in Preview
Some third-party tools let you choose capture resolution directly.
Use Spotlight for Screenshot Search
Spotlight indexes screenshots, including any text visible in them (using OCR). Press ⌘ + Space and search for words that appeared in your screenshot. This works surprisingly well for finding old captures.
Screenshot Specific Menu Items
To capture a dropdown menu:
- Open the menu you want to capture
- Press
⌘ + Shift + 4 - Press
Spaceto enter window mode - Move the camera cursor over the menu (it highlights separately from the parent window)
- Click to capture just the menu
This gives you a clean menu capture with proper shadows.
Copy Text from Screenshots
Need to extract text from a screenshot? macOS has built-in OCR that most users don't know about:
- Open the screenshot in Preview or Quick Look
- Hover your cursor over any text—it becomes selectable
- Select the text and copy with
⌘ + C - Paste anywhere
This works on most images, not just screenshots. The accuracy is good for printed text, less reliable for handwriting.
For more reliable text extraction, especially from complex images, see our guide on copying text from screenshots on Mac.
Batch Rename Screenshots in Finder
If you have many screenshots with default names, select them all in Finder and right-click > Rename. You can add text, replace text, or add sequential numbers. Much faster than renaming individually.
Use Automator for Custom Workflows
Power users can create Automator workflows that:
- Automatically resize screenshots
- Convert formats on capture
- Upload to cloud storage
- Add watermarks or borders
This requires some setup, but pays off if you process many screenshots daily.
Frequently Asked Questions
Wrapping Up
You now know every way to screen grab on Mac:
⌘ + Shift + 3for full screen⌘ + Shift + 4for selections⌘ + Shift + 5for the toolbar with all options- Preview for immediate editing
- Third-party tools for advanced features
For most people, the keyboard shortcuts handle 90% of screenshot needs. When you need more—like instant cloud sharing, annotations, or GIF recording—tools like ScreenSnap Pro bridge the gap between basic captures and professional-quality visuals.
Start with the shortcuts, and upgrade your workflow when you need to.
Morgan
Indie DeveloperIndie developer, founder of ScreenSnap Pro. A decade of shipping consumer Mac apps and developer tools. Read full bio
@m_0_r_g_a_n_