Snipaste for Mac: 5 Better Native Alternatives (2026)
Snipaste is a beloved screenshot tool for Windows power users. It's famous for one feature: snip-and-paste. Capture any area, then pin it as a floating window on your desktop. Mac users wanting that workflow often turn to native apps like ScreenSnap Pro instead.
Snipaste has a Mac version. But it has major limits. Many users want better options.
Switched from Windows to Mac? Miss that pin screenshot feature? You're in the right place. This guide covers 5 native Mac options. They match or beat Snipaste's strengths. Better macOS integration. More features. Smoother workflows.
What is Snipaste (and Why Do People Love It)?
Snipaste is a free snipping tool. It brought a key concept: snip-and-paste. Here's why people love it:
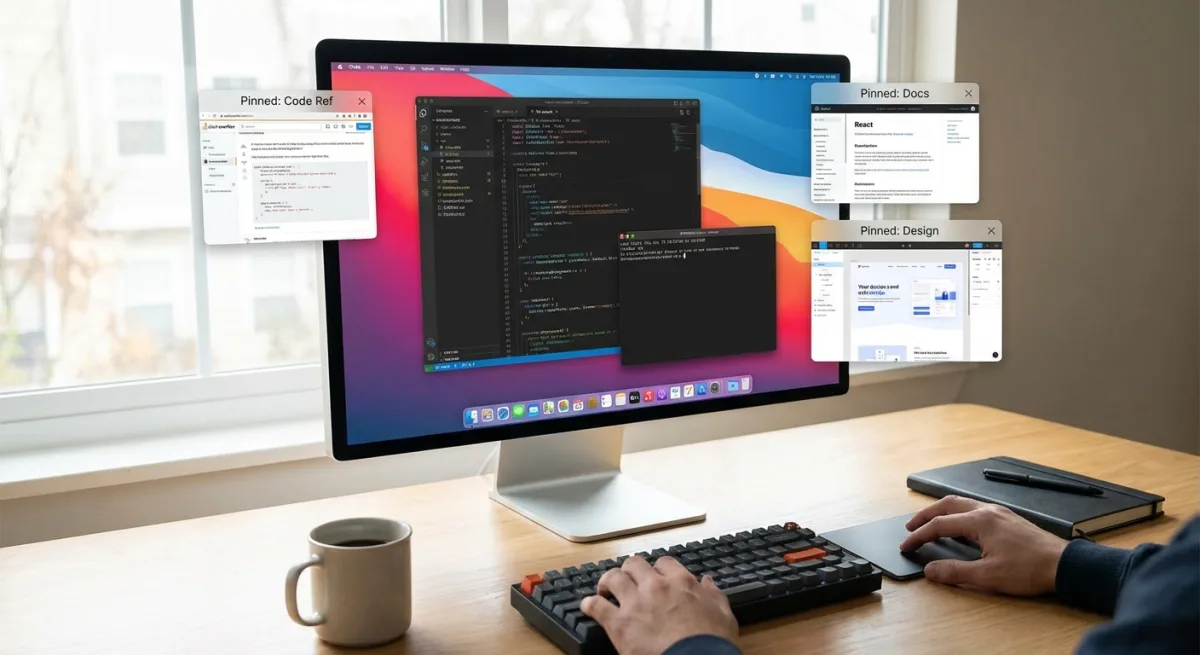
- Pin screenshots to desktop — Capture any area. Press F3. It becomes a floating window on top of everything.
- Quick reference captures — Keep code snippets visible. Reference docs while you work. Compare design mockups side by side.
- Lightweight and keyboard-driven — No bloated interface. Just hotkeys: F1 to snip, F3 to paste.
- Free and portable — Download and run. No install needed.
Developers love the pin feature. Need docs visible while coding? Done. Designers comparing UI elements? Perfect. You can zoom, rotate, and flip pinned screenshots. Even make them click-through.
The problem? The Mac version falls short.
Snipaste's Mac Limitations
Snipaste is available for macOS. But it has drawbacks compared to Windows:
No App Store Distribution
Download from their website. Install by hand. No automatic updates. You'll grant security permissions yourself.
Fewer Updates
Windows gets more updates and features. Mac lags behind. Some features never arrive.
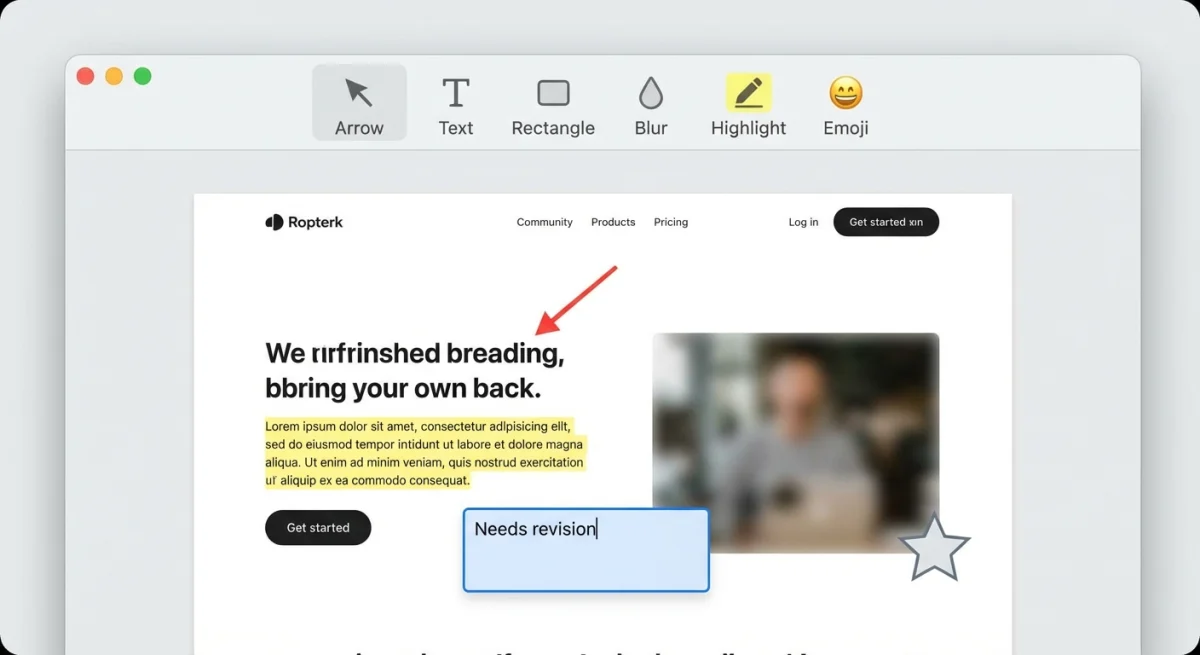
Limited Markup Tools
Snipaste has basic markup: arrows, shapes, text, mosaic, blur. Mac-native tools offer more. They work better with macOS too.
No Cloud Sharing
Snipaste is local-only. Need a shareable link? Save the file. Upload somewhere. Share by hand. Too many steps.
No GIF Recording
Modern workflows need quick GIF captures. Tutorials. Bug reports. Demos. Snipaste can't record at all.
No Background Styling
Social posts need polished screenshots. Same for slides. Snipaste can't add backgrounds. You'd export and use Figma or Canva on the side.
Less Intuitive on Mac
Snipaste was built for Windows. Keyboard shortcuts feel wrong. Workflows seem foreign. No Touch Bar support. No macOS Services. No Handoff between devices.
Manual Install Friction
No App Store means going through security settings. First launch shows a scary warning. "Developer cannot be verified." Go to System Settings → Privacy & Security. Click "Open Anyway." Not a dealbreaker. But it adds friction.
These limits matter. Time to explore native Mac options.
5 Best Snipaste Alternatives for Mac
1. ScreenSnap Pro — Best Overall Snipaste Alternative
ScreenSnap Pro is a Mac-native screenshot and GIF recording app. It has the pin screenshot feature Snipaste users love. Plus cloud sharing. 500+ wallpapers. Great markup tools.
Key Features:
- Pin Screenshot — Keep captures floating on your desktop, just like Snipaste
- GIF Recording — Record screen as GIF for tutorials and demos
- Cloud Sharing — Get instant shareable links without leaving the app
- 500+ Gradient Backgrounds — One-click styling for social-ready screenshots
- 11 Markup Tools — Arrows, shapes, text, blur, pixelate, highlighter, emojis, counter
- OCR Text Extraction — Copy text from any screenshot right away
Pricing: One-time purchase (no subscription)
Why It Beats Snipaste:
ScreenSnap Pro copies Snipaste's pin feature. It adds everything Snipaste lacks: GIF recording, cloud sharing, beautiful backgrounds, more tools. One-time purchase. No recurring fees.
How the Pin Feature Works:
Pin screenshots work the same way as Snipaste. Capture any area of your screen. Click the pin button or press the shortcut. Your screenshot becomes a floating window. It stays on top of other apps. Move it anywhere. Resize it. Make it see-through. Even click through it to interact with apps behind.
Developers use this for API docs. Keep endpoint specs visible while coding. Designers pin mockups. Compare them to live code side by side. Anyone can pin reference info. No window-switching needed.
If you're looking for the best screenshot app for Mac, ScreenSnap Pro deserves a look.
Best For: Developers and designers who want Snipaste's pin feature with modern cloud sharing and GIF recording.
2. CleanShot X — Feature-Rich with Cloud Integration
CleanShot X is one of the most popular screenshot tools for Mac. Known for its all-in-one approach.
Key Features:
- Scrolling capture for long webpages and documents
- Built-in markup overlay with many tools
- Cloud storage with CleanShot Cloud
- Quick access overlay after capture
- Screen recording (video, not just GIF)
- OCR and text grabbing
Pricing: $39 one-time + optional cloud subscription
Why Consider It:
CleanShot X has great macOS integration. Polished interface. Great scrolling capture for full webpages. But cloud features need a subscription. No pin-to-desktop feature like Snipaste.
Scrolling Capture Deep Dive:
Long webpages are tricky to screenshot. CleanShot X handles this with auto-scroll. Click to start. The app scrolls and stitches frames together. You get one tall image of the full page. Works for websites, documents, and chat logs. Snipaste can't do this at all.
Quick Access Overlay:
After every capture, a small preview appears in the corner. Click to annotate. Drag to save. Hit ⌘C to copy. Dismiss to save to your default folder. This workflow keeps you in the zone. No hunting for files. The overlay is clever. But some users find it intrusive. You can tweak or disable it.
For a detailed comparison, check out our CleanShot X alternatives guide.
Best For: Power users who want an all-in-one solution and don't mind paying for cloud features.
3. Shottr — Free and Lightweight
Shottr is the best free option. Lightweight and fast. Similar to Snipaste's minimal footprint.
Key Features:
- Totally free (no premium tier)
- Fast and lightweight (~2MB)
- OCR text grabbing
- Pixel-perfect measurements for designers
- Scrolling screenshots
- Basic markup tools
Pricing: Free
Why Consider It:
Shottr appeals to users who loved Snipaste's minimal approach. Launches right away. Captures fast. Stays out of your way. The OCR is good for a free tool. But no pin feature. No cloud sharing. No GIF recording.
Pixel Measurements for Designers:
Shottr includes a built-in pixel ruler. Measure distances between elements. Get exact widths and heights. Color picker grabs hex codes from any pixel. These tools help designers match specs. Developers can check spacing too. All free. All built in.
How It Compares to Snipaste:
Both tools focus on speed and simplicity. Both stay lightweight. Shottr adds Mac-native shortcuts. Uses standard ⌘+Shift combos. Snipaste sticks to F1/F3 Windows-style keys. Shottr also adds scrolling capture. Snipaste can't scroll. But Snipaste pins screenshots. Shottr can't.
Best For: Users who want a free, fast, no-frills screenshot tool with good OCR.
4. Snagit — Enterprise-Grade Features
Snagit by TechSmith is a widely used enterprise screenshot and screen recording tool.
Key Features:
- Full-page scrolling capture
- Video recording with audio
- Large template library
- Team sharing and teamwork tools
- Batch image conversion
- Step tool for creating tutorials
Pricing: $63 one-time (recently moved to subscription for new versions)
Why Consider It:
Need documentation tools? Templates? Team work features? Snagit delivers. Overkill for personal use. But great for tech writers and docs teams. See our Snagit alternatives guide for options.
Step Tool Explained:
The Step tool is unique to Snagit. Click anywhere on a screenshot. A numbered callout appears. Click again. Number two shows up. Keep clicking to build a sequence. Perfect for tutorials. Shows users exactly what to click and in what order. No manual numbering needed.
Template Library:
Snagit comes with dozens of templates. Combine multiple screenshots into collages. Add titles and captions. Create comparison graphics. Export as images or GIFs. Templates save time for docs teams. Create guides once. Reuse the format for every new feature.
Video Recording:
Snagit records video with audio. Narrate walkthroughs. Capture system sounds. Trim clips in the built-in editor. Export to MP4 or GIF. More robust than screen recording in most tools. But adds complexity if you only need screenshots.
Best For: Teams creating product docs, tutorials, and training materials.
5. Xnapper — Beautiful Screenshots for Developers
Xnapper focuses on making code screenshots beautiful with minimal effort.
Key Features:
- Automatic background styling
- Code screenshot boost
- Social media-ready output
- Light/dark mode detection
- Simple drag-and-drop interface
Pricing: One-time purchase
Why Consider It:
Developers sharing code on Twitter love Xnapper. Same for blogs and docs. Automatic styling saves time. More focused than general tools. Great for code. Limited for other use cases.
How Automatic Styling Works:
Drop a screenshot into Xnapper. It detects edges. Adds a gradient background. Rounds corners. Adds subtle shadows. The result looks like a polished marketing image. Takes two seconds. No design skills needed. Adjust colors if you want. But defaults look good.
Code Screenshot Tips:
Capture code in your editor. Use a readable font size (14-16pt works well). Xnapper detects syntax themes. It matches the background to your code colors. Light code gets light backgrounds. Dark code gets dark. The result is cohesive. Looks like a designed graphic.
Limits:
Xnapper focuses on styling. It lacks markup tools. No arrows or boxes. No cloud sharing. No GIF recording. It's a single-purpose tool. Use it for pretty code screenshots. Use something else for everything else.
Best For: Developers and writers who share code snippets on social media.
Feature Comparison Table
Here's how these Snipaste options compare across key features:
| Feature | ScreenSnap Pro | CleanShot X | Shottr | Snagit | Xnapper |
|---|---|---|---|---|---|
| Pin to Desktop | ✅ | ❌ | ❌ | ❌ | ❌ |
| GIF Recording | ✅ | ✅ (video) | ❌ | ✅ (video) | ❌ |
| Cloud Sharing | ✅ | ✅ ($) | ❌ | ✅ | ❌ |
| Backgrounds | 150+ | ✅ | ❌ | ❌ | ✅ |
| OCR | ✅ | ✅ | ✅ | ✅ | ❌ |
| Markup | 15 tools | 10+ | Basic | Many | Basic |
| App Store | ✅ | ✅ | ✅ | ✅ | ✅ |
| Pricing | $39 one-time | $29+ | Free | $63+ | One-time |
Which Alternative is Right for You?
Choosing the right Snipaste option depends on your needs:
Choose ScreenSnap Pro if:
- You want the pin screenshot feature from Snipaste
- You need GIF recording for tutorials and bug reports
- Cloud sharing with instant links is key
- You prefer one-time pricing over subscriptions
- You want beautiful gradient backgrounds for social sharing
Choose CleanShot X if:
- You need scrolling screenshots for long pages
- Video recording (not just GIF) is a must
- You're okay with subscription pricing for cloud features
- You want the most feature-rich option overall
Choose Shottr if:
- You want something totally free
- Speed and lightweight are top goals
- You need pixel measurements for design work
- Basic features are enough for your needs
- You work offline and don't need cloud sharing
Choose Snagit if:
- You work on a team with shared needs
- Templates and documentation tools are needed
- You need enterprise-grade features and support
- Budget isn't a main concern
Choose Xnapper if:
- You mainly share code screenshots
- Automatic styling sounds good to you
- You use Twitter/social media a lot
- You don't need general screenshot features
Tired of plain screenshots? Try ScreenSnap Pro.
Beautiful backgrounds, pro annotations, GIF recording, and instant cloud sharing — all in one app. Pay $39 once, own it forever.
See what it doesSnipaste's Pin Feature: Which Mac Apps Support It?
Pin-to-desktop is Snipaste's main feature. Oddly few Mac apps copy it. Developers need docs visible while coding. Designers compare mockups side-by-side. Anyone using reference info while working benefits.
Here's the current state of pin support across Mac screenshot tools:
| App | Pin Support | How It Works |
|---|---|---|
| ScreenSnap Pro | ✅ Full | Capture → Pin as floating window |
| Snipaste (Mac) | ✅ Limited | Works but fewer features than Windows |
| CleanShot X | ❌ | No pin feature |
| Shottr | ❌ | No pin feature |
| Snagit | ❌ | No pin feature |
If the pin feature is a must-have, your Mac options are ScreenSnap Pro or sticking with Snipaste's limited Mac version.
How the Pin Feature Works
When you pin a screenshot, it becomes a floating window:
- Stays on top of all windows
- Move it anywhere on screen
- Zoom in/out for details
- Make it see-through or click-through
- Persists across app switches and desktops
Keeping API docs visible while coding? Comparing a mockup to code? This workflow beats window-switching. Faster than split-screen too.
Real-World Pin Use Cases
Bug Reports: Pin a screenshot of the bug. Open your code editor. Reference the visual while debugging. No tab-switching.
Design Review: Pin the Figma mockup. Open the live site. Compare pixel-by-pixel without losing context.
Data Entry: Pin a reference document. Fill forms in another window. The source stays visible.
Learning: Pin a tutorial. Follow steps in the terminal or app. Keep the guide on screen.
Beyond Snipaste: Features You Might Not Know You Need
Switch to a Mac-native tool. New workflows become possible.
GIF Recording for Tutorials
Don't explain bugs with text. Record a 10-second GIF instead. Show the exact issue. Tools like ScreenSnap Pro let you record GIFs on your Mac. No video conversion needed.
Why GIFs Beat Videos:
GIFs play anywhere. Slack previews them inline. GitHub renders them in issues. No video player needed. Files are smaller than MP4 for short clips. Perfect for bug reports, quick demos, and UI walkthroughs.

Cloud Sharing Without Extra Steps
Built-in cloud sharing changes everything. Capture. Get a link. That's it. No saving to disk. No uploading to Imgur. No app-switching.
How Cloud Sharing Works:
Take a screenshot. The app uploads it for you. Copy the link with one click. Paste into Slack, email, or docs. The link works for anyone. No attachments. No file-size limits. Sharing a bug report? Takes five seconds.
Beautiful Backgrounds for Social Sharing
Raw screenshots look amateur. On Twitter. In slides. One-click backgrounds fix this. Your captures look polished. Learn more in our guide on how to add backgrounds to screenshots.
Why Backgrounds Matter:
A screenshot with a gradient looks like marketing material. Same image without one looks like a bug report. Perception matters for product demos. For portfolio pieces. For social posts that need to stand out in feeds.
Pro-Level Markup
Snipaste has basic markup. Mac options offer more. Numbered steps. Magnifiers. Blur and pixelate for private info. Emoji stamps. Check our markup guide for tips.
Blur vs Pixelate:
Blur smooths an area. Data is unreadable but the shape shows. Pixelate turns an area into blocks. Completely hides content. Use blur for names and emails. Use pixelate for passwords and keys. Both protect private info in shared screenshots.
Copy to Clipboard Workflows
Many Mac users prefer copying screenshots to clipboard. Skip saving files. Capture and paste into Slack. Into email. Into documents. Native Mac tools do this better.
Clipboard Tips:
Hold Control while taking a screenshot to copy to clipboard. Or set your tool to always copy. Paste with ⌘+V anywhere. Faster than drag-and-drop. No file clutter.
Keyboard Shortcut Custom Setup
Mac-native tools follow macOS ways. Adjust shortcuts in System Settings. Set global hotkeys. Avoid conflicts with other apps. Use modifier keys that feel natural. Even trigger captures from the Touch Bar.
Setting Up Shortcuts:
Open your screenshot app's preferences. Look for keyboard shortcuts or hotkeys. Set capture to something easy like ⌘+Shift+4 or ⌘+1. Set annotate. Set pin. Muscle memory builds fast. Good shortcuts speed up your workflow.
Windows Switchers: Other Tools to Consider
If you're coming from Windows and miss other screenshot tools, we've covered options for most popular Windows apps:
- Greenshot for Mac — Popular free Windows tool with Mac options that offer similar features
- Lightshot for Mac — Lightweight capture with Mac versions for quick sharing
- Print Screen on Mac — Full guide for Windows keyboard users learning Mac screenshot shortcuts
The Windows-to-Mac switch feels jarring at first. But Mac-native tools often beat Windows ones. macOS has deep system hooks. Third-party tools use them in ways Windows can't match.
Making the Transition Smoother
Week One: Learn the basic Mac shortcuts. ⌘+Shift+3 for full screen. ⌘+Shift+4 for area. ⌘+Shift+5 for the options panel.
Week Two: Install your chosen tool. Set shortcuts to match muscle memory. Use your old Windows habits if possible.
Week Three: Explore new features. Try cloud sharing. Record a GIF. Add a background. Discover what you were missing.
Free Screenshot Tools Worth Trying
Don't want to pay? Besides Shottr, the built-in macOS tools work well for basic needs.
macOS Screenshot (Built-in)
Press ⌘+Shift+5 for a control bar. Full screen. Window. Area. Screen recording. Timer options. Saves to Desktop by default. Change the save location in options. No markup built in. But it's free and always there.
Preview for Markup
Open any image in Preview. Click the markup button (pen in a circle). Add shapes. Add text. Arrows and boxes. Draw freehand. Crop and resize. Not as polished as paid tools. But good enough for basic notes.
Combining Free Tools
Screenshot with ⌘+Shift+4. Open in Preview for markup. Upload to Imgur or CloudApp for sharing. This workflow is free. It takes more steps. But it works. Use it while you decide if a paid tool is worth it.
For more free screenshot tools for Mac, check our full roundup.
Frequently Asked Questions
Conclusion
Snipaste earned its reputation on Windows. It pioneered pin-to-desktop screenshots. The Mac version exists. But limits push power users toward native options. Same pin feature. Plus modern features: GIF recording, cloud sharing, beautiful backgrounds.
Want the closest Snipaste feel on Mac? ScreenSnap Pro is the top choice. It copies the pin feature. Adds everything Snipaste lacks. One-time purchase. No recurring fees.
Don't need the pin feature? CleanShot X has the most complete feature set. Shottr is free and lightweight for users who value simplicity.
Any Mac-native option beats Snipaste here. Better macOS hooks. More reliable updates. Features built for Mac workflows.
Morgan
Indie DeveloperIndie developer, founder of ScreenSnap Pro. A decade of shipping consumer Mac apps and developer tools. Read full bio
@m_0_r_g_a_n_