Smoke Testing: What It Is, Checklist and Smoke vs Sanity
In software, smoke testing is a quick set of checks run on a new build or deployment to confirm the most important functions work before anyone spends time on deeper testing. If the app will not load, users cannot log in or the main flow breaks, the build is rejected. It is also called build verification testing.
This guide is for developers, QA engineers and release owners who ship web apps, often without a QA team. Smoke tests are the first gate in QA testing.
What is smoke testing?
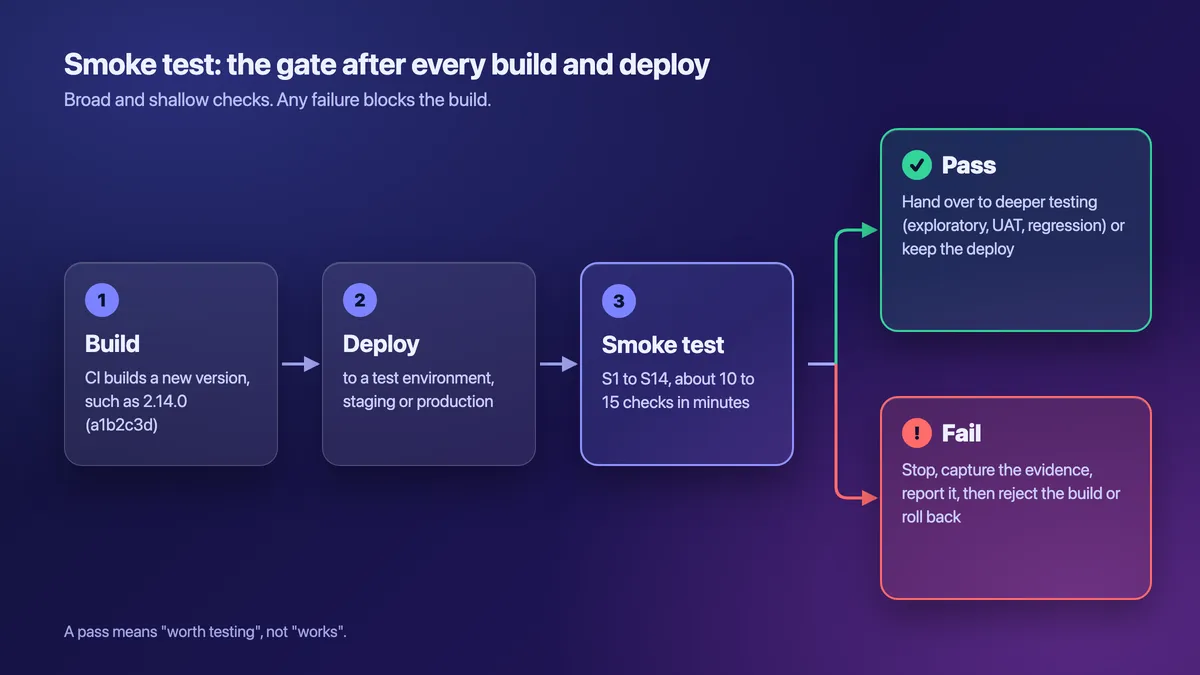
A smoke test answers one question: is this build worth testing, or safe to keep? It checks the few things that must work. It is fast and shallow by design.
The ISTQB glossary calls smoke testing a test type that gives you enough confidence a build is ready for planned testing. Its entry for a build verification test (BVT) is the automated form: a test of each new build's key functions, stability and testability.
Steve McConnell made the habit popular in Daily Build and Smoke Test (IEEE Software, 1996). His rule still holds: run the whole system end to end, but do not try to be exhaustive. The MDN glossary gives plain examples: does the program start, do the main buttons work, and can you save a new test user?
A smoke test is the gate before deeper testing, such as exploratory testing or UAT.
Why is it called smoke testing?
The name comes from hardware. In Lessons Learned in Software Testing, Cem Kaner, James Bach and Bret Pettichord trace it to electronics: you plug in a new board and turn on the power. If you see smoke, you switch it off, and no more testing is needed.
Plumbers and mechanics push smoke through pipes and hoses to find leaks, which is why "smoke test" searches also show sewer and car results. In software, the smoke is a page that will not load or a login that fails.
When to run a smoke test, and who runs it
Run one every time something changes what users get:
- After every build reaches a test environment.
- After every deploy to staging and to production.
- After config or infrastructure changes, such as feature flags, secrets, DNS or CDN settings. Many "nothing changed" outages start here.
- Before a bug bash, a UAT cycle or an exploratory session, so a room full of people does not find the same crash.
CI runs the automated tier on every build. The person who deploys runs the manual pass. QA or the tech lead owns the list and keeps it current.
Google Cloud Tech covers the same idea in an 8-minute video:
What belongs in a smoke test (and what does not)
Teams disagree here. QA Wolf, a managed testing vendor, keeps smoke checks at the infrastructure level (the app starts, the health check passes, the database answers) and moves login and user flows to sanity or end-to-end tests. LaunchDarkly's guide, MDN and McConnell include the critical user path: log in, use the main controls, save a record.
Both sides have a point. Infrastructure checks are fast and rarely flaky, but a build where nobody can log in is not worth testing. So use two tiers.
Tier 1: Is it alive? The deploy succeeded and the expected version is live. The health endpoint returns OK, key services answer and the page loads with no fatal console errors.
Tier 2: Can a user do the one thing? A seeded test account logs in, the main page loads with data, and the core action works once.
Keep both tiers broad and shallow: 10 to 15 checks, each with a yes or no answer, where any failure blocks. The automated tier should finish in under 5 minutes, and a manual pass in 10 to 15 minutes.
Leave out edge cases, validation messages, every browser, performance and visual polish.
Why it pays off:
- A broken build gets caught in minutes, not after a day of testing.
- Each failure points to the last change, so the fix is fast.
Where it stops:
- A pass means "worth testing", not "works". Most bugs still get through.
- Shallow checks miss edge cases, slow leaks and anything off the main path.
Types of smoke testing
By method, a smoke test is manual, automated or hybrid, where CI runs tier 1 and a person runs tier 2. By stage, there are three common forms:
- Build verification in CI: tier 1 on every build.
- Post-deploy on staging: both tiers, before testers start.
- Production smoke test: tier 1 plus a read-only tier 2, right after release.
Smoke test checklist for a web app release (copy and paste)
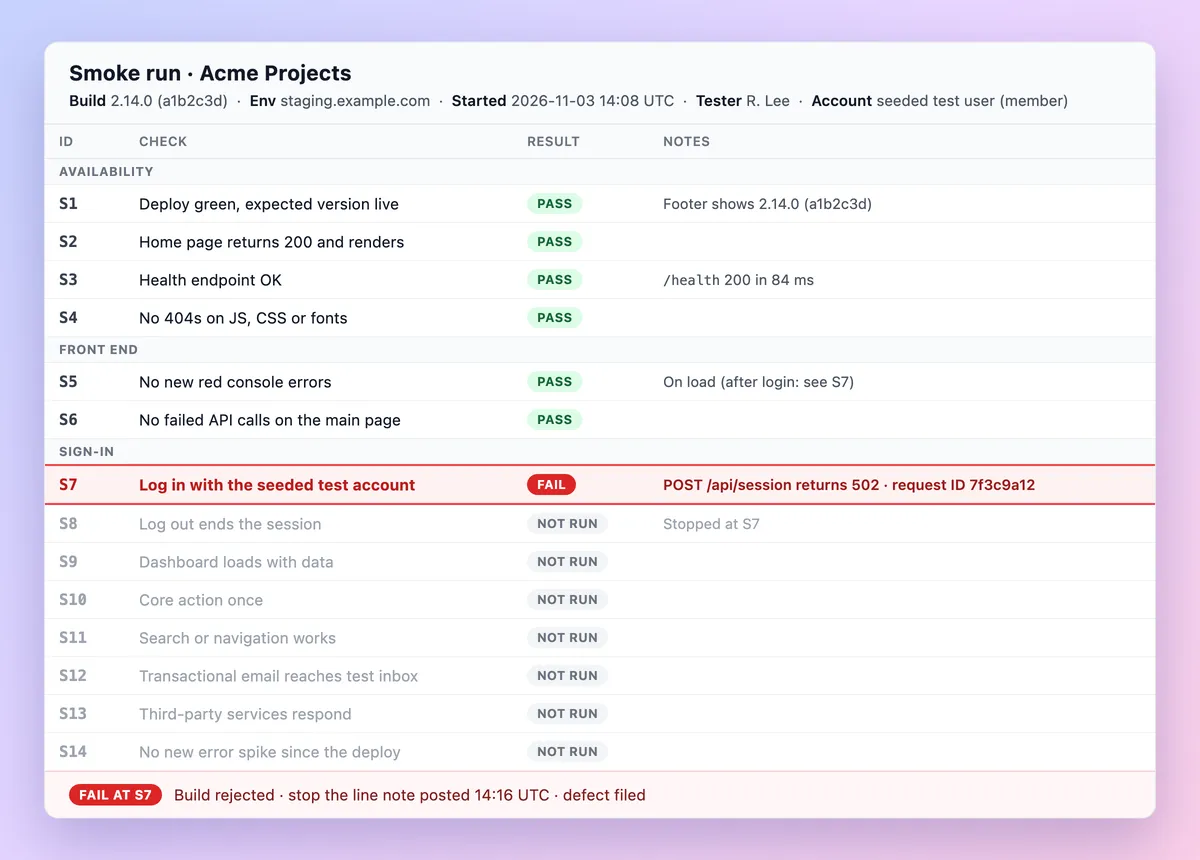
Each item has an ID, so a report can say "S7 failed" and everyone knows which check broke. Fill in the header first: build, environment, a test account per role and the time in UTC.
## Smoke test · build [version or commit SHA] · [environment URL] · [date, time UTC]
Tester: [name] · Accounts: [one per role]

### Availability
- [ ] S1 Deploy green, expected version live
- [ ] S2 Home page returns 200 and renders
- [ ] S3 Health endpoint returns OK
- [ ] S4 No 404s on JS, CSS or font files

### Front end
- [ ] S5 No new red console errors on load and after login
- [ ] S6 No failed API calls (4xx or 5xx) on the main page

### Sign-in
- [ ] S7 Log in with the seeded test account
- [ ] S8 Log out ends the session

### Core flow
- [ ] S9 Dashboard or main list loads with data
- [ ] S10 Core action works once (payments in test mode only)
- [ ] S11 Search or main navigation works

### Integrations
- [ ] S12 Transactional email reaches the test inbox
- [ ] S13 Third-party services respond (payments, maps, auth)

### Monitoring
- [ ] S14 No new error spike in the error tracker

Result: PASS (hand over or keep the deploy) / FAIL at S__ (stop, capture, report, reject or roll back)
Paste it into a GitHub issue, a pull request or Notion, and the boxes become clickable. The last line matters most: one failed item stops the run.
Adapt the list to your product:
- SaaS: add a login per role.
- E-commerce: add the cart, tax and shipping, with payments in Stripe's test mode.
- API only: swap the page checks for endpoint calls.
- Mobile app: check that it installs, opens to its first screen, reaches the backend and accepts the seeded login.
Then turn each item into a test case with an ID, steps and an expected result, using a test case template.
Smoke test examples
Three smoke testing examples from different kinds of software:
- E-commerce, staging build. The home and product pages load, checkout accepts a Stripe test card, and the order email reaches the test inbox.
- B2B SaaS, production deploy. An SSO test user signs in. The dashboard loads with data, and a CSV export downloads.
- API service, after a config change. The health check returns 200, a token is issued, and one read and one write succeed on a test tenant.
Save this as smoke.sh, set API to the staging base URL and use a test tenant's client credentials:
#!/usr/bin/env bash
set -euo pipefail
curl -fsS "$API/health"
TOKEN=$(curl -fsS -u "$CLIENT_ID:$CLIENT_SECRET" -d grant_type=client_credentials \
  "$API/oauth/token" | jq -r .access_token)
curl -fsS -H "Authorization: Bearer $TOKEN" "$API/v1/projects?limit=1"
curl -fsS -X POST -H "Authorization: Bearer $TOKEN" -H "Content-Type: application/json" \
  -d '{"name":"smoke-check"}' "$API/v1/projects"
The -f flag makes curl exit with an error on any 4xx or 5xx, and set -euo pipefail stops the script at the first failed call, including the token request inside the pipe.

Tired of plain screenshots? Try ScreenSnap Pro.
Beautiful backgrounds, pro annotations, GIF recording, and instant cloud sharing, all in one app. Pay $39 once, own it forever.
See pricing and featuresSmoke testing vs sanity testing vs regression testing
Here is how the three compare.
| Smoke testing | Sanity testing | Regression testing | |
|---|---|---|---|
| Question it answers | Is this build worth testing? | Does this fix or change work? | Did anything that worked before break? |
| Scope | Broad and shallow. | Narrow, one area. | Broad and deep. |
| When | Every build or deploy. | After a fix or small change. | Every build in CI, plus a full run before a release. |
| Run by | CI, then the person who deploys. | The developer or tester who checks the fix. | CI pipeline or QA. |
| Typical time | Minutes. | Minutes to an hour. | Hours for a full suite. |
| If it fails | Reject the build or roll back. | Reopen the fix. | File bugs and hold the release. |
Why do people disagree about sanity testing? Google's SRE book says smoke tests are also known as sanity testing, and so do Wikipedia and older ISTQB glossaries. Most QA teams mean something narrower: a quick recheck of the area a fix touched.
The current ISTQB glossary has no sanity testing entry. Its formal term for retesting a fix is confirmation testing. Neither usage is wrong: pick one and write it into your test plan, so the whole team means the same thing.
Smoke testing vs UAT is a simpler line: a smoke test takes minutes after every deploy, while UAT takes days of business testing before sign-off. Regression testing goes deep where the smoke test stayed shallow, and visual regression testing adds screenshot comparisons for the UI.
How to perform smoke testing: manual and automated
Most teams start with a manual pass, then automate tier 1.
A manual smoke pass
One person, one build, one checklist. Keep the checklist open in a second window or on a second monitor, with the build ID and start time (UTC) at the top.
Mark each item pass or fail, in order, because later checks depend on earlier ones. Stop at the first blocker: if S7 login fails, S8 to S14 tell you nothing useful, so capture it and report it.
Automate tier 1 in CI with Playwright
Start with two checks, the health endpoint and a test login. In Playwright, add a tag in the test details:
import { test, expect } from '@playwright/test';

test('health endpoint is OK', { tag: '@smoke' }, async ({ request }) => {
  const res = await request.get('/api/health');
  expect(res.ok()).toBeTruthy();
});

test('test login shows the dashboard', { tag: '@smoke' }, async ({ page }) => {
  const errors: string[] = [];
  page.on('pageerror', (err) => errors.push(err.message));
  await page.goto('/login');
  await page.getByLabel('Email').fill(process.env.SMOKE_USER!);
  await page.getByLabel('Password').fill(process.env.SMOKE_PASS!);
  await page.getByRole('button', { name: 'Sign in' }).click();
  await expect(page.getByRole('heading', { name: 'Dashboard' })).toBeVisible();
  expect(errors).toEqual([]);
});
In playwright.config.ts, set baseURL: process.env.BASE_URL and add screenshot: 'only-on-failure' and trace: 'retain-on-failure' under use (see the test options). A failed run then leaves a screenshot and a trace for the report. Run only the tagged tests with npx playwright test --grep @smoke.
In GitHub Actions, make the smoke job the first job after your staging deploy job:
jobs:
  smoke:
    needs: deploy-staging
    runs-on: ubuntu-latest
    env:
      BASE_URL: ${{ vars.STAGING_URL }}
      SMOKE_USER: ${{ secrets.SMOKE_USER }}
      SMOKE_PASS: ${{ secrets.SMOKE_PASS }}
    steps:
      - uses: actions/checkout@v7
      - run: npm ci && npx playwright install --with-deps chromium
      - run: npx playwright test --grep @smoke
      - uses: actions/upload-artifact@v7
        if: failure()
        with: { name: smoke-results, path: test-results/ }
  deploy-production:
    needs: smoke
    runs-on: ubuntu-latest
    steps:
      - uses: actions/checkout@v7
      - run: ./deploy.sh production
The production job needs the smoke job, so GitHub skips it when a smoke test fails. To have a person approve production too, add an environment with required reviewers. That manual gate does not react to a failed job, so keep the needs line.
For screenshot options inside tests, see the Playwright screenshot guide or the Selenium screenshot guide.
Smoke testing in production
Run tier 1 right after a production deploy, plus a read-only tier 2. Use a dedicated test account in its own test tenant, and keep every check read-only or reversible.
Production runs on live payment keys, so use an internal test product or stop before the pay step. Watch the error tracker for 10 to 15 minutes, and if a check fails, roll back with your runbook first.
Smoke testing best practices and common mistakes
- The suite grows into a regression run. Cap it at 10 to 15 checks and move the rest to the regression suite.
- Flaky checks get ignored. Fix or delete a flaky check within the week. Never rerun until green.
- Results carry no build ID. Stamp the version or commit SHA on every run and every report.
- Production checks create real orders or emails. Use a test tenant and read-only or reversible checks.
- The list goes stale. Review it after each incident and each new core feature.
What to capture when a smoke check fails
The person who fixes it needs four things: the build, the environment, the check that failed and the first error.
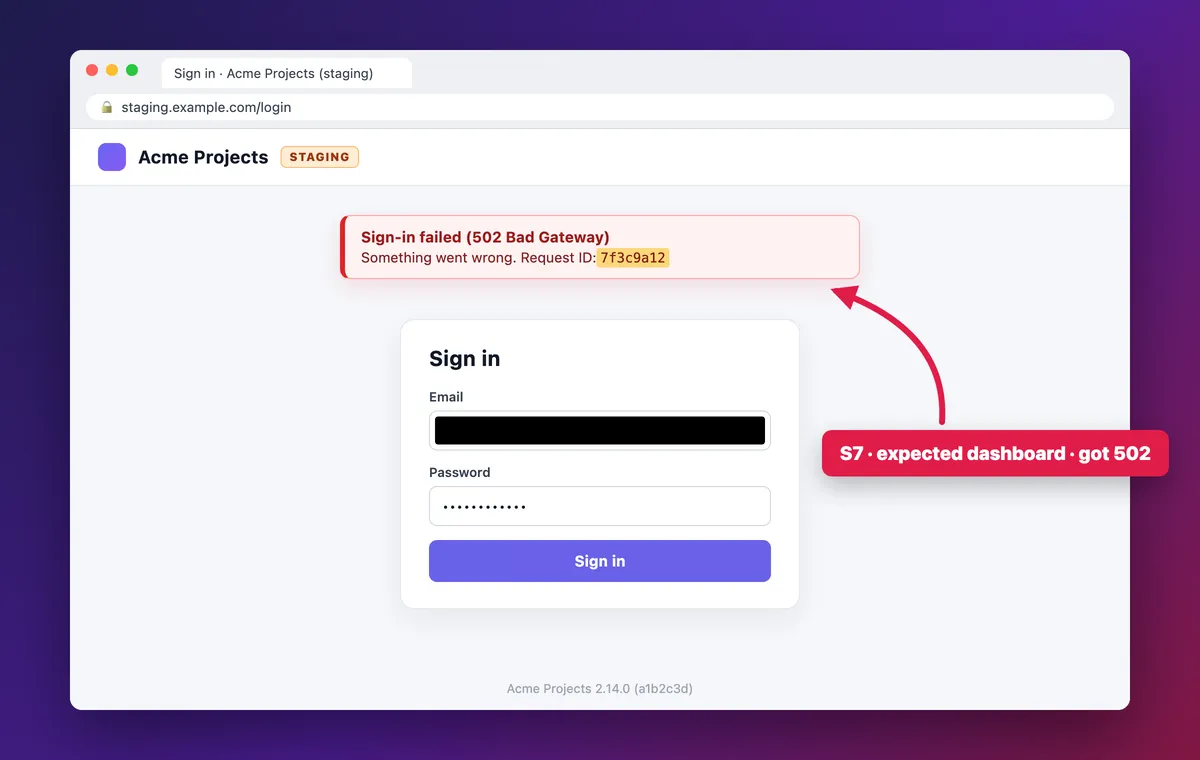
The basics are the same as for any bug: crop to the failing region, then add one arrow and a callout with the check ID and result, such as "S7 · expected dashboard · got 502". Use numbered counters (1, 2, 3) only for multi-step failures, and record 10 to 20 seconds instead when the failure is about flow or timing. Cover secrets, tokens, test emails and customer data with a solid, opaque box, because blur and pixelate can be reversed (the UAT guide above has the long version).
A smoke failure also needs evidence tied to the build. Collect these six items:
- Build and environment. Version or commit SHA, environment URL, deploy time in UTC, and any flag or config that changed.
- The check. The S-number, plus expected vs actual in one line.
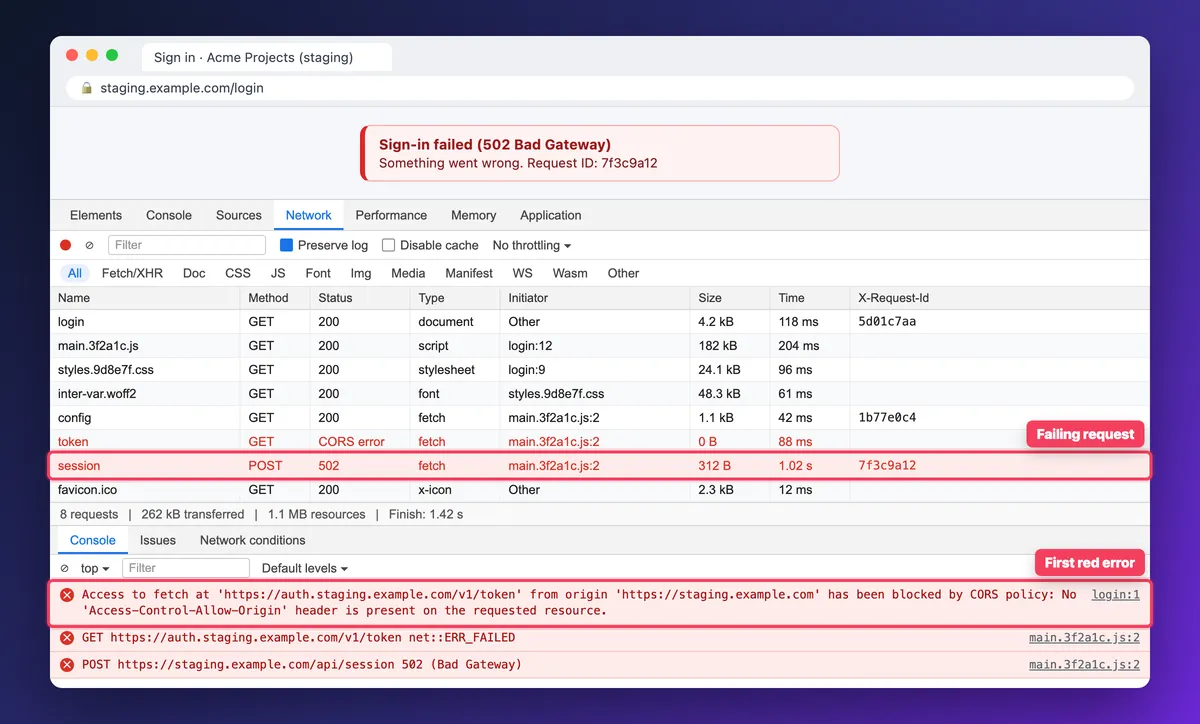
- The first console error. In Chrome or Edge, open the Console with
Cmd+Option+Jon a Mac orCtrl+Shift+Jon Windows. Copy the first red error, or right-click and choose Save as for a .log file (see the Console reference). - The failing request. From the Network panel: method, path, status and request ID, such as POST /api/session returns 502. Send a HAR file only on request: Chrome's default export is sanitized (no Cookie, Set-Cookie or Authorization headers), but check URLs and bodies for tokens.
- CI artifacts. The only-on-failure screenshot and the retain-on-failure trace from the smoke job.
- Browser and account. Browser and version (chrome://version), OS, screen size and zoom, and the test account's role. Never the password.
Browser-extension bug recorders can attach console and network logs automatically. With a desktop capture tool, you add those from DevTools.
The built-in tools cover the capture (see Apple's screenshot guide and the shortcuts below). To copy a request ID you cannot select in a toast, use Live Text in Preview on a Mac or the Text actions in Snipping Tool on Windows. More options: copy text from a screenshot on Mac and OCR software for Windows.
| Task | Mac | Windows |
|---|---|---|
| Capture a region | Shift+Command+4 | Win+Shift+S |
| Record the screen | Shift+Command+5 | Win+Shift+R |
| Open the Console (Chrome or Edge) | Cmd+Option+J | Ctrl+Shift+J |
| Open DevTools, then pick Network | Cmd+Option+I | Ctrl+Shift+I or F12 |
No capture app on the test machine? The free image annotation tool has a Filled Rectangle for tokens and emails, and you can extract text from an image to copy an error message or request ID.
ScreenSnap Pro handles the capture in one app: capture the region, then add an arrow, a callout with the check ID and result, and numbered counters (1, 2, 3) to show step order. A Filled Rectangle covers tokens and test emails, and OCR copies error text and request IDs. For a flow or timing failure, record a short Video (add your mic to narrate), trim it in the built-in video editor and export an MP4, or a GIF that plays inline.
Smoke failure report template (copy and paste)
Post this stop-the-line note in the release channel the moment a check fails. It only says the build is blocked and why. The full defect comes next.
[SMOKE FAIL] S[number] [check] · [environment] · build [version] ([SHA])
Build:        [version] ([SHA]), deployed [hh:mm] UTC
Environment:  [URL]
Time (UTC):   [yyyy-mm-dd hh:mm]
Check:        S[number] [check text]
Expected:     [one line]
Actual:       [one line + request ID]
Evidence:     [attached files]
Scope:        [all users / one role / one browser]
Decision:     [rejected / rolled back / hotfix in progress]
Owner:        [name]
Drop a share link in the release channel for a quick heads-up, then attach the screenshot and clip files to the Jira or GitHub issue so the evidence stays with the defect. File the defect with the fields from a bug report template, and see how to attach screenshots in Jira or build a GitHub issue template for it.
Worked example: staging login returns 502
An environment variable change breaks the staging login. The tester copies the toast's request ID with OCR, finds a CORS error in the Console and a 502 on /api/session in Network, and rejects the build:
| Field | Entry |
|---|---|
| Title | [SMOKE FAIL] S7 login returns 502 · staging · build 2.14.0 (a1b2c3d) |
| Build | 2.14.0 (a1b2c3d), deployed 14:05 UTC |
| Environment | staging.example.com |
| Time (UTC) | 2026-11-03 14:12 |
| Check | S7 Log in with the seeded test account. |
| Expected | The dashboard loads. |
| Actual | "Sign-in failed" toast with request ID 7f3c9a12. POST /api/session returns 502. The Console shows a CORS error from auth.staging.example.com. |
| Evidence | s7-login-502.png, console.log, s7-login.mp4, trace.zip |
| Scope | All users, all browsers. |
| Decision | Rejected. The AUTH_ORIGIN change is reverted, with a redeploy at 14:40 UTC. |
| Owner | Dana (backend) |
Frequently Asked Questions
Before your next deploy
Copy the checklist into your release template, tag your first two Playwright checks with @smoke, and agree on what "sanity" means for your team. Once the smoke test passes, publish your release notes.
If your smoke runs end in a screenshot and a short clip, ScreenSnap Pro keeps the capture side in one app: region capture, callouts, numbered counters, solid-box redaction, OCR and screen recording. It is a one-time $39 purchase: 1 license, 2 seats (2 computers, Mac or Windows). See pricing.

Morgan
Indie DeveloperIndie developer, founder of ScreenSnap Pro. A decade of shipping consumer Mac apps and developer tools. Read full bio
@m_0_r_g_a_n_