QA Testing Explained: Process, STLC and Testing Types
QA testing (quality assurance testing) is how a team makes sure software meets its requirements before users get it. It runs across the whole lifecycle: reviewing requirements, planning tests, running manual and automated checks, reporting defects and confirming fixes. QA focuses on preventing defects. Testing finds the ones that slip through.
This guide is for engineers, tech leads and QA engineers who need to set up a QA process, often without a QA team. It covers the six phases of the QA process and what each one leaves behind. It also covers which tests run when, what to automate, and what evidence a manual check should leave.
Each part links to a deeper guide, from writing test cases to reporting defects.
What is QA testing?
QA stands for quality assurance. In software, it is the set of habits that keeps defects out of a release. Think clear requirements, reviews, planned tests and agreed release criteria.
QA testing is the testing work inside that effort. It rests on two ideas that sit side by side.
QA is process focused: it looks at how the team builds software, from the first story to the release. Testing is product focused: it runs the software, or reviews its code and documents, to find defects.
A short way to remember it: QA prevents, testing finds. Good QA does not remove the need to test. It means fewer surprises late in the cycle.
Modern teams also shift left. The ISTQB (International Software Testing Qualifications Board) keeps the standard glossary of testing terms. It defines shift left as doing testing and QA work as early as possible in the lifecycle.
In practice, a tester reads the story before anyone writes code. A developer writes the unit test with the feature, not a week later.
Why QA testing matters
The ISTQB Foundation syllabus (CTFL v4.0.1, section 1.3) lists seven testing principles. Three of them explain why QA testing pays off:
- Early testing saves time and money. A defect fixed in a requirement never reaches the code built on it.
- Testing shows that defects are present, not that there are none. A clean run lowers risk. It never proves the build is perfect.
- Defects cluster together. A few modules usually hold most of the bugs, so test effort should follow them.
There is a human reason too: release confidence. A team that knows what was tested, on which build, can ship without crossing its fingers.
QA vs QC vs testing
People mix up these three terms all the time. The ISTQB glossary keeps them apart.
Quality assurance is the work that builds confidence that quality requirements will be met. Quality control checks how good a given component or system is.
Testing is the process that checks the quality of the product and the work behind it, such as requirements and code. It runs through the whole lifecycle.
| Term | Focus | When | Output | Example |
|---|---|---|---|---|
| Quality assurance (QA) | The process | The whole lifecycle | Checklists and a definition of done | No story starts without acceptance criteria |
| Quality control (QC) | The product | Once a build exists | A pass or fail call | Checking a release candidate against exit criteria |
| Testing | The product and its work products | Early, then on each change | Test results and bug reports | Running the regression suite on build 142 |
The short version: QA shapes the process, QC inspects the result, and testing is the main way software teams inspect. Most people with QA in their job title do all three.
Who does QA testing?
Everyone on the team does some of it. Here is the usual split.
| Who | QA work they usually own |
|---|---|
| Developers | Unit and integration tests, PR checks, fixing and retesting bugs |
| QA engineers | Test design, exploratory sessions, regression runs, automated tests |
| Product owner or client | Acceptance: deciding the release does its job |
| The whole team | A time-boxed bug bash before a big release |
A QA tester, or QA engineer, is the specialist in that table. They design the tests, run the risky ones and report what fails.
No QA engineer on your team? The lightweight process later in this guide spreads the same jobs across the people you have.
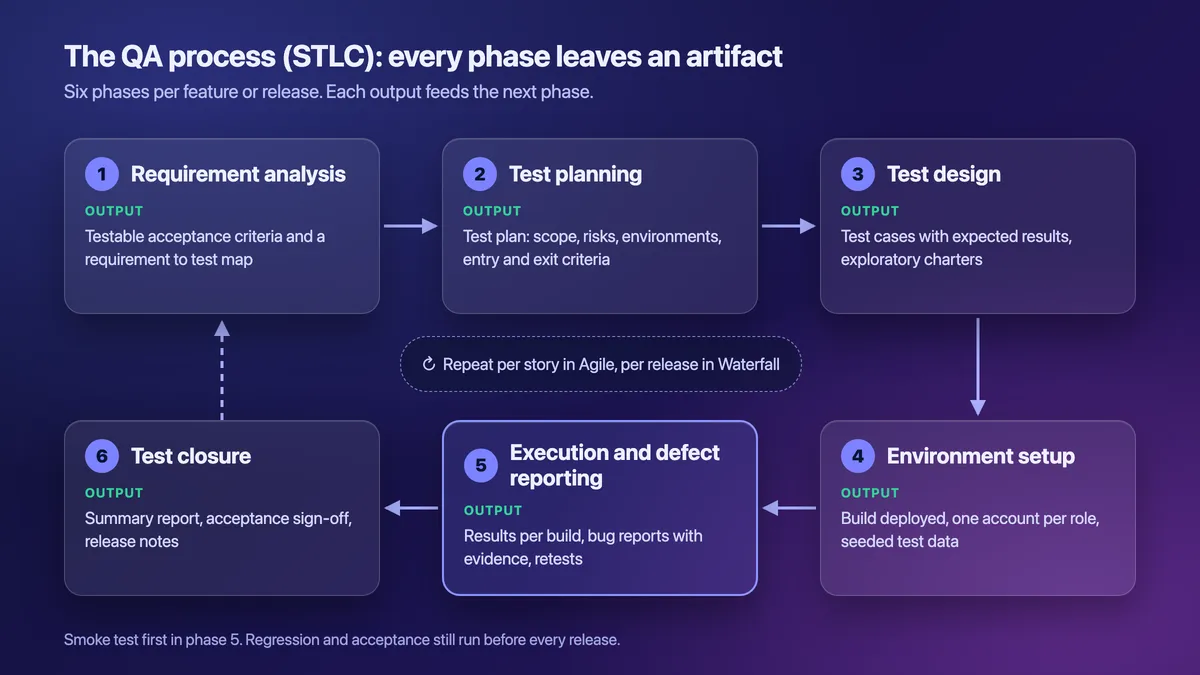
The QA process: the software testing life cycle (STLC)
The software testing life cycle (STLC) is the sequence of test activities a feature or release moves through. Each phase has an entry condition. Each one also leaves an output that the next phase needs.
That last part is what makes the QA process work. If a phase leaves nothing behind, the next one starts from guesswork.
| Phase | What happens | Output | Guide |
|---|---|---|---|
| 1. Requirement analysis | Check each story can be tested, agree acceptance criteria, map stories to tests | Testable criteria and a story to test map | Acceptance criteria examples · requirements traceability matrix |
| 2. Test planning | Set scope, approach, test setups, risks, entry and exit criteria | A test plan | Test plan template |
| 3. Test design | Write scenarios, test cases with expected results, and charters | Test cases and charters | Test case template · exploratory testing |
| 4. Environment setup | Deploy the build, one account per role, seed data, payments in test mode | A ready test setup | Bug bash (safe test data) |
| 5. Execution and defect reporting | Smoke test first, then scripted cases, exploratory sessions and regression; file and retest bugs | Results per build, bug reports with evidence | Smoke testing · bug report template |
| 6. Test closure | Check exit criteria, write the summary, record sign-off, publish notes | Summary report, sign-off and release notes | UAT testing · release notes template |
1. Requirement analysis
Testing starts before code. The tester, or the developer who will test, reads each story and asks one question: how would I know this passes? Vague words like "fast" or "easy" become numbers and examples.
The output is a set of testable criteria and a map from each requirement to its tests. Good acceptance criteria examples read like small test cases. Atlassian's guide to acceptance criteria shows how to write them, with three worked examples.
Larger teams, or teams under audit, keep the map as a requirements traceability matrix. Testers also read the PRD to spot needs nobody can test yet.
2. Test planning
Planning decides what you will test, how and where. The plan names what is in and out of scope and the approach for each risk. It also lists the test setups and the entry and exit criteria.
The QA lead or tech lead owns it. For one feature it fits on a page, and a test plan template keeps it that short.
3. Test design
Design turns criteria into tests. Testers write scenarios, test cases with exact expected results, and charters for exploratory sessions.
Two techniques from the ISTQB syllabus keep the number of cases small. Equivalence partitioning picks one test per group of inputs the system treats the same way. Boundary value analysis tests the edges, where developers slip most often.
The boundary value example for email and password rules shows both at work.
4. Environment setup
Tests need a stable place to run. Deploy the build to a test or staging environment and write down its build number. Each result will cite it.
Create one account per role, seed realistic fake data and put payments and email in test mode. The bug bash guide shows how to seed test data that is safe to screenshot.
5. Execution and defect reporting
Run a smoke test first. If login or checkout is broken, stop and send the build back.
Then run the scripted cases, the exploratory sessions and the regression suite. Log each result against the build number.
File each failure with steps, expected and actual results, and evidence. Retest it on the build that holds the fix.
6. Test closure
Closure answers one question: can we ship? Check the exit criteria and list open defects with their risk. Then write a short summary: what was tested, on which build, with what result.
For big releases, the product owner or client records acceptance. Then you publish release notes.
Keep the test cases and evidence too. Test docs are documentation, and the same rules apply as in good technical documentation examples.
STLC vs the ISTQB test process
The six phases above are industry shorthand. The ISTQB Foundation syllabus (CTFL v4.0.1, section 1.4.1) describes seven groups of test activities instead:
- Test planning
- Test monitoring and test control
- Test analysis
- Test design
- Test implementation
- Test execution
- Test completion
The two lists map closely. Requirement analysis is test analysis, environment setup is part of test implementation, and closure is test completion. Monitoring and control (tracking progress against the plan) runs through all of them.
The syllabus also notes that these activities "are often implemented iteratively or in parallel". So treat both lists as a loop, not a one-way waterfall.
The STLC in Agile teams
In Agile, the loop runs per story. Criteria get agreed in refinement, and tests get designed and automated during the sprint. Execution happens before the story closes.
Release-level work does not go away, though. Before each release you still run regression across the product. You also get acceptance for flows that span many stories.
Types of QA testing: levels, types and approaches
Most lists of QA testing types mix up three questions. How much of the system is under test, what does the test check, and how is it run?
The ISTQB syllabus (section 2.2) separates the first two:
- Five test levels: component (unit), component integration, system, system integration and acceptance.
- Four test types: functional, non-functional, black-box and white-box.
- Two change-related types: confirmation testing and regression testing.
This guide adds one practical split of its own: how a check is run, scripted or exploratory, manual or automated. ISTQB files exploratory testing under experience-based techniques, not as a level or a type.
| Type | What it checks | When it runs | Usually run by |
|---|---|---|---|
| Unit (component) | One function or class alone | Each commit and PR | Developers |
| Integration (component integration) | How parts work together | Each PR | Developers |
| System | The whole product against its spec | On a test build | QA |
| System integration | Links to outside services and APIs | On staging | QA |
| End-to-end | A full user journey | Nightly and before release | QA or CI |
| Acceptance | Fit with the business need | Before release | Product owner or users |
| Functional | What the system does | At each level | Everyone |
| Performance | Speed under load | Before big launches | QA |
| Security | Weak spots an attacker could use | Each release and on a schedule | Security team |
| Usability | How easily people finish tasks | On prototypes and staging | UX researchers |
| Accessibility | Keyboard, screen reader, contrast | Each feature and release | QA or designers |
| Compatibility | Browsers, devices, OS versions | Each release | QA |
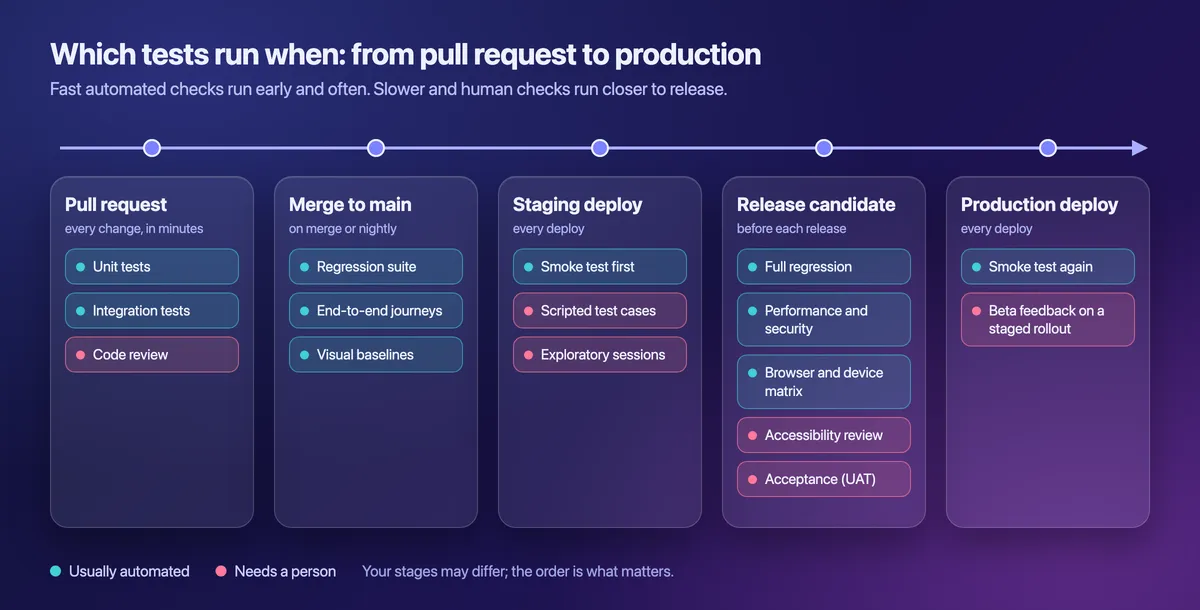
| Smoke | Whether a build is worth testing | After each deploy | QA or CI |
| Regression | That nothing that worked broke | Each merge, in full before release | CI and QA |
| Exploratory | What nobody wrote down | Each feature, in timed sessions | QA and developers |
Checks that decide if a build is worth testing
A smoke test runs a handful of critical paths right after a deploy: log in, load the main page, save a record. If one fails, the build goes back before anyone spends a day on it. After a fix, a narrow re-check of the changed area (often called a sanity check) confirms it before deeper testing starts.
Checks that confirm requirements
Functional testing checks what the system does against its requirements. System tests run those checks on the whole product. End-to-end tests follow one user journey through each layer, from the UI to the database.
Each starts as a test case with an exact expected result. The split between functional vs non-functional requirements decides which checks a story needs.
Checks that find what nobody wrote down
Scripted cases only find the bugs someone predicted. In exploratory testing, a tester designs and runs tests at the same time, guided by a charter and a time box.
A bug bash scales the same idea to the whole team for an hour or two. Both catch the odd edge cases that specs miss.
Checks that prove nothing broke
Regression testing checks that a change did not break the parts you did not touch. It runs on each change, which makes it the first suite most teams automate. Confirmation testing is the rerun after a fix, to prove the failure is gone.
Visual regression testing compares screenshots with a baseline to catch layout breaks. This visual testing checklist adds responsive and localized layout checks and CI review gates.
Checks on how well it works
Non-functional testing checks how well the system behaves, not what it does. Performance tests measure speed under load.
Security tests look for weak spots an attacker could use. Usability tests watch real people try real tasks.
Accessibility tests cover keyboard use, screen readers and contrast against WCAG, with a color contrast check for text. Compatibility tests cover browsers, devices and OS versions.
Checks that accept the release
Acceptance testing asks whether the release meets the business need, not only the spec. In user acceptance testing (UAT), business users or the client run real scenarios and sign off.
Alpha testing puts the build in front of potential users in a controlled setting. Beta testing then hands it to real customers for real-world feedback.
Black box vs white box testing
Black-box testing designs tests from the spec: inputs, outputs and behavior, with no look at the code. White-box testing designs them from the internal structure, such as code paths, branches and data flows.
Most manual QA work is black box. Developers write white-box unit tests to cover the code they own.

Tired of plain screenshots? Try ScreenSnap Pro.
Beautiful backgrounds, pro annotations, GIF recording, and instant cloud sharing, all in one app. Pay $39 once, own it forever.
See pricing and featuresManual testing vs automation testing
In manual testing, a person runs the check and judges the result. In automated testing, a script runs it and asserts the result.
The ISTQB glossary keeps both definitions short. Manual testing is a test activity done by hand. Test automation turns test activities into automated ones.
Neither one wins. They answer different questions.
A script can confirm that a total is $72.00 a thousand times a day. Only a person notices that the coupon field is hard to find.
| Automate | Keep manual |
|---|---|
| Unit and API checks | Exploratory sessions |
| Smoke checks after each deploy | UI that changes every sprint |
| Regression suites | Usability and accessibility judgement (keyboard, screen reader) |
| Visual baselines (visual regression testing) | One-off checks |
| Data-driven cases: one test, many inputs | UAT |
The test pyramid
The test pyramid is a model of how much testing each level gets: the lower the level, the more tests. In practice that means many fast unit tests, fewer integration tests and only a few slow UI tests.
Ham Vocke's The Practical Test Pyramid explains it in depth. The idea comes from Mike Cohn's book Succeeding with Agile, and the ISTQB syllabus covers it too (section 5.1.6).
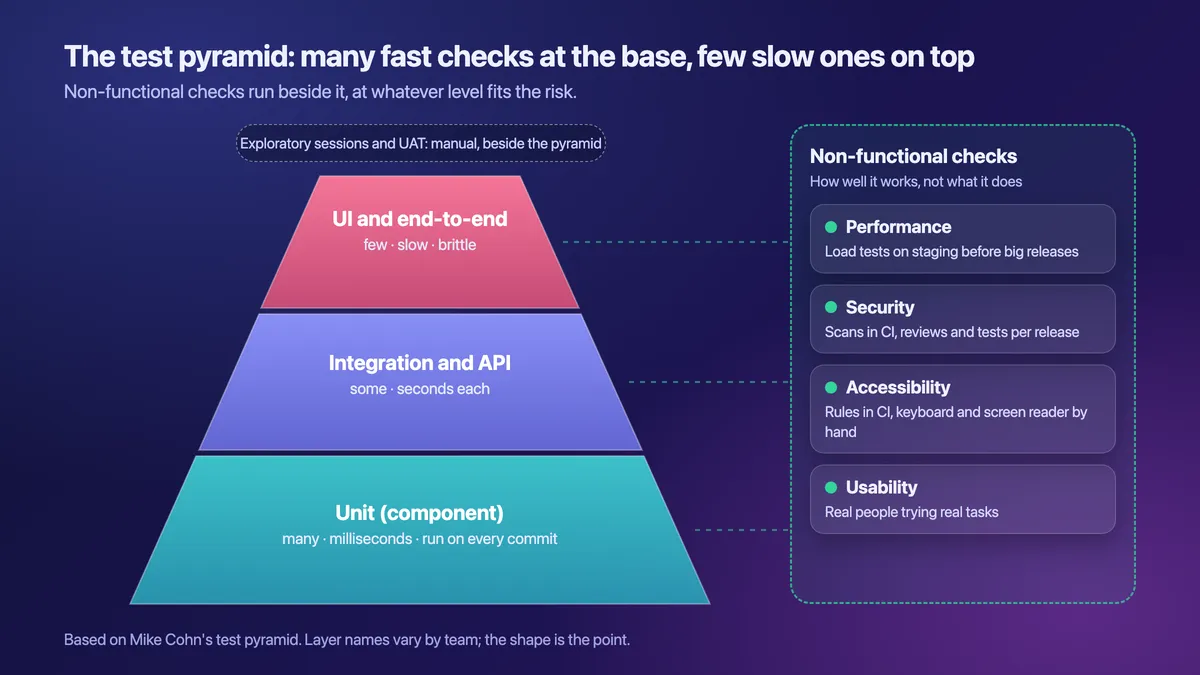
A good rule of thumb: automate a check when it runs each release, gives the same result each time and sits on UI that rarely changes. If it fails any of the three, keep it manual for now.
For browser automation, the Playwright screenshot guide and the Selenium screenshot guide show how to capture evidence inside test scripts. Still picking a framework? Read Puppeteer vs Playwright.
QA testing tools by category
You need one tool per category, not the "best" tool in each. Most teams already own half of them.
| Category | What it does | Examples |
|---|---|---|
| Test management | Stores cases, plans runs, logs results | A test tool, or a shared sheet |
| Test frameworks | Run unit, API and UI checks in CI | Playwright, Selenium, Cypress |
| API testing | Sends requests and checks the replies | Postman |
| Bug tracking | Logs, assigns and tracks bugs | Jira, GitHub Issues and other bug reporting tools |
| Capture and markup | Screenshots, recordings and notes on them | OS built-ins or a capture app (see the evidence section) |
Where AI fits
AI tools now draft test cases, suggest edge cases and repair broken locators when the UI changes. People still review that output. They own the risk calls: what to test, what to skip and when a build is good enough to ship.
A lightweight QA process for teams without testers
No QA engineer? You can still run a real QA process. These six steps spread the work across developers and the product owner:
- Acceptance criteria on every story. No criteria, no work. Write them as examples someone could check, like good acceptance criteria examples do.
- Unit and integration tests in every PR. CI blocks the merge if they fail. Add a "How to test" section to your pull request template so reviewers can repeat the check.
- A smoke test after every deploy, on staging and again on production. 10 to 15 checks, under 5 minutes automated or 10 to 15 minutes by hand.
- A 45 to 60 minute exploratory session per big feature, run by someone who did not build it.
- One bug format with evidence. Everyone files the same fields with the same kind of screenshot, based on one bug report template.
- Stakeholder sign-off for big releases through a short UAT round, then release notes that say what changed.
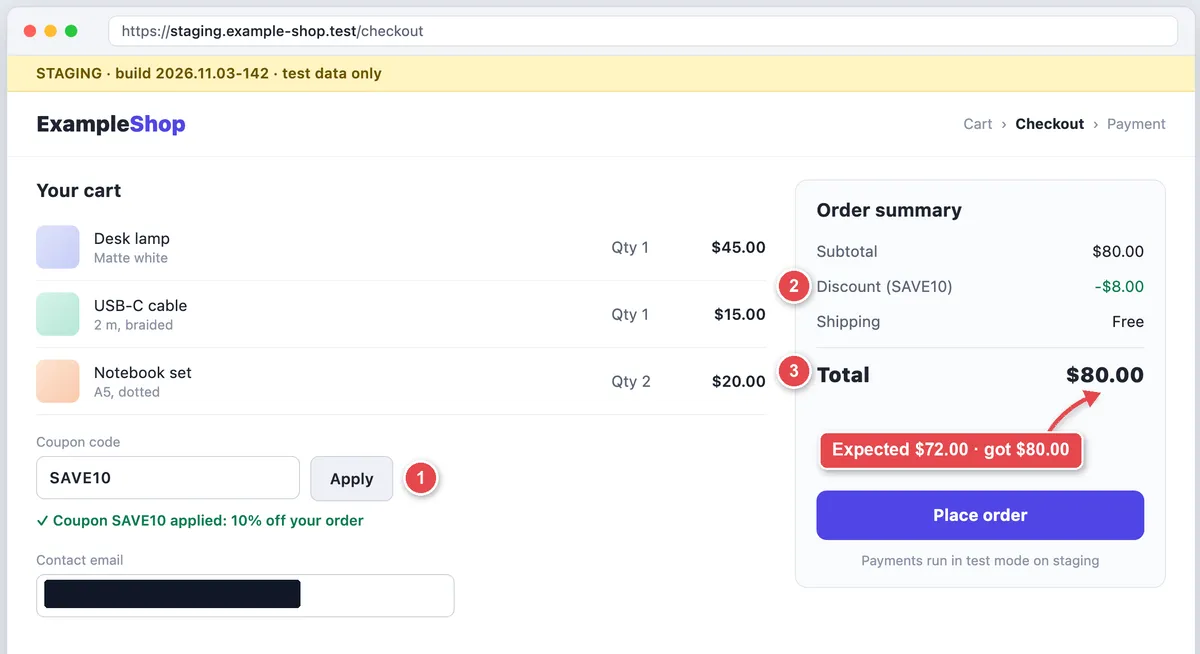
The format matters more than the tool. Agree on one evidence format for the whole team. Use counter markers that match the written steps, one arrow with a short callout, and a solid box over secrets.
A QA checklist for one feature
Paste this into the story, PR or ticket. Tick it off before the story closes.
**QA checklist: [story ID] [feature name]**

- [ ] Acceptance criteria reviewed and testable
- [ ] Unit and integration tests added, CI green
- [ ] Smoke check updated for the new path
- [ ] Exploratory session done, notes linked
- [ ] Bugs filed with steps, expected vs actual and evidence
- [ ] Regression run passed on build: ______
- [ ] Docs and release notes updated
- [ ] Sign-off recorded (who and when)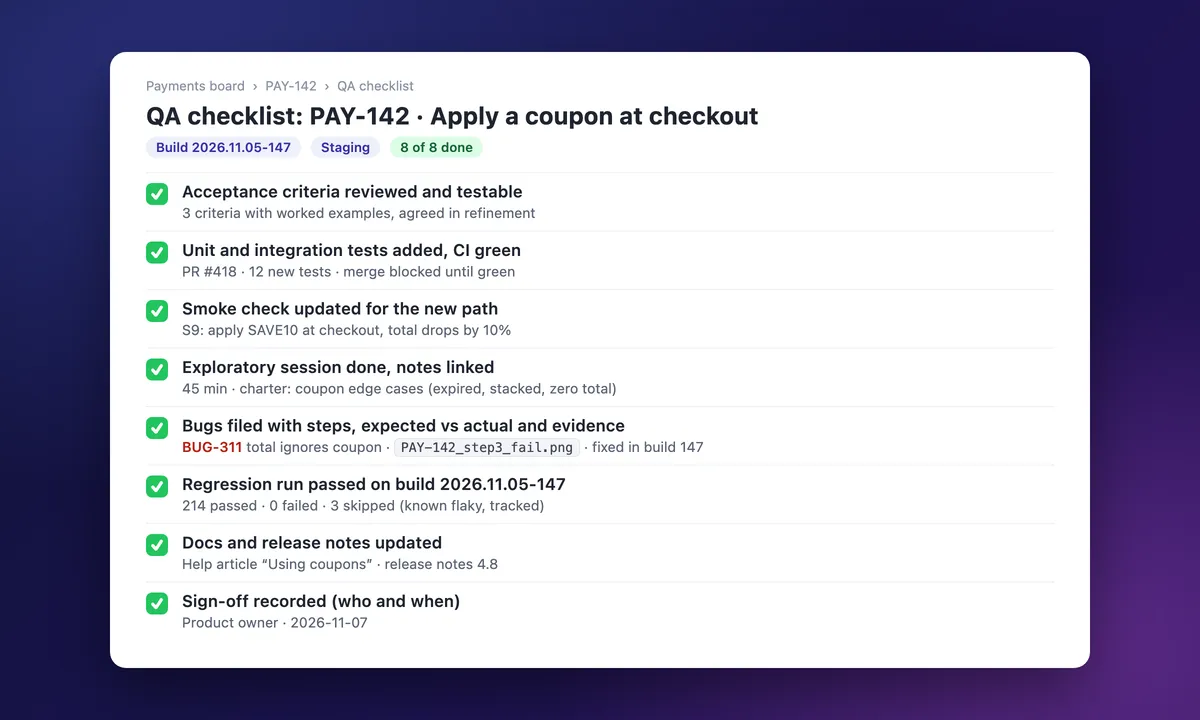
Note the build number on the regression line and the evidence file on the bug line. Those two details answer most questions a lead will ask later.
Three process mistakes to avoid
- Testing starts after the code is done. By then, a vague requirement has turned into a wrong feature. Bring a tester, or a second developer, in before coding starts.
- Results carry no build number. "It passed" means little if nobody knows which build passed. Each result and each bug should name the build and where it ran.
- Bugs filed as "it does not work". No steps, no expected result, no evidence. The developer has to track down the reporter. The next section fixes this one.
How to capture evidence during manual QA
Good evidence lets a developer reproduce a failure without a call. It also lets a lead see what passed without asking.
Automated checks leave logs on their own. Manual checks leave only what the tester captures.
| Test activity | What to capture | Guide |
|---|---|---|
| Smoke check fails | Screenshot, console log, build and setup | Smoke testing |
| Test case step fails | Expected vs actual callout, step numbers from the case | Test case template |
| Exploratory session | Numbered screenshots plus session notes | Exploratory testing |
| Flow or timing bug | A 10 to 20 second recording (mic optional) or a silent GIF | GIF capture on Mac · Windows |
| Long page behind a login | One long screenshot: select the content, scroll down by hand, let the tool stitch it | Scrolling screenshots on Mac · Windows |
| Error text in a toast | Copy the text with OCR into the ticket | Copy text on Mac · OCR on Windows |
| UAT failure | A screenshot tied to the script step | UAT testing |
| Bug bash finding | The 60 second filing card | Bug bash |
Five evidence rules for screenshots
- Capture the region, not the desktop. Crop to what failed, plus the build number if it shows.
- Number the steps so the counters match the written steps. See how to annotate screenshots on a Mac or edit screenshots on Windows.
- Use one arrow and one short callout, such as "Expected $72.00 · got $80.00".
- Cover secrets with a solid box. Tokens, passwords and customer data get an opaque box, because blur and pixelate can be reversed. Seeded test data is safer still.
- Attach the file to the ticket or test run, as with screenshots in Jira or a GitHub issue template. A share link is a quick heads-up, never the record.
For recordings, trim the clip to the failure and list the step numbers in the ticket, or say them over the mic. A state bug like the one below is clearer in motion: the name changes, the form shows unsaved changes, and Save never turns on.
For web apps, see how to annotate a website. Write the team's evidence policy (file names, where files live, what counts as a pass) in your test plan template.
No markup tool installed? The free image annotation tool adds solid boxes, arrows and text in the browser. The extract text from image tool copies error text out of a screenshot.
Your OS covers the basics too. On a Mac, Shift + Command + 4 captures a region. Shift + Command + 5 opens the Screenshot toolbar, which also records the screen (Apple's guide).
Markup in Preview adds arrows, shapes and text. Live Text copies text from an image on macOS Monterey or later.
On Windows 11, Snipping Tool captures with Win + Shift + S, records with Win + Shift + R and copies text with Text actions. It has no scrolling capture, so a long page takes several shots.
Any capture tool can follow these rules. When evidence is a daily job, ScreenSnap Pro (Mac and Windows) keeps the routine in one app. The counter tool numbers steps, arrows and callouts mark expected vs actual, and a filled rectangle covers secrets.
Its Scrolling Capture grabs a long page behind a login: select the area, click Start Capture, scroll down by hand, then click Finish. For timing bugs, record the screen with mic narration, trim the clip in the built-in editor and export an MP4 or a silent GIF.
Frequently Asked Questions
Start with one feature next sprint
Pick one feature in your next sprint and run it through the six phases with the checklist above. Write the criteria first, smoke test each deploy and file each failure with the same evidence format. Once the loop works for one feature, it works for a release.
Capturing test evidence all day? ScreenSnap Pro puts region capture, numbered counters, solid-box redaction, Scrolling Capture and screen recording in one app.
It is a one-time $39 purchase: 1 license, 2 seats (2 computers, Mac or Windows). See pricing.

Morgan
Indie DeveloperIndie developer, founder of ScreenSnap Pro. A decade of shipping consumer Mac apps and developer tools. Read full bio
@m_0_r_g_a_n_